Data Migration
The Data Migration task powers all the ELT work that takes place in Loome Integrate.
Data Migrations are easy to configure and are a simple UI version of what can be done with a set of SQL Queries. You can also easily modify and fine-tune a data migration to meet your requirements.
How to Create a Data Migration Task
First, choose a name to identify this task, an agent to run this task and the task type Data Migration.
The next few steps depends on how you want to configure your data migration task. You have the option to configure the details of this task according to your requirements, such as incremental ETL, specifying data columns or file-based ETL.
- Choose Source and Target Connections or Choose File Definitions
- Choose Data for Migration
- Choose the Source Data Type:
- View Target Tables
- Configure Target Table Migrations (Optional)
- Submit the Task
Select your Source and Target Connections
Data Migrations consist of two connections, the source and the target.
Loome Integrate will guide you through selecting the source and target connections, and will indicate whether you will need to choose schemas or file definitions (if the connection type supports it). The agent will load available entities such as schemas, tables, columns and other pieces of metadata as you progress.
First, choose a source connection from where your data will be extracted. The dropdown will display all available connections.
(You can add a connection following our guide here. If you cannot find an existing connection, it may only be available in certain projects. Please contact your administrator.)
Then choose the source schema where your data is located.
Choose a target connection where your data will be loaded.
Then choose an existing target schema from the dropdown or create a new schema. To create a new schema, check the Create Target Schema checkbox and provide a name for the schema.
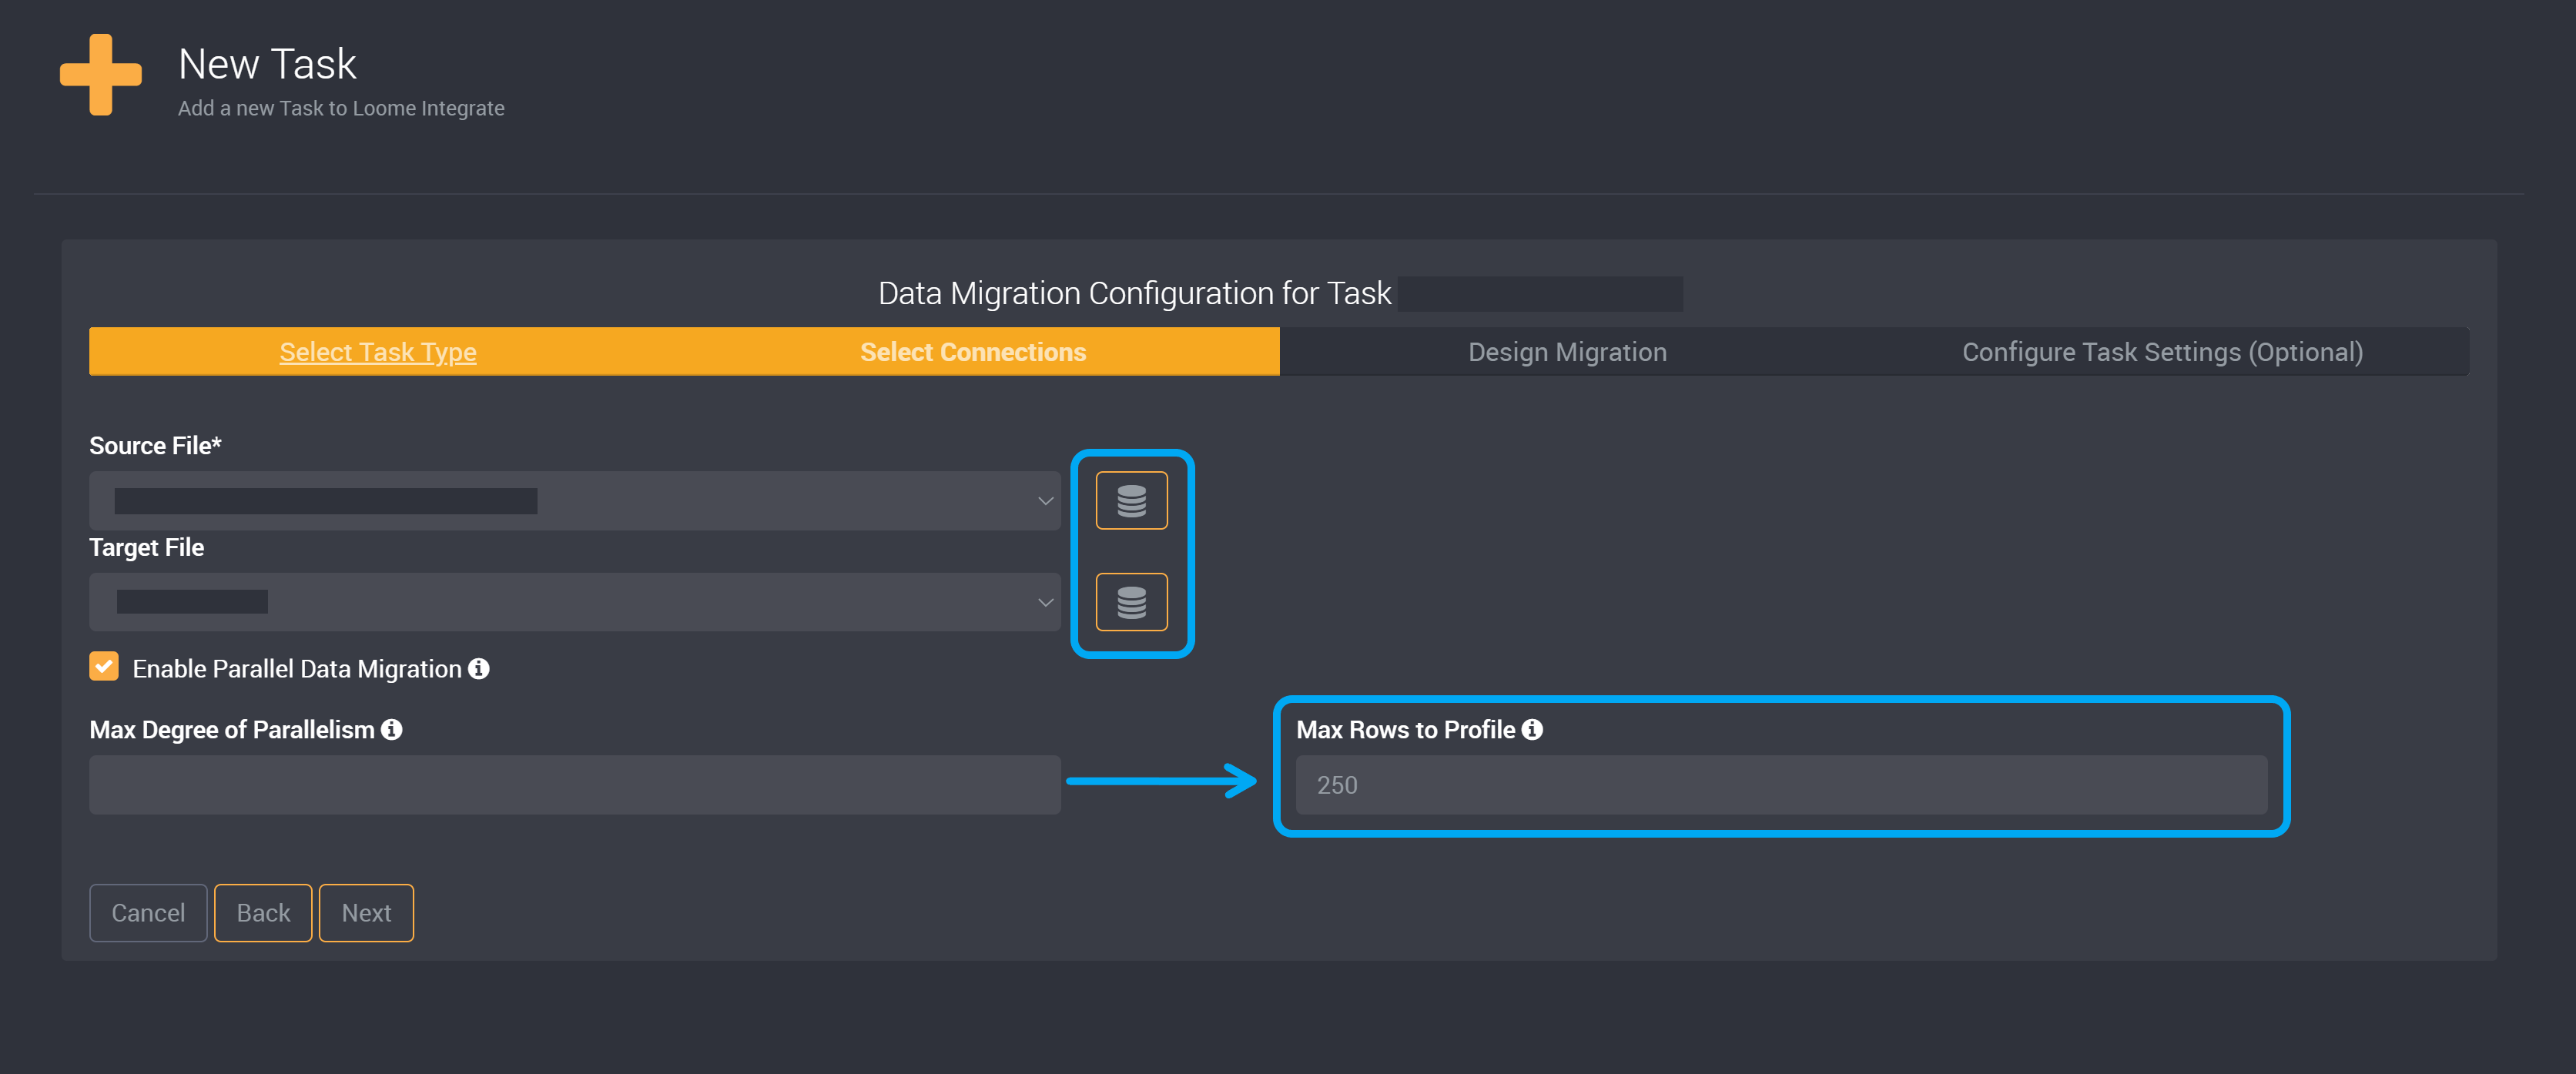
Working with File System File Definitions
If you would like to use a file system file definition as a source or target in your migration, click the file icon on the right of the source or target connection field.
Loome will switch to the file definition view where you can pick an available definition from the dropdown.
If you provide a custom output schema for the migration, Loome Integrate will create the schema on migration.
Advanced Options
You can configure your data migration task further by choosing to use the Parallel Data Migration and Max Rows to Profile fields.
Parallel Data Migration
Enabling Parallel Data Migration will allow the Loome Integrate agent to migrate multiple tables over in parallel. This can result in faster migrations as more tables can be brought over in a shorter amount of time.
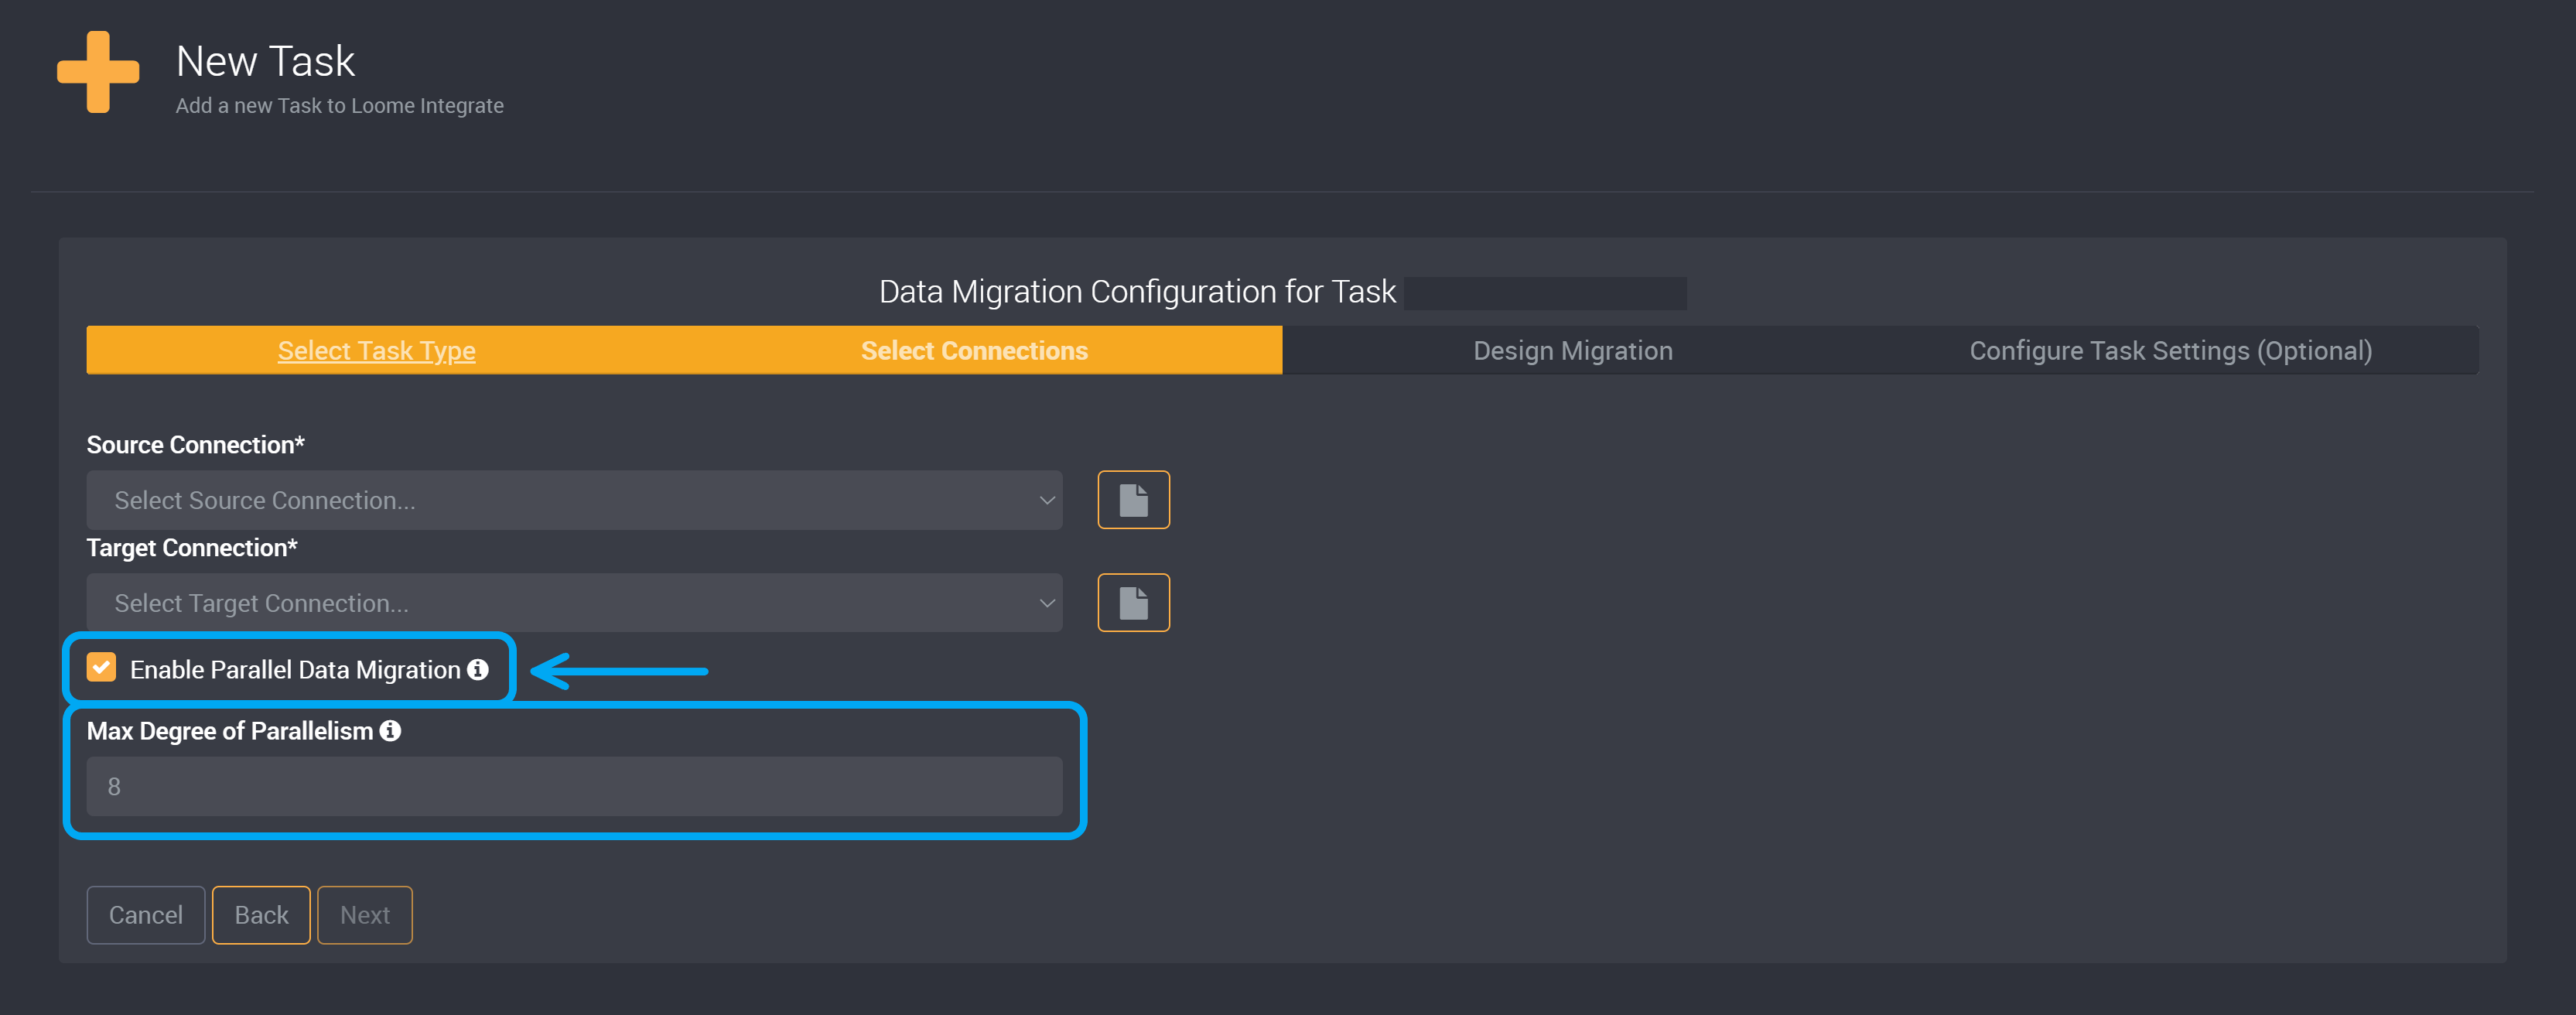
The ‘Max Degree of Parallelism’ sets how many tables can be migrating concurrently at any given time. For example if you set this to 4, Loome Integrate will limit itself to only migrating up to 4 tables at a time meaning that additional tables would be migrated once a table migration completed in the currently running migrations.
Configuring Max Degree of Parallelism can be touchy and it is recommended that you work your way up to higher degrees of parallelism rather than choose an obscenely high number. The recommended starting value is 8.
Max Rows to Profile
When using a File Definition or a Blob Storage connector in a data migration task, you will have the option to choose the maximum number of rows of the flat file that will be imported. The column lengths will be determined using this sample.
Provide the number of max rows in the Max Rows to Profile field.
If you want to use the maximum column length then please set this number to 0.
Click on Next to proceed to the next page.
Selecting your Tables to Migrate
Once you’ve picked both a source and target connection, moving onto the next page will show you the migration builder. The builder splits the screen into top and bottom, source and target respectively.
Building a migration is as easy as finding the tables you wish to migrate in the top half of the screen, clicking the add button next to the table and seeing how it gets pushed to the target list in the bottom half.
Different Source Types
There are different ways of loading data into your target. You have the option to choose from Table, View, Query and Detect mode. These are available in the left of the source section.
Tables
For many of the above examples, we have used tables. When you choose to extract and load your data using tables, Loome Integrate will provide a list of the available tables in your schema.
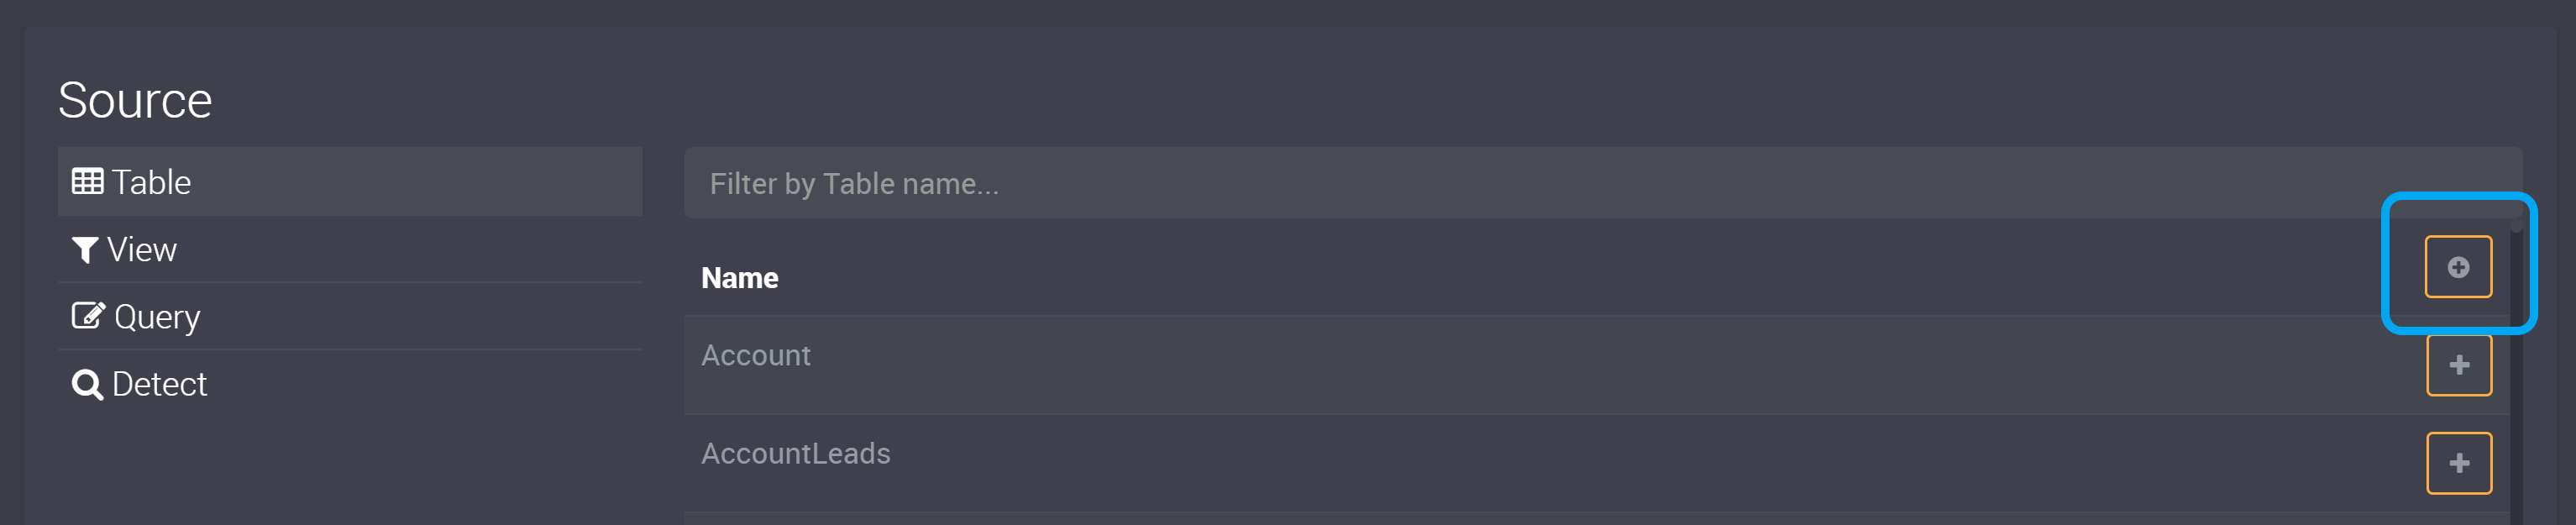
On the left, the source type of Table will be chosen by default.
You can choose which tables will be migrated by clicking Add on the right of the table.
You can add all tables using Select All at the top-right of the list.
You can deselect a table by clicking on the ‘-’ button on the right of a table in the target section. This will move it back to the source table list.
You can also filter your list of tables by writing your search term in the search bar at the top of each source and target list.
View
Loome Integrate also supports sourcing data from stored queries, commonly referred to as ‘Views’.
A database view is defined by a query that is an object of rows and columns selected from a database, so this means a view is a subset of a database.
All views that are available in your selected source schema will display under the ‘View’ tab.
You can select a view in Loome Integrate by clicking on the ‘+’ icon on its right. This view will then appear in the target section of this data migration task, ready to be extracted and loaded into your selected data target.
Again, you can select all views by clicking on the select all ‘+’ button at the top of the view list.
You can filter the list of views by writing a search term in the search bar at the top of the list of views and target list.
Query as Source
If you wish to use a SQL Query as a source table, click the Query tab of the Source area.
Here you are given a text editor where you can insert a SQL Query that can be used to mock a table to migrate.
Query as a Source tables are not locked to the source schema and so you will need to specify the schema you are querying from as part of the query.
Importing all Tables with Detect Mode
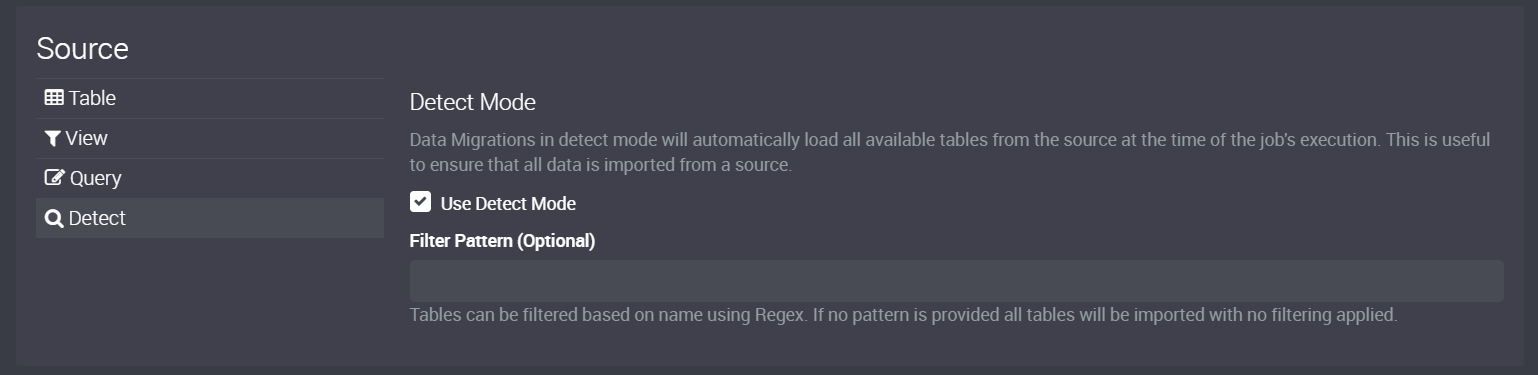
For instances where the tables/files in a source may grow with time, Data Migrations can be configured to use Detect Mode which ensures that additional objects that are added to the source are automatically imported with every migration.
An example of when this may be useful is for importing from a folder of flat files which gets additional files every so often-Loome Integrate Online will retrieve all the available files from the folder and add them automatically to the Data Migration task.
Detect Mode also supports an optional Regex based Filter Pattern which can be used for only importing objects which match the pattern. For example if you wanted to only import objects that began with the word “Sales” you could use the pattern ^Sales.
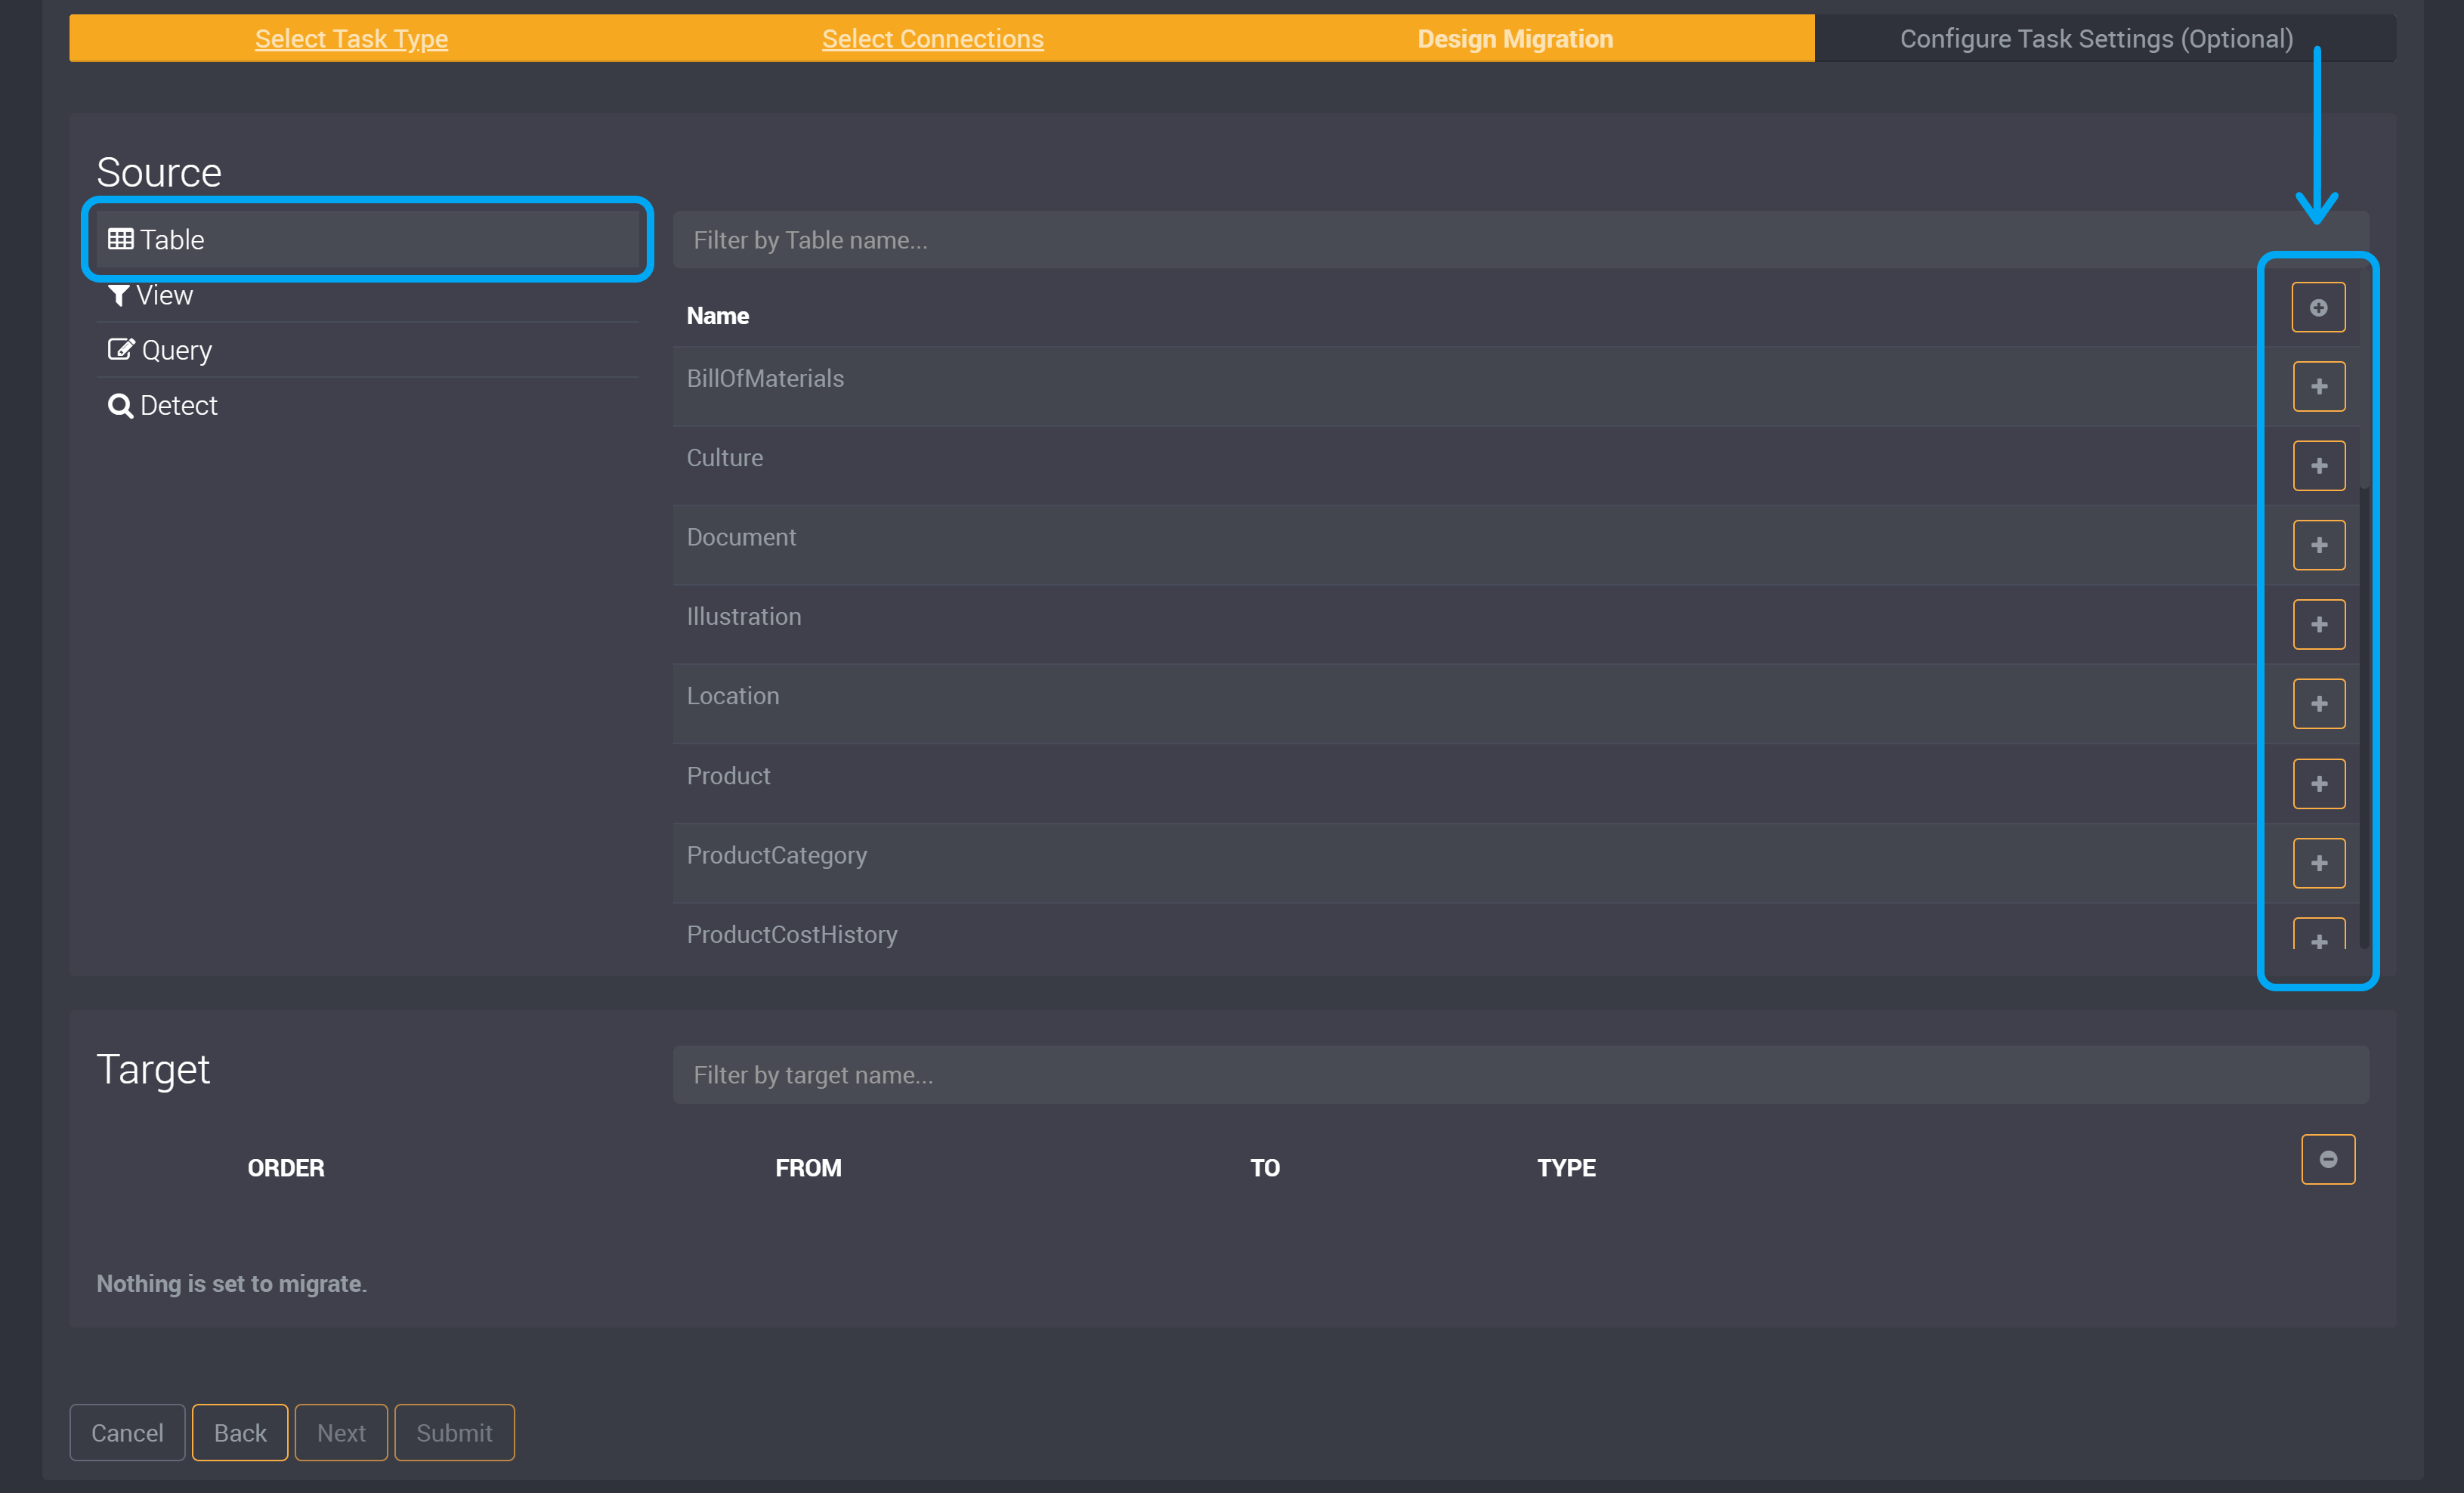
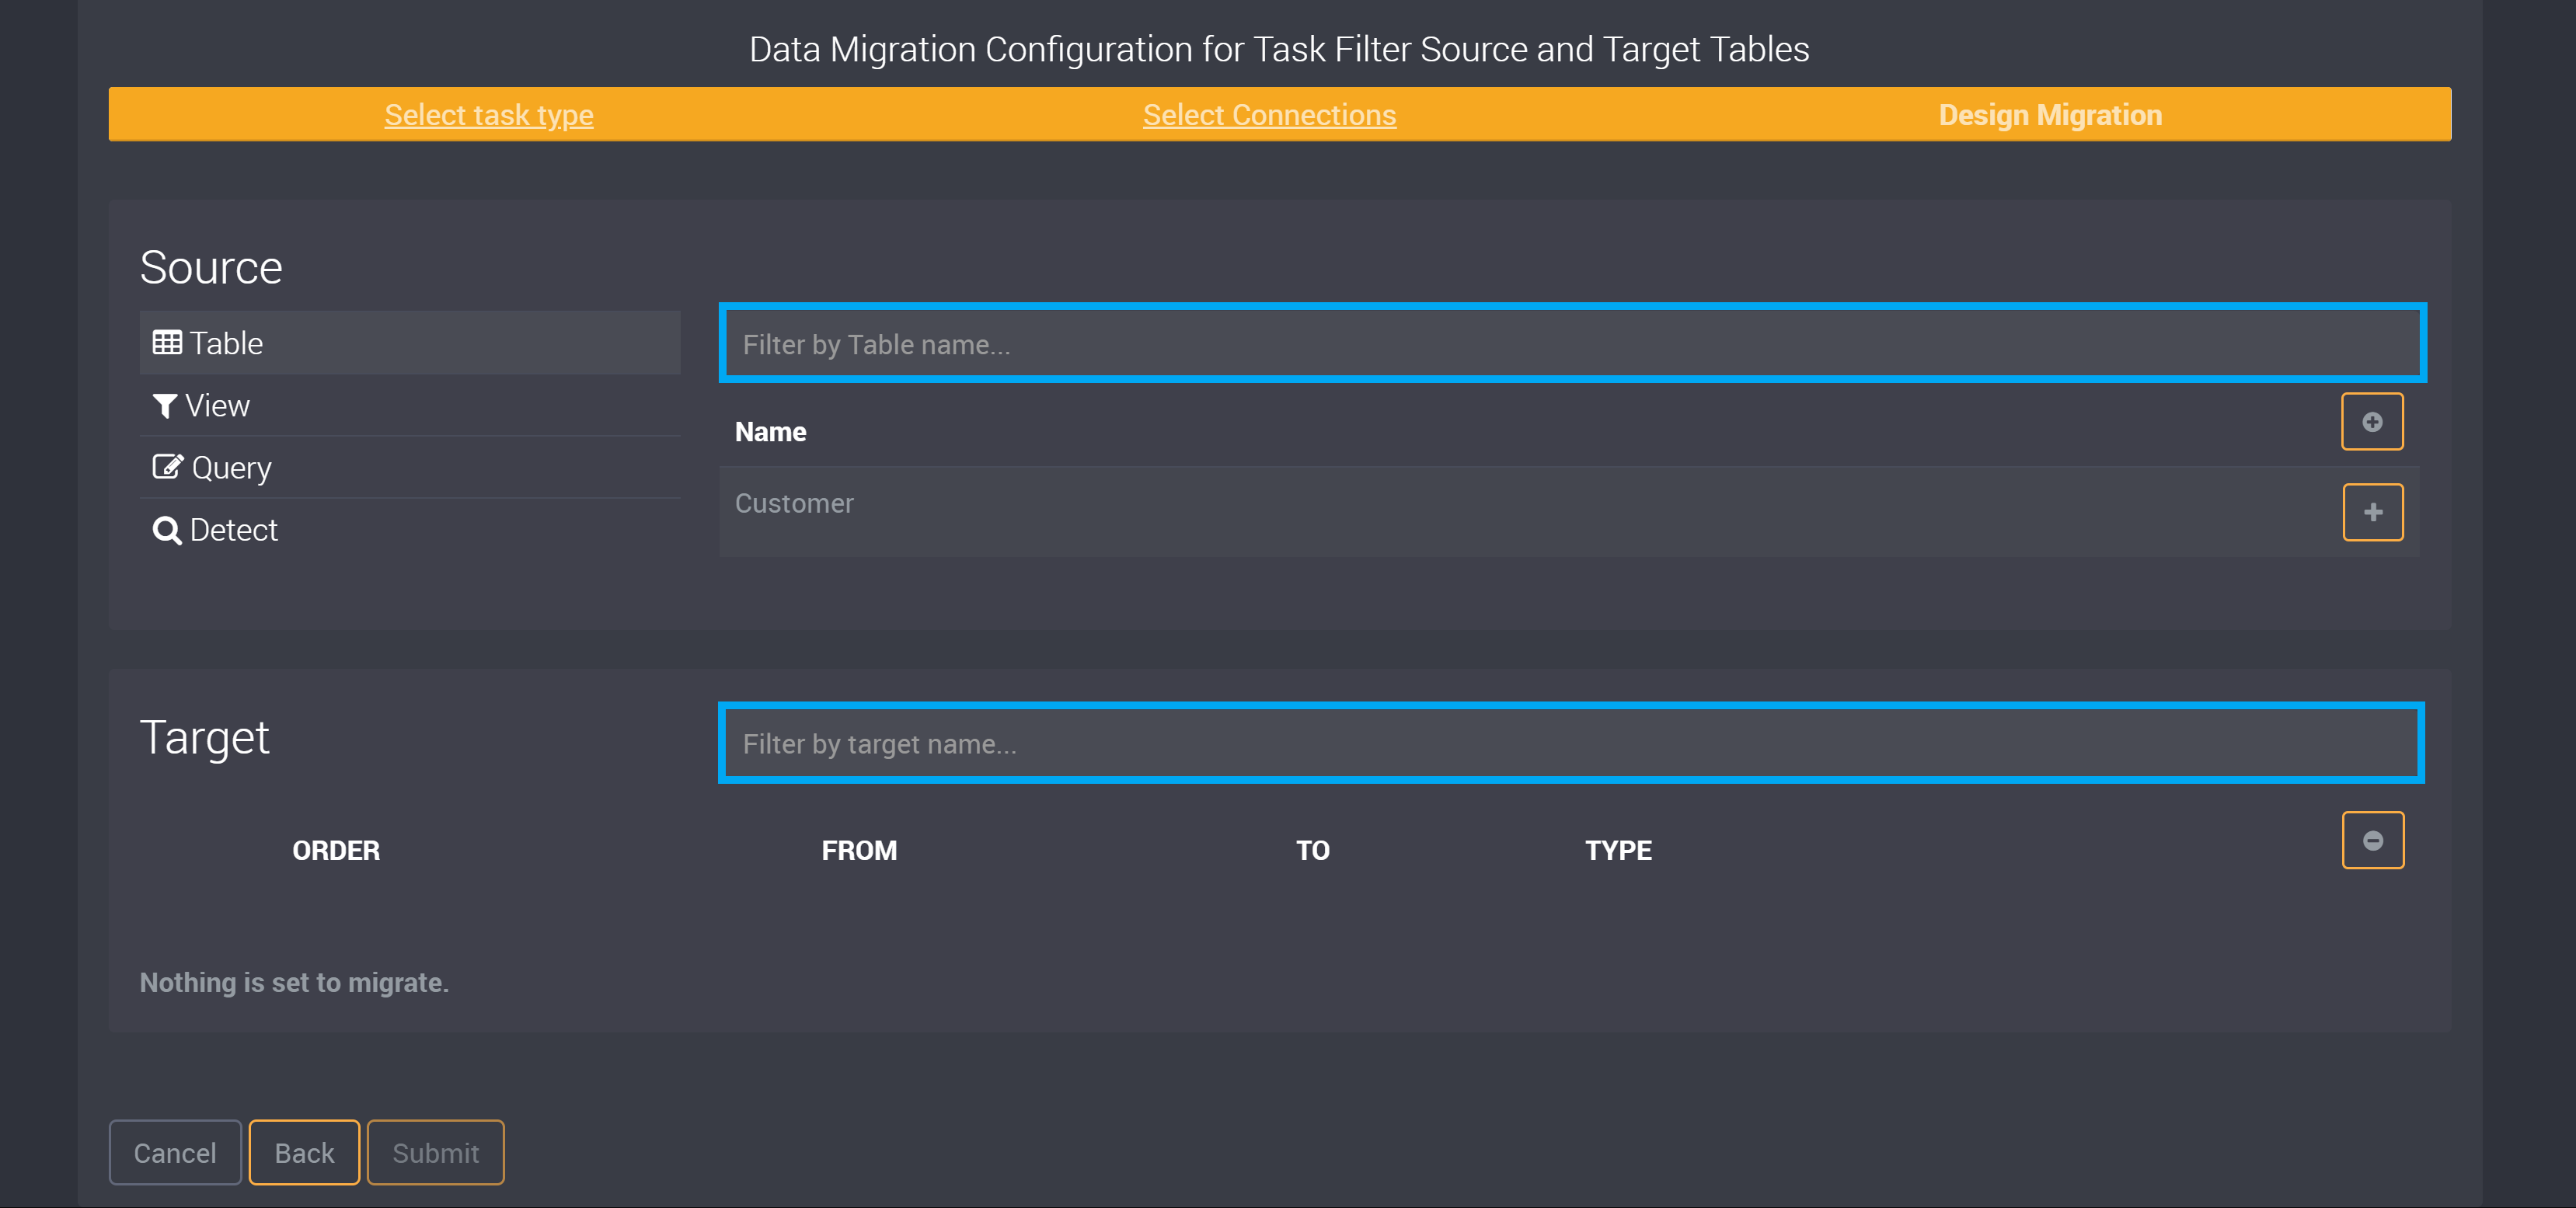
Filtering your Tables
If you would like to filter through a large list of tables in either the source or target section, type in your filter keyword in the field above each list (as highlighted in blue below).
Target Tables
All added tables will be displayed in the Target section.
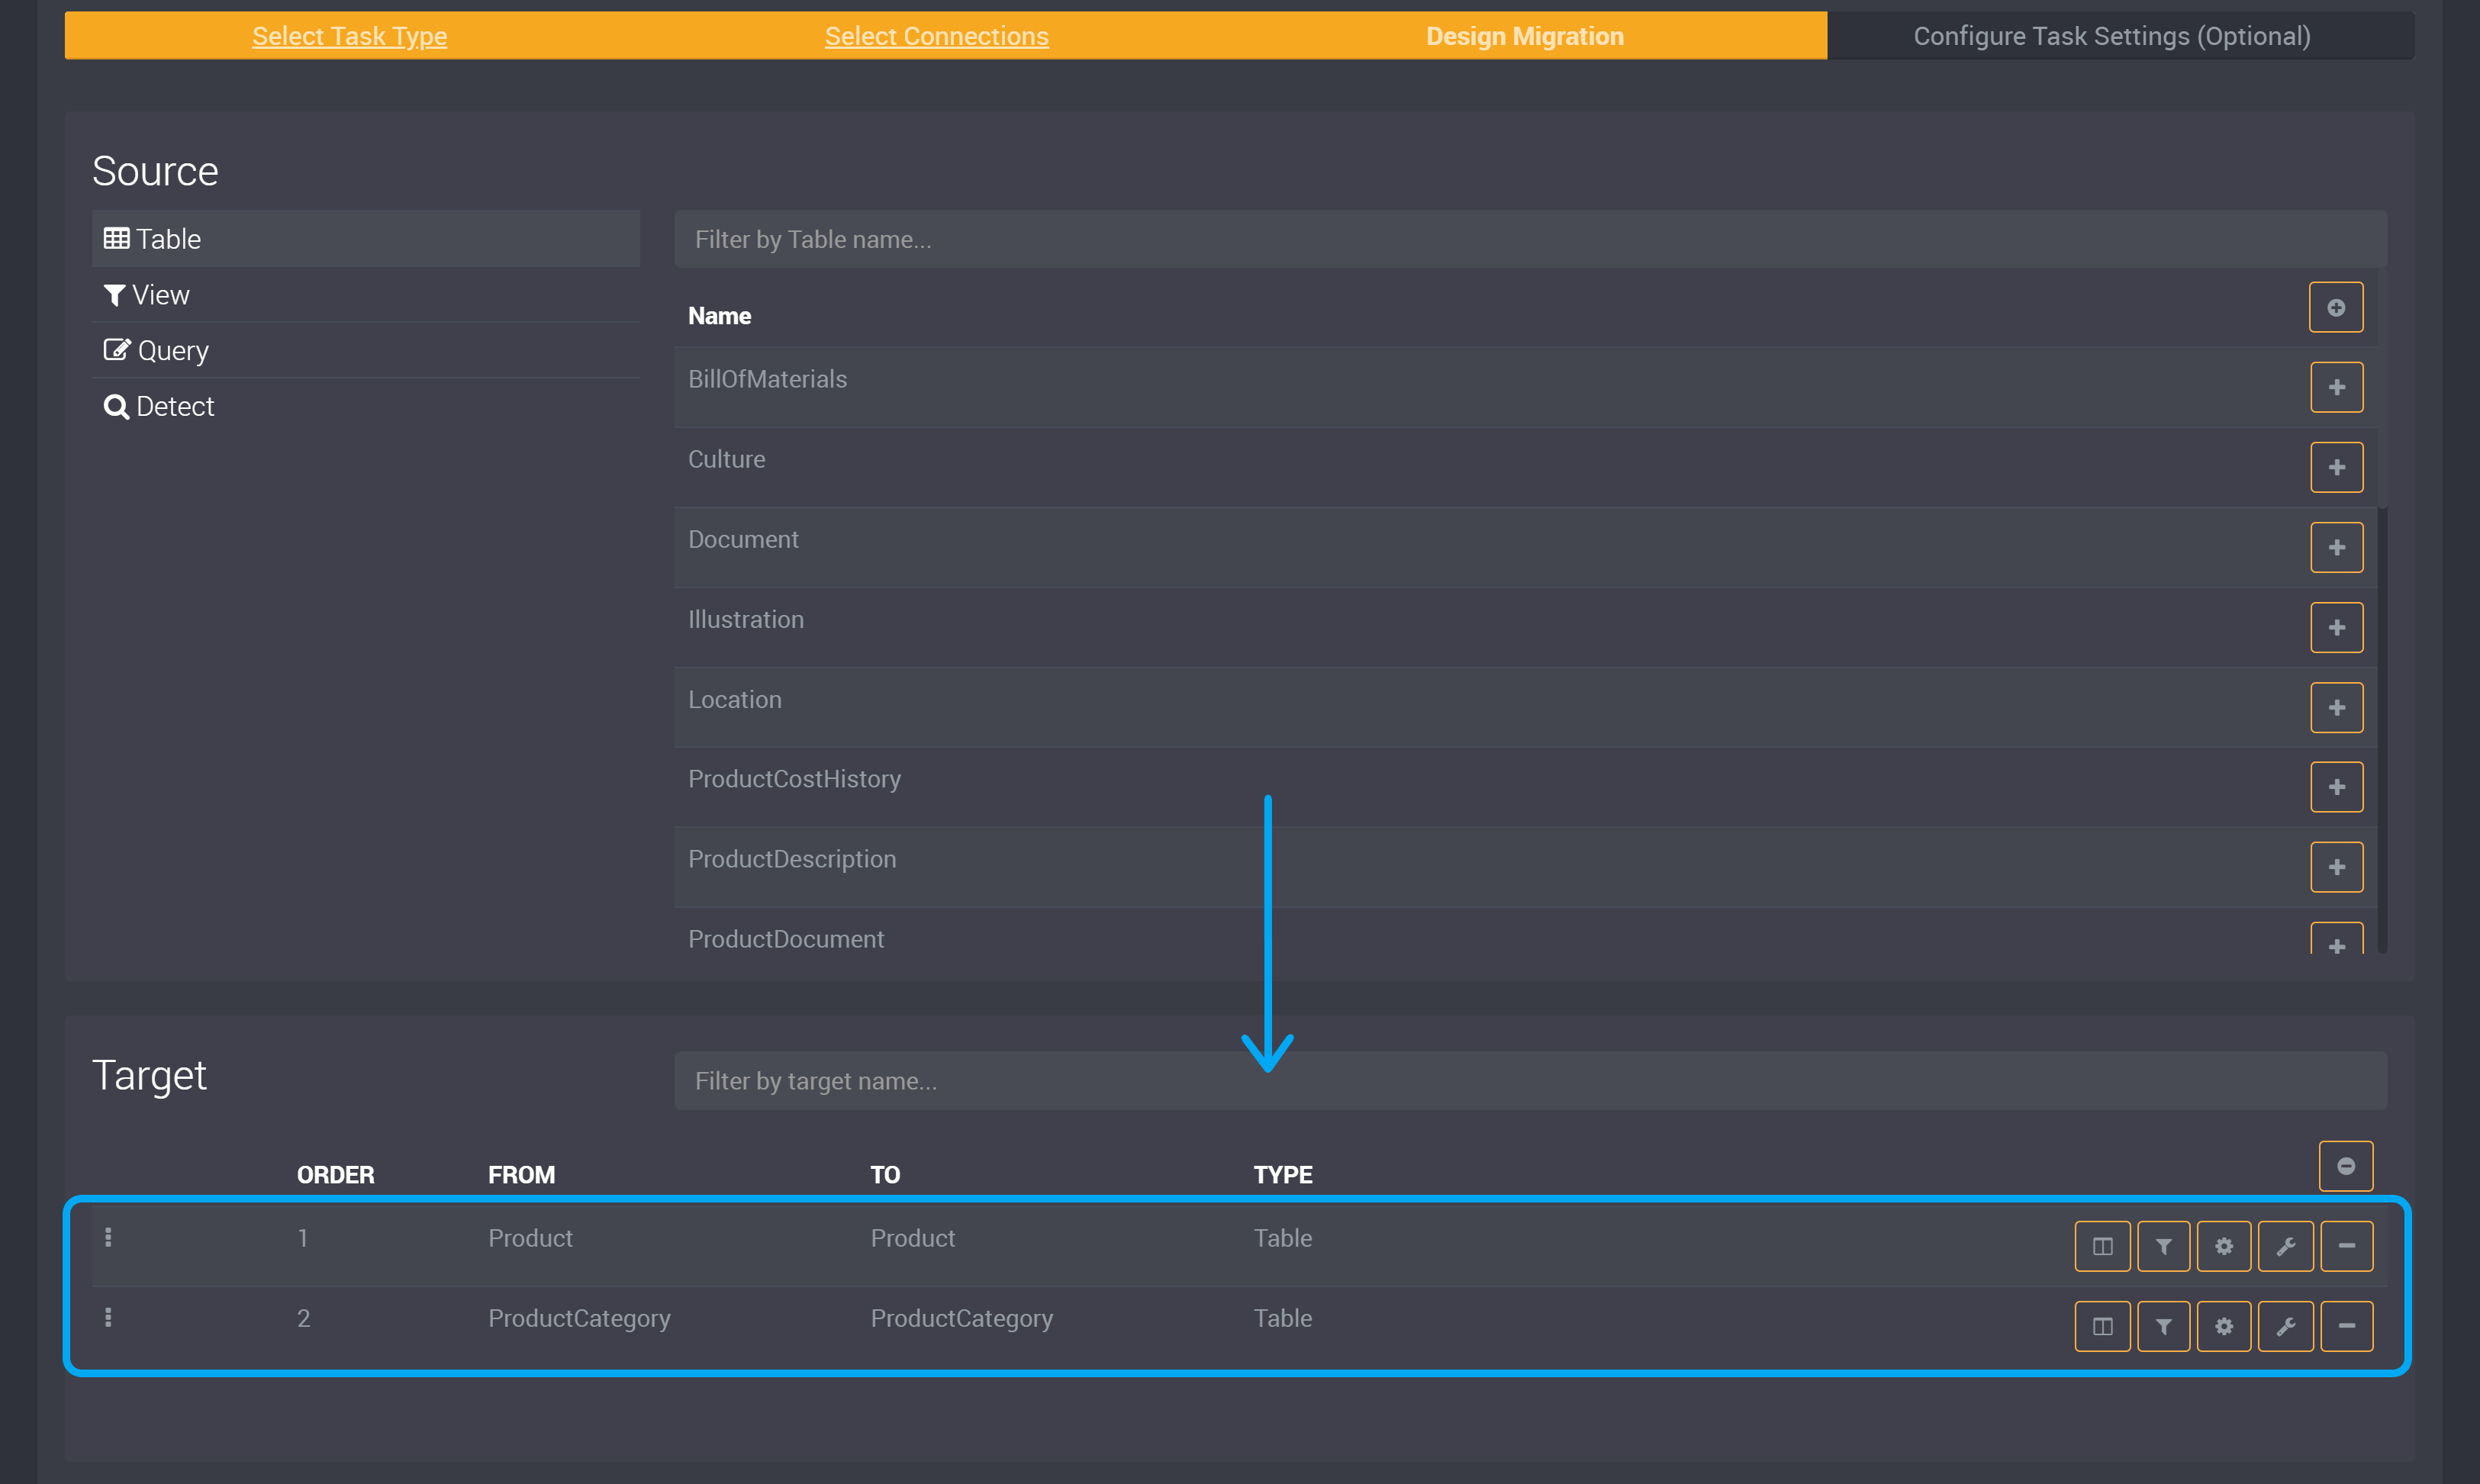
Configuring Target Tables
Target tables have a set of actions associated with each table.
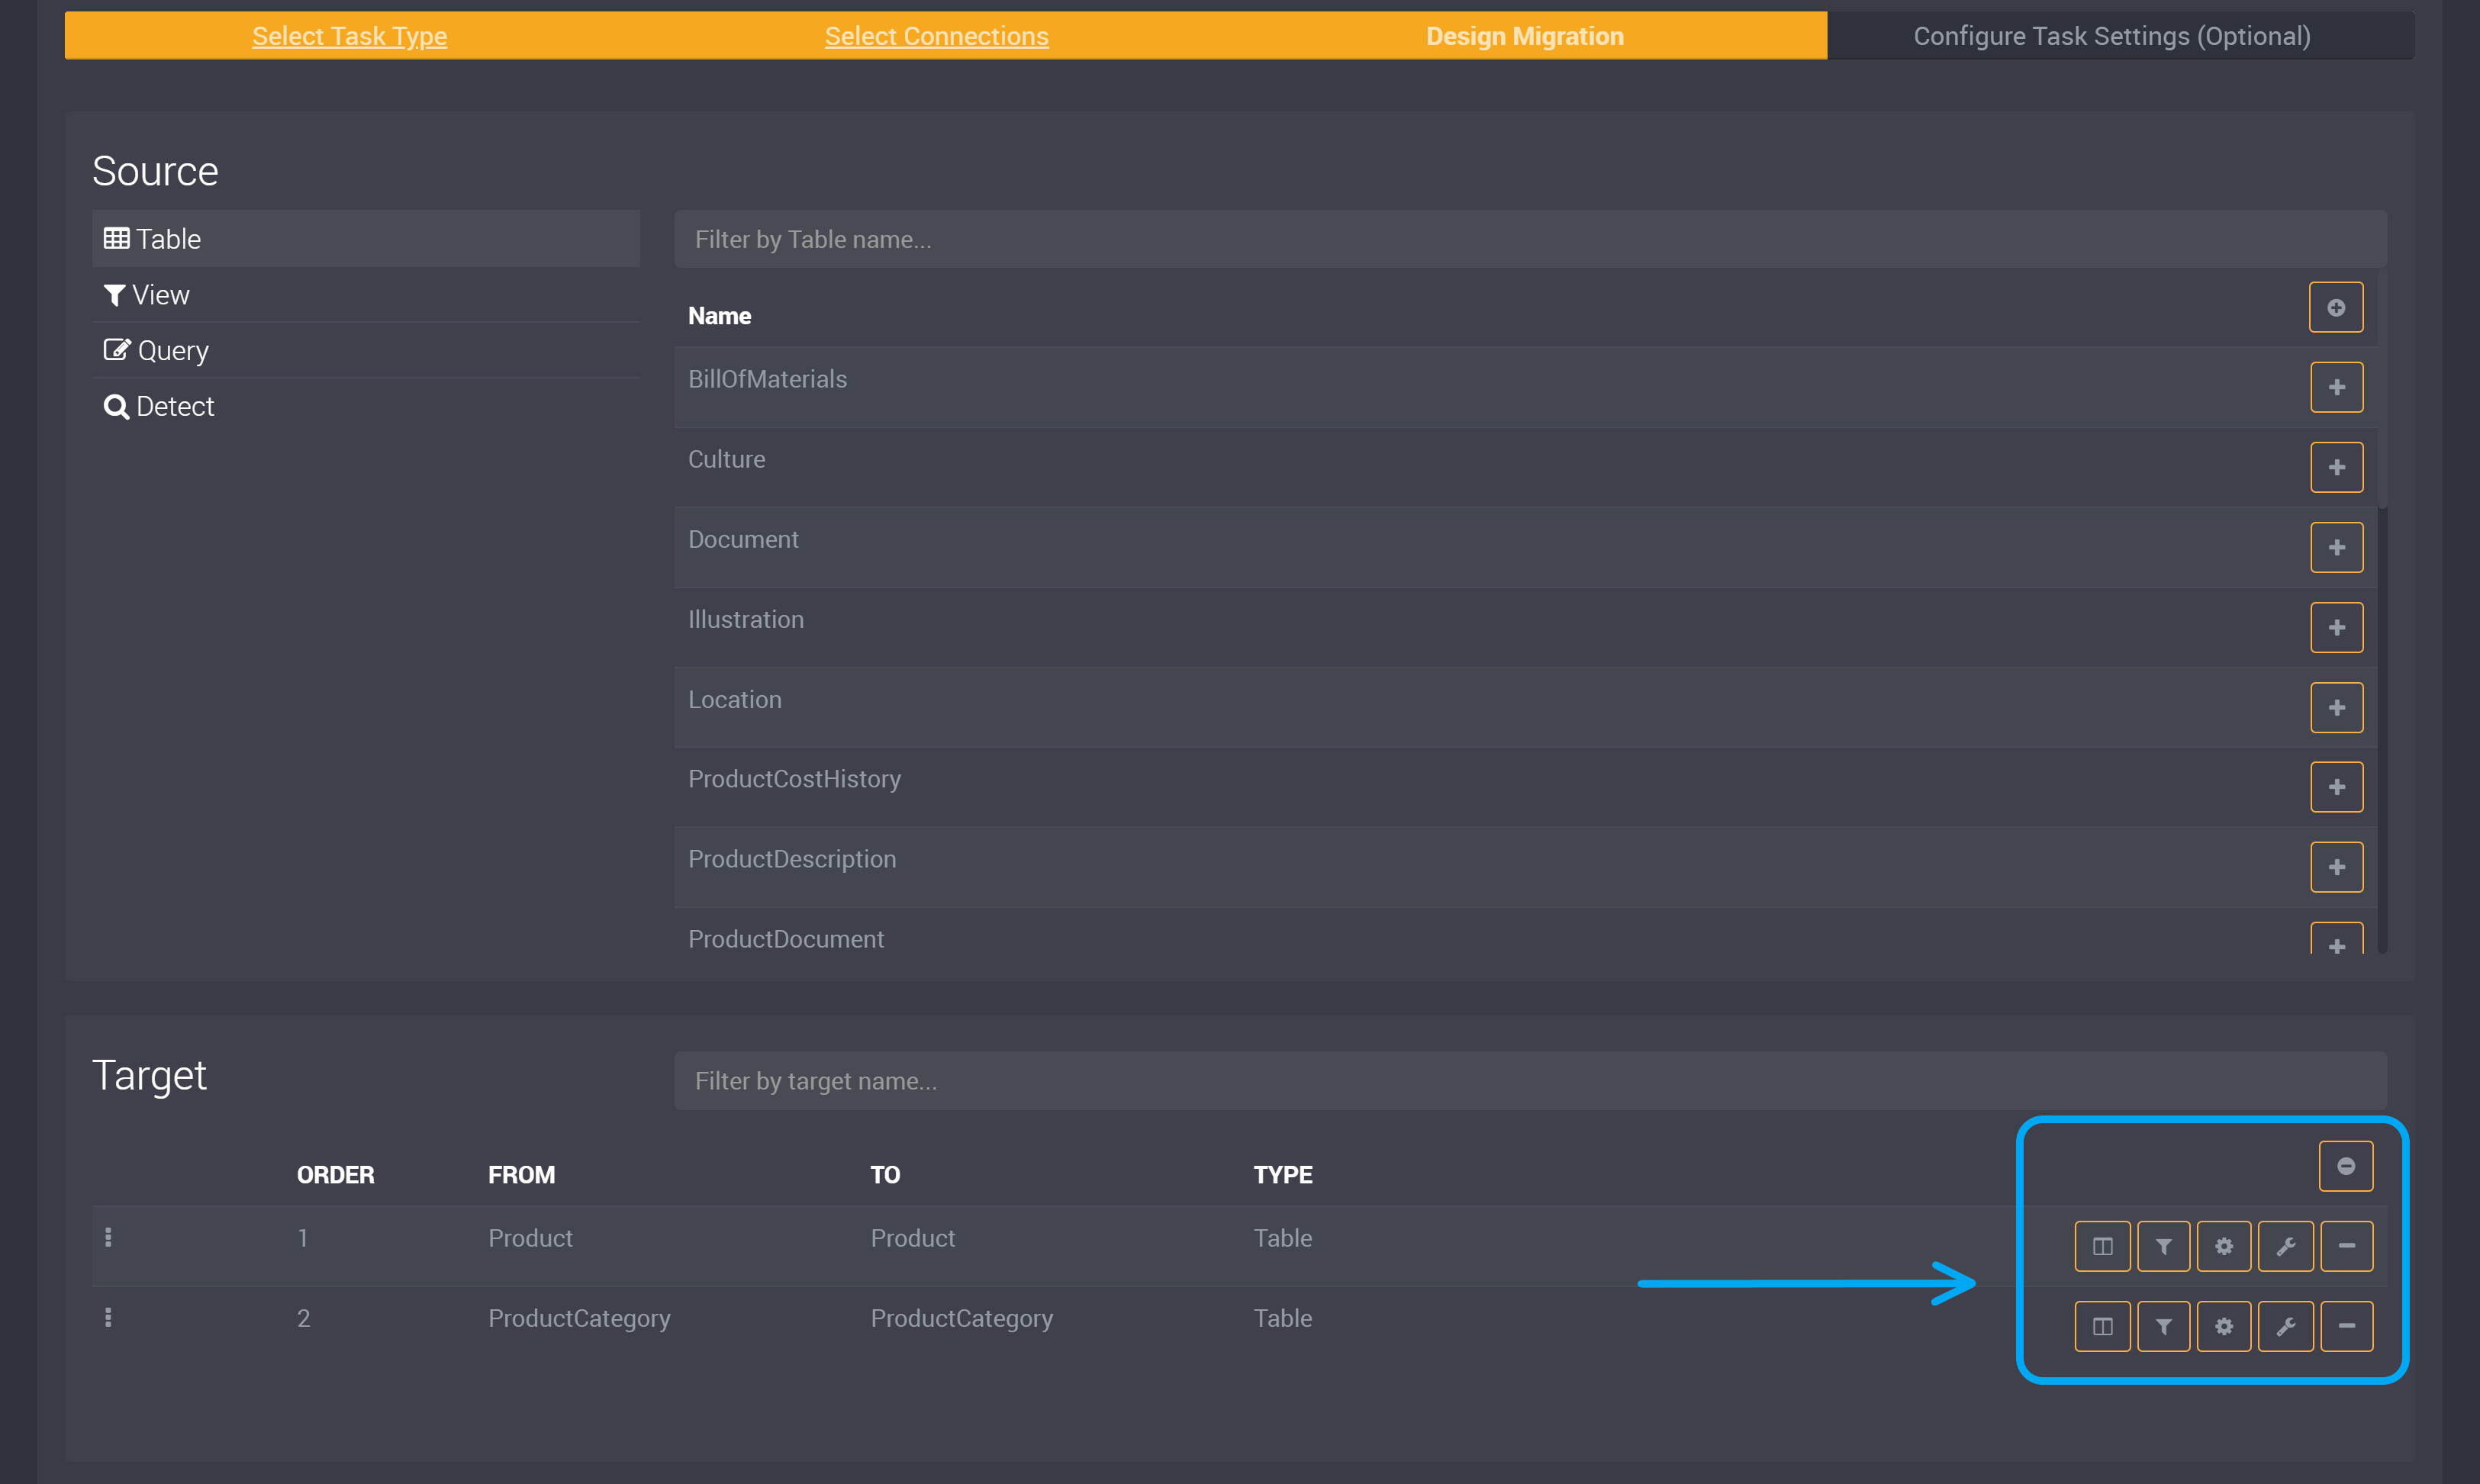
Besides the minus to remove the table from the target, the other two actions from left to right include:
Incremental Config
By default, Data Migrations will drop any matching target tables to the source. If Incremental Config is enabled, the migration will insert the new records into the existing table.

Table Options
- Incremental
- This enables the basic feature of incremental migrations.
- Primary keys
- If enabled, primary key constraints will be re-created on the target table as part of the migration.
- Indexes
- If enabled, indexes from the source table will be re-created on the target table as part of the migration.
Currency Configuration
Once Incremental is enabled, you are given the option to define a currency column and how often this column will ‘refresh’ with new data being brought in.
The Currency Column is the column Loome Integrate will check to determine what records need to be brought in as part of the migration and which records are considered to be already migrated. This column by default can be either a numeric value (such as a primary key) or a DateTime value.
Once a currency column is selected, you can set the conditions for how to compare the data in the source with the target based on that column. The Refresh Period Type allows for you to set what measurement you use for comparison, whilst the Refresh Period is the threshold used for determining what records shall be migrated.
If you want to do basic numeric comparison for a currency column, use “TransactionID”.
LoadDateTime fields will be stored in UTC format in your database.
Select Columns
Using the Select Columns configuration, you can easily migrate specific columns from the source to the target table. This is as easy as opening up the select columns menu and checking the columns you wish to migrate.

Specify Data Columns
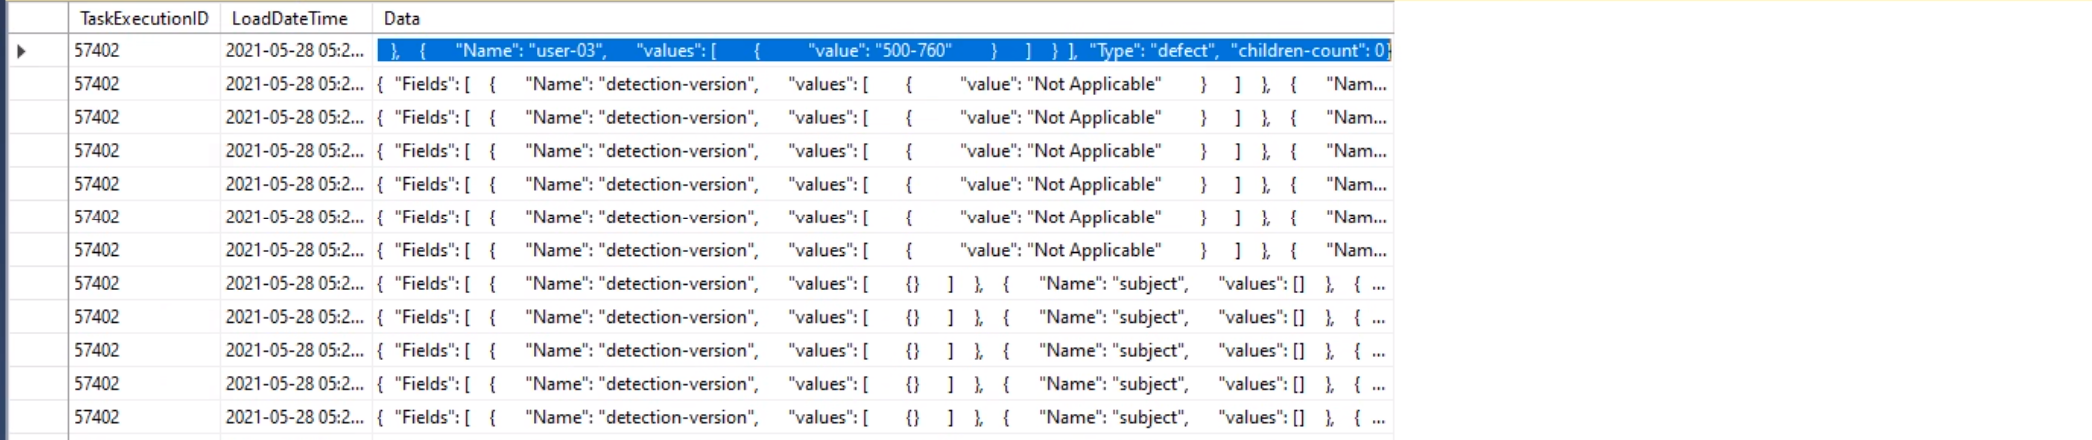
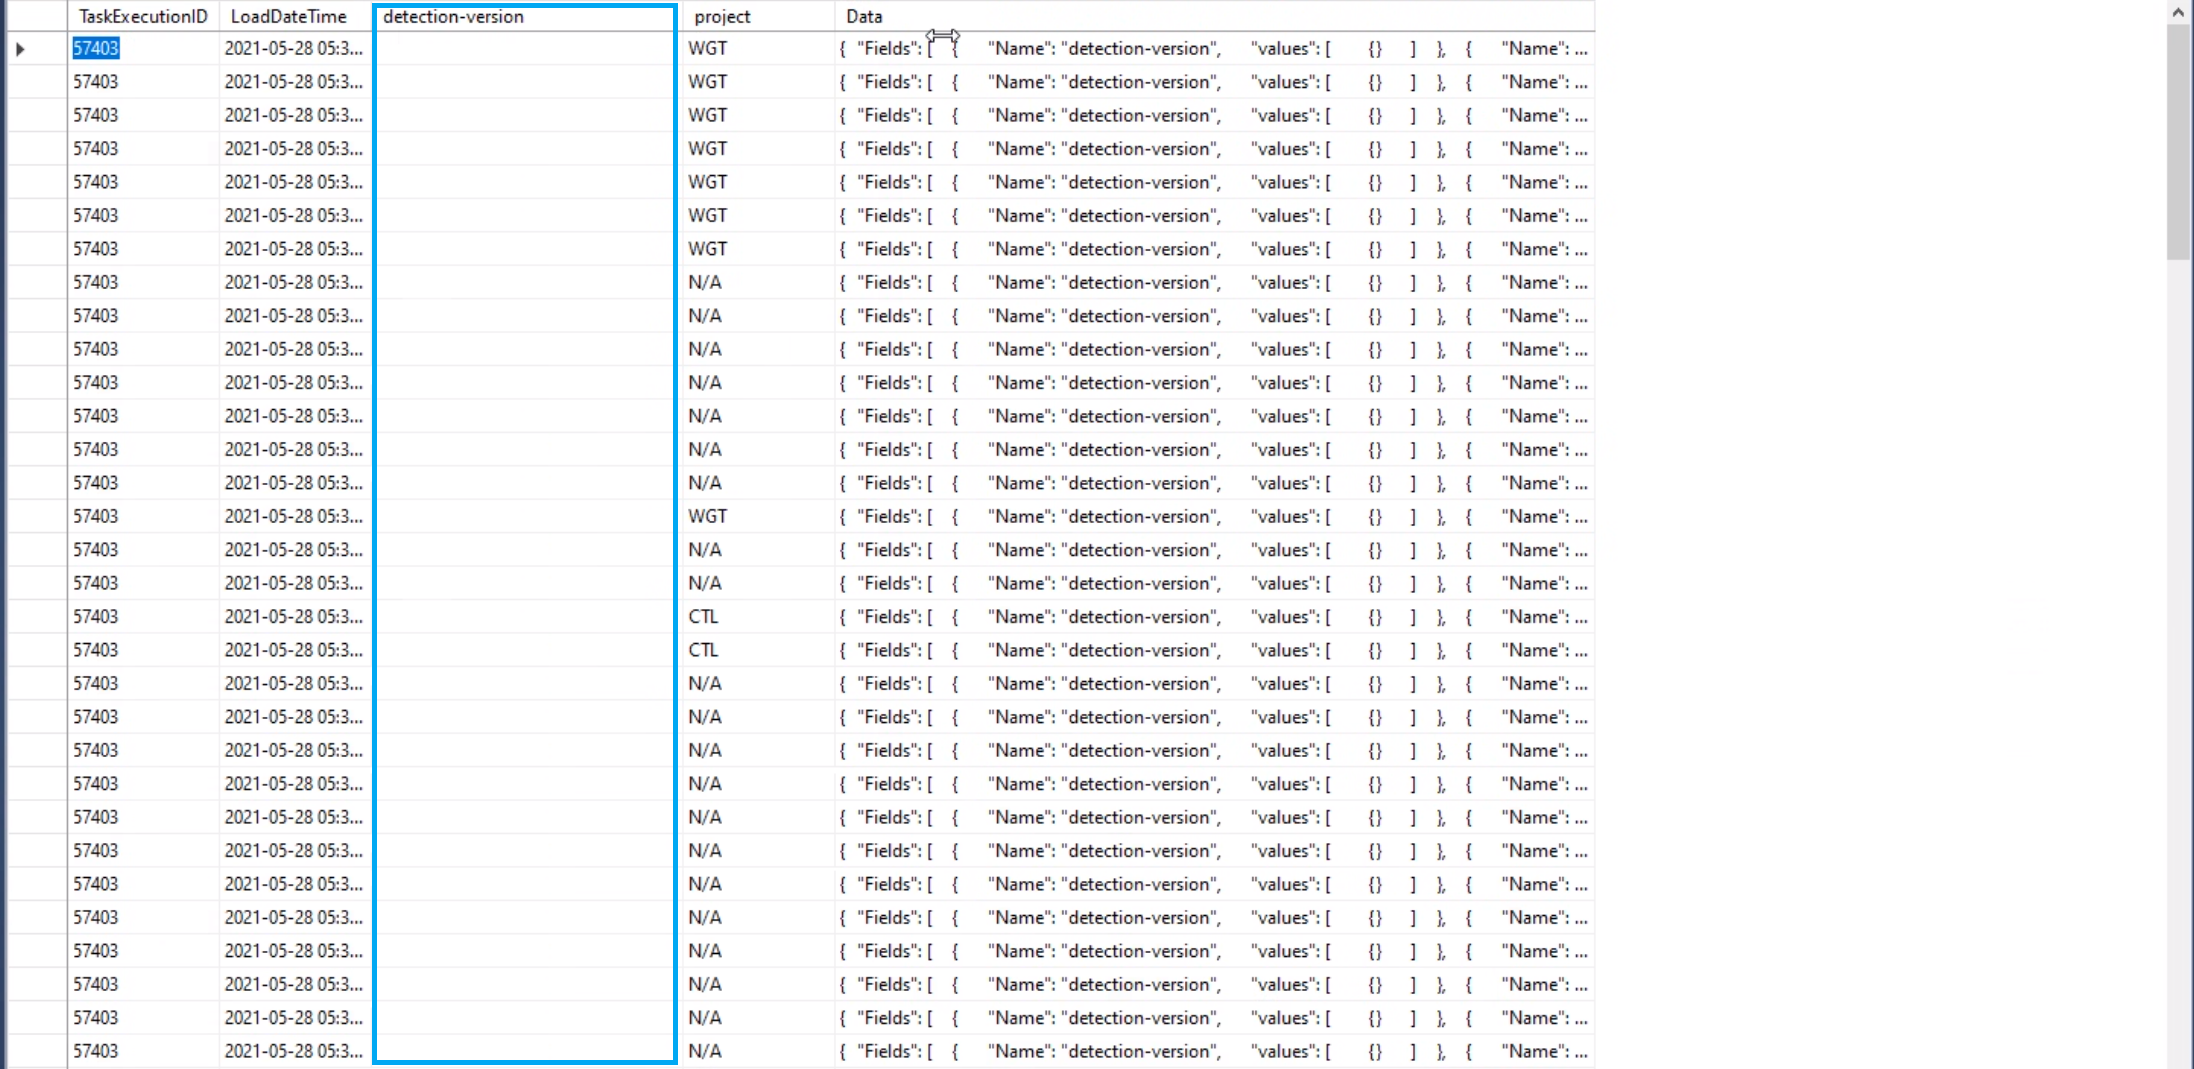
In tasks that use connections such as Aconex V2 Application and Microfocus ALM, you may need to define columns and extract fields from a data column, such as the data column in the image below.
Once you have migrated your data, you can define its columns.
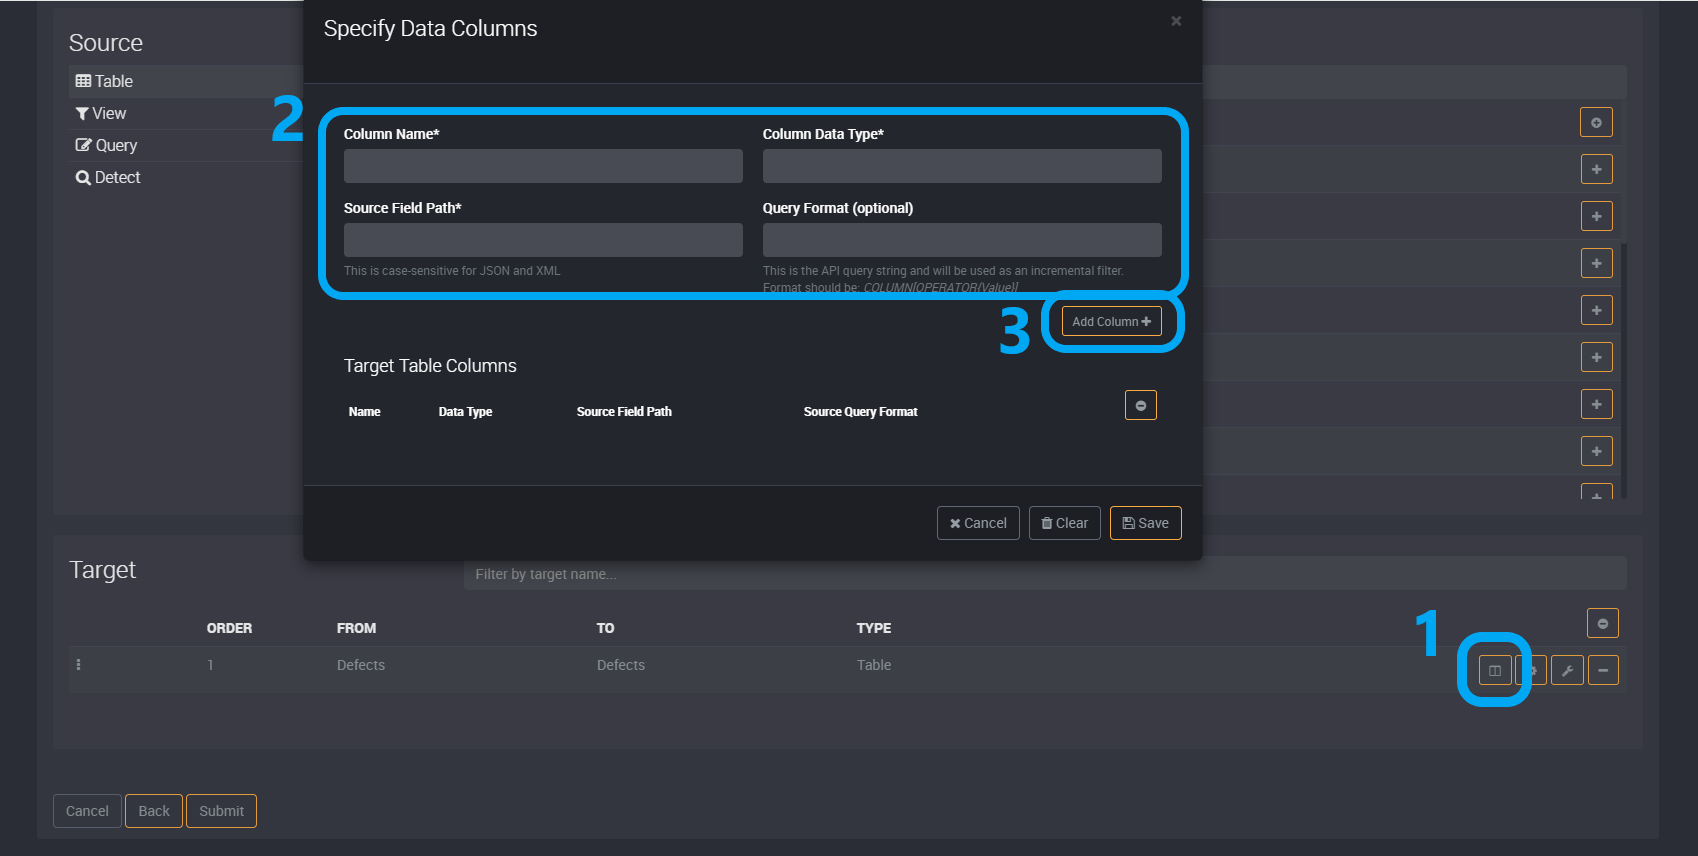
In this example we have chosen the ‘Defects’ table, and then decided to define the field ‘detection-version’ from the ‘Data’ column in the ‘Defects’ table as shown in the image above.
Click on the Select Data Column button beside the table you have selected as your target table.
Find the field you want to define in your source data column and provide its details here.
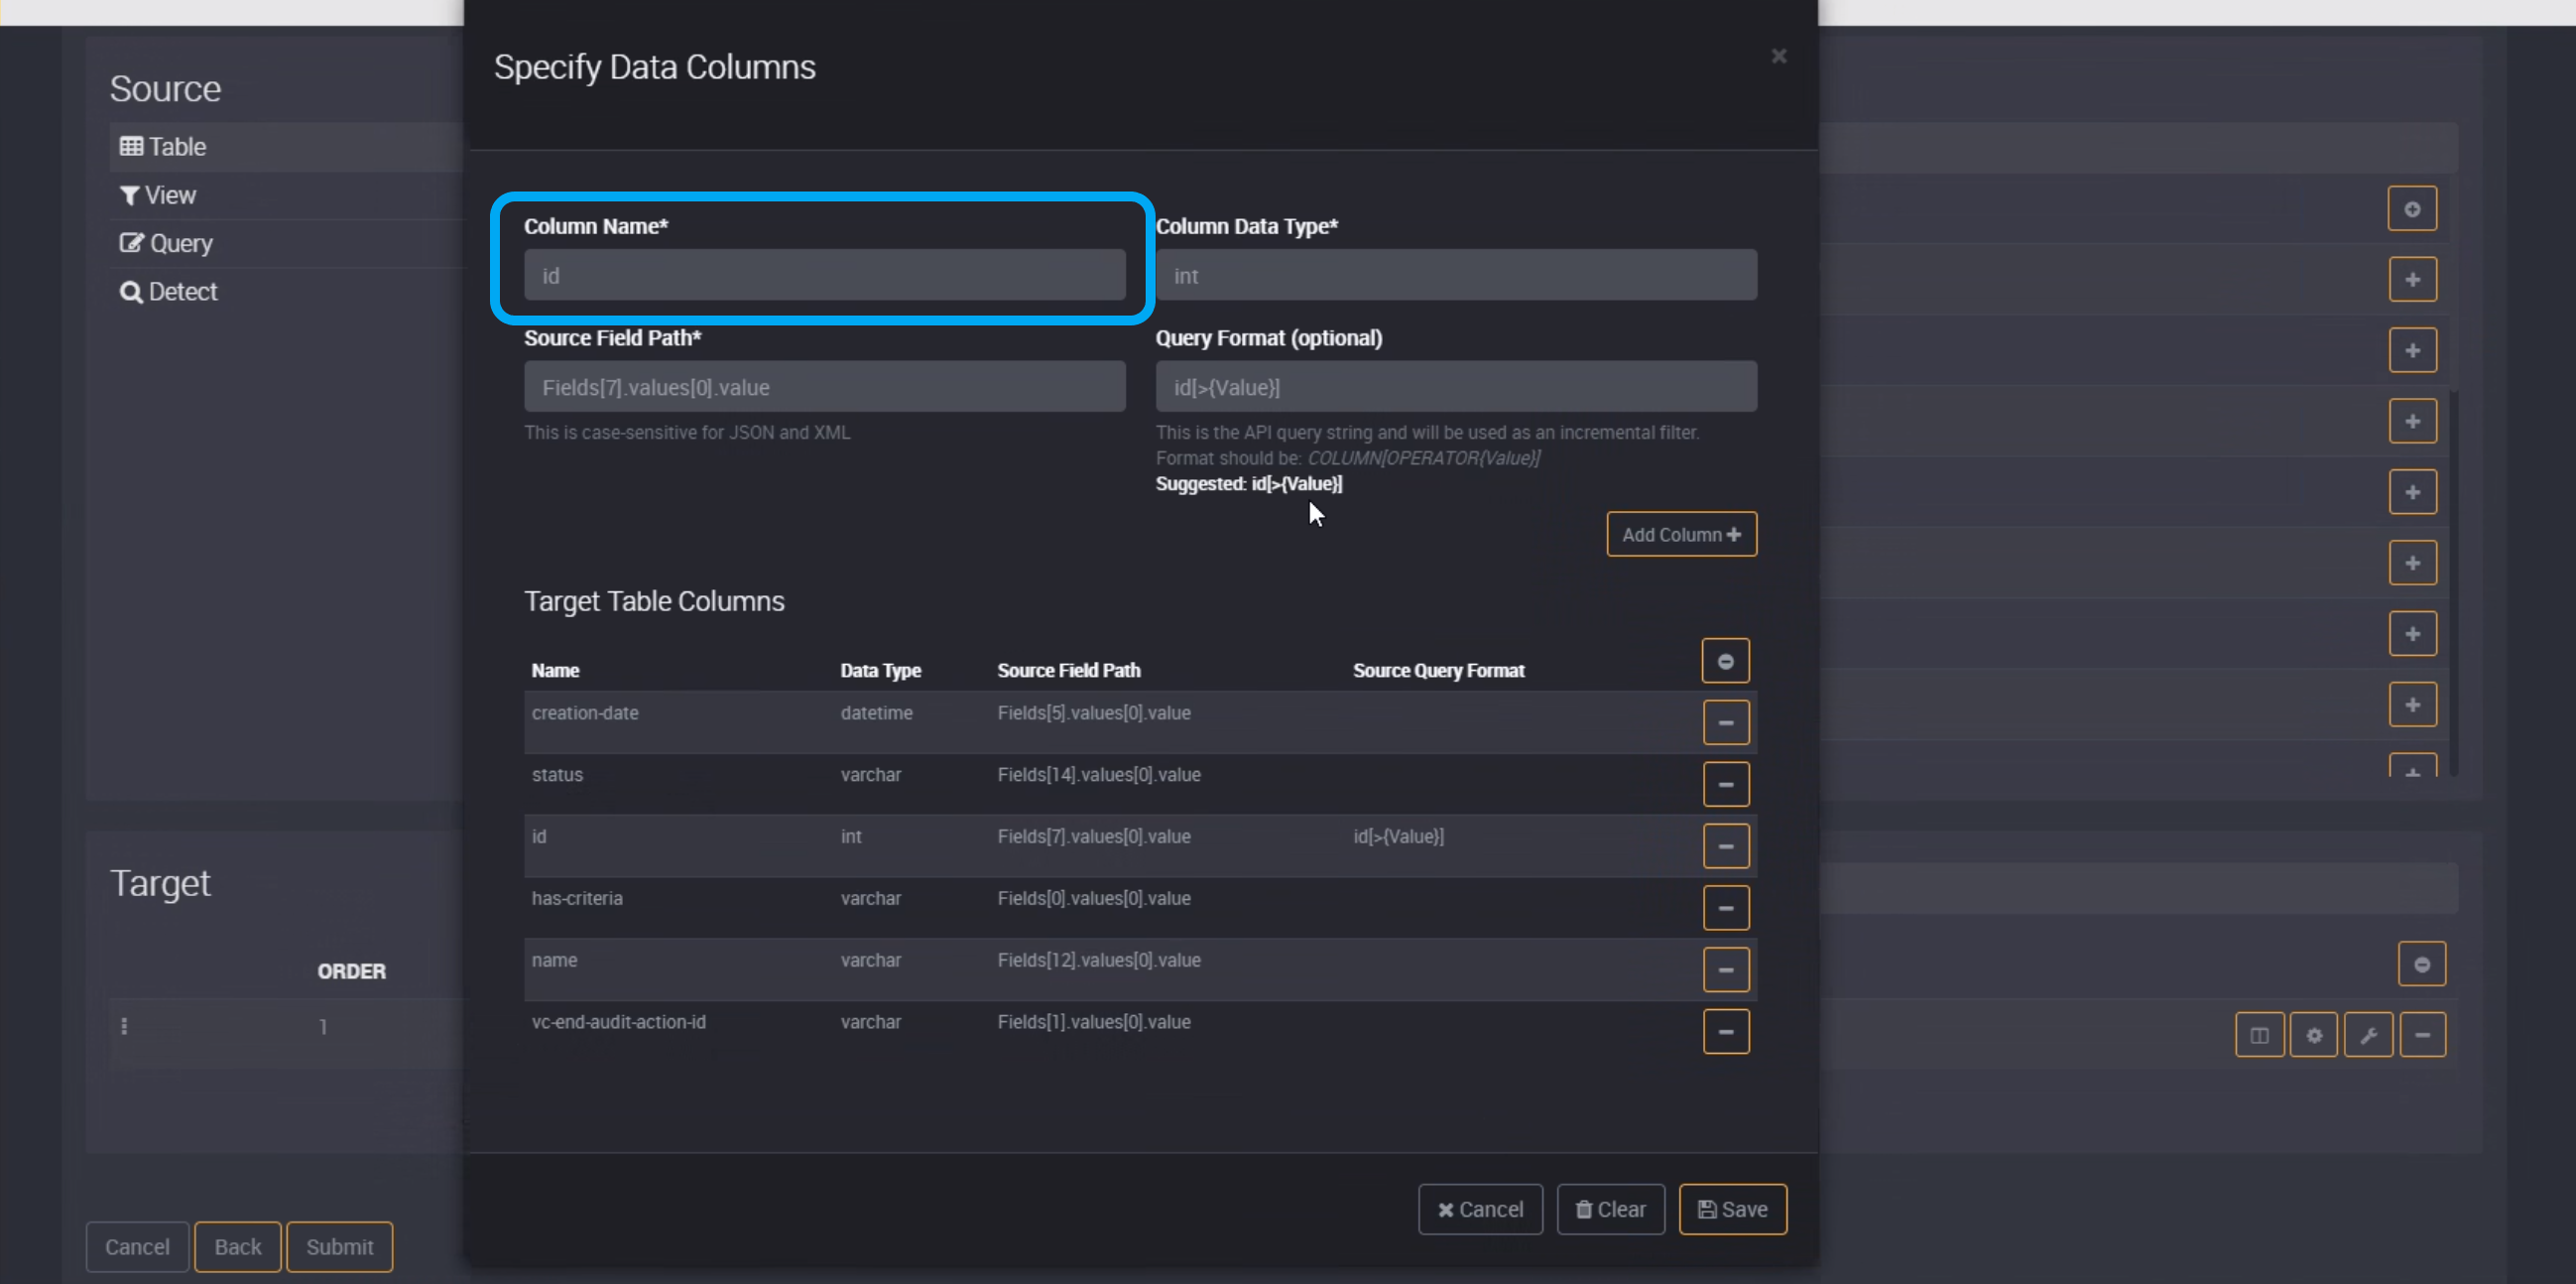
First, provide the Column Name.
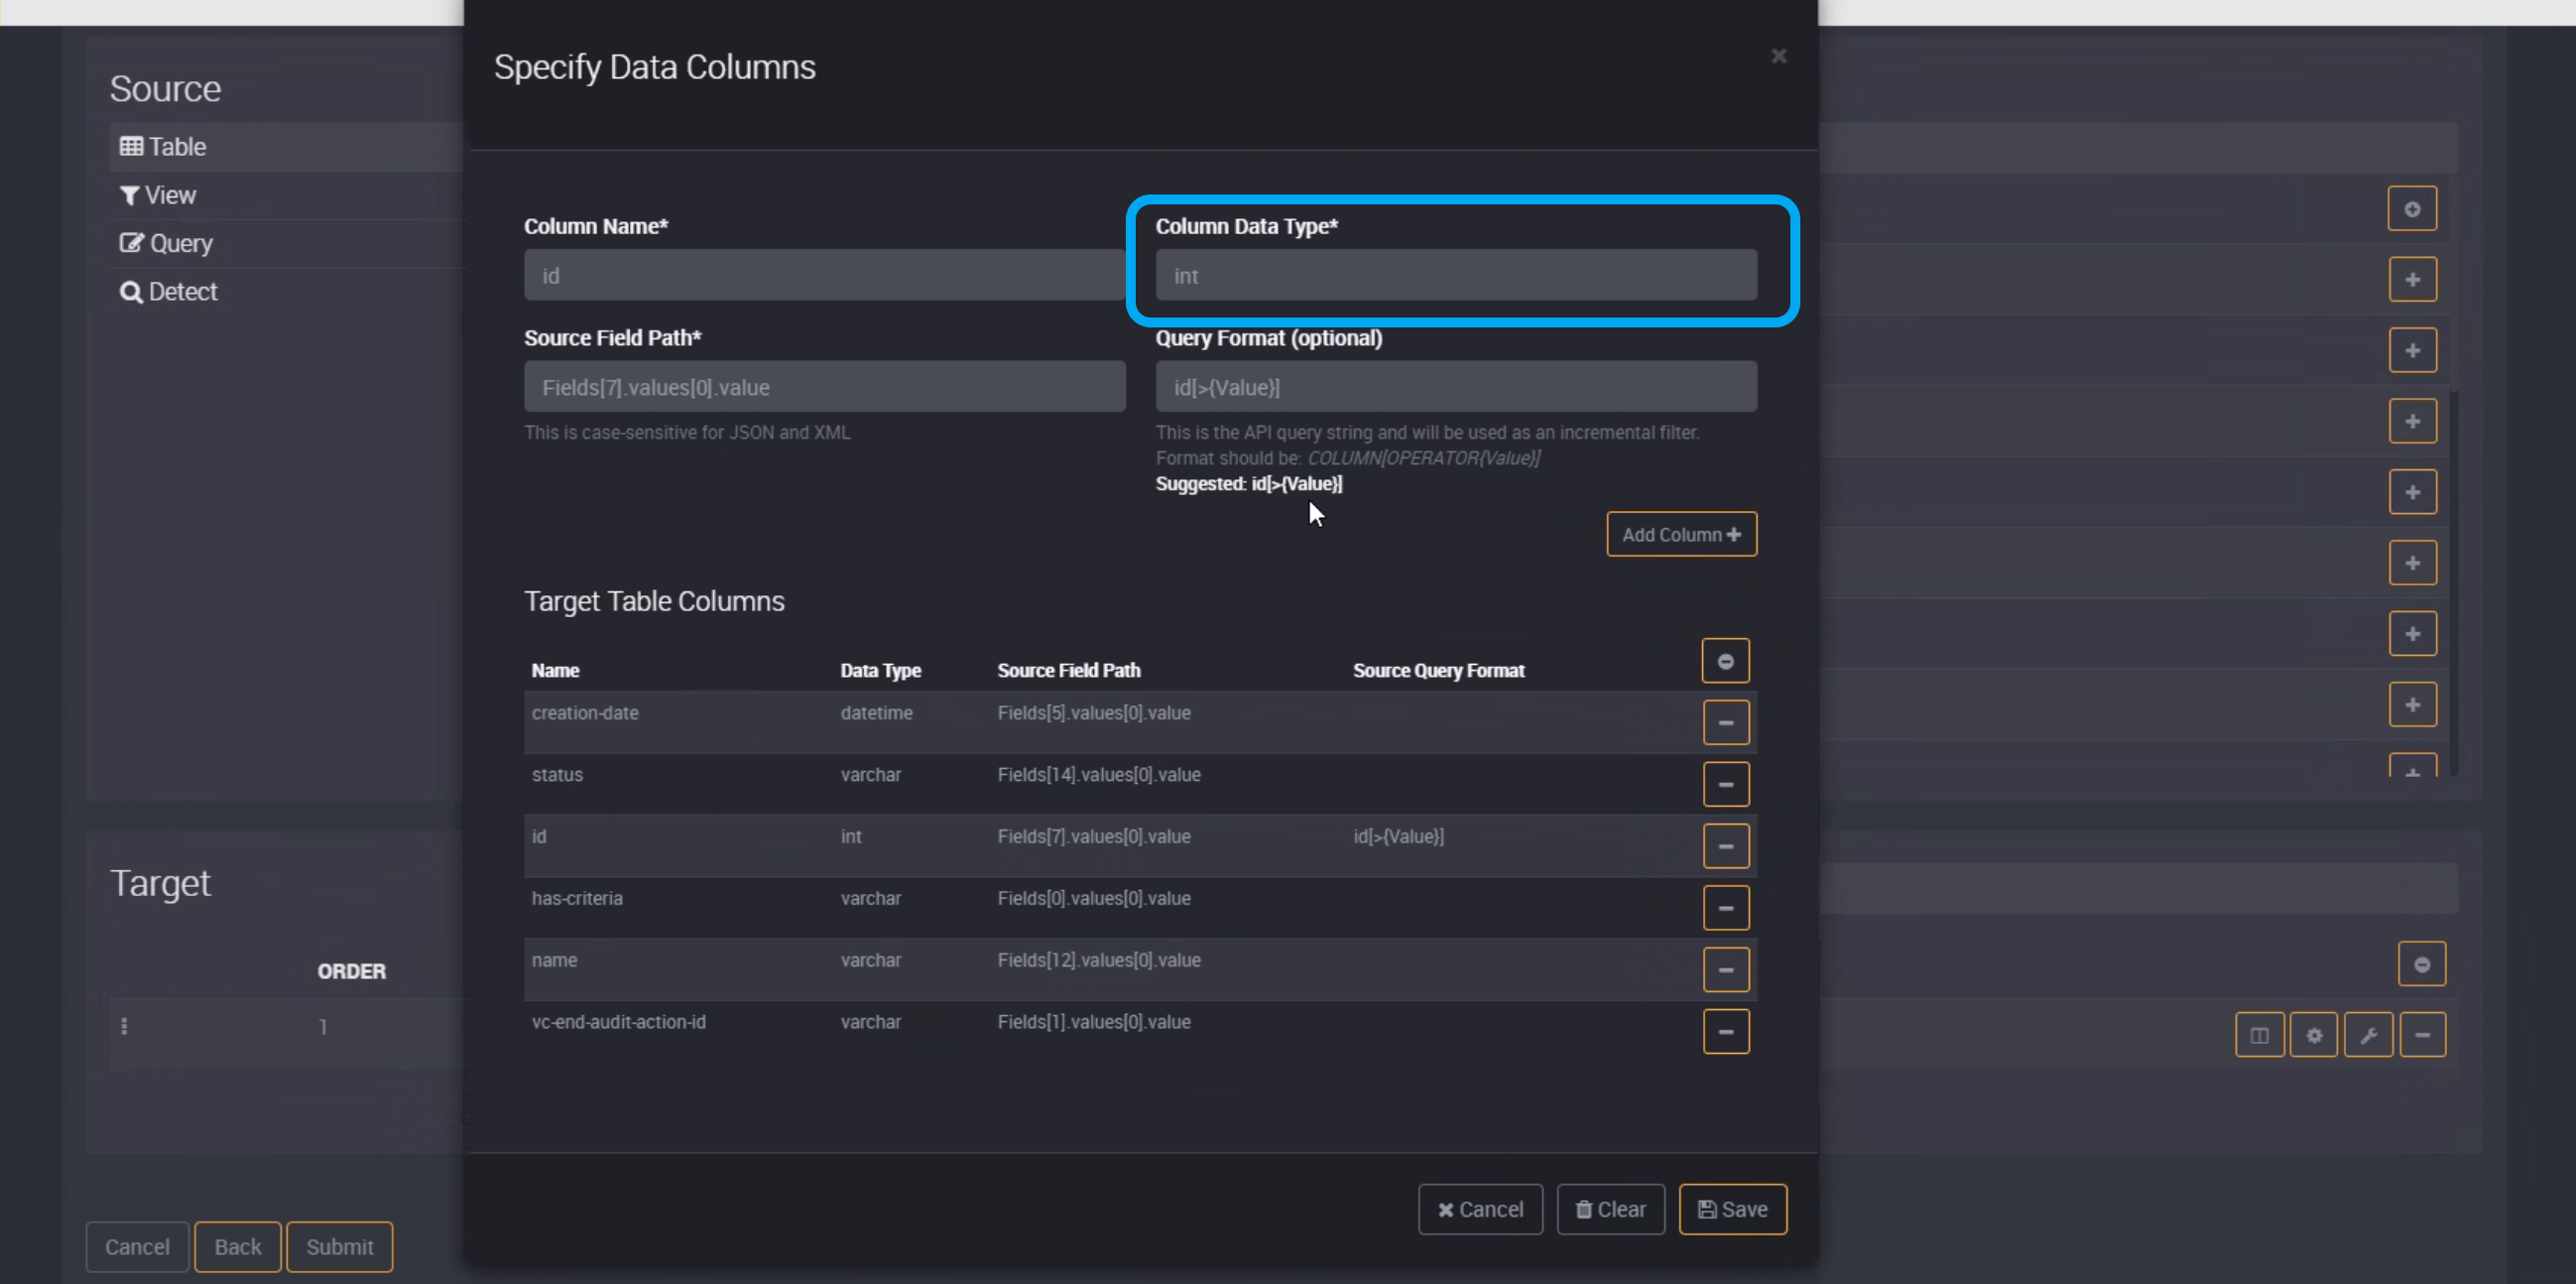
You will then provide the Column Data Type of this field. This depends on the type of data of the field, such as datetime, varchar or int.
Provide the Source Field Path.
If you are using XML, you can use the XPath format for the Source Field Path.
If using JSON, you can use the format in the following example.
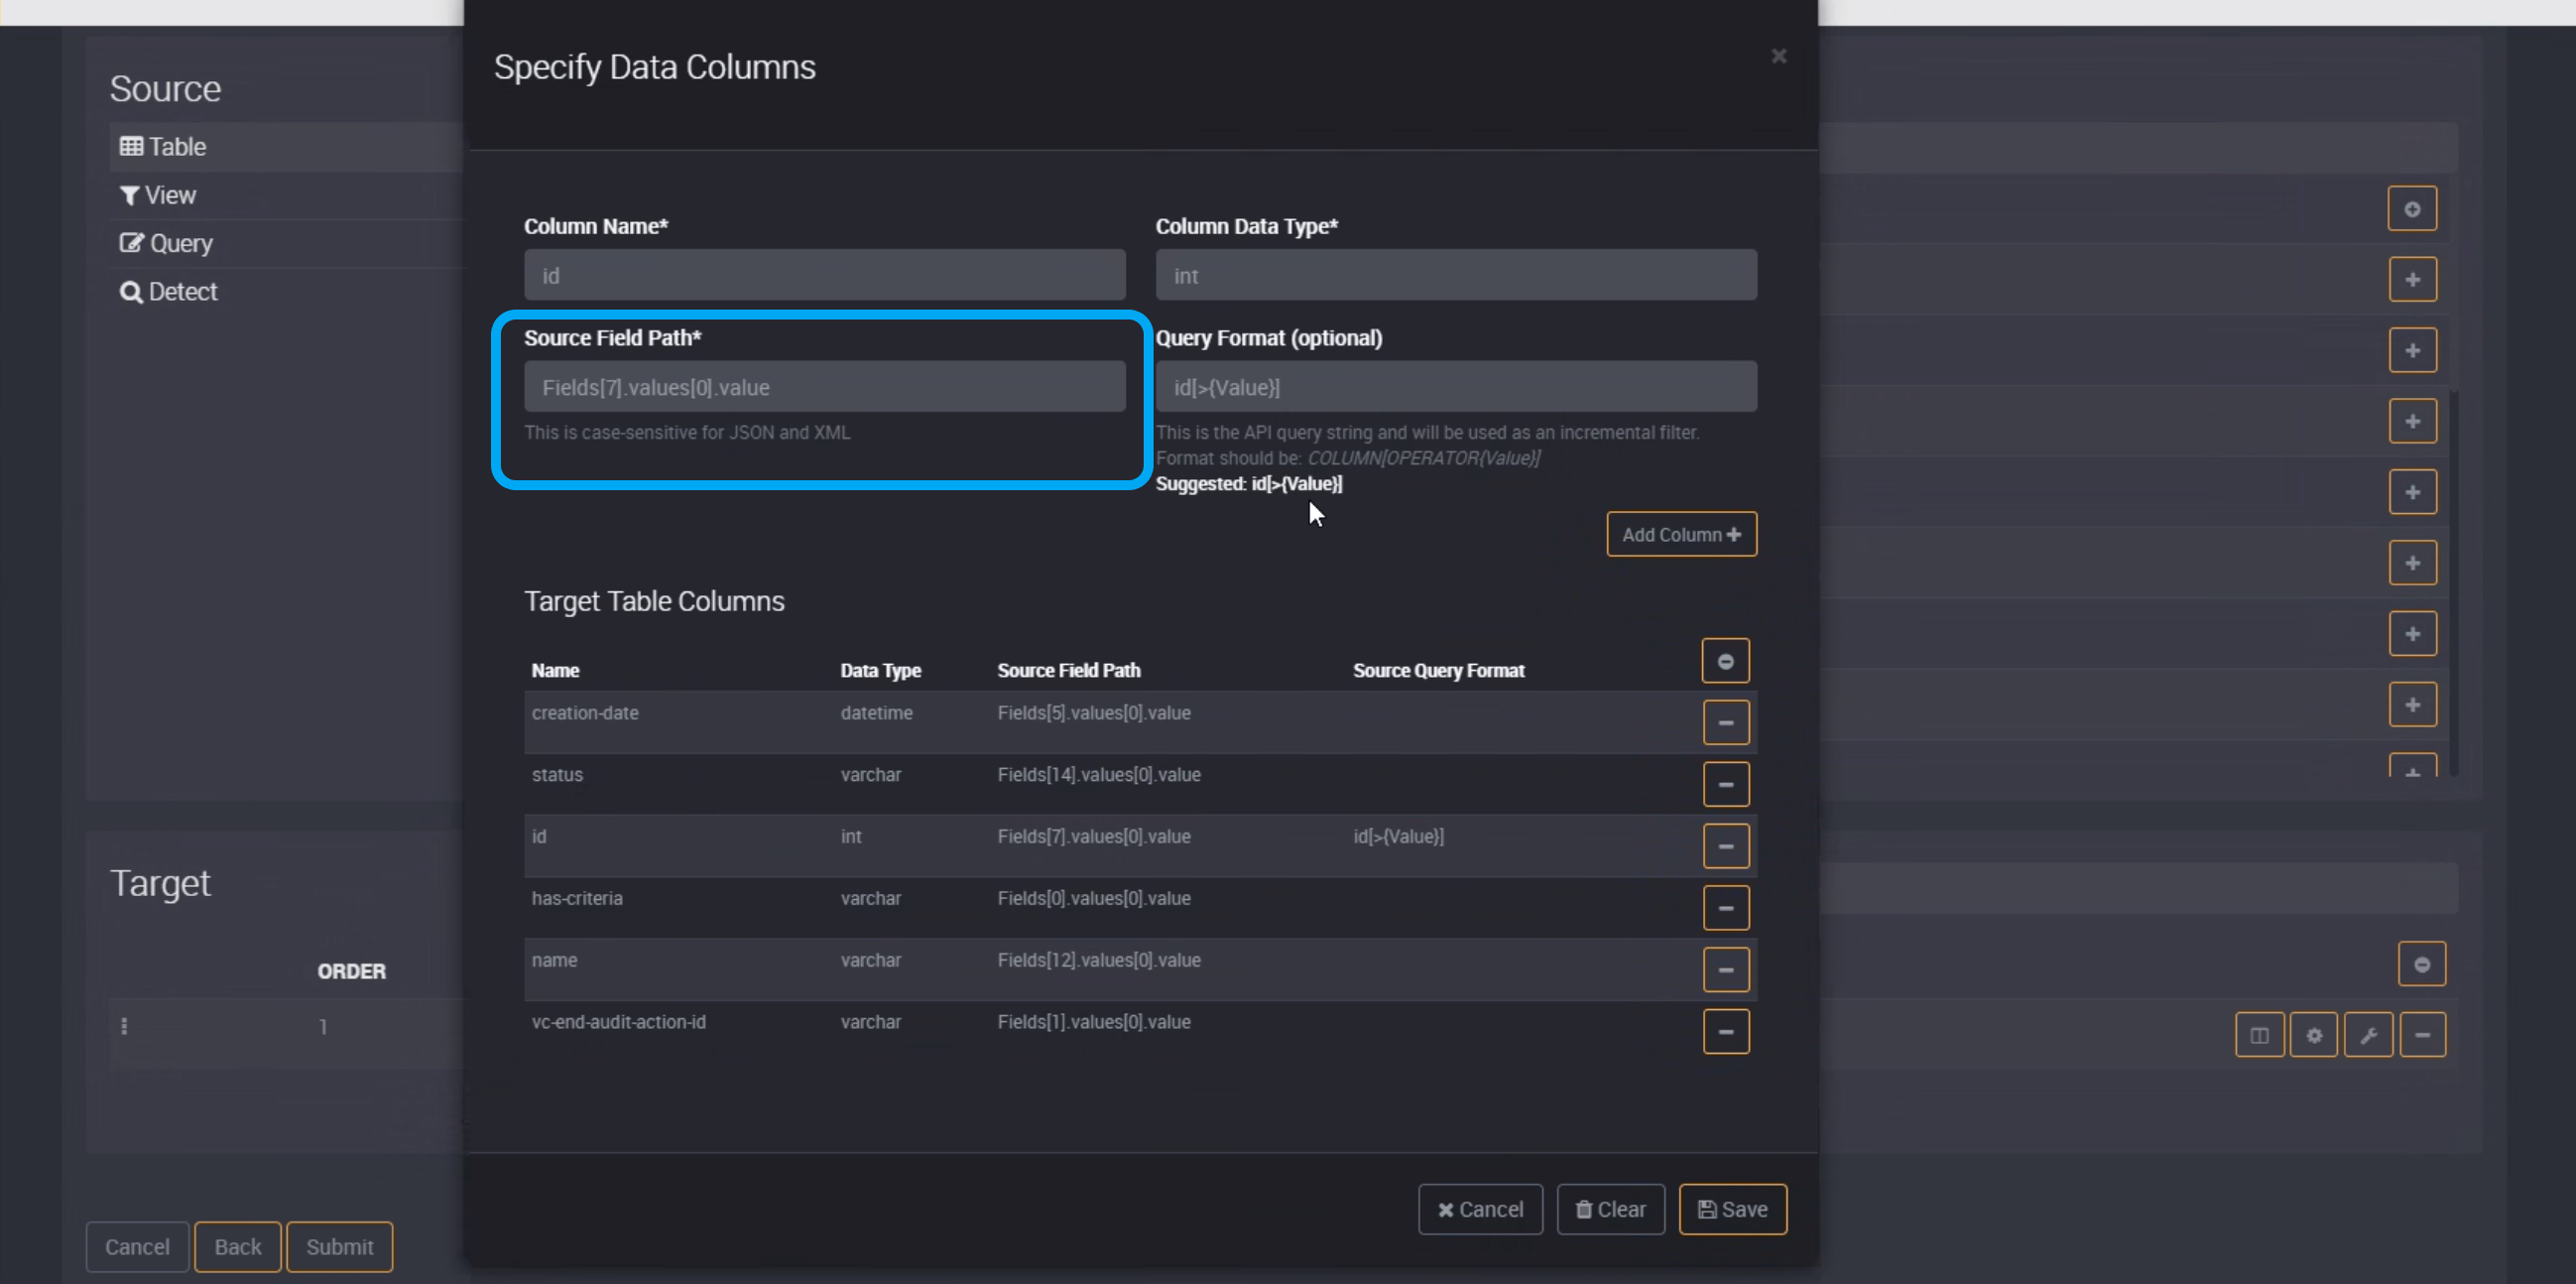
Please note this is case-sensitive for JSON and XML.
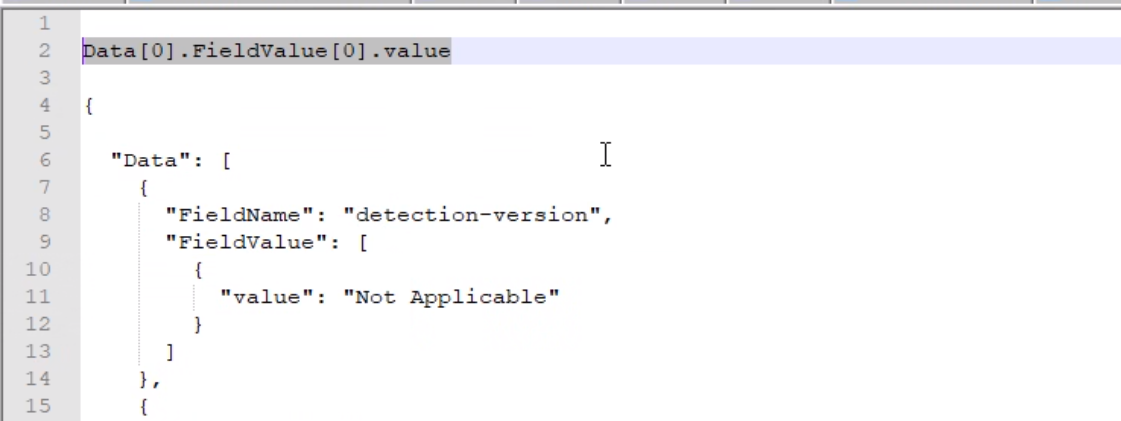
To get the source field path, you can follow the example of the path structure in the image below.
In the image below, ‘detection-version’ is the first field so the value is 0 as we want to pick the first instance. There is no field value for ‘detection-version’ so that is also 0. If the next field was called ‘Subject’ it would be ‘Data[1]‘, and so on for the next fields in this source data column.
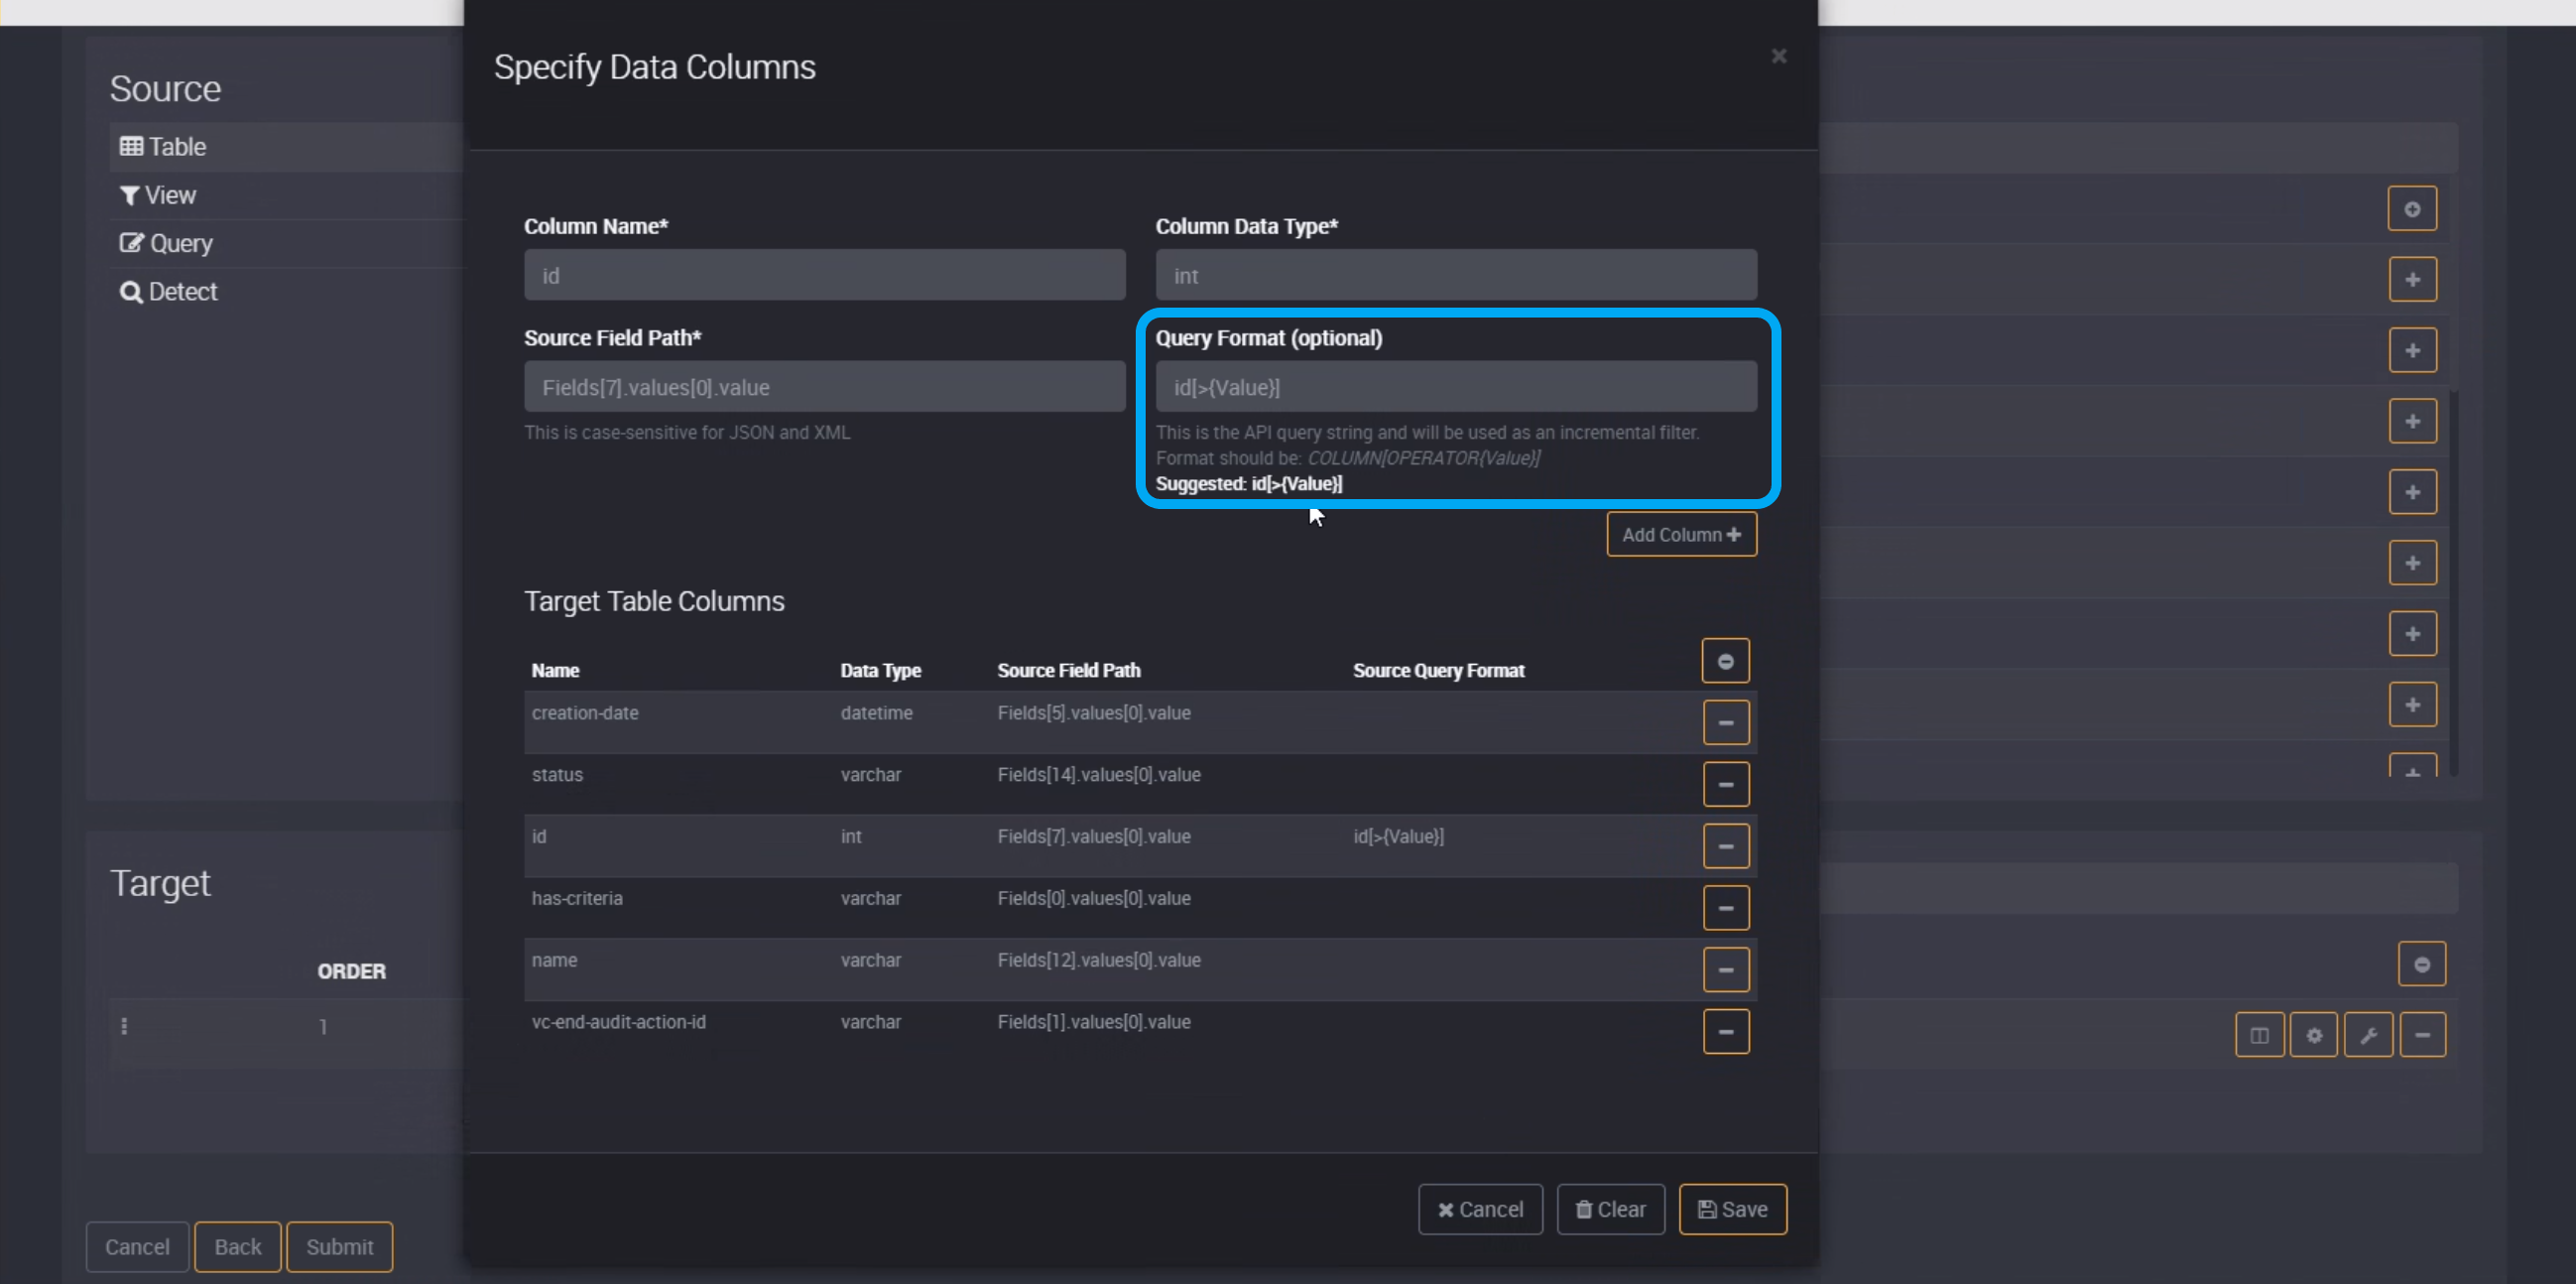
Then select the Query Format. This step is optional, but if you would like to load data incrementally you will need to provide this.
This is the API query string and will be used as an incremental filter.
It must contain a {Value} string in the query format.
The query format will differ depending on the source connection.
In the image below, we have used a Microfocus ALM connector, and it is in the format, COLUMN[OPERATOR(Value)].
Add the column, and repeat this process if you would like to add other columns.
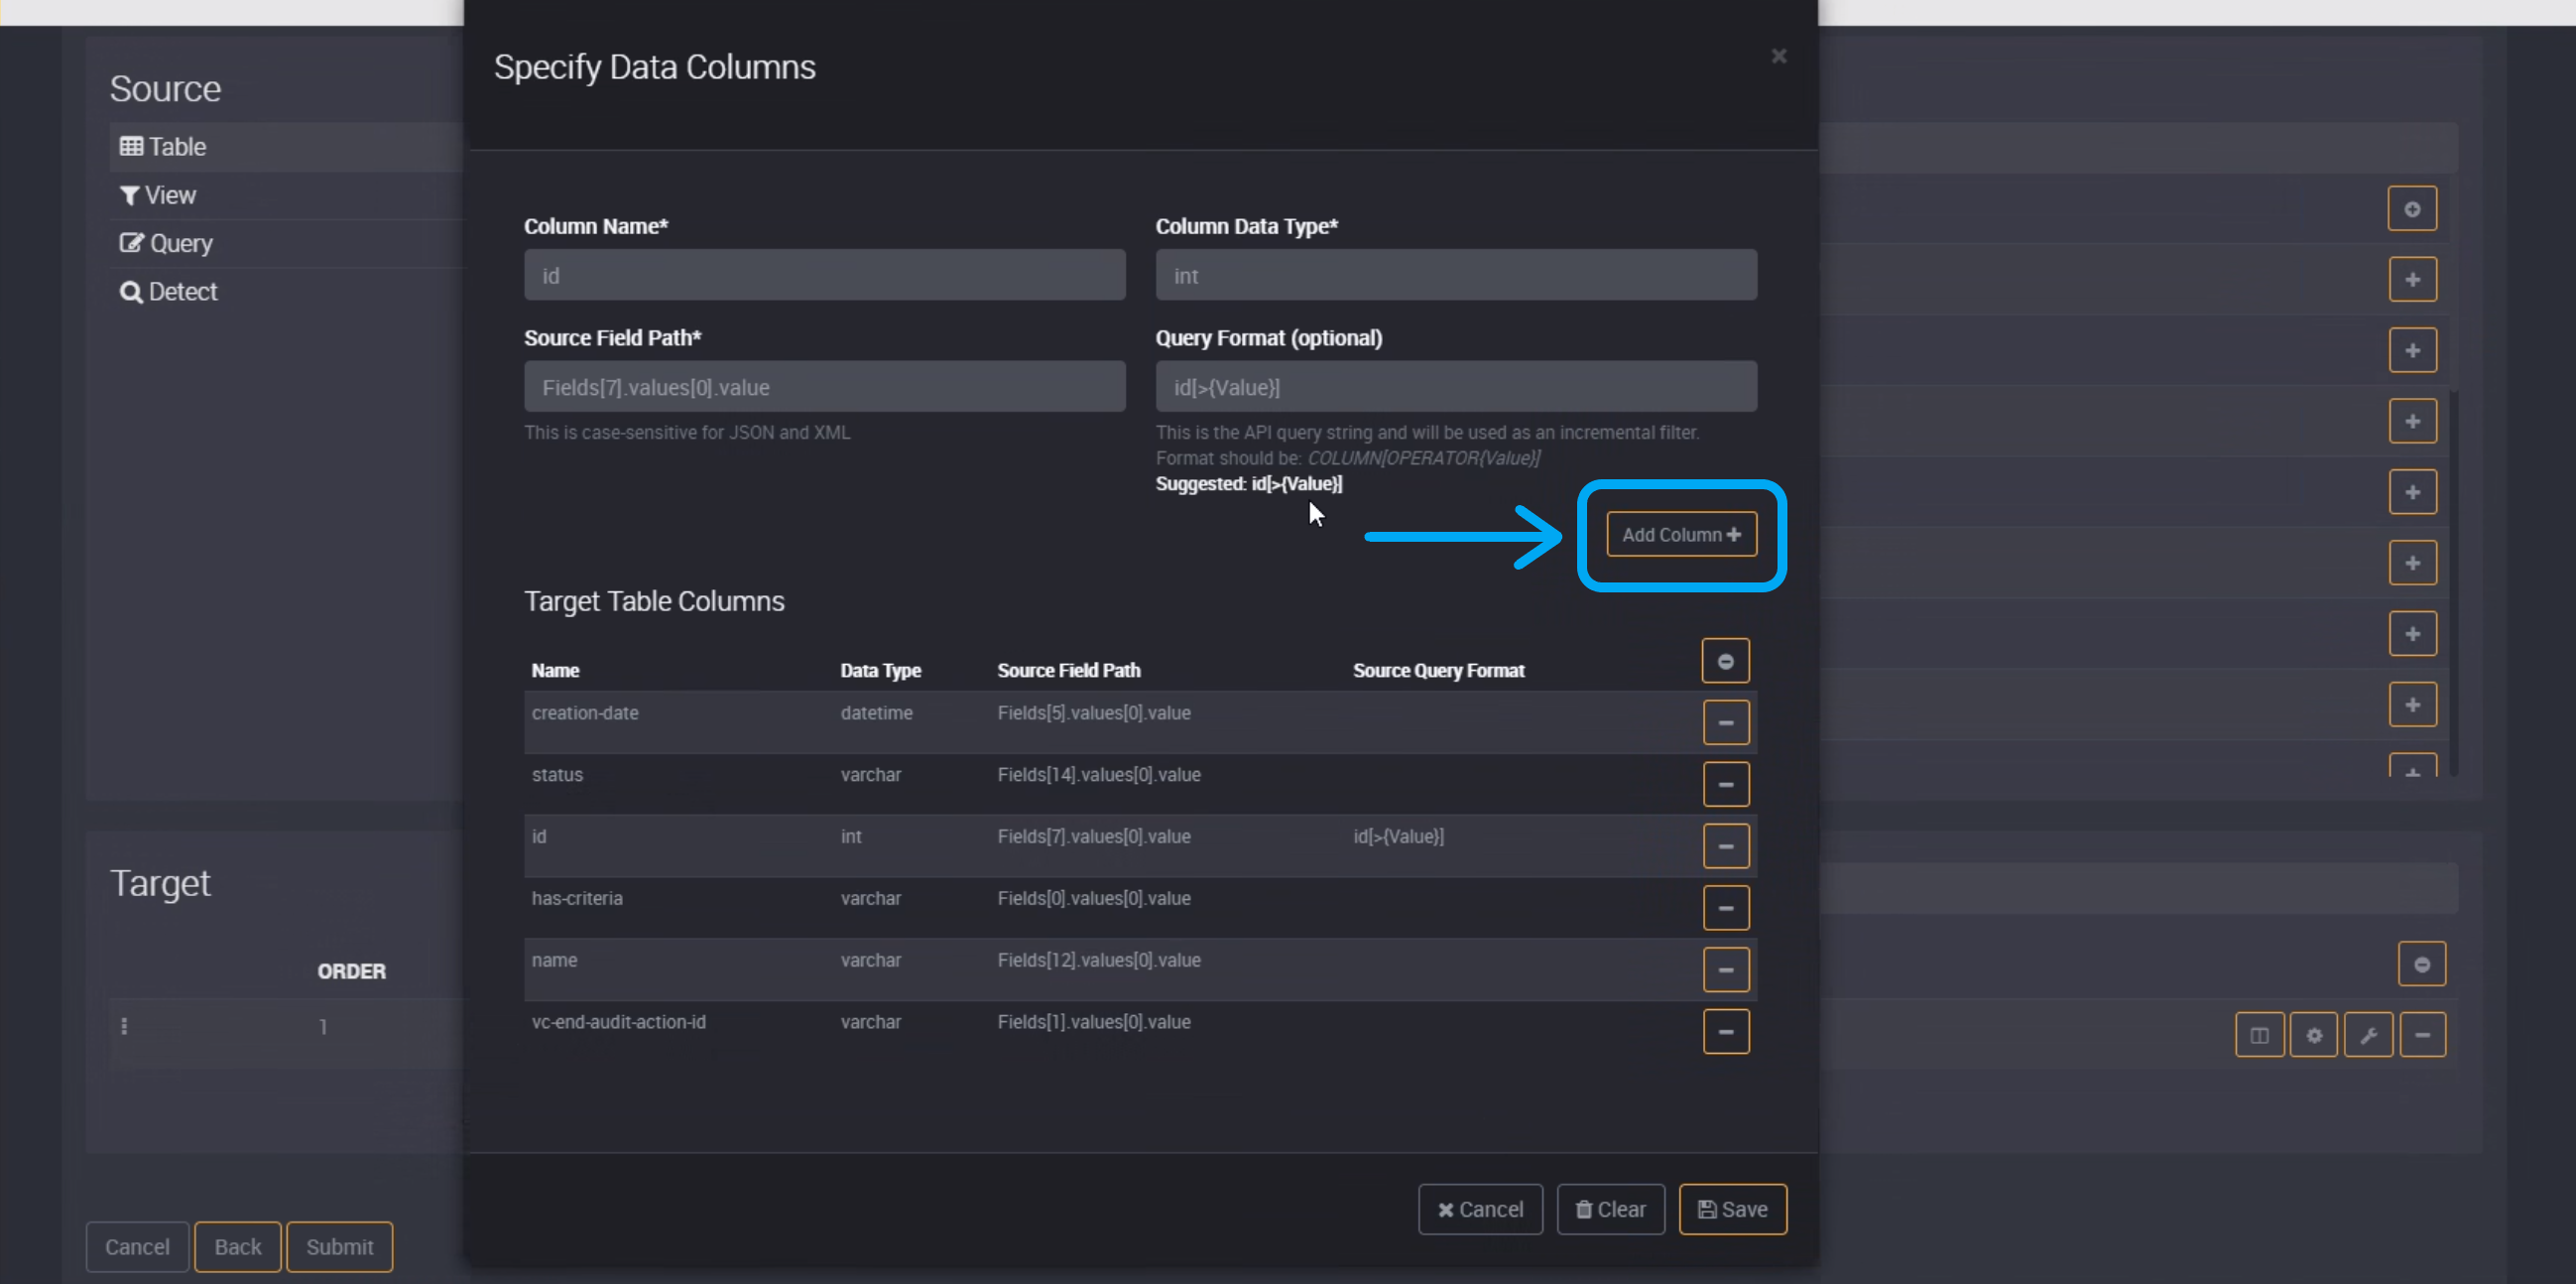
Save these target table columns, and you can then either add more tables or submit this task.
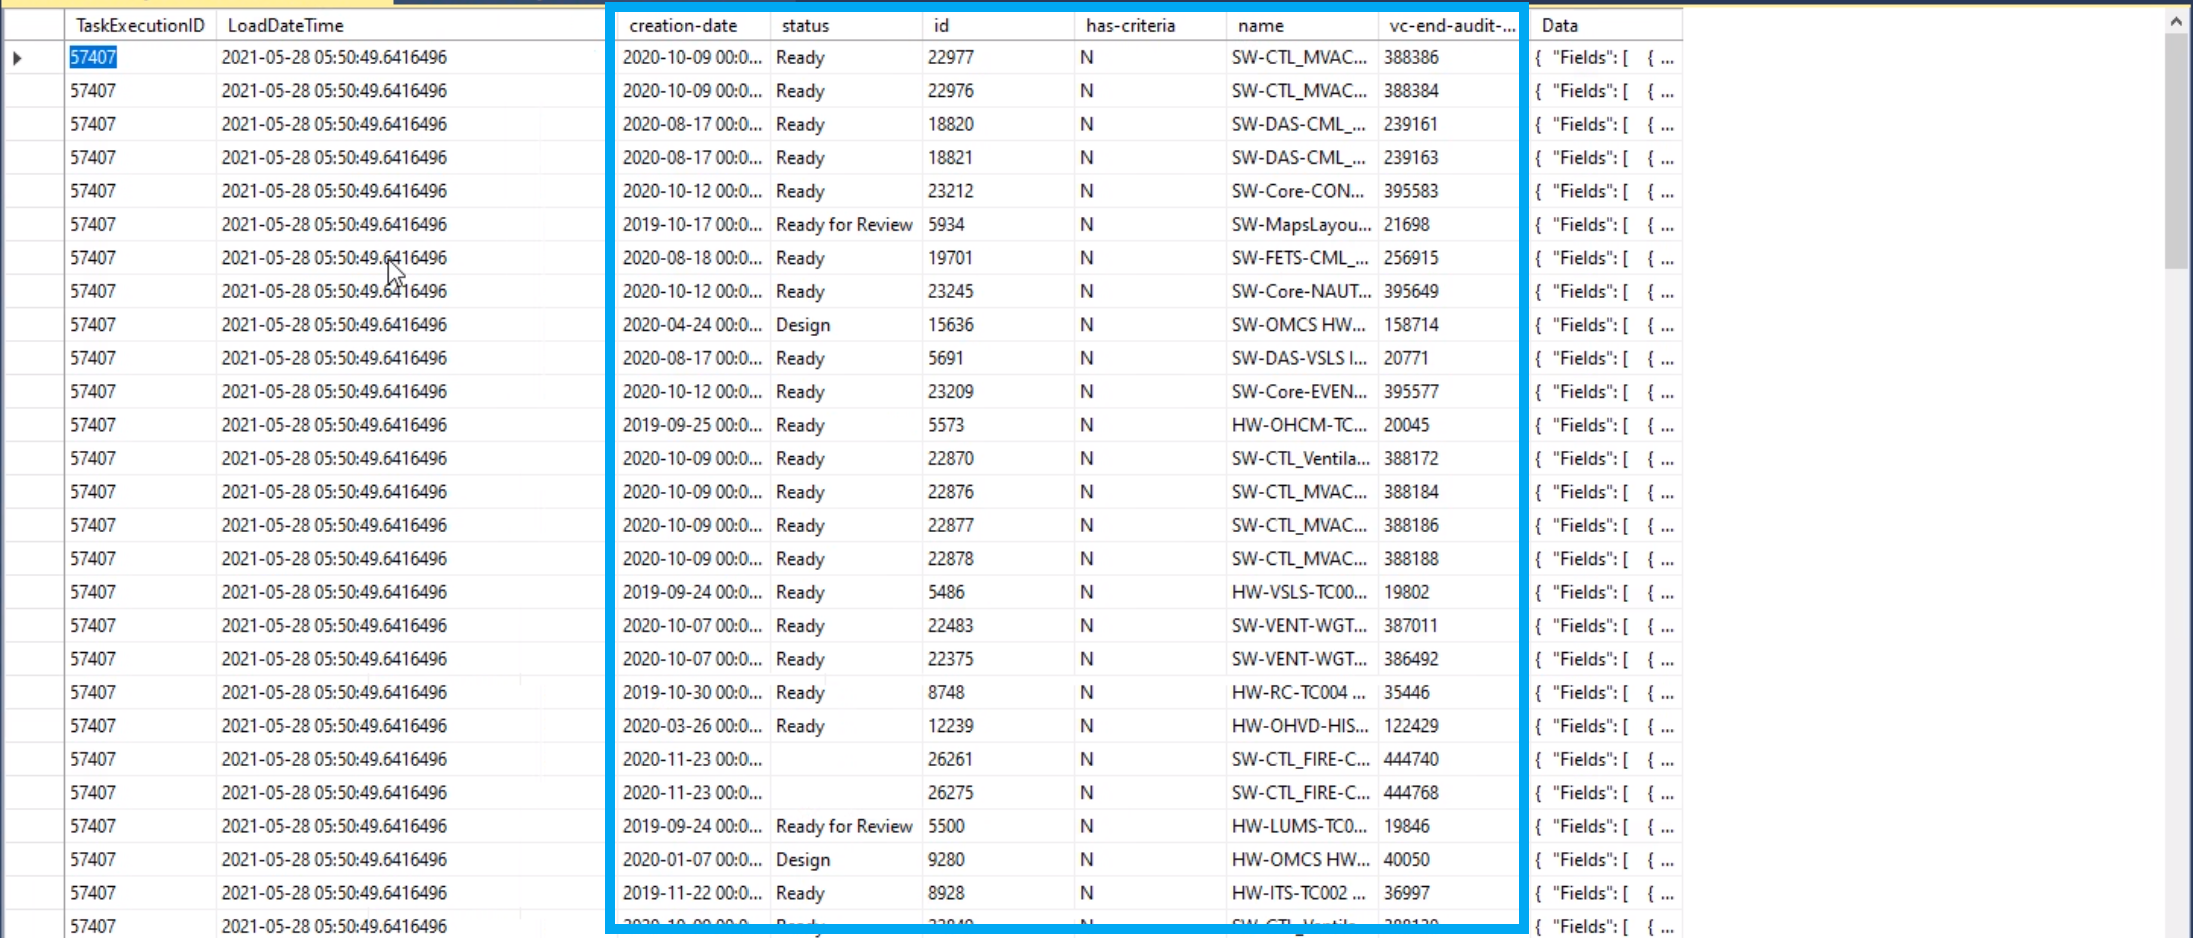
Next, run this task and you will have a new table with the new columns we specified above.
You can see that ‘detection-version’ now has its own column.
Once we added more columns and ran the the rule, the target table also included those new columns.
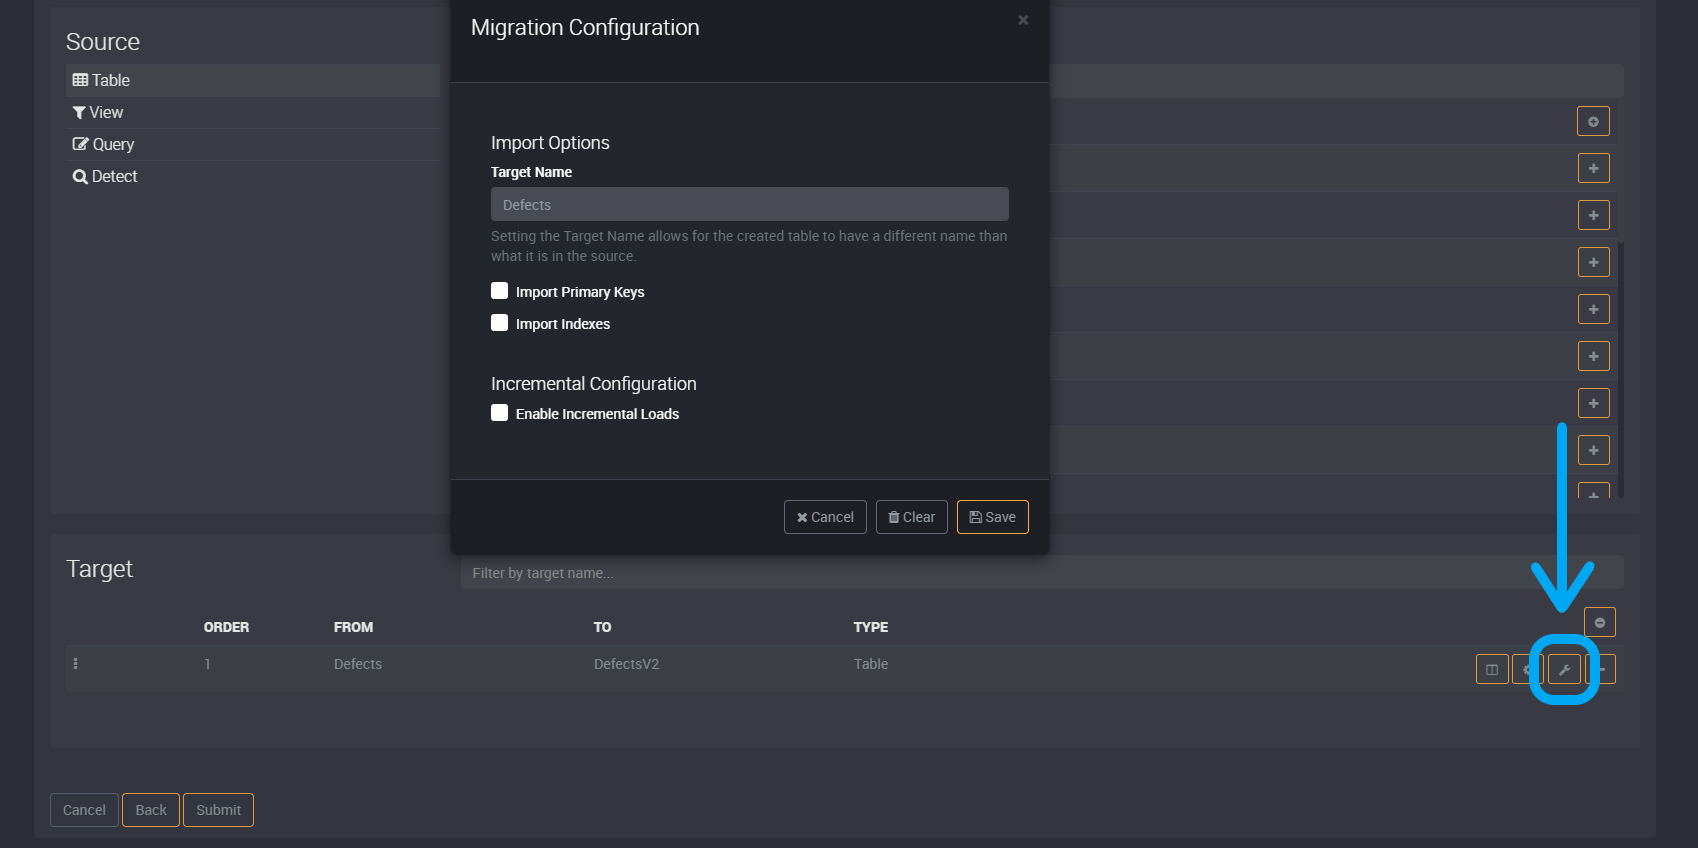
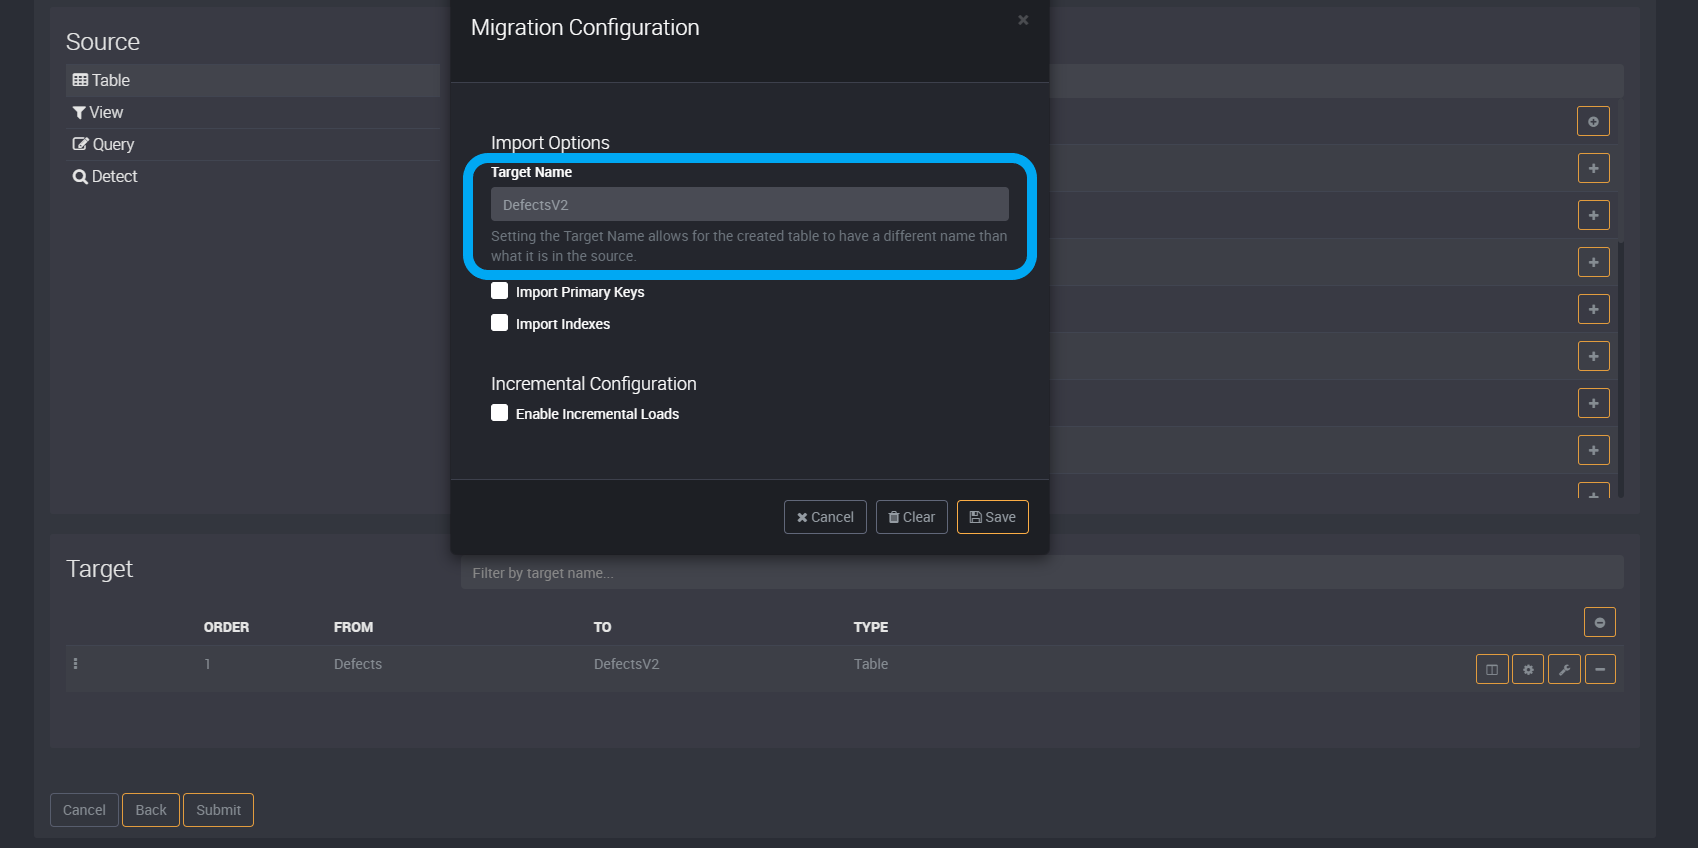
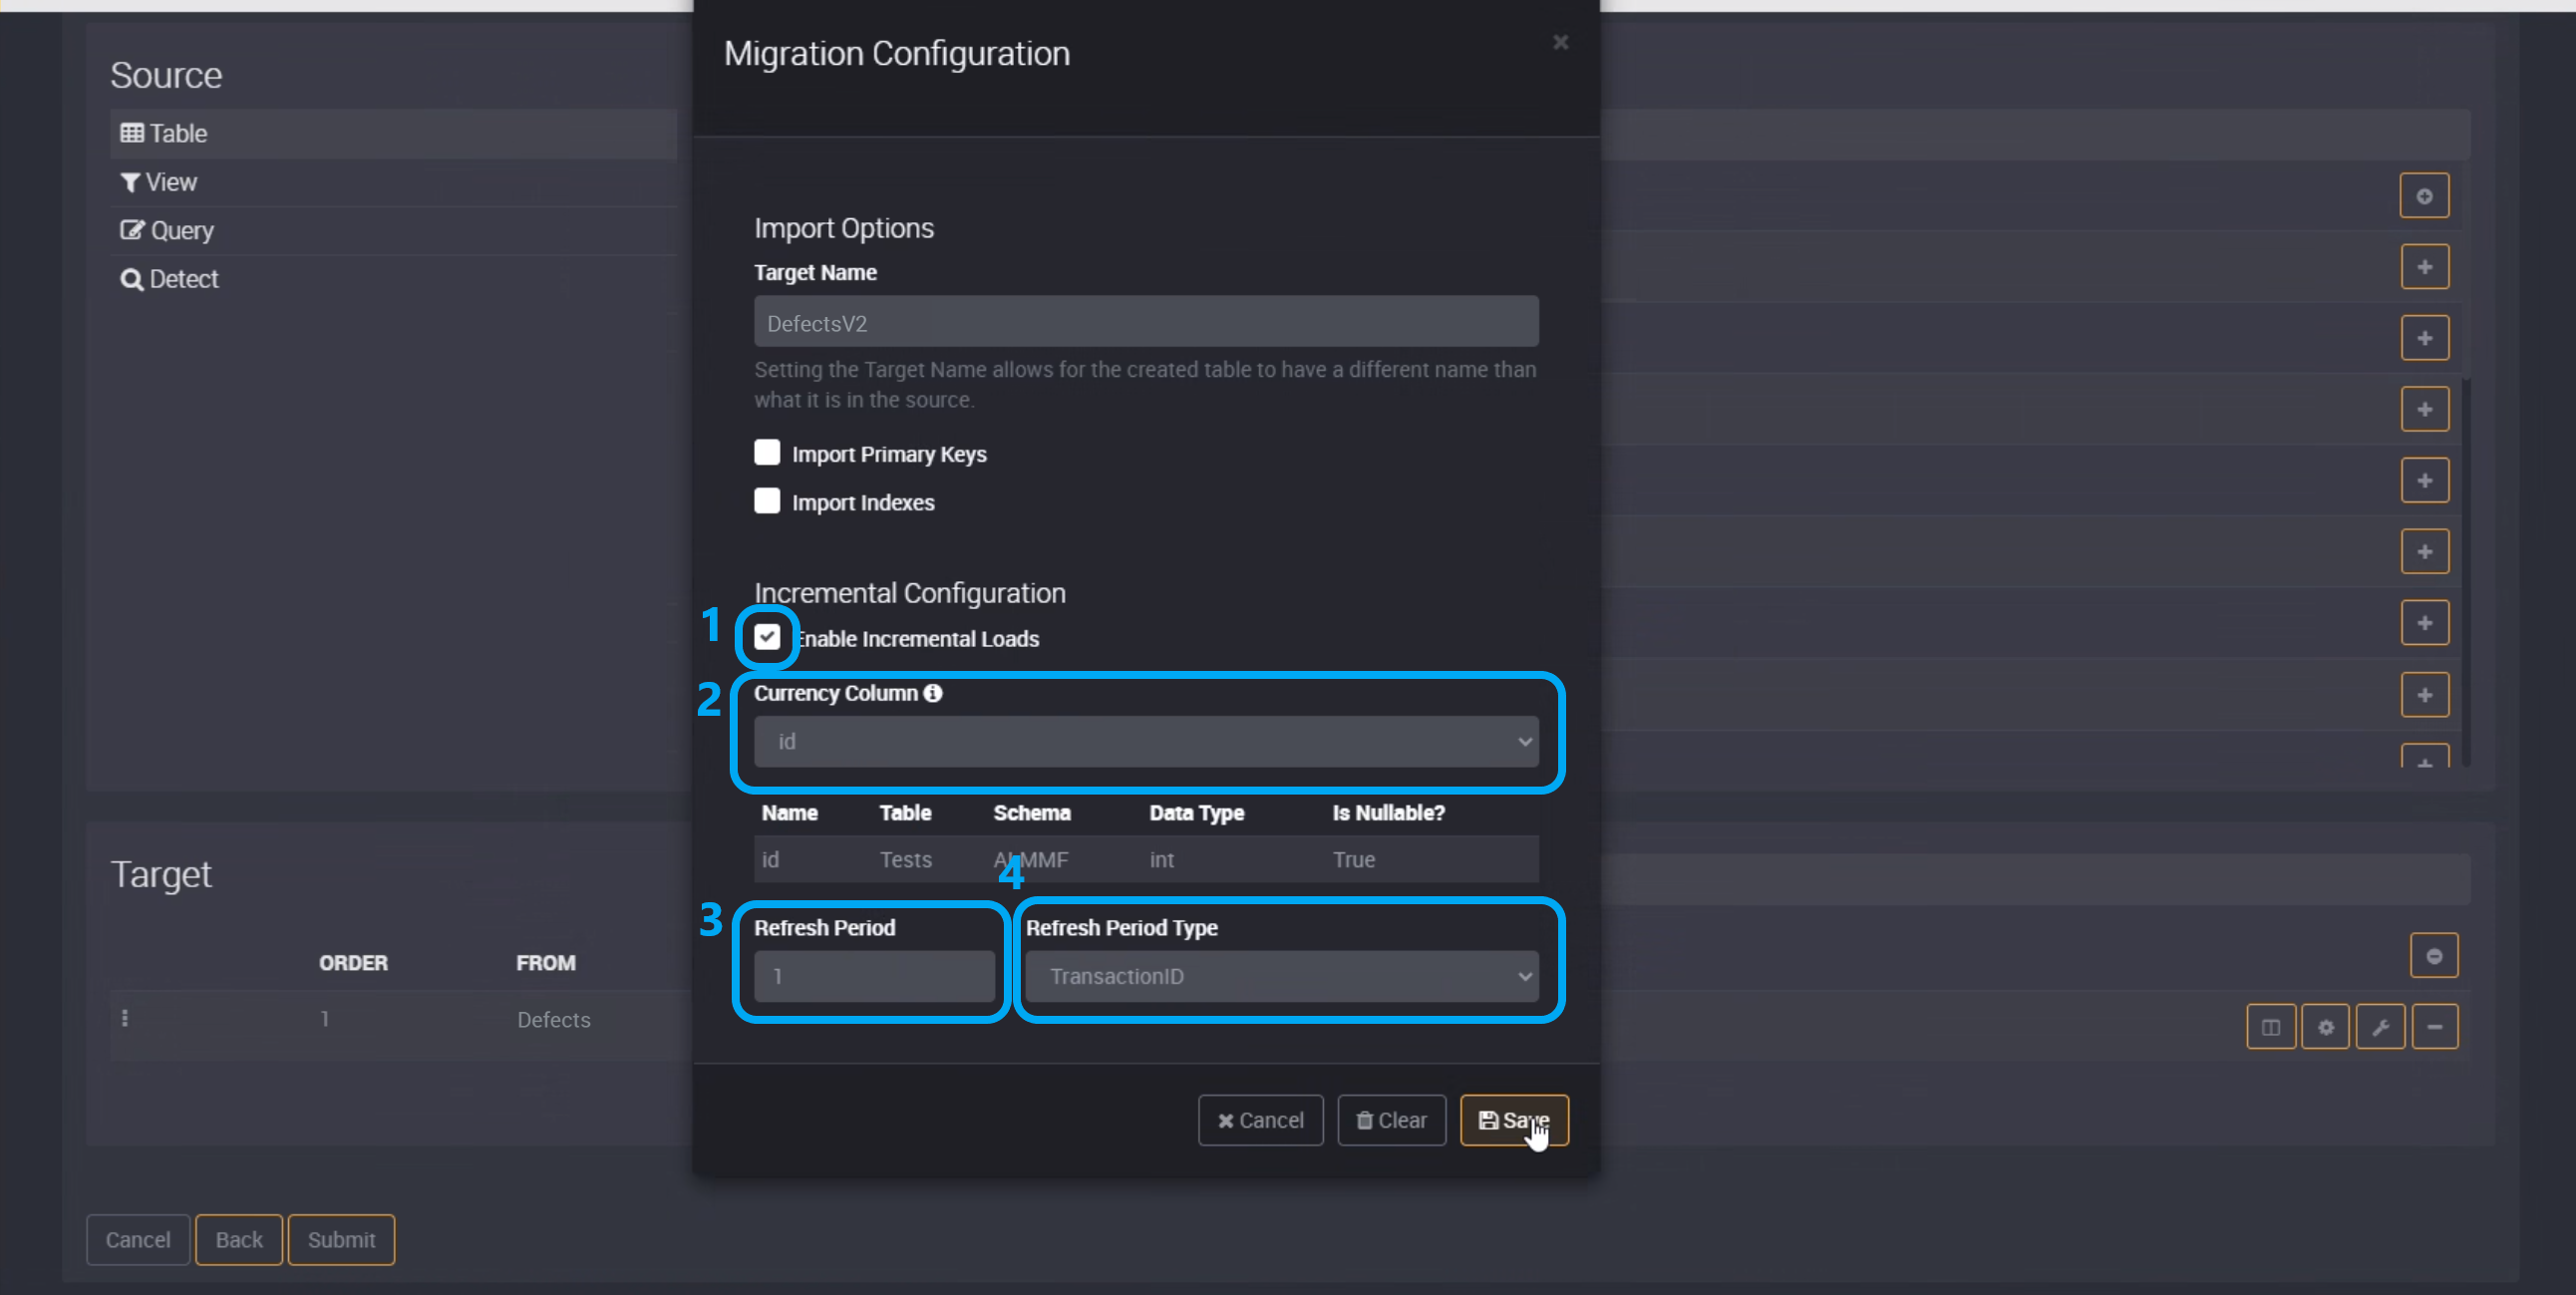
You can then change the table name and set your incremental configuration using the Migration Configuration button on the right of a row.
To change the name of your target table, enter your chosen name into the Target Name field.
When you have defined data columns and would like to run an incremental data migration, you will need to use the query format that was provided above when defining data columns.
You can then select this column as your Currency Column. For this example, we will select ‘id’ as we set a query format for this column.
We also set the Refresh Period to ‘1’, and the Refresh Period Type to ‘TransactionID’ as it is an ID column.
If we were to use the column ‘creation-date’ as our currency column, we could set the incremental refresh period to 1 day.
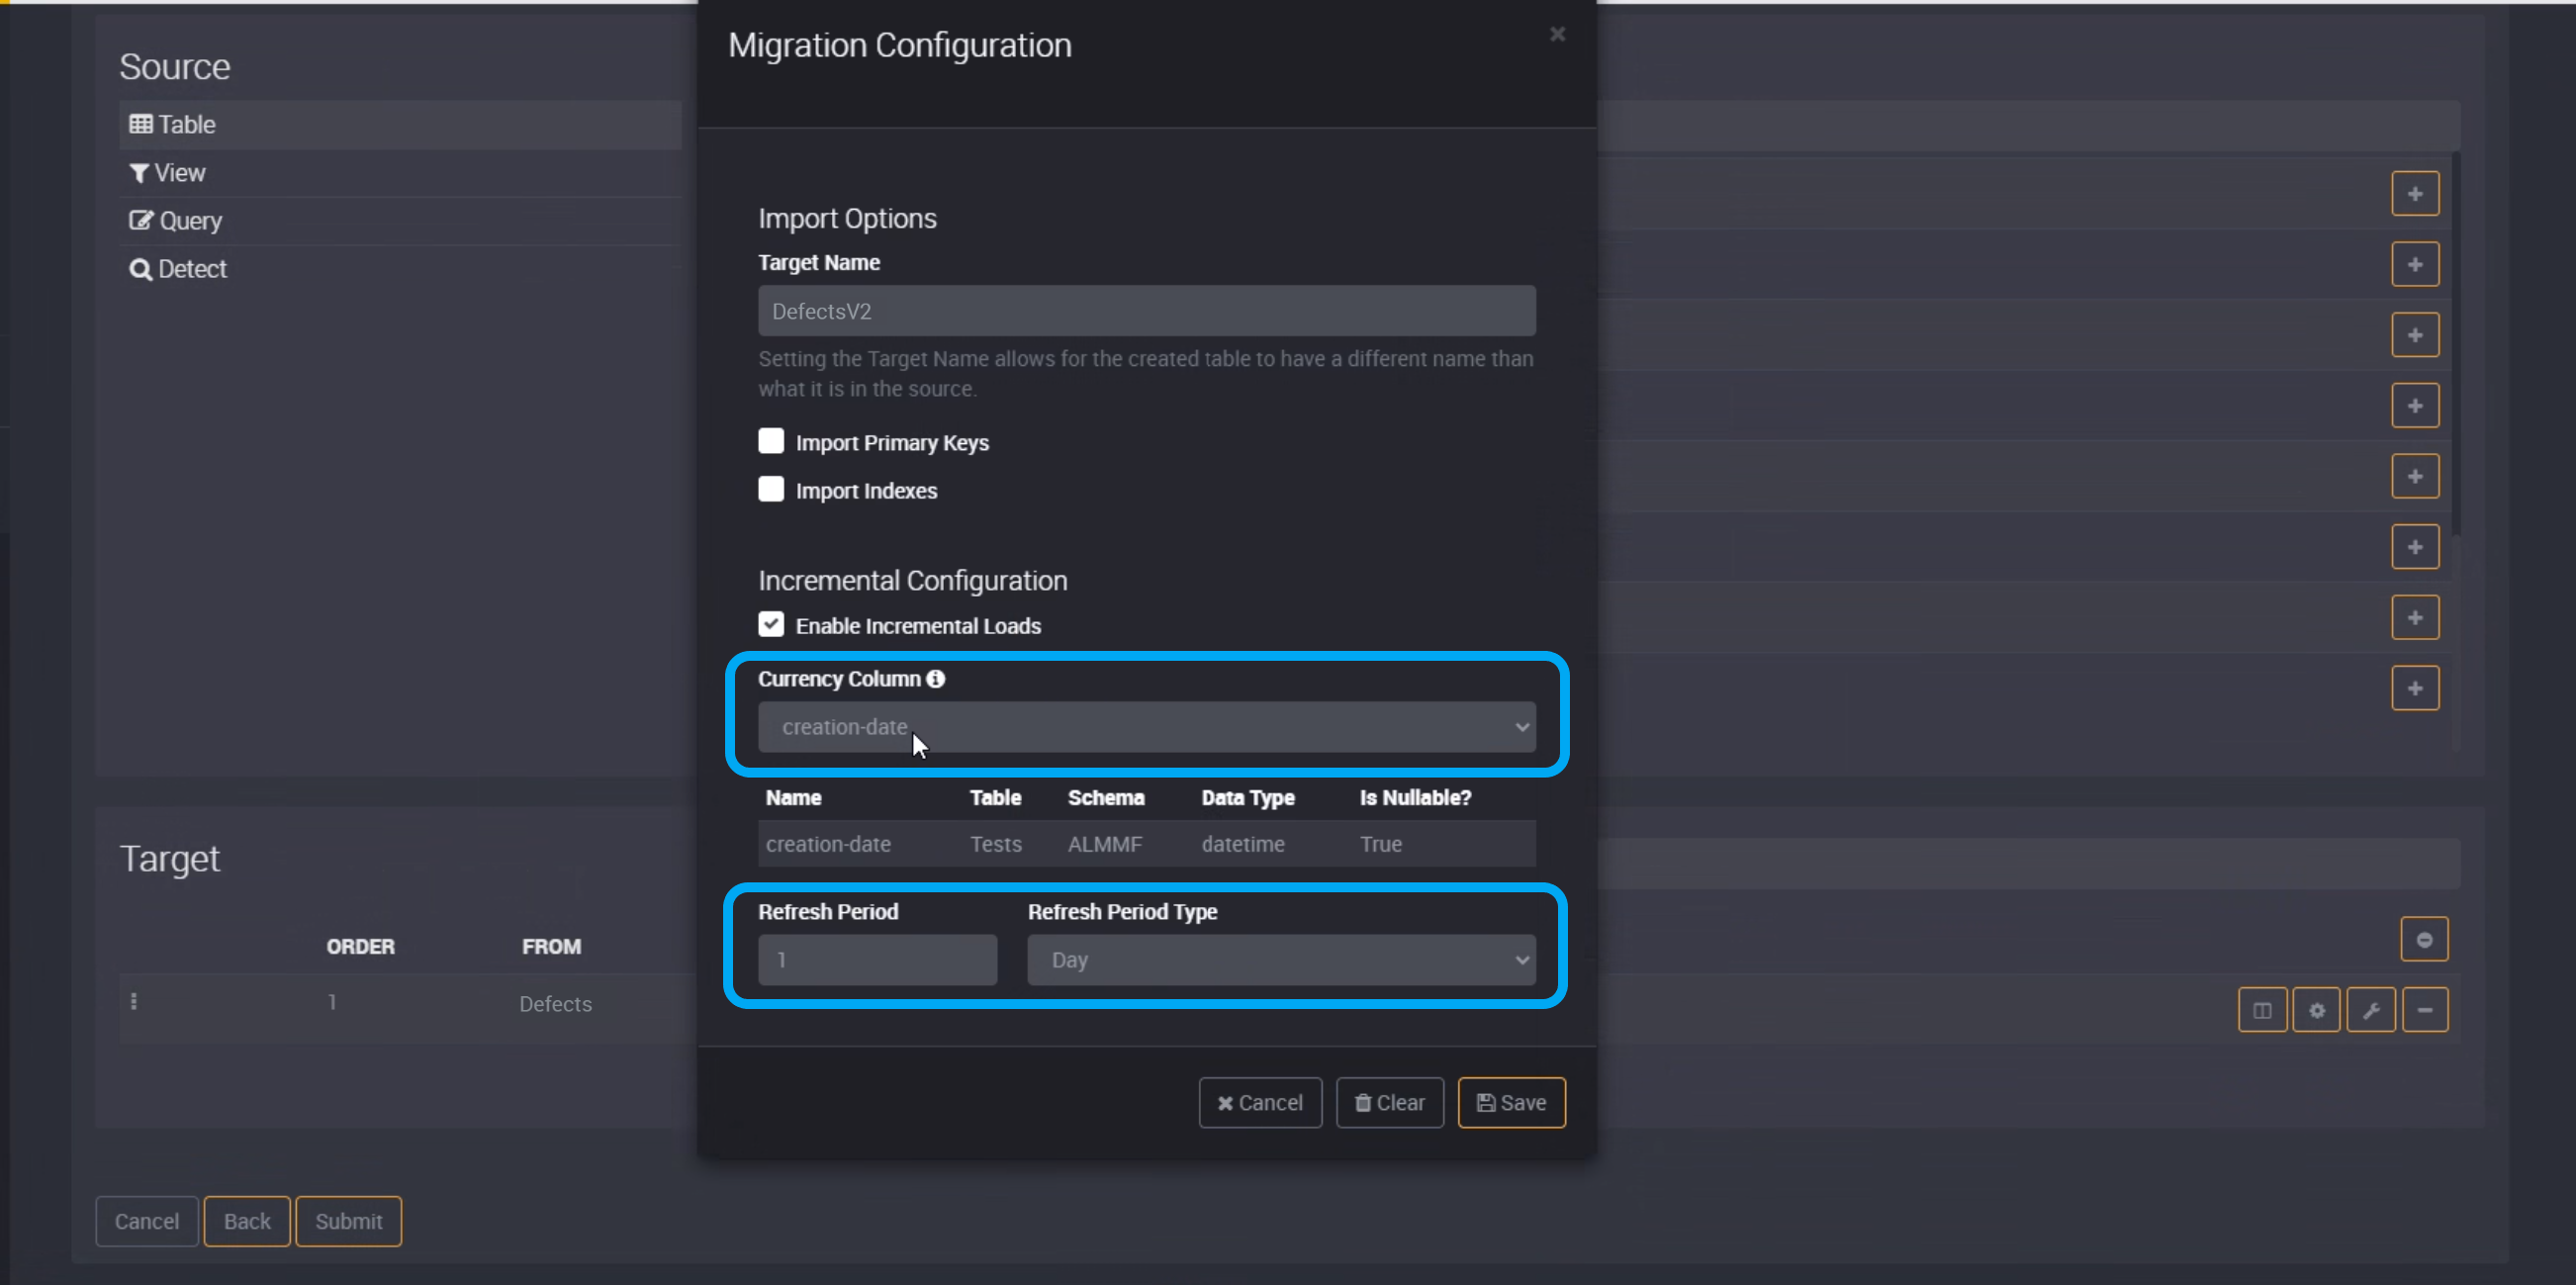
Save and submit this task, and when it is next run it will load only newly added rows since its previous execution.
Target Filters
Tables can be filtered using a Target Filter. We have provided a simple interface where you can select available columns in a table and provide a value to use as your filter.
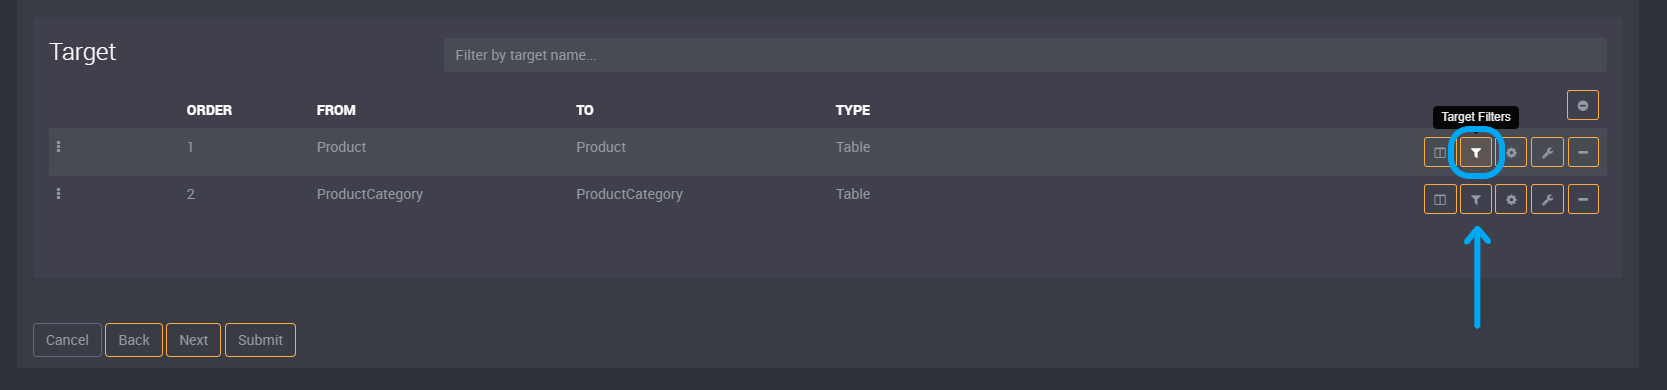
How to filter a table
Once you have created a Data Migration task and selected your tables, there will be an option beside the table called Target Filter.
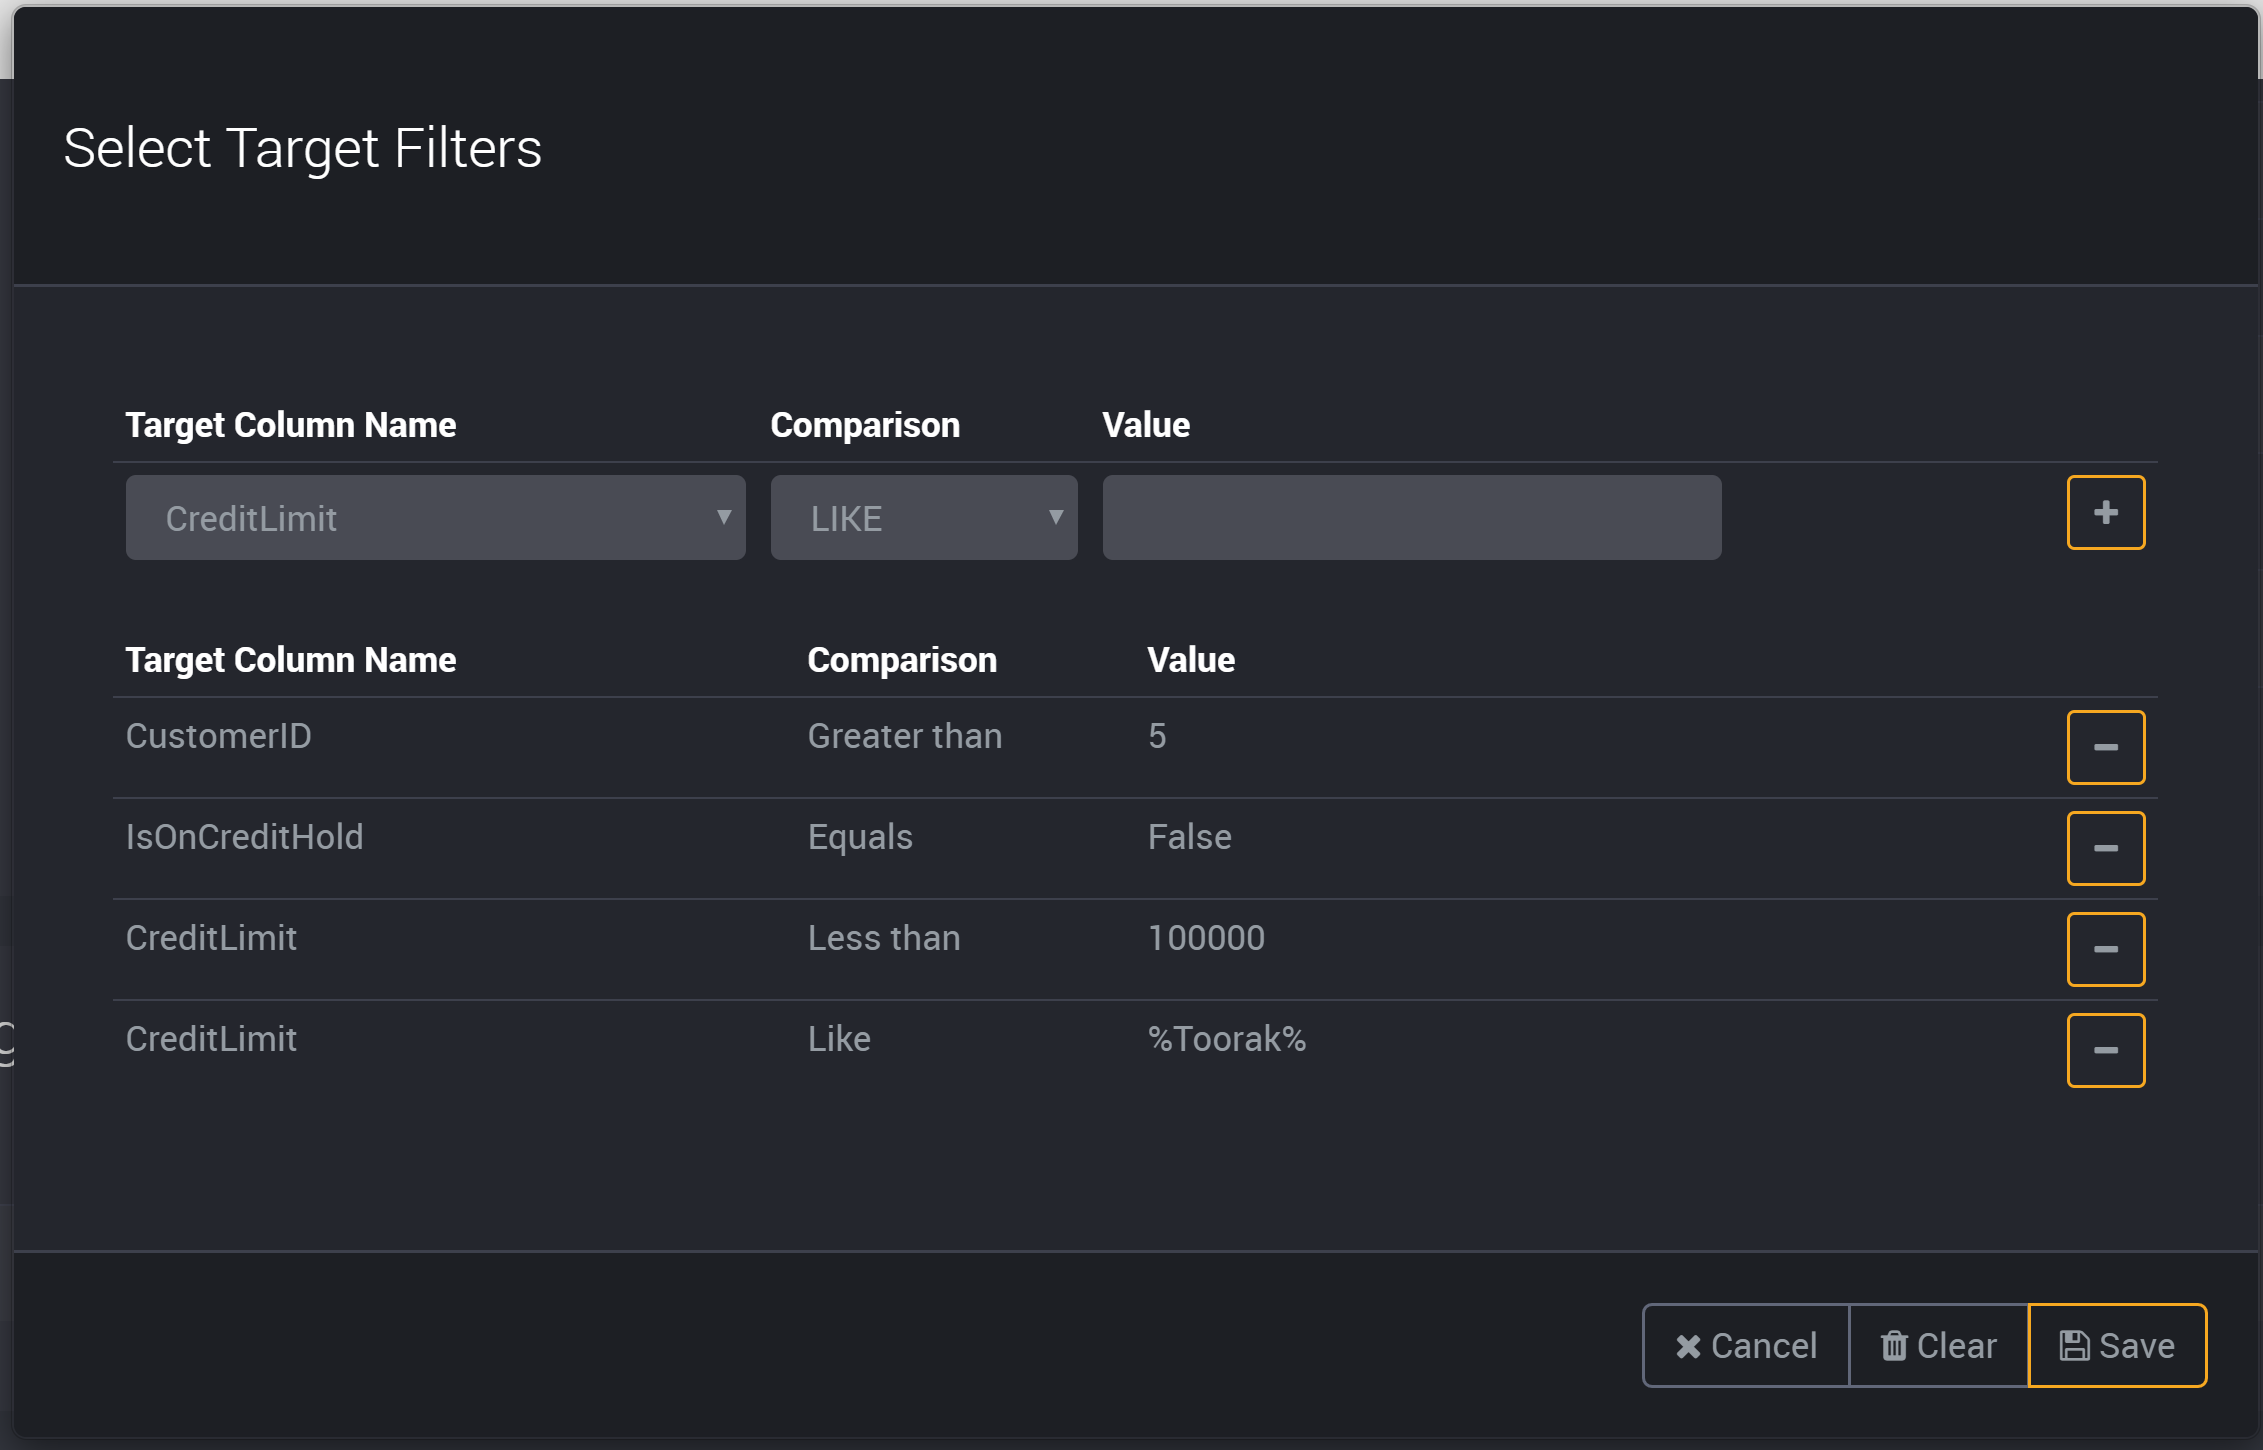
In this modal, you can select your column under Column Name from the drop-down list.
Then select your Comparison type from the drop-down list.
| Comparison Type | Description | Usage Scenario |
|---|---|---|
Equals (=) |
Filters out results to only include records with the same column value. | Find all employees with the name ‘Steve’. |
Greater than (>) |
Filters results to only include records that are greater than the provided column value. | Find all customers over the age of 50. |
Less than (<) |
Filters results to only include records that are less than the provided column value. | Find all products that have sold less than 10,000 items. |
Not equal to (<>) |
Filters user’s results so that it does not include records of the provided value. | Find all sales made that day that were not sold with a discount. |
Similar results (LIKE) |
Filters results to provide records similar to the provided value. | Find products with a name that contains ‘bar’. |
For the LIKE operator, Loome Integrate Online Supports standard SQL wildcard patterns as explained here.
Then provide a Value to filter the columns.
Add the filter using the Add Filter button beside it.
It will appear below (if there is more than one filter it will appear in list form), and you can delete filters using the button beside it.
Save the filters and once you submit the task, you will import only the rows that are relevant to your filters.
You can view how many rows were migrated in the Execution log.

You can edit filters by clicking on Edit Task and going back to the Target Filter menu.
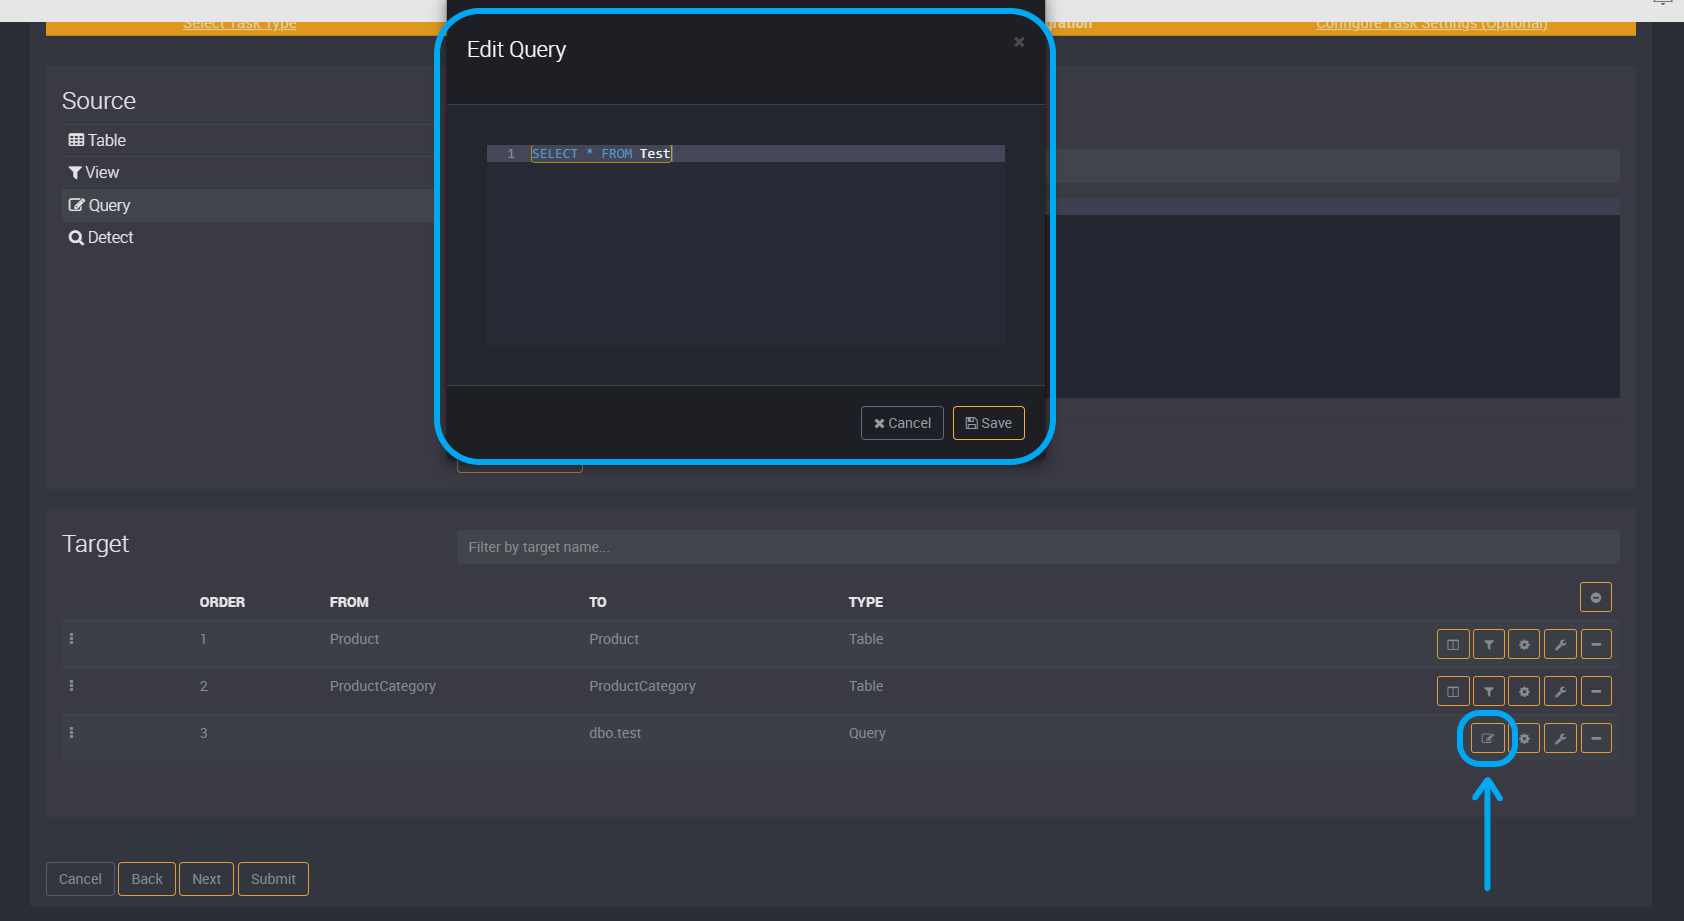
View and Edit Query
When editing a Task you can view and edit the Source Query by clicking the View Query in the Target section next to your selected Source Query, and in this pop up window you can then edit the query.
Submit the Task
Click Submit to save the task. You will be redirected to the job page where you can then run or schedule the job. After the job has been successfully run, you can find your data in the target connection and schema you selected.
You can also optionally click Next to configure task settings. These settings will be specific to this task and will not apply to any other tasks.
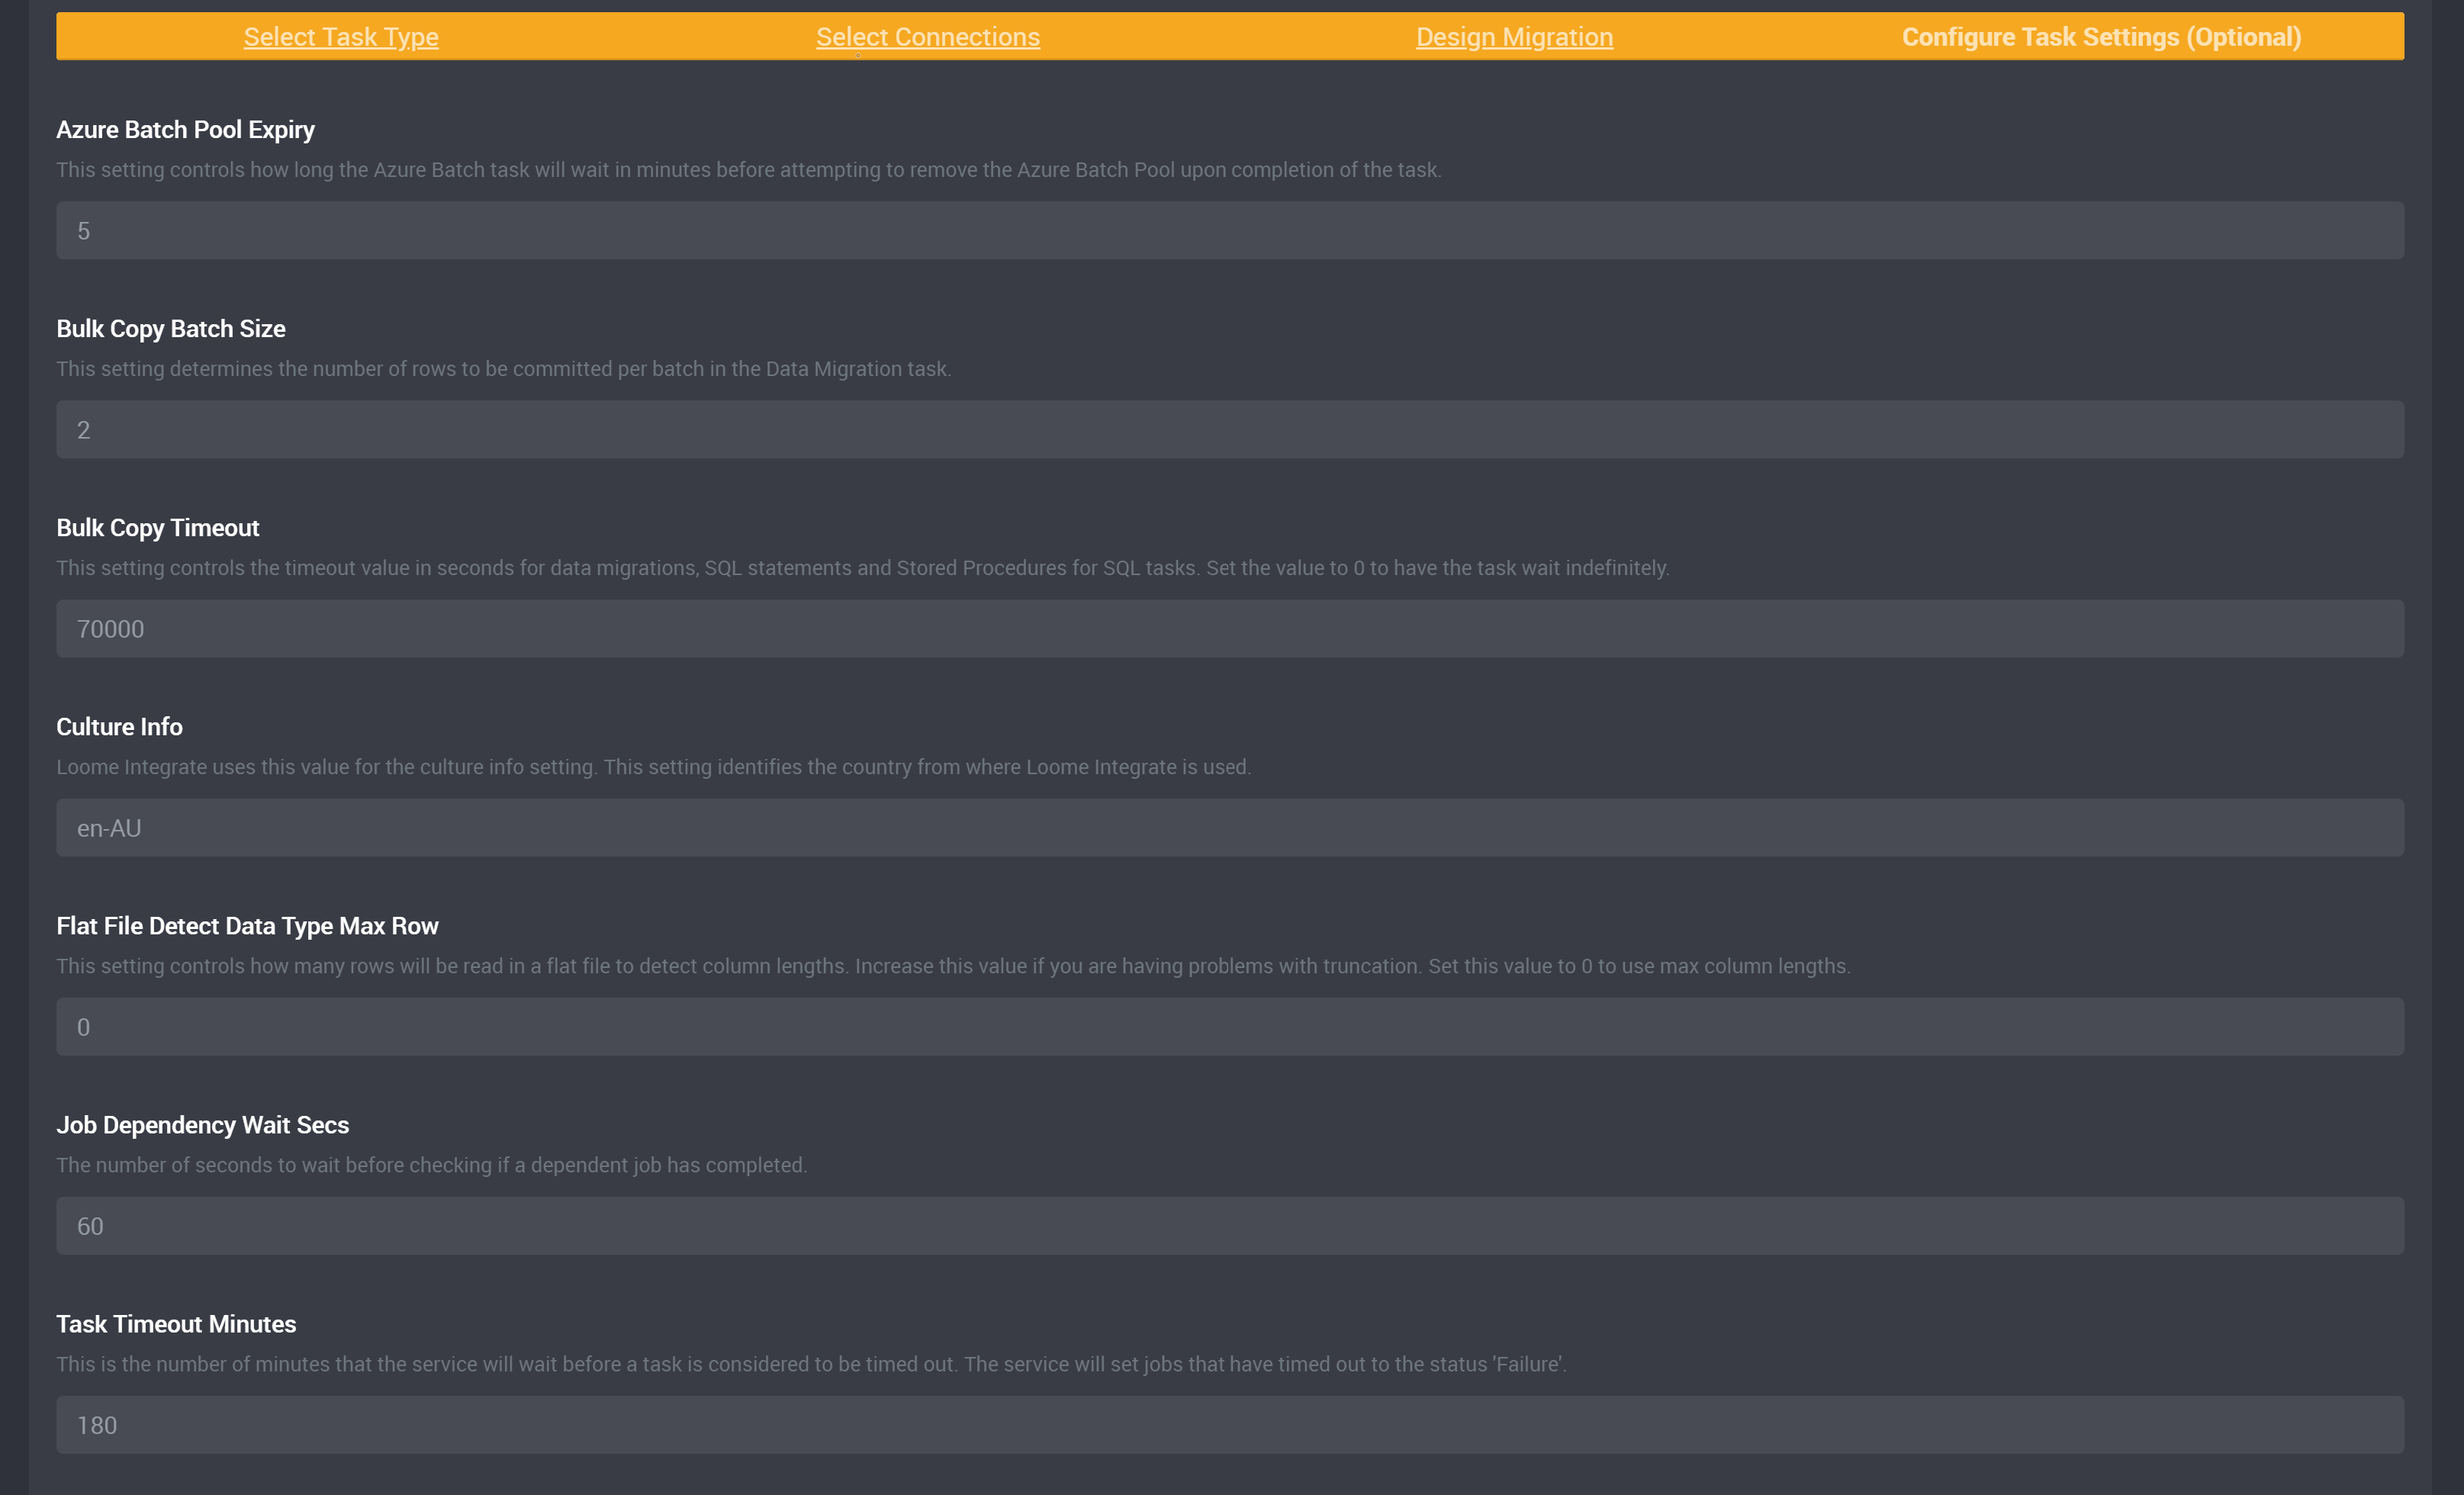
After changing any task settings, click Submit to save.