Additional Agent Configuration
- How to Configure Agent Log Levels
- How to Specify an External File Path to Store Agent Files
- Anti Virus Configuration
- Enterprise Proxy Configuration
- Kerberos Keytab Detection
- Using PowerShell Core v PS Core Workspace in the Agent
How to Configure Agent Log Levels
You can change the level of logs that the Loome agent will generate in the appsettings.json file.
You can also change the log level in Loome in the job settings.
Your settings in the appsettings.json file will remain if you restart the agent, but you will need to reapply any manual settings if you reinstall the agent.
In Windows:
Open the appsettings.json file.
Choose a log level of ‘Standard’ or ‘Debug’ and provide "LogLevel": "Debug" or "LogLevel": "Standard".
Restart the agent service.

In Linux:
Open the appsettings.json file.
Choose a log level of ‘Standard’ or ‘Debug’ and provide "LogLevel": "Debug" or "LogLevel": "Standard".
Restart the agent service.

In Containers:
You will need to rerun the create command to change the agent settings.
Open the environment settings.
Choose a log level of ‘Standard’ or ‘Debug’ and provide "LOOME_AGENT_SETTING_LOGLEVEL": "Debug" or "LOOME_AGENT_SETTING_LOGLEVEL": "Standard".
You will need to rerun the create command to change the settings.

How to Specify an External File Path for Persistent Storage of Agent Files
When you install an agent on Windows, Linux, and Docker containers, the agent puts its log files in a subfolder called ‘logs’. You can instead specify an external file location to persistently store agent files such as log files, offline log files, and the running tasks collection.
When the agent is restarted, these files will be kept in a different location and will not be deleted when the agent is reinstalled and restarted; unlike files saved in the agent’s default subfolder.
If you restart the agent, your settings in the appsettings.json file will remain, but you will need to reapply any manual settings if you reinstall the agent.
Windows
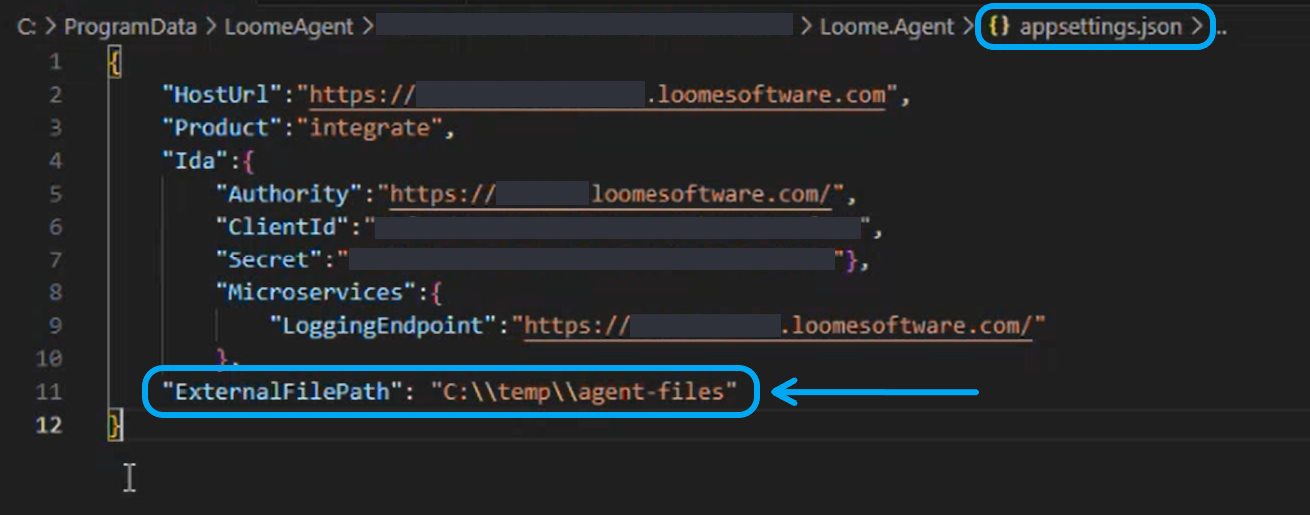
For Windows, go to your agent install folder and open appsettings.json. This will show the connection details used to connect to the service.
In the appsettings.json file, add "ExternalFilePath": "C:\\YOURFOLDERNAME", for example, "ExternalFilePath": "C:\\temp\\agent-files".
Linux
In Linux, in the agent install folder, open appsettings.json.

Enter "ExternalFilePath": "/YOURFOLDERNAME", for e.g., "ExternalFilePath": "/tmp/agent-files".

Restart the agent and files will then save in this folder.
Containers
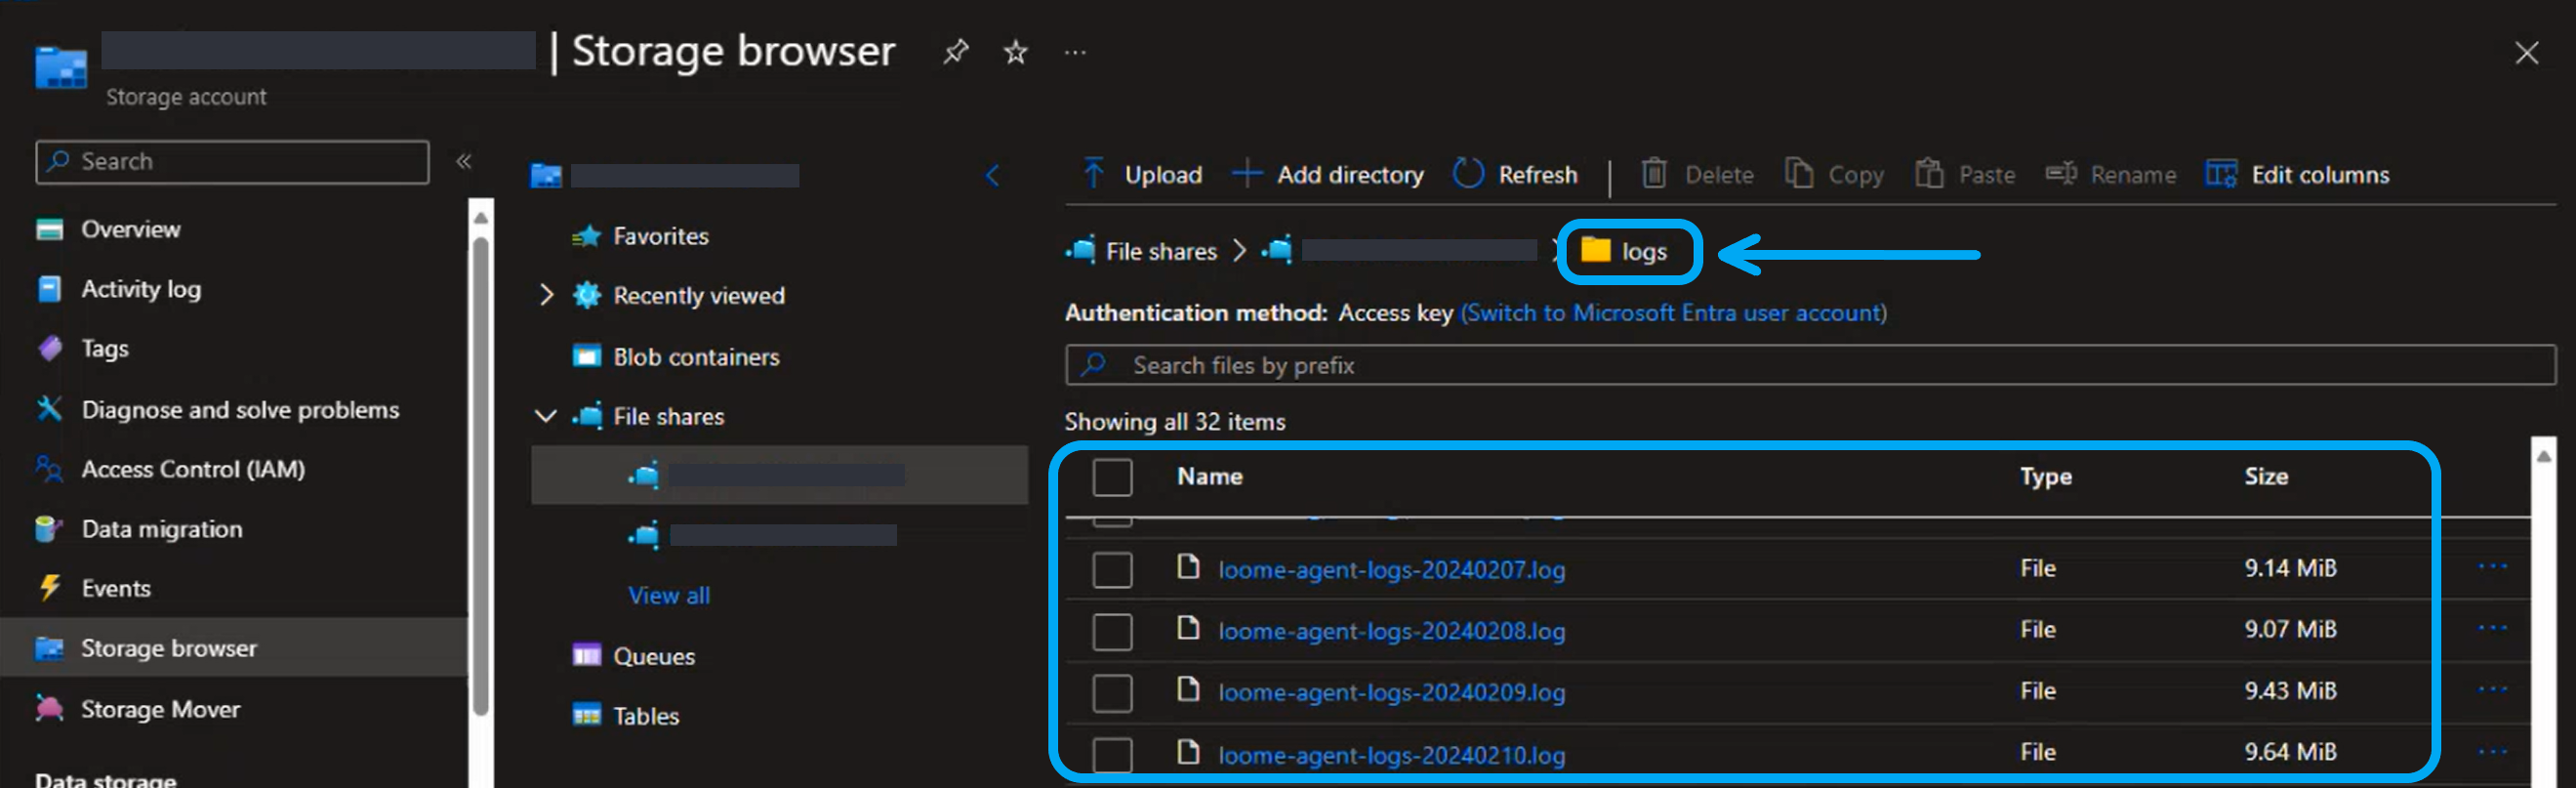
You can store log files in an Azure storage account. This will provide easy access to log files when you need to view or download logs.
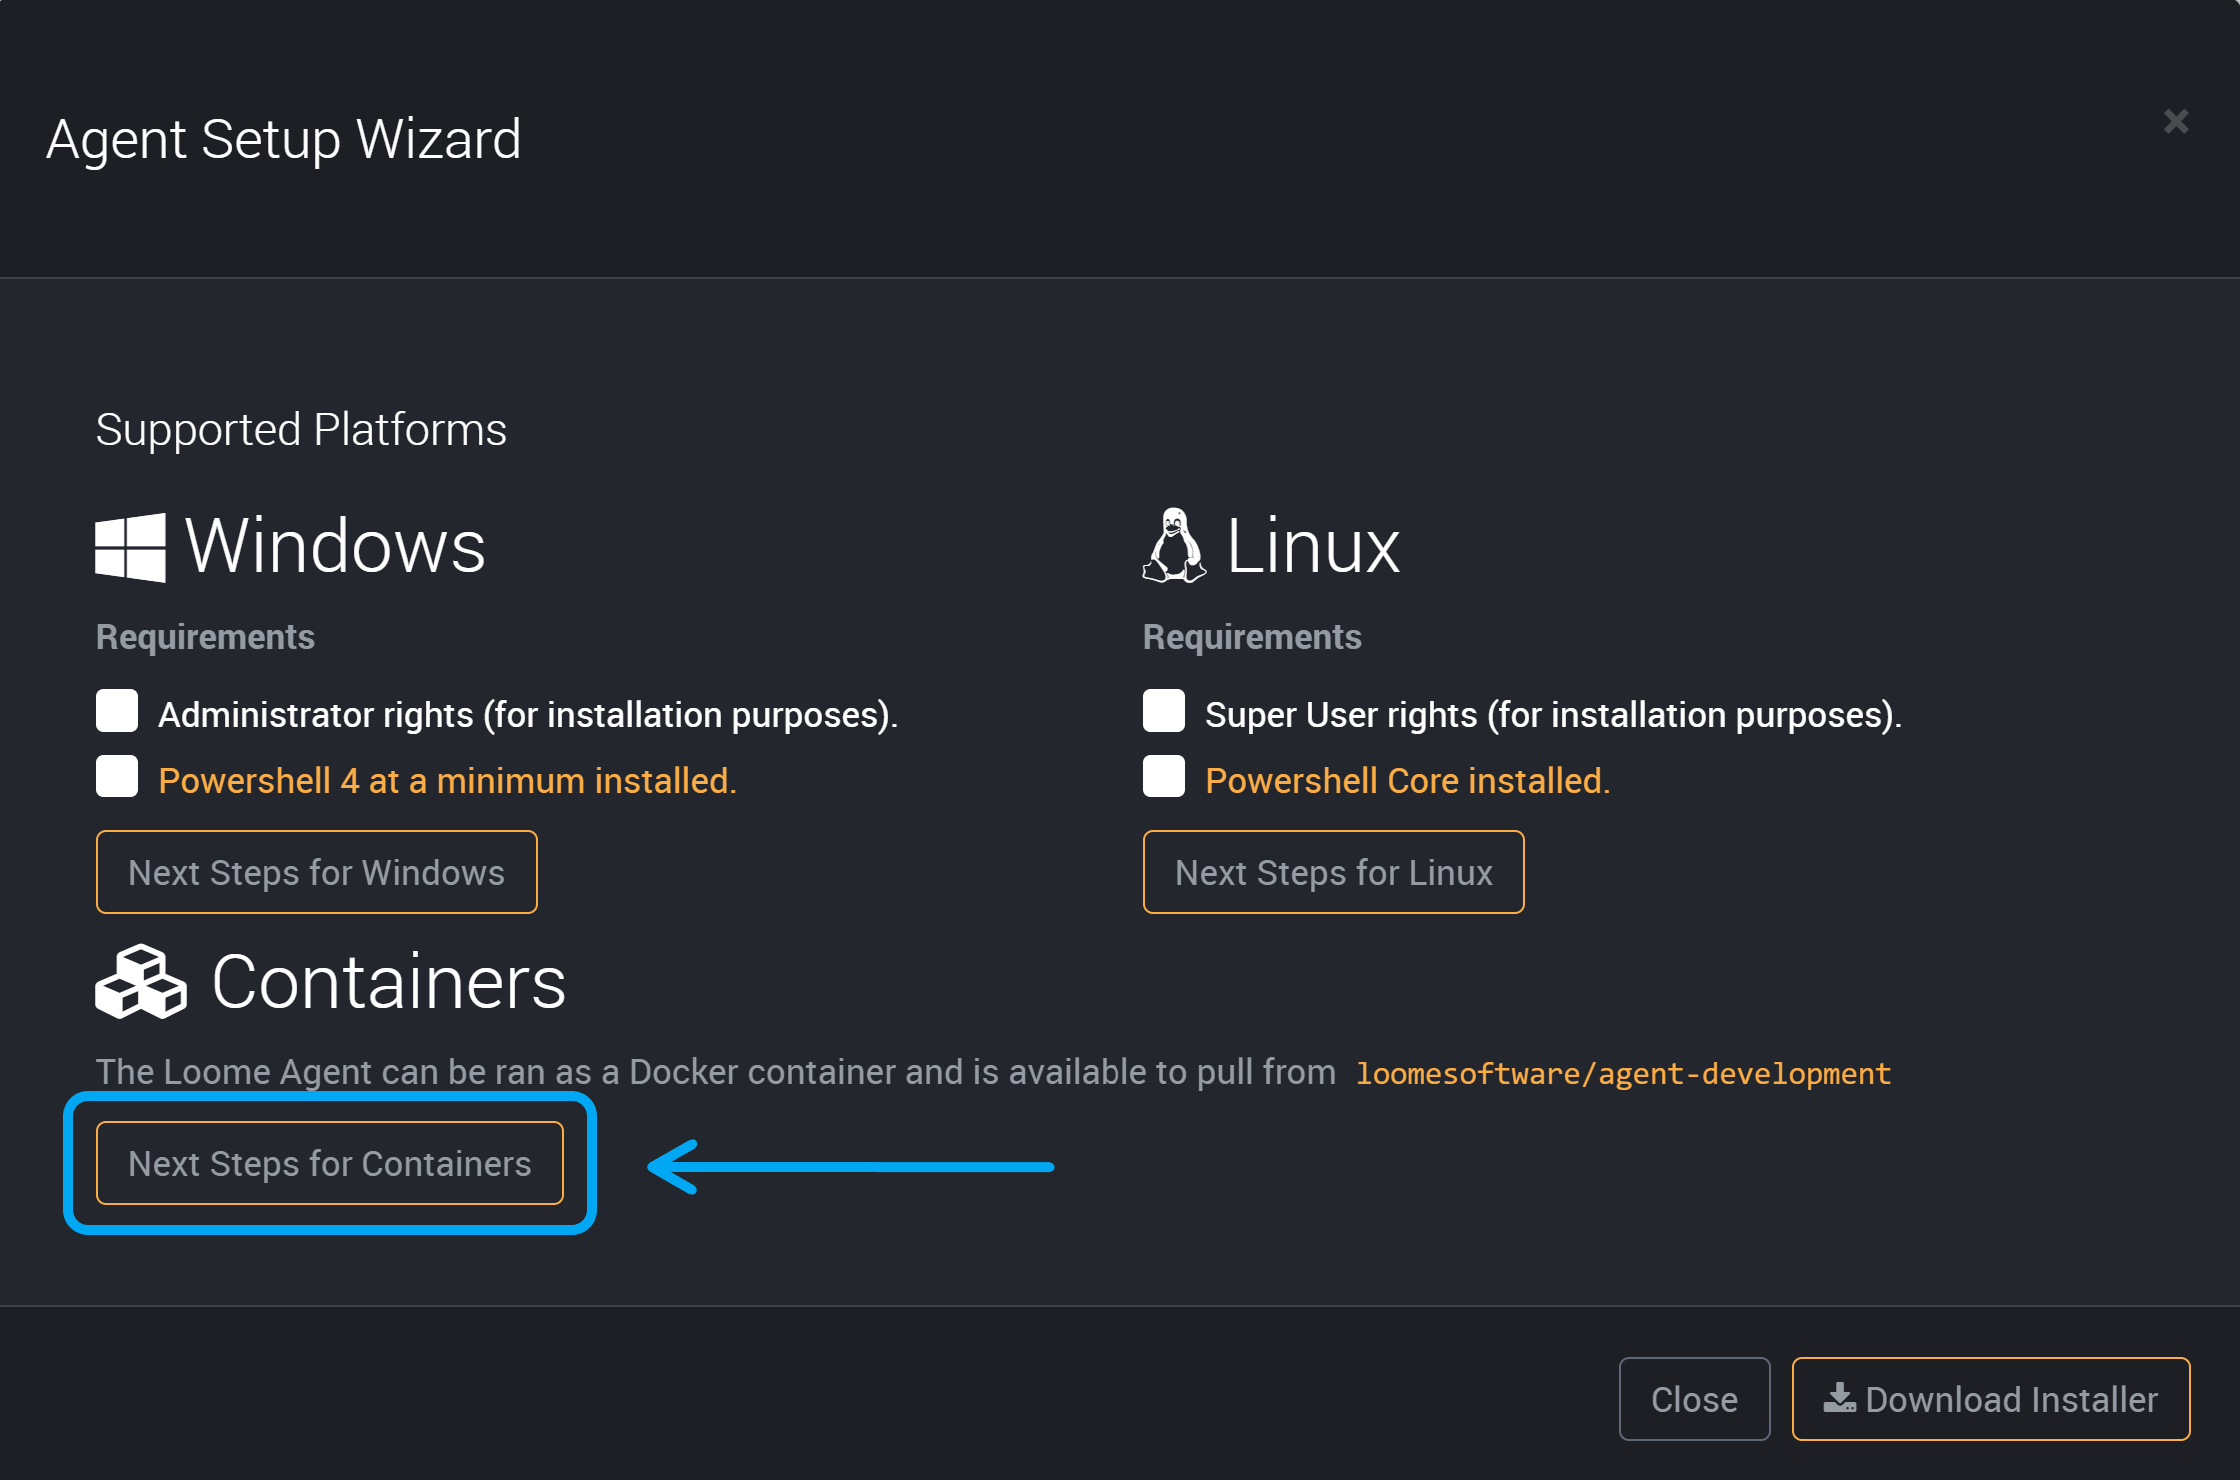
On the agent page in Loome, click on Setup Agent.
Click on Next Steps for Containers.
Copy the Azure CLI/Cloud Shell.
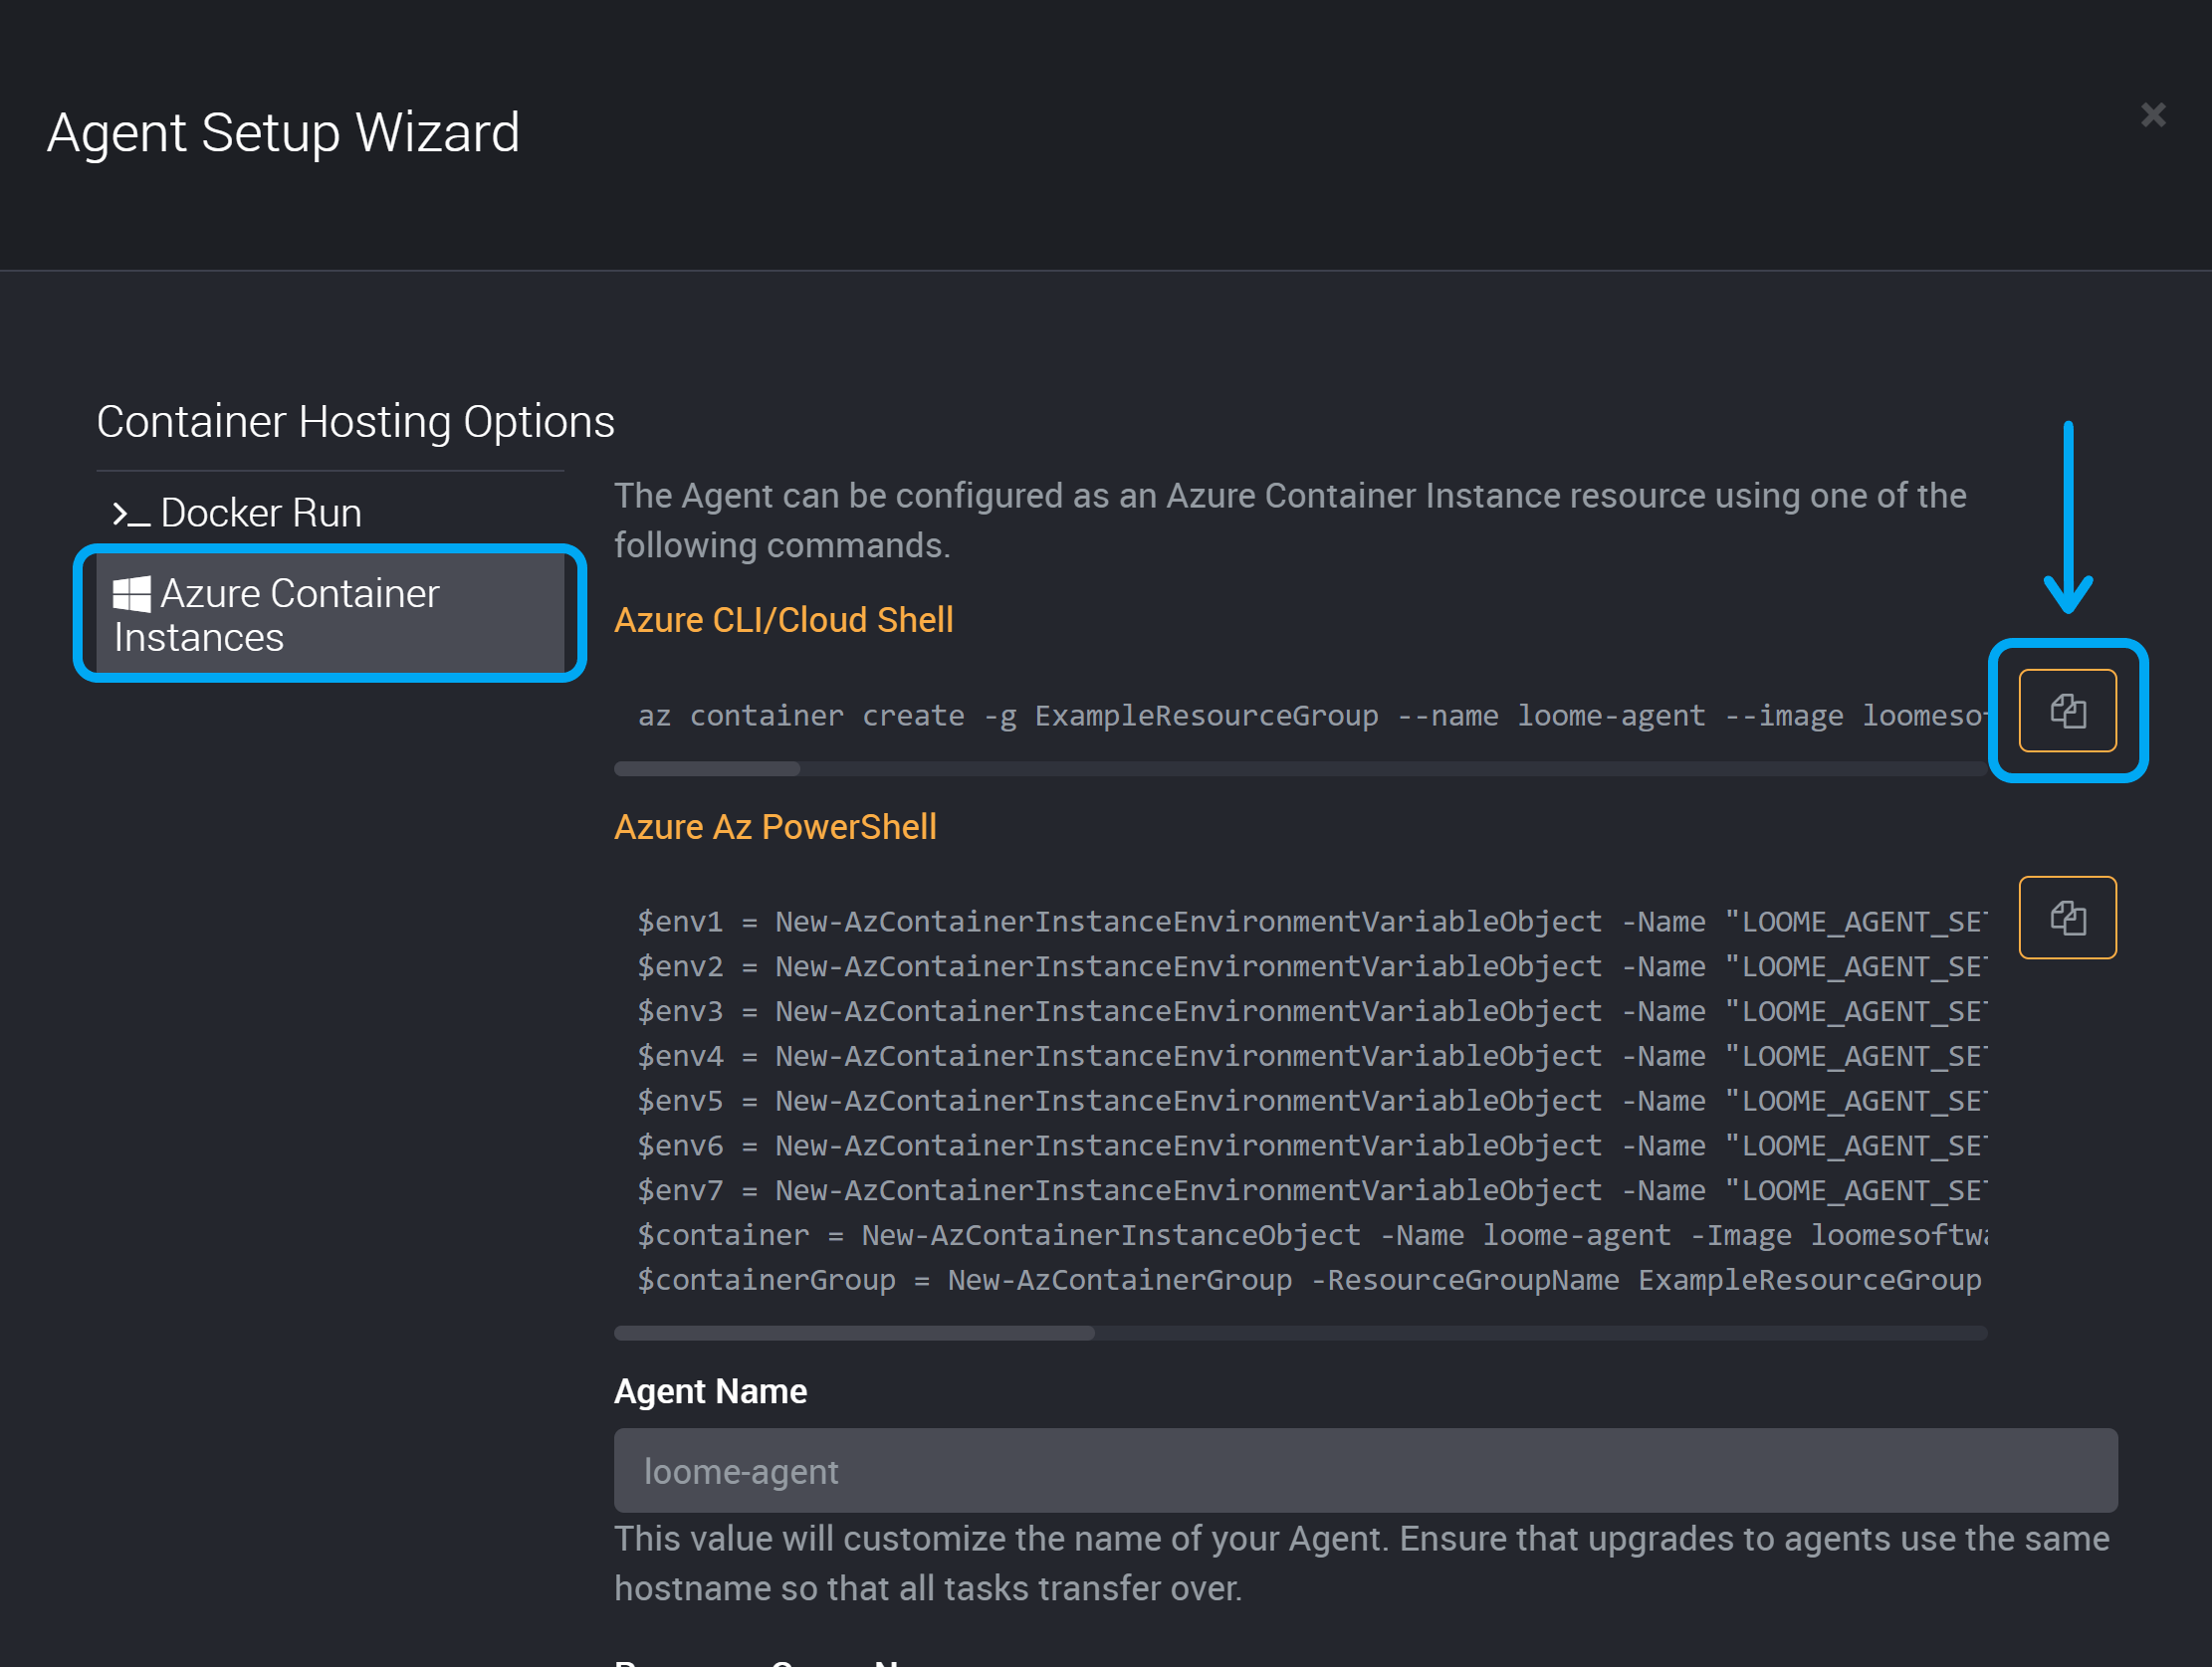
You can then edit it to add additional parameters and run.
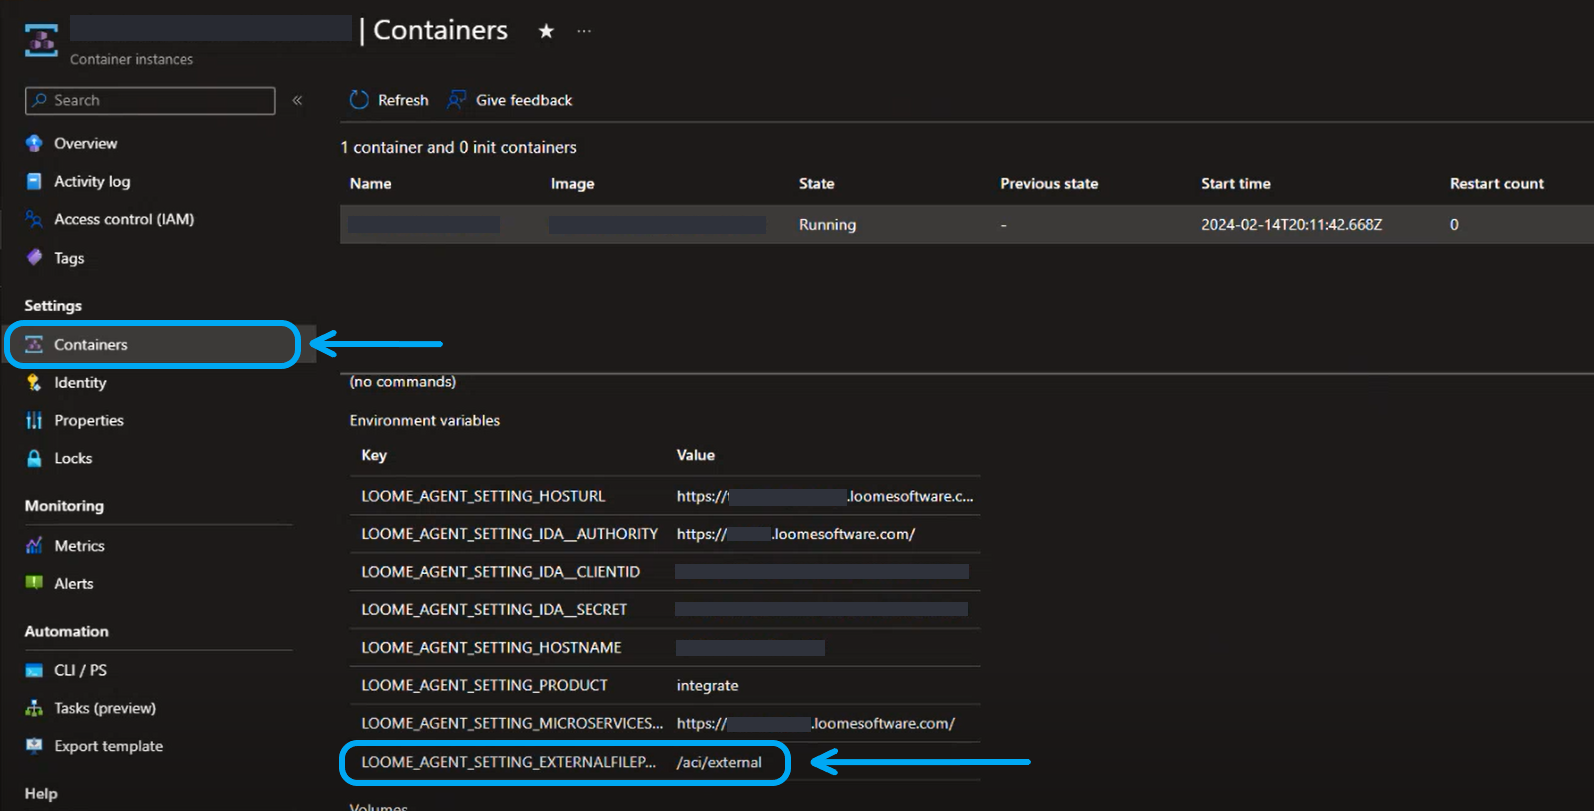
In the environment settings, you can use the setting "LOOME_AGENT_SETTING_EXTERNALFILEPATH" = and provide your storage folder. For example, "LOOME_AGENT_SETTING_EXTERNALFILEPATH" = "/aci/external".
You will need to augment that command with four additional options:
- the account name of the storage account,
--azure-file-volume-account-name - the storage account key,
--azure-file-volume-account-key - the share name inside the storage account,
--azure-file-volume-share-name - and what it should be mounted as inside the container.
--azure-file-volume-mount-path
You will also need to match the Azure file logging mount path.
The mount path of the container is where files will be saved. You will need to match the mount path in this file to the mount path in the container.

Add the additional parameter LOOME_AGENT_SETTING_EXTERNALFILEPATH.
From your Azure container instance, under ‘Settings’ in the menu choose Containers.
Copy the LOOME_AGENT_SETTING_EXTERNALFILEPATH value.
Paste it into your environment settings file.
Run the command as when installing an Azure container instance agent and it will add these settings to the agent.
Any logs will then be saved in your external file path location as you use your agent.
Anti Virus configuration
Some Anti Virus programs may cause the Loome Agent to stop working on Windows. This is due to the Anti Virus software obtaining an exclusive lock on a log file being used by the agent.
To resolve this issue, you should exclude the logs folder from your Anti Virus. Your agent log files are located under C:\ProgramData\LoomeAgent\<guid>\Loome.Agent\logs\ where <guid> should be replaced by the guid of your tenant.
When you use the agent installation wizard to install your agent, you will be shown the installation path, including your guid. If you have already installed the agent then you can open the agent installation wizard again and copy the path shown.
Enterprise Proxy Configuration
The Loome Integrate Online Agent supports connecting to the internet through an Enterprise Proxy.
Proxy Support in the Loome Integrate Agent
The Loome Integrate Agent supports the following properties for proxy configuration in the appsettings.json file:
| Property | Description | Required? | Example Value/s |
|---|---|---|---|
"UseSystemProxy" |
It is recommended that you use a System Proxy rather than the Proxy. If this is set to “true”, Integrate will use the default system proxy in the networking service. This is the same proxy that is configured for the host’s web browser. | Yes | UseSystemProxy: "true" |
"UseProxy" |
If set to “true”, proxy settings will be applied to all requests from the agent. You will have to provide all details manually. | Yes | UseProxy: "true" |
"UseSSL" |
If set to “true”, the proxy being used is utilizes HTTPS. | Yes | "UseSSL": "true" |
"Host" |
The host of the proxy | Yes | "Host": "127.0.0.1" |
"Port" |
The port of the proxy, often 8888 |
Yes | "Port": "8888" |
"Credentials" |
The credentials for the proxy, if not provided default credentials will be utilized for proxy connections. Note that username, password and/or domain can be omitted in instances where you wish to fallback to the default for certain parts of the credentials. | No | "Credentials": { "Username": "1", "Password": "1", "Domain": "test.com"} |
Manually configuring through App Settings
To configure enterprise proxy credentials through the application settings, open up the appsettings.json and ensure the
following Proxy object is included:
"Proxy": {
    "UseProxy": "true",
    "UseSSL": "false",
    "Host": "127.0.0.1",
    "Port": "8888",
    "Credentials": {
        "Username": "1",
        "Password": "1",
        "Domain": "test.com"
    }
}
In a configuration file this would look like the following (take note of the proceeding comma before the proxy object and how the object is within the braces.)
{
    "HostUrl": "...",
    "Product":"integrate",
    "Ida": {
        "Authority": "...",
        "ClientId": "...",
        "Secret": "..."
    },
    "Proxy": {
        "UseProxy": "true",
        "UseSSL": "false",
        "Host": "127.0.0.1",
        "Port": "8888",
        "Credentials": {
            "Username": "1",
            "Password": "1",
            "Domain": "test.com"
        }
    }
}
Once this object is included, you can configure details from that object. Note that any changes will require a a restart of the agent service.
Kerberos Keytab Detection
Many Hadoop services and programs support authentication through Kerberos/SPNEGO. Loome Integrate Agents define conventions
for working with kerberos keytabs so that the agent can easily impersonate a user in a Kerberos Realm without an explicit kinit.
To allow for Keytab detection in the agent, save any keytabs to /.loomeagent/keys with the convention of USERNAME@DOMAIN.keytab
(eg. for user TEST in domain COMPANY the keytab would be saved as /.loomeagent/keys/TEST@COMPANY.keytab).
Ensure that the .keytab extension is included in the file as Loome Integrate will ignore any files that do not contain that extension
in the /keys directory.
Kerberos Keytab Instructions
These instructions are available in the Linux installation steps within Loome Integrate.
Run
ktutilas a super user. As was the case with installing the agent, you must be a super user to create keytabs for Loome Integrate Agents.Create a valid keytab using the following commands. These will need to be ran one-by-one, you will need replace USERNAME and DOMAIN with your Kerberos username and domain respectively as well as enter the password when prompted.
addent -password -p USERNAME@DOMAIN -k 1 -e rc4-hmac
addent -password -p USERNAME@DOMAIN -k 1 -e aes256-cts
wkt /.loomeagent/keys/USERNAME@DOMAIN.keytab
quit
Use the Username & Domain in Connections Requiring the Keytab Connections that utilize Kerberos can now automatically create tickets assuming you provide the username and domain used in the keytab to the connection.
Using PowerShell Core v PS Core Workspace in the Agent
The agent will check whether PowerShell Core is installed with the agent. If it is not installed, it will use PS Core Workspace, which does not allow installation of modules.
We recommend that you install PS Core so you can install modules as part of complex scripts. The Docker container includes PS Core by default.