App Owns Data
Table of Contents
- Overview
- Pre-requisites
- Embedding Wizard
- Sharing content with the Power BI Master Account
- You’re now ready to embed in Loome Publishl
- Publishing assets Multiple App Owns Data registrations
- Creating tiles with Multiple App Owns Data registrations
- Configuring row level security on dashboards, reports, and tiles
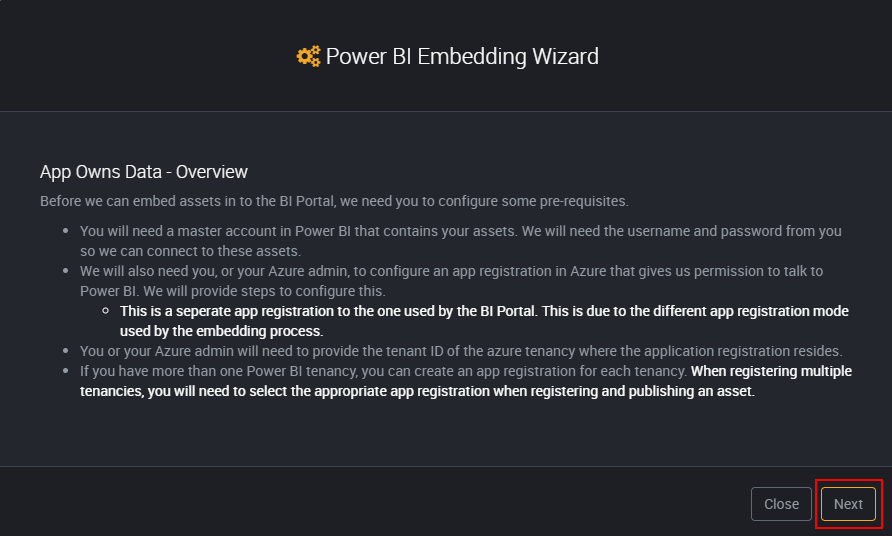
Overview
App Owns Data is tied directly to Power BI capacity-based licencing. In this model, you must first purchase capacity, and then assign your workspace(s) to this capacity.
In this model your users do not have direct access to PowerBI.com and cannot browse to it. Access to assets is assigned to a service account, and any embedding request from Loome Publish is done as the service account.
Because of this, you will not immediately have access to the user identity in your reports and data sources. You can however choose to pass through the user identity of the user logged in to Loome Publish. This means you can use this to filter data using Row Level Security (RLS) in your reports and Data Sources.
Support for Row Level Security with App Owns Data in Loome Publish requires version 4.4 for Reports and version 4.5 for Dashboards and Tiles.
App Owns Data also provides the benefit of allowing one portal to serve content from multiple Power BI tenancies. This can be useful where you have multiple entities within a larger structure, that each have their own Azure AD/Power BI tenancies. When you configure two or more Power BI tenancies, your report publishers will be prompted to select the correct tenancy when publishing their report. By providing friendly names within Loome Publish for each tenancy, this job is a relatively simple one.
We currently support the embedding of the following types;
- Dashboards
- Reports
- Tiles
- Q&A
We do not support embedding of apps, as these do not exist in the Power BI API. You can however embed content from the workspace of the app.
Your content can be kept in a workspace created by any developer, however you must follow the steps under Sharing content with the Power BI Master Account for all content you wish to embed.
Pre-requisites
If you plan to serve up multiple Power BI tenancies, please repeat all pre-requisite steps per Power BI tenancy.
Power BI Master Account
Content is embedded in Loome Publish from PowerBI.com via a service account called the Power BI Master Account. This account is a standard user account in your Active Directory available via Azure Active Directory that you must create.
You should create this account in your directory and retain the user principal name (account@my.domain.com) and the password for later use. You will need to assign a Power BI Pro licence to this account via the Office 365 Administration Portal.
If you are using content syncing, you can reuse the same account.
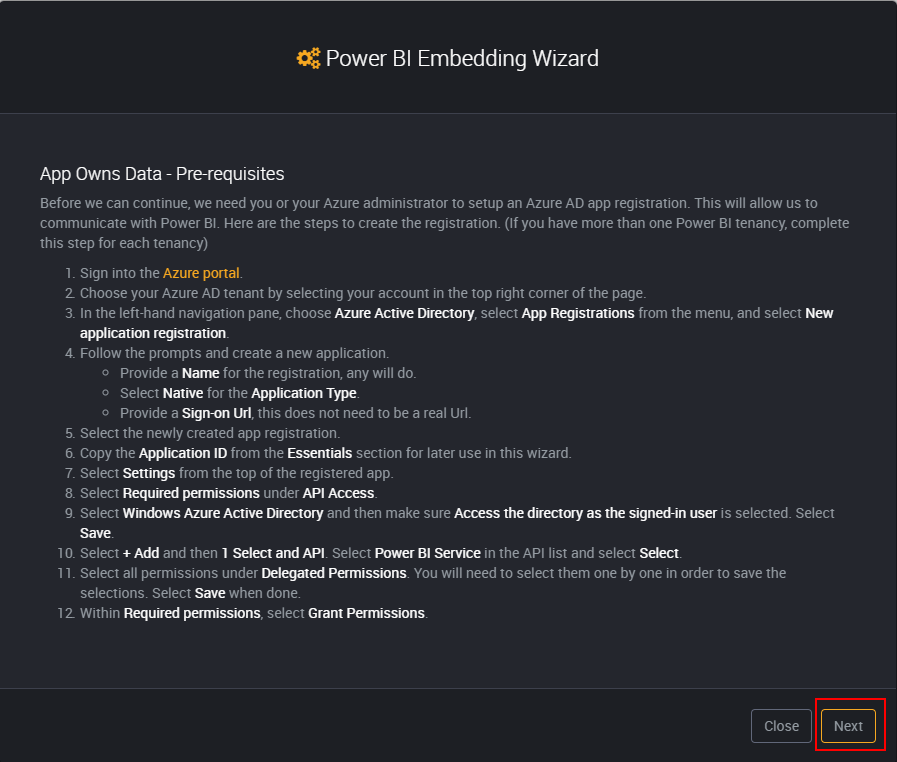
Azure AD App Registration
To facilitate communication between Loome Publish and PowerBI.com with the Power BI Master Account, we will require an Azure App Registration. If you are running the Azure or On-Premises with Azure AD versions of Loome Publish, this will be in addition to your existing App Registration.
If you are using App Owns Data embedding, you can reuse the same app registration.
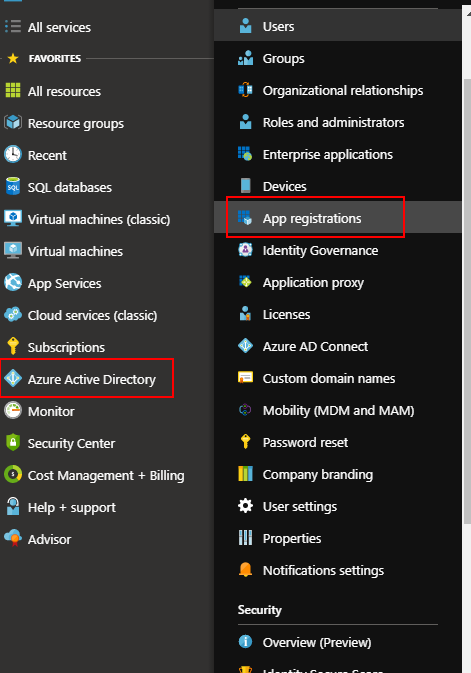
Browse to portal.azure.com, then click on ‘Azure Active Directory’ from the menu, followed by ‘App Registrations’ from the Azure AD menu.
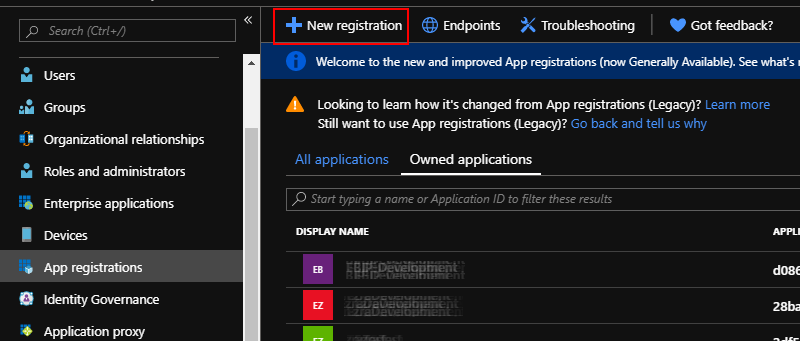
Click on the ‘New application registration’ button.
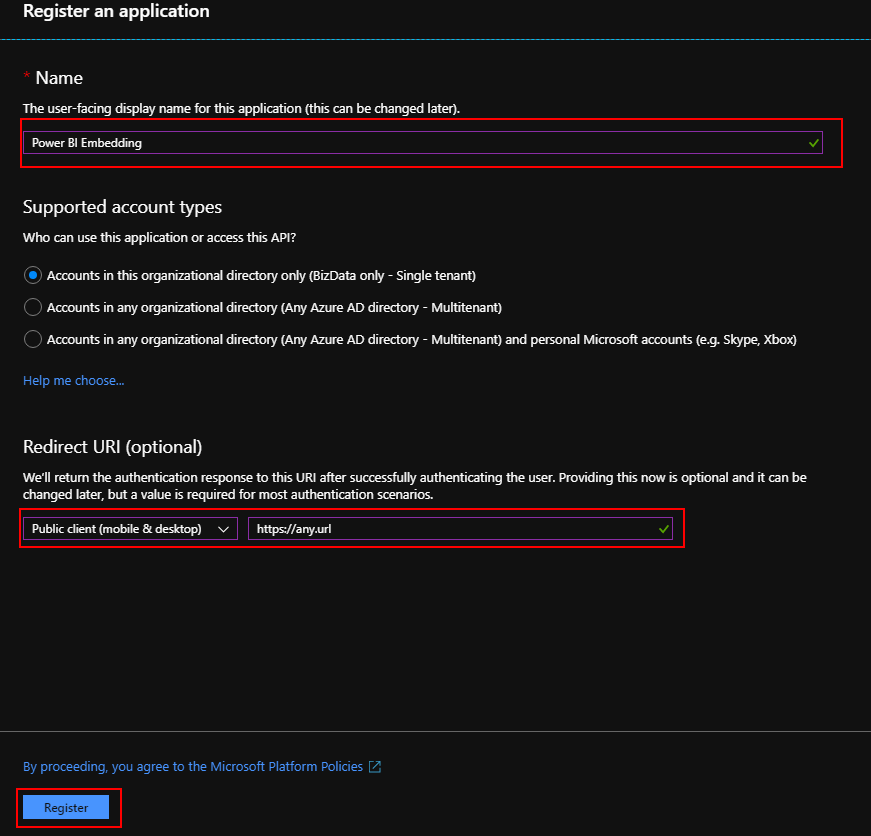
Type a name for your application registration.
Select ‘Public client (mobile & desktop)’ from the drop down.
As this is a Native application, you can enter any fictitious URL for the ‘Redirect URI’.
Select the ‘Register’ button to create the App Registration.
Copy the ‘Application ID’ and ‘Directory ID’ for use in the source system configuration.
Select ‘API Permissions’ from the app registration menu.

Click the ‘Add a permission’ button from the top of the registered app.

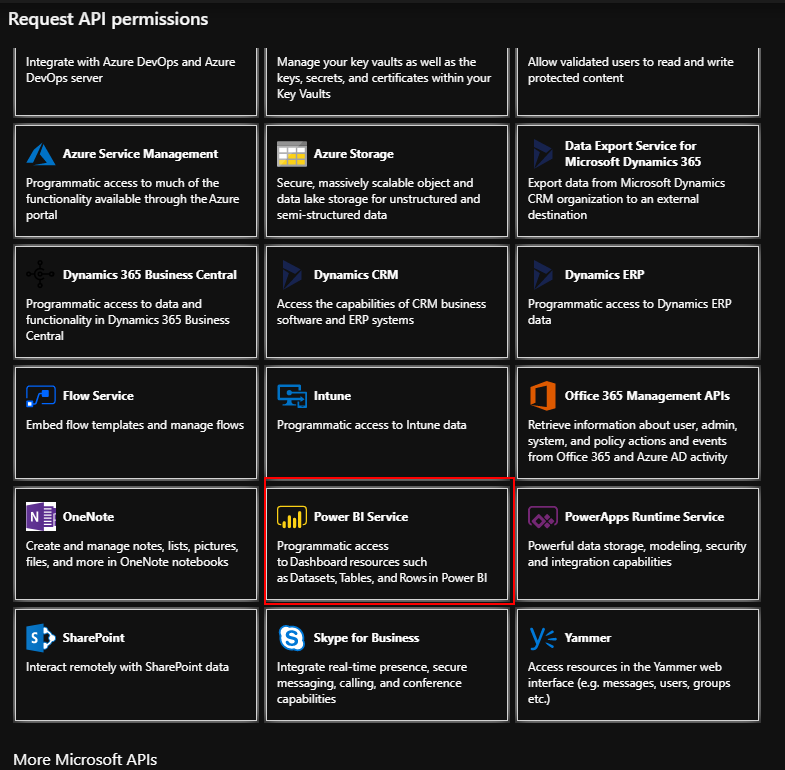
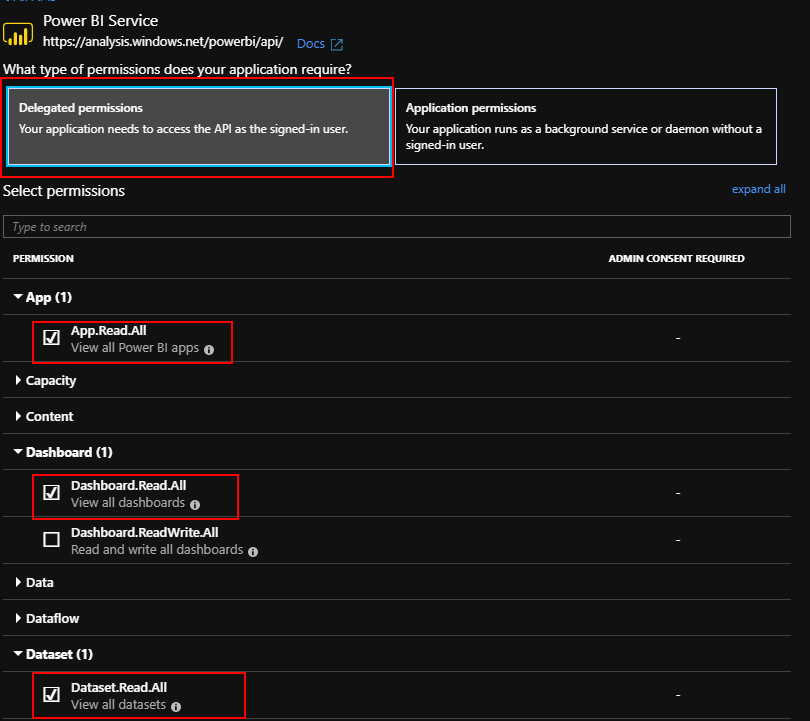
Select ‘Power BI Service’ from the list of available services.
Select ‘Delegated Permissions’, permissions will now appear.
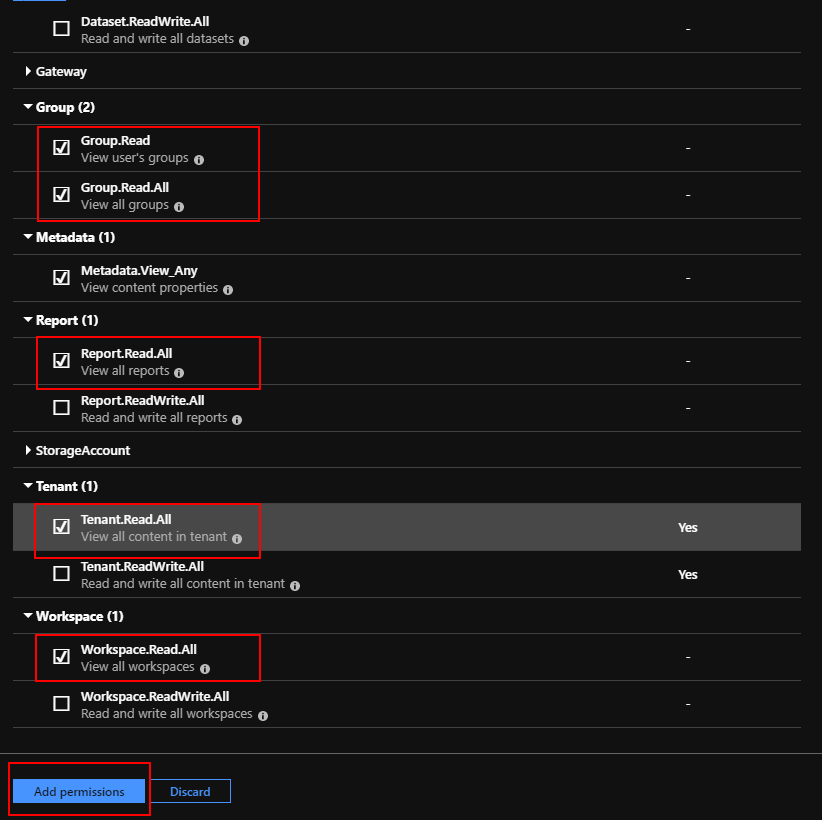
Select all permissions as shown in the following two screenshots, then click ‘Add Permissions’
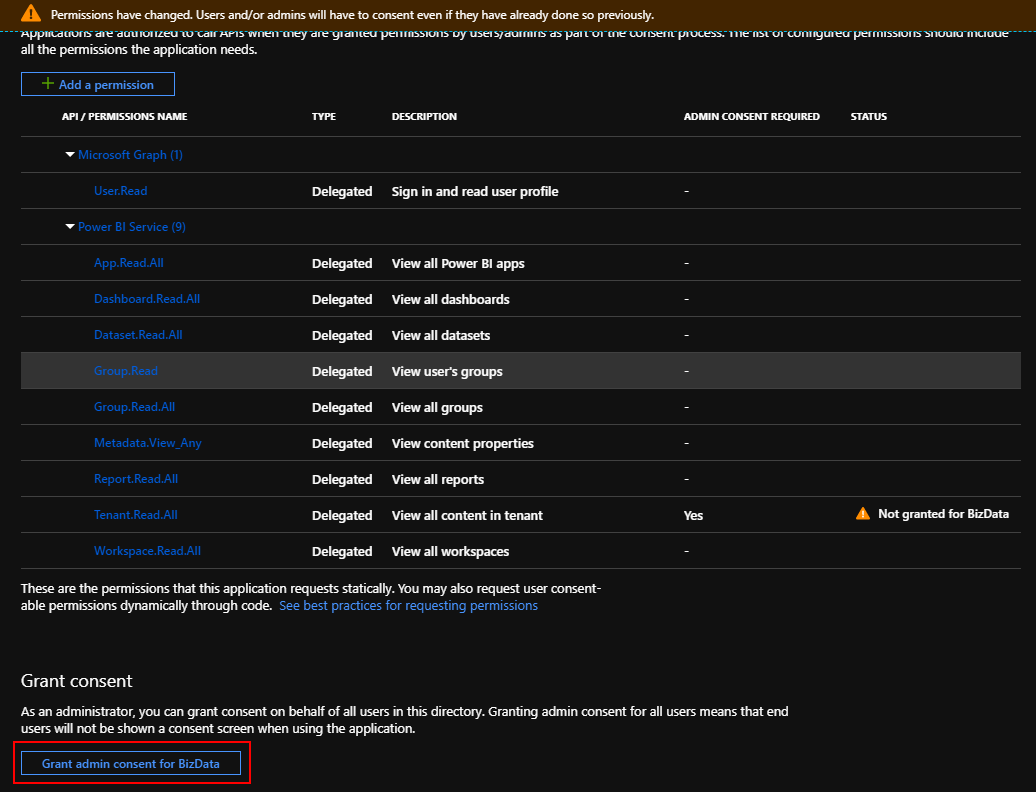
This step requires a Global Administrator account to complete.
Click the ‘Grant admin consent for company’ button at the bottom.
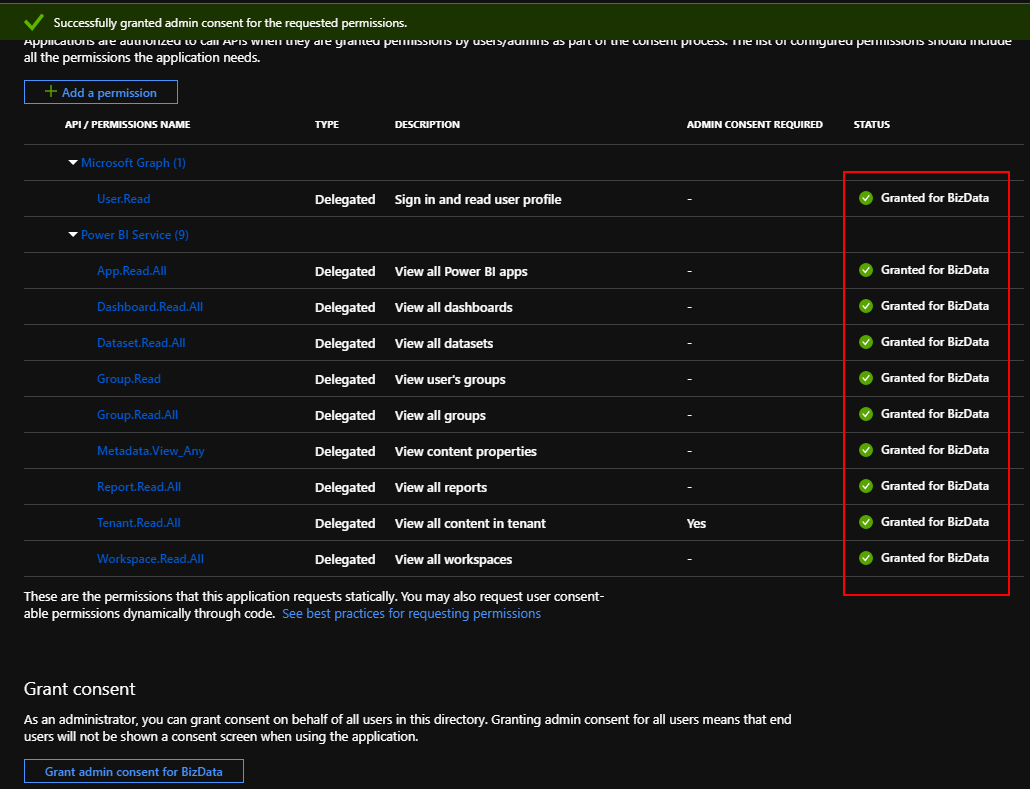
This step requires a Global Administrator account to complete.
Click the ‘Yes’ button to confirm consent.

Verify you now see the ‘Granted for company’ tick next to each permission.
Embedding Wizard
The embedding wizard within Loome Publish needs to be run to enable embedding.
Browse to Loome Publish, click on the cog in the top right hand menu and then click on ‘Asset Types’
Select ‘Power BI’.
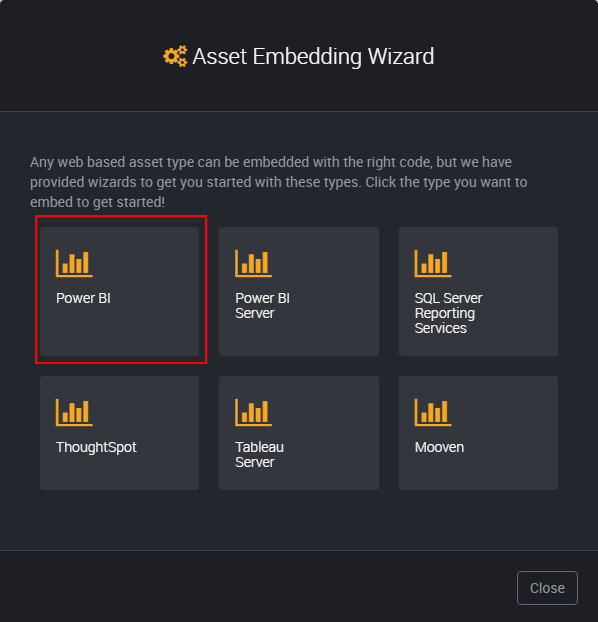
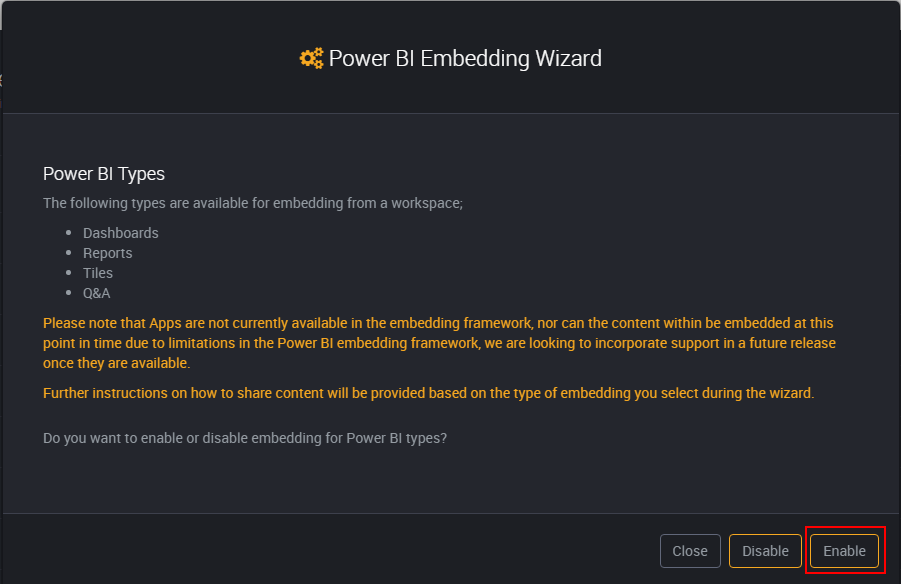
The next screen is just a brief description of what is supported through embedding, and to clarify if you want to enable or disable the embedding feature.
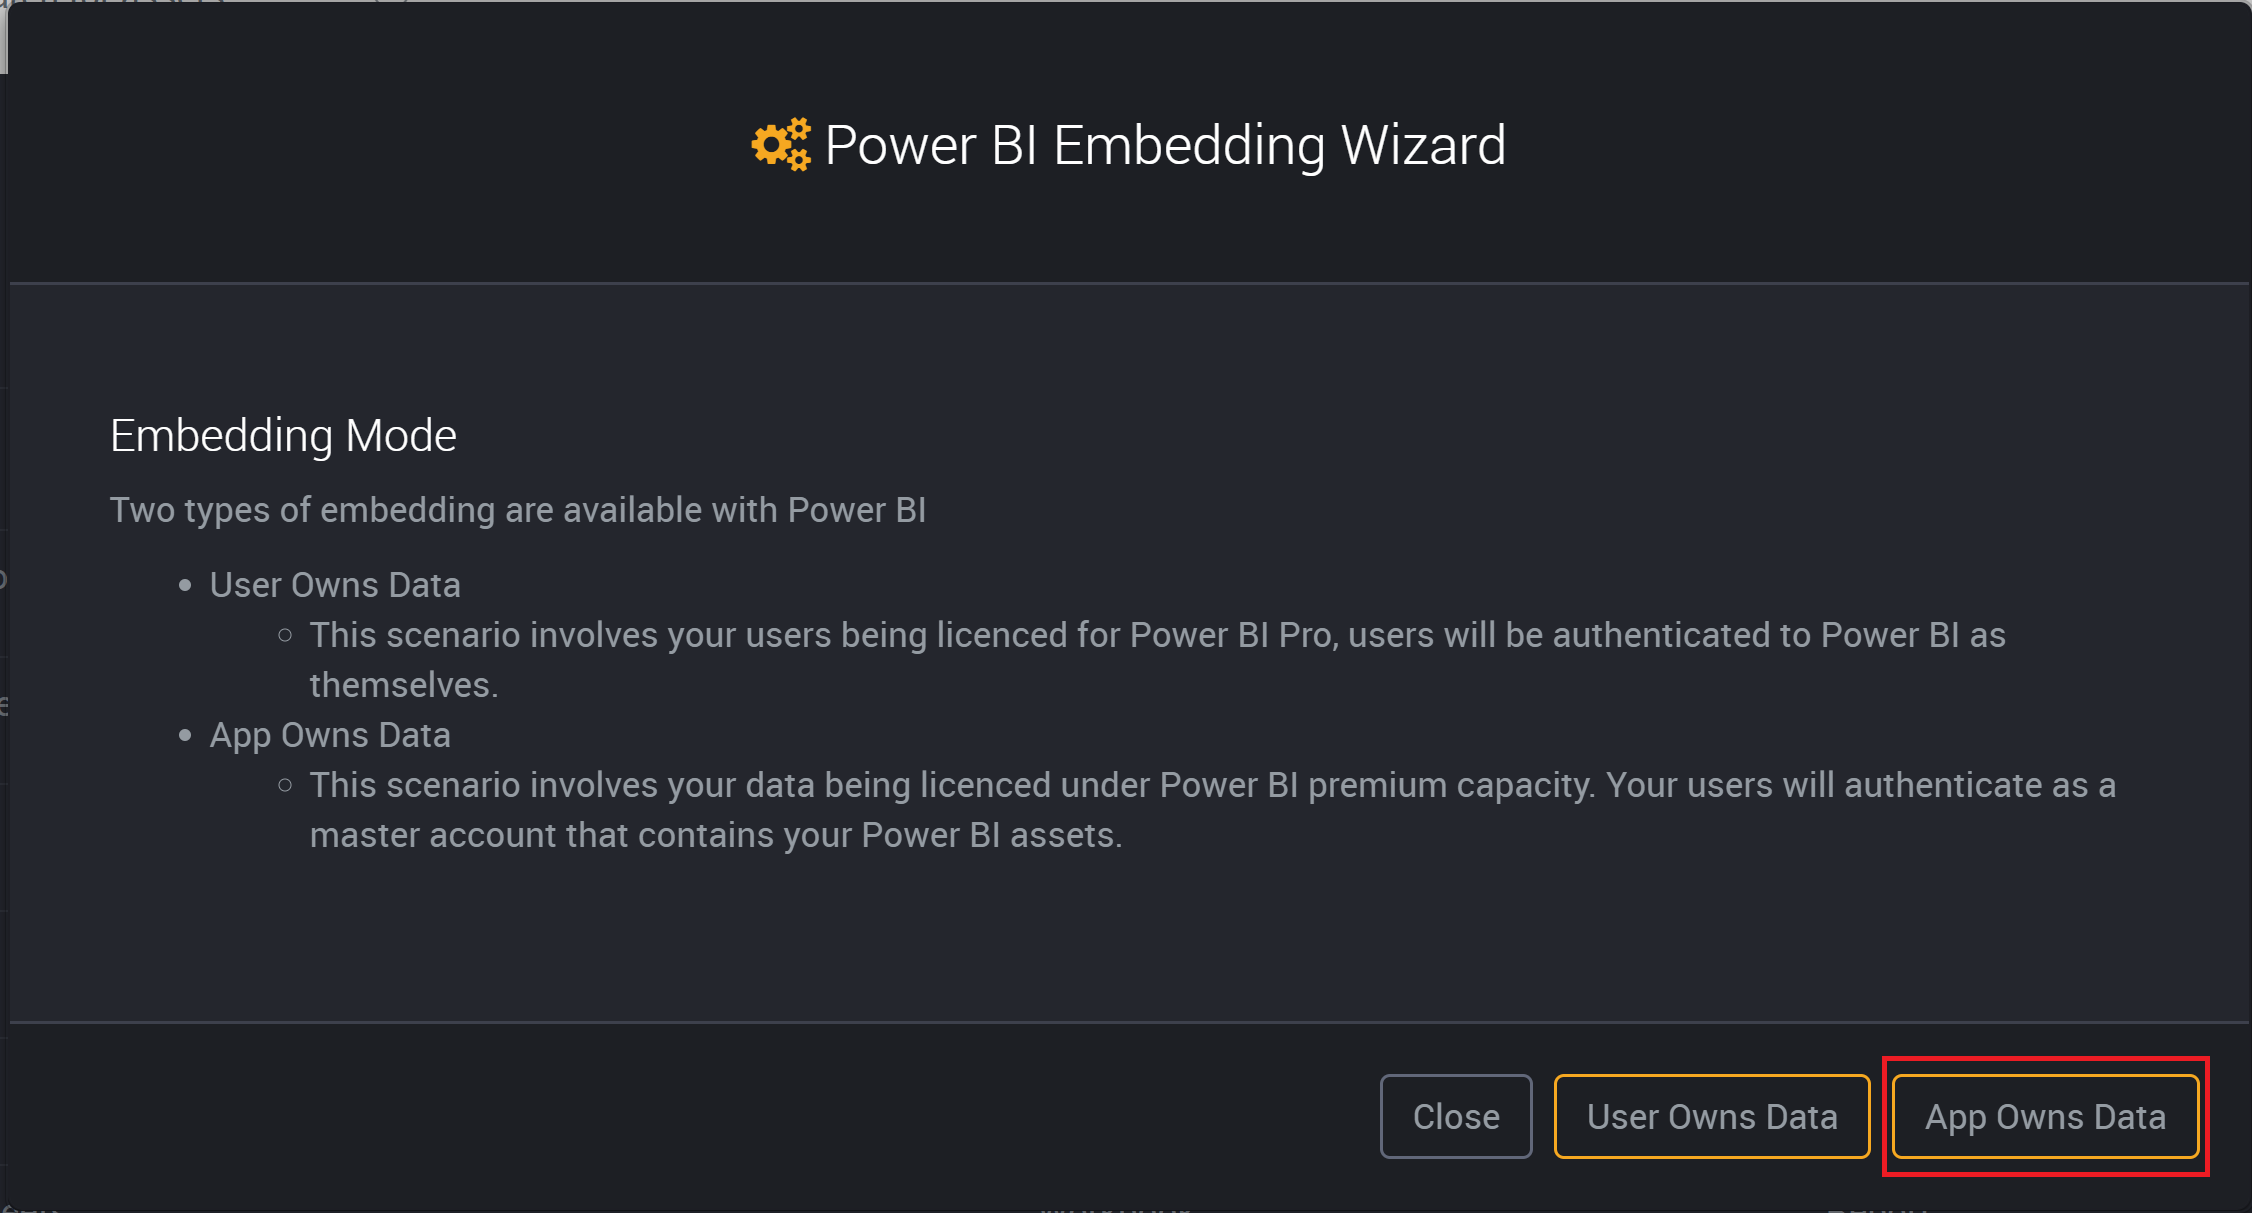
Click ‘App Owns Data’.
Please read the overview, then click ‘Next’ to continue.
You will now be presented with some more information regarding necessary pre-requisites, click ‘Next’ to continue.
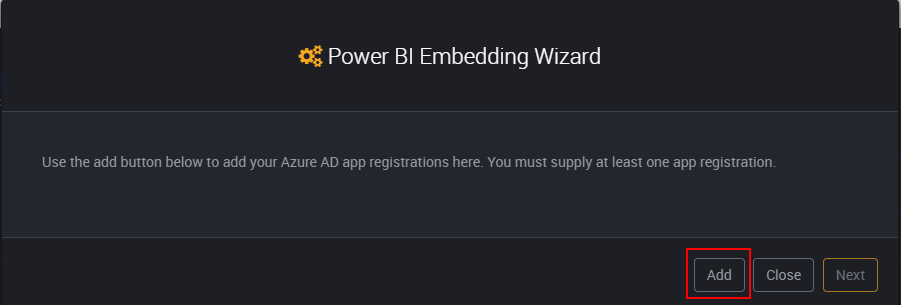
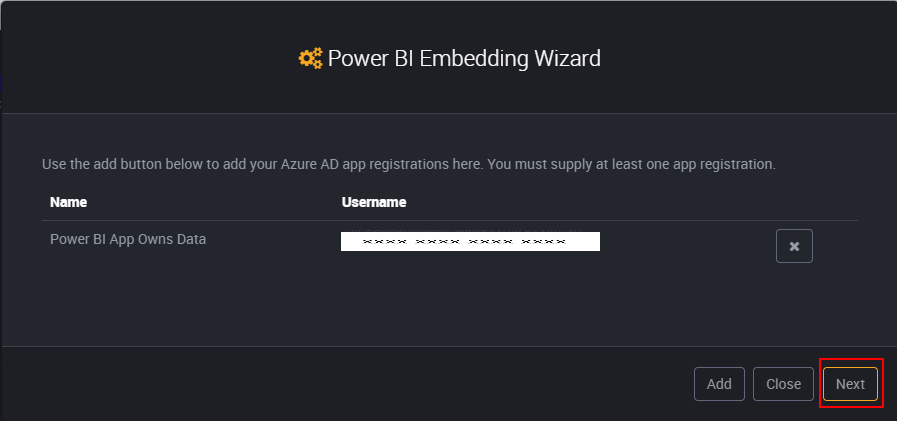
Click the ‘Add’ button to add a new App Owns Data registration.
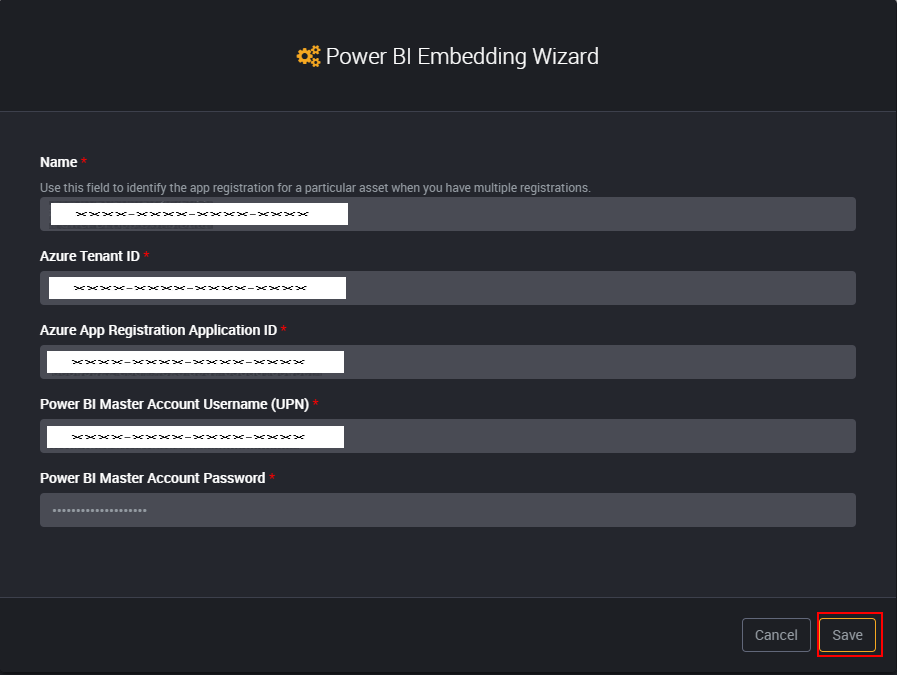
Complete the following information;
| Field | Description |
|---|---|
| Name | This is a friendly name to identify your app registration by. If you plan to register multiple App Owns Data registrations, you should specify a meaningful name to your report publishers, otherwise you can use the default value. |
| Azure Tenant ID | This should be the tenant ID of the Azure tenancy where the Native App Registration was created earlier. |
| Azure App Registration Application ID | The Application ID of the Native App Registration created earlier. |
| Power BI Master Account Username (UPN) | This is the UPN of the account that you will grant access to content in PowerBI.com |
| Power BI Master Account Password | This is the password of the account that you will grant access to content in PowerBI.com |
Click ‘Save’ to continue.
You will now see your app registration appear in the list of app registrations. If you are multi tenanting Power BI tenancies, please use the ‘Add’ button to add more app registrations, otherwise click Next to continue.
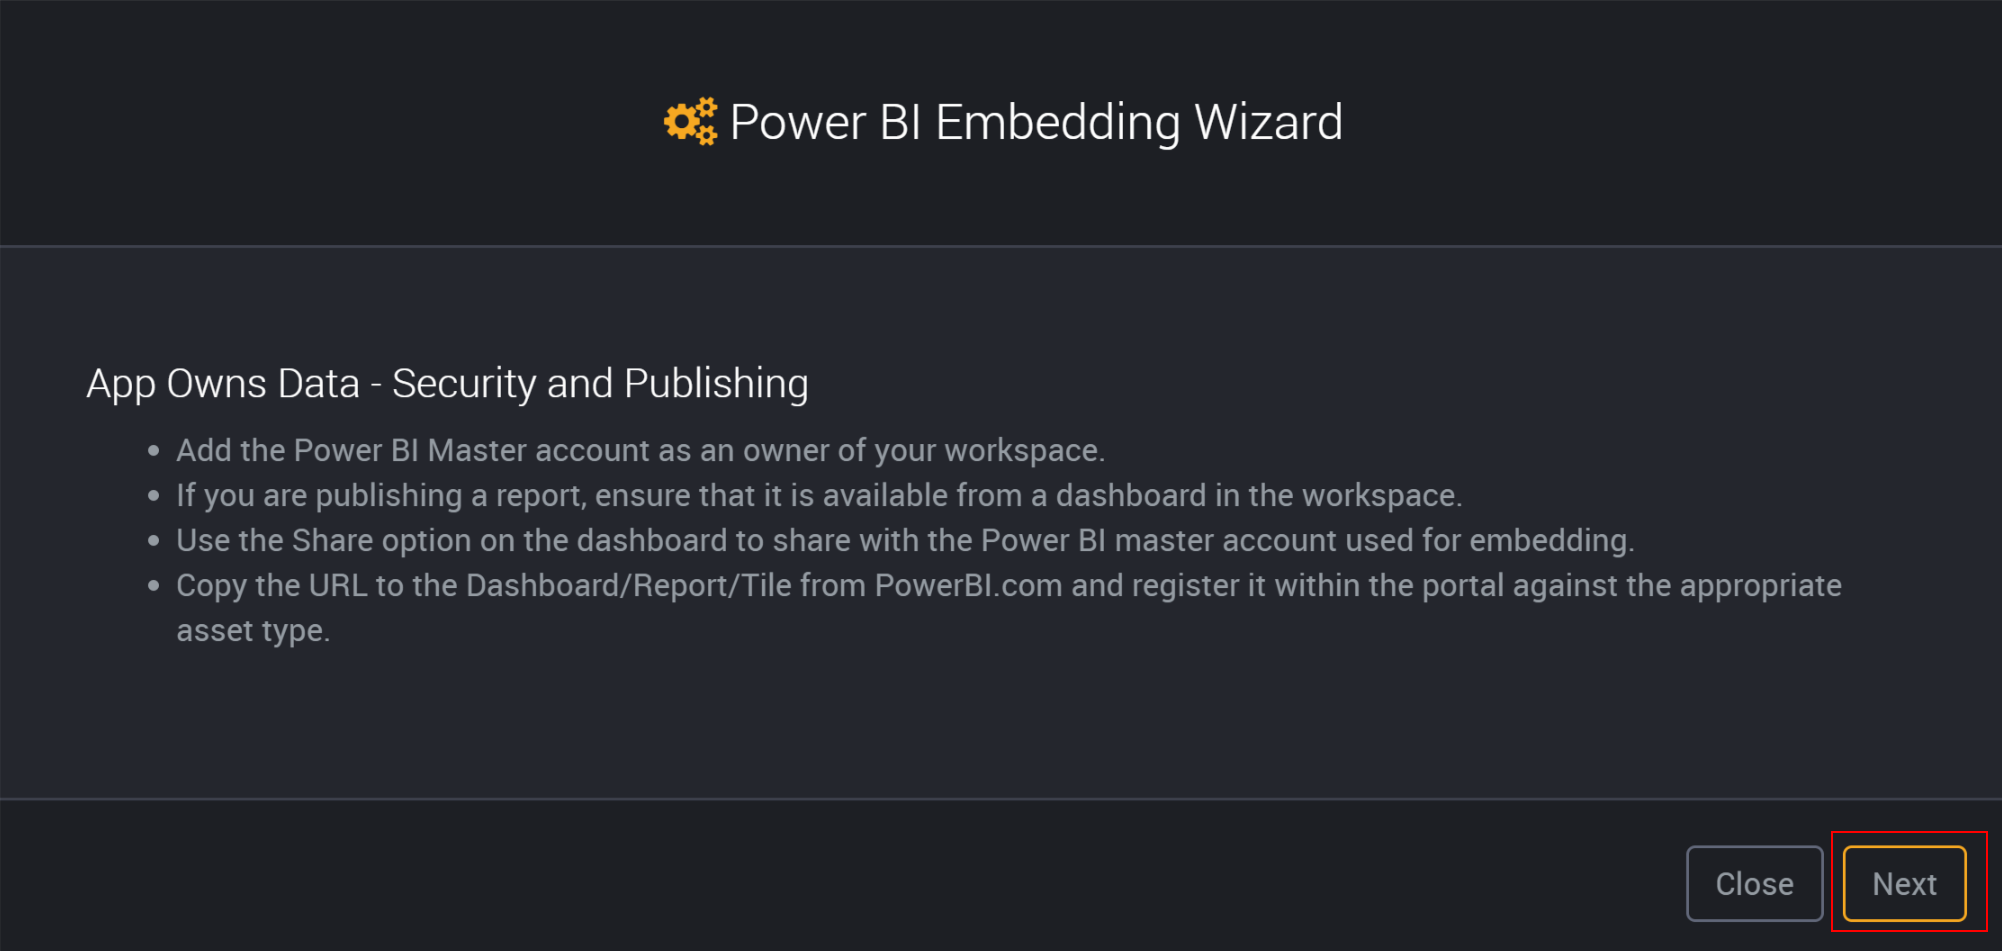
Here you are provided a brief description of securing content within Power BI for use with App Owns Data. You will find more detailed information later on in this guide. Click ‘Next’ to continue.
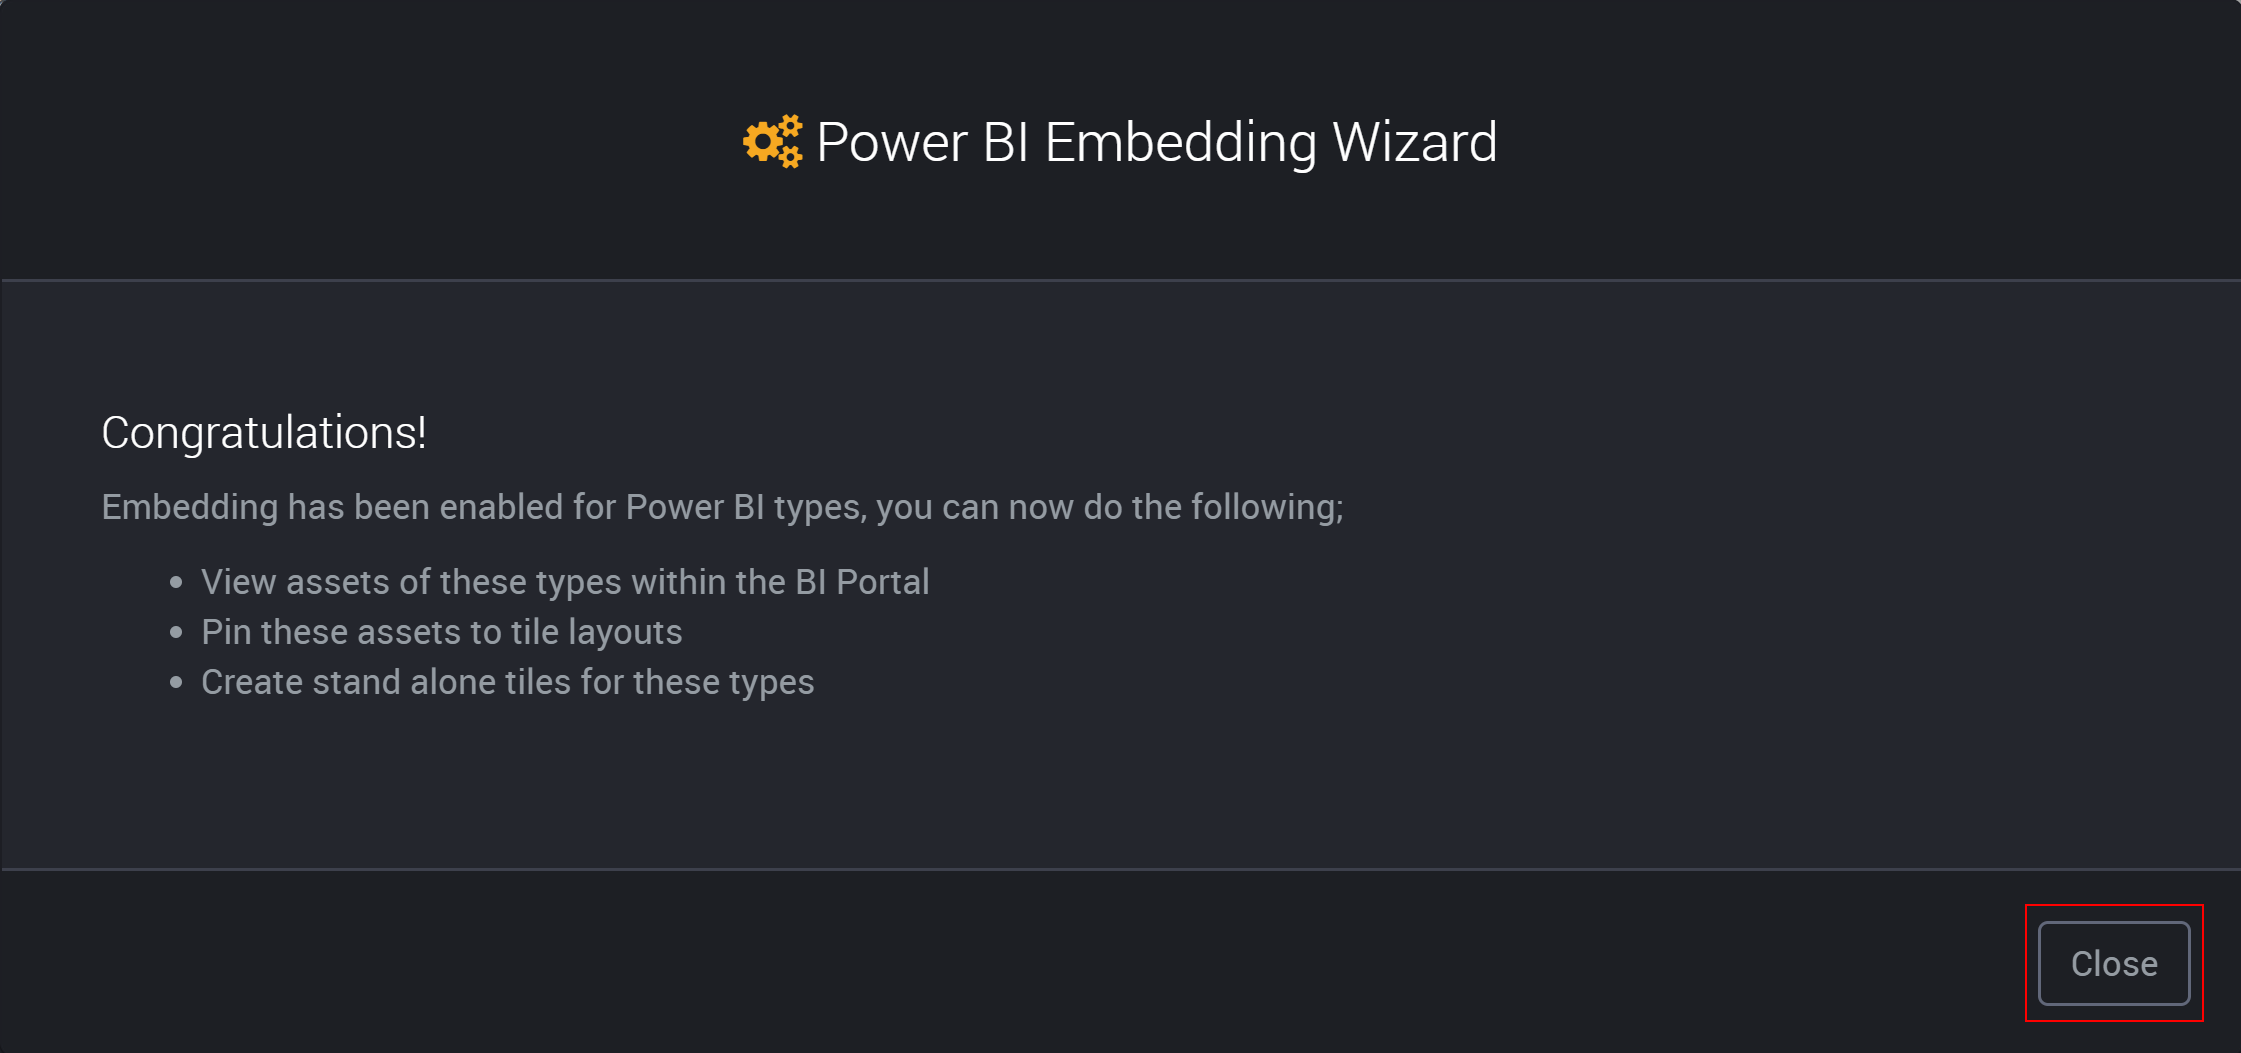
Click ‘Close’ to complete the wizard.
Sharing content with the Power BI Master Account
In order for the Power BI Master Account to see your content, you must complete a two step process as shown below.
Add the account as a workspace admin
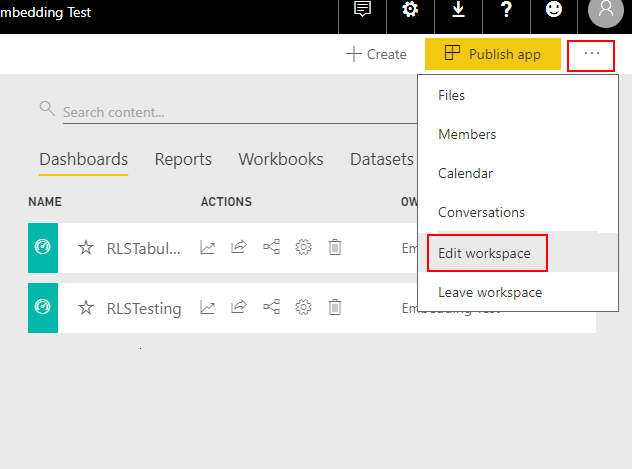
Browse to the workspace containing your content. Click the ellipse at the top right corner of the page. Click on ‘Edit Workspace’.
Lookup the Power BI Master Account using the ‘Workspace members’ control. Click ‘Add’
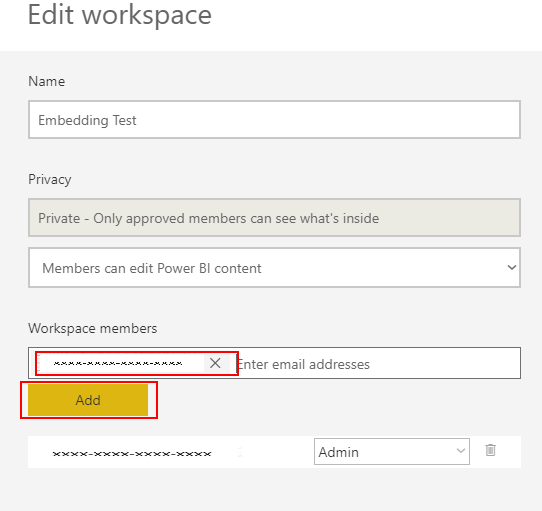
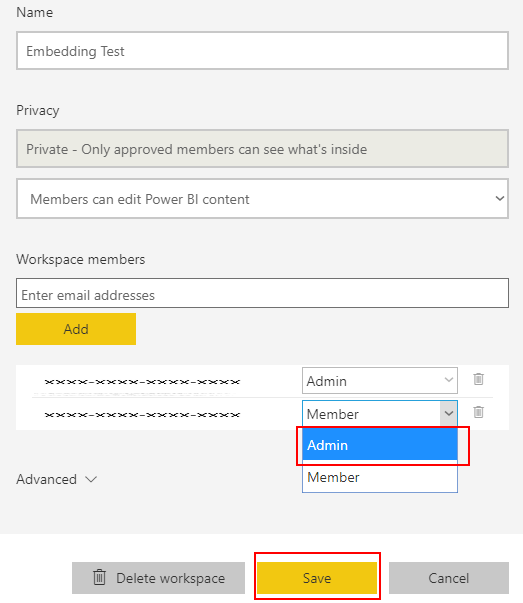
Click the drop down for the Power BI Master Account and select ‘Admin’. Click the ‘Save’ button
Share dashboards and reports with the account
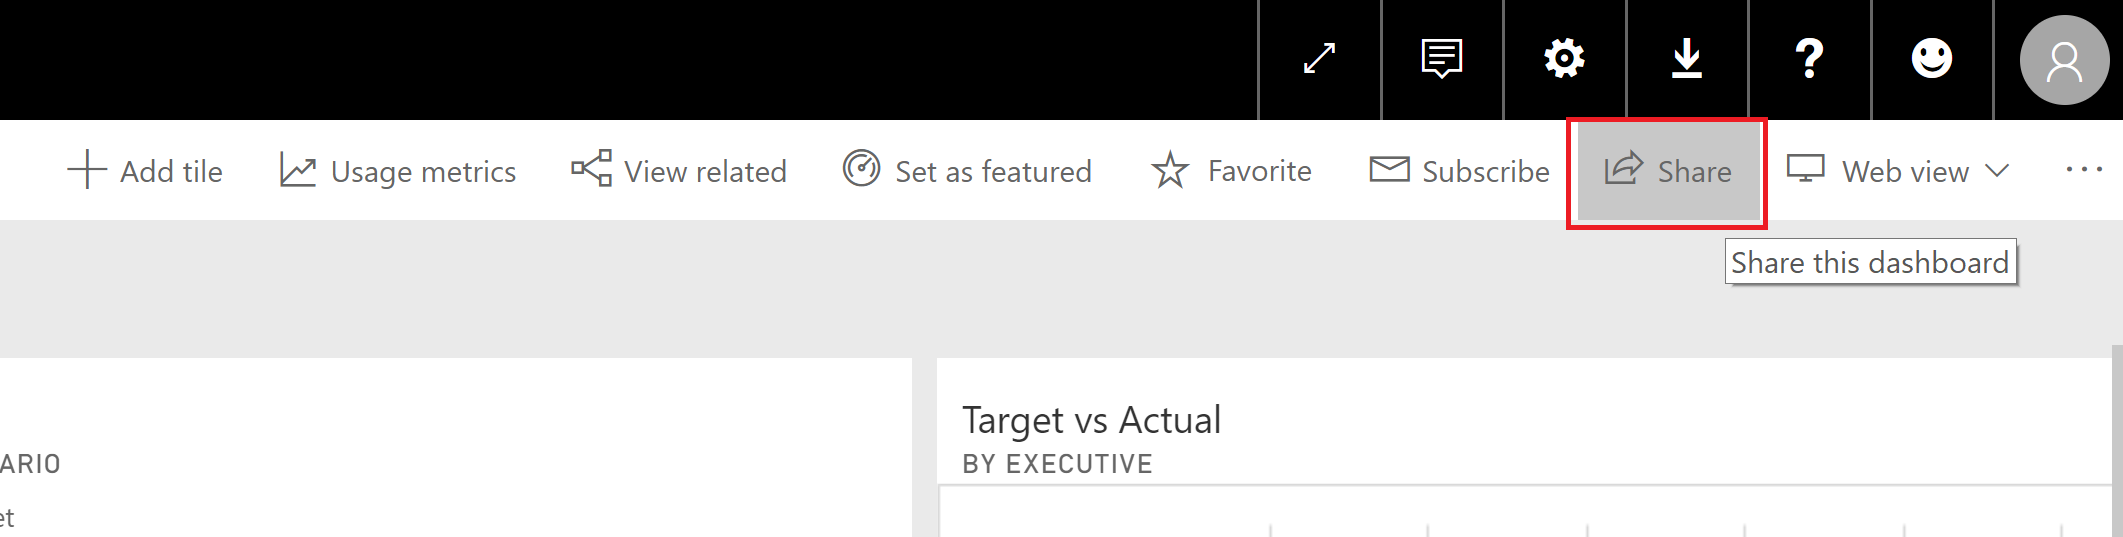
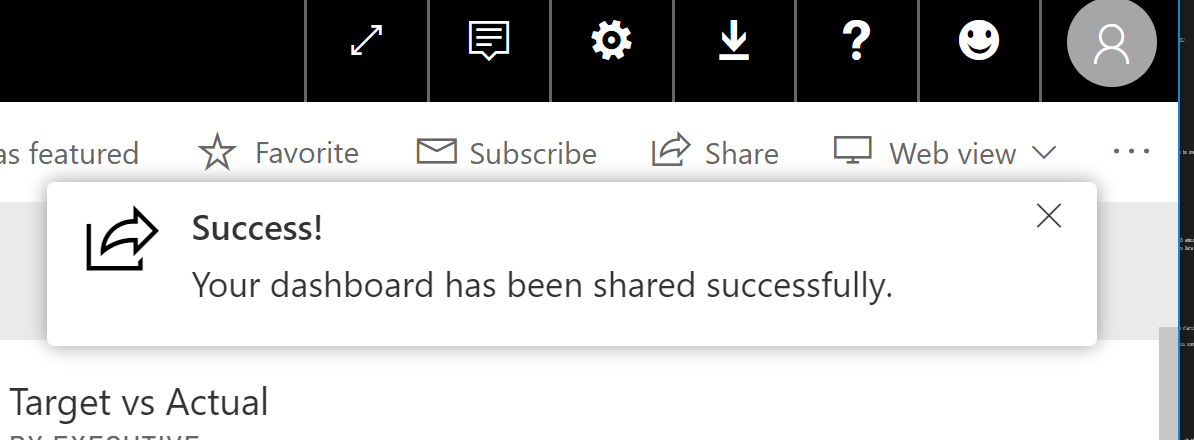
Once logged into your desired workspace in PowerBI.com, open up a report or dashboard and select ‘Share’ from the top right hand corner.
This will bring up a slide out that will ask you who you wish to grant access to. This is where you enter the user principal name of the master account.
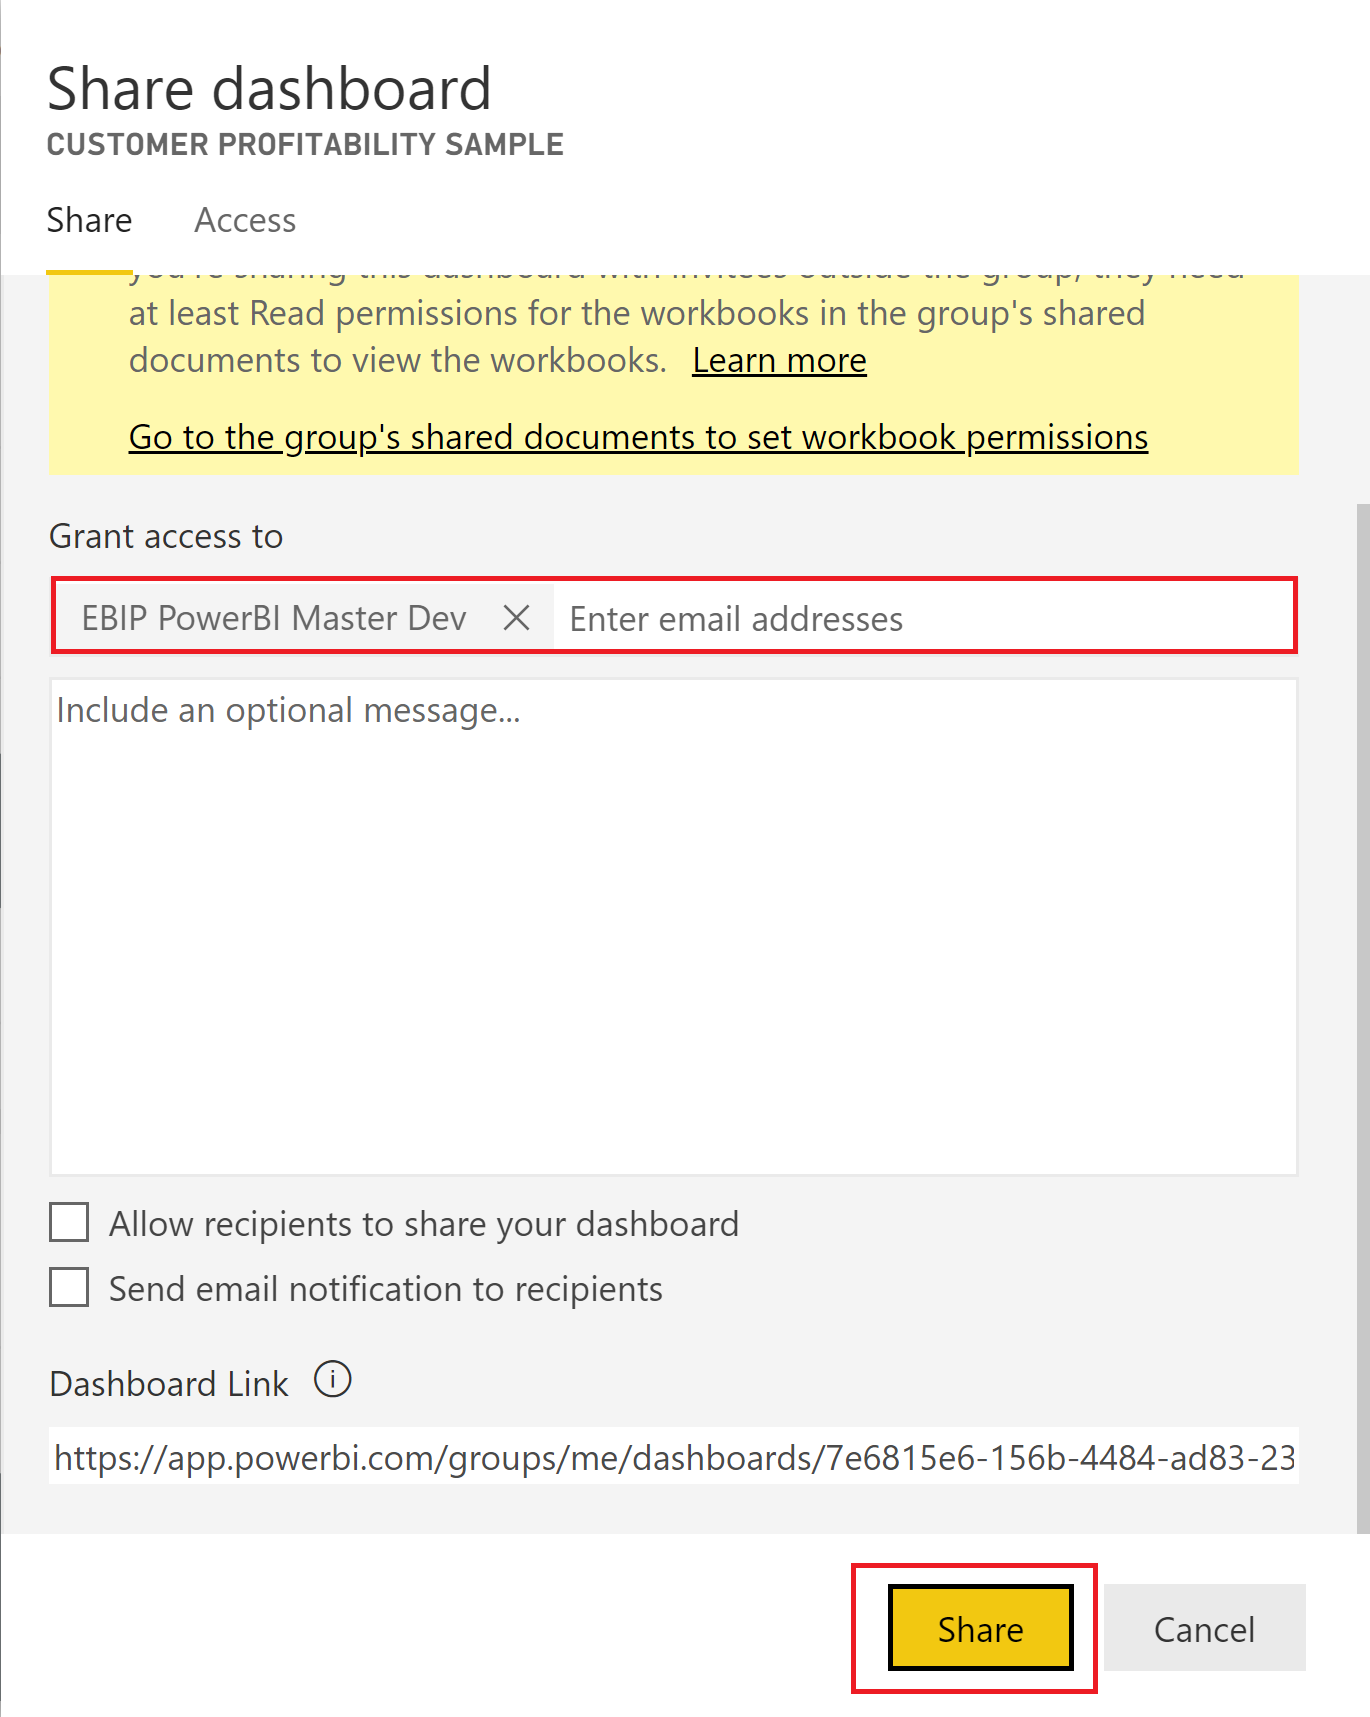
You will then receive a notification to confirm that you have successfully shared the dashboard/tile/report with the master account.
You’re now ready to embed in Loome Publish
Once you’ve completed the steps above, you are ready to start embedding Power BI assets in your Loome Publish portal. This is simple to do - once the permissions are all turned on, embedding is the same process as registering an asset, however the end result will show your content within the Portal instead of in an external tab.
This is where you can read about registering assets.
To obtain dashboard and report URLs needed for the registration process, open each and copy the URL in the browser window. If you are embedding a tile, don’t forget to first hover over the desired tile and click focus mode before copying the URL in the browser window.
Publishing assets Multiple App Owns Data registrations
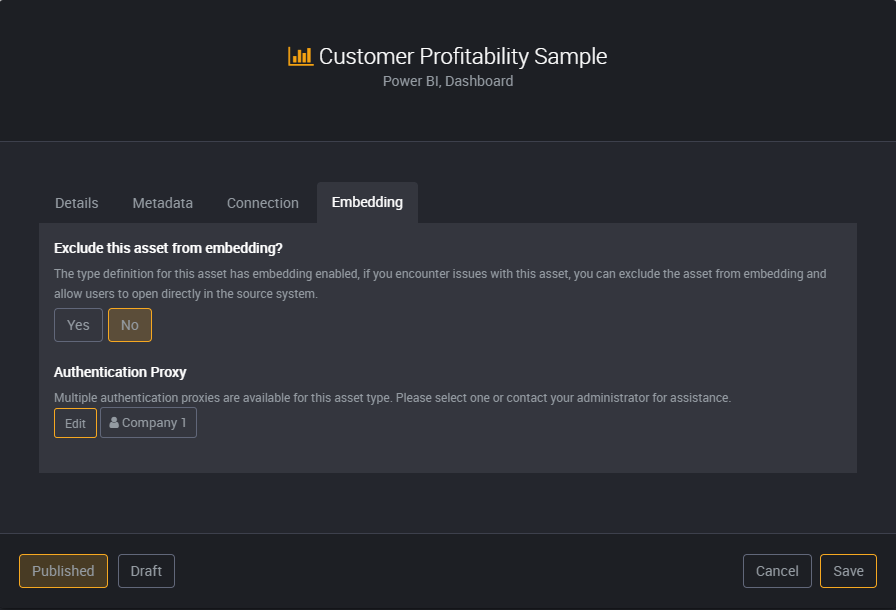
If you have configured more than one App Owns Data app registration, you will have an additional step when publishing Power BI assets.
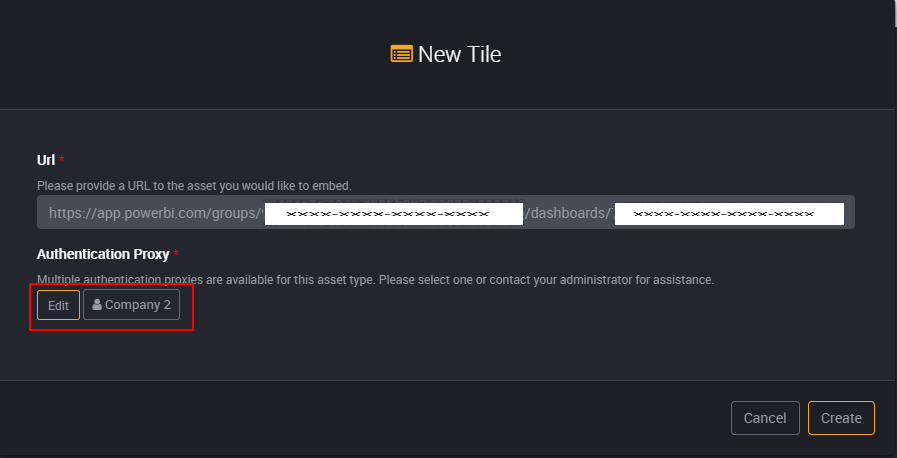
When publishing an asset, you will now see that you have an additional required field under the Embedding tab. Go ahead and click on the Edit button for the Authentication Proxy field.
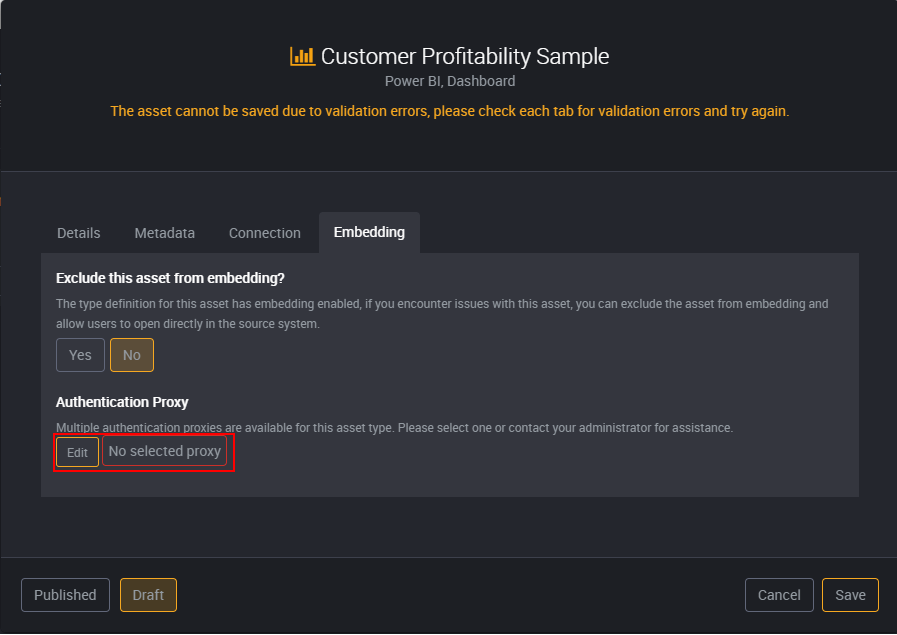
Click on the correct proxy for the asset that you are publishing.

You have now satisfied the additional configuration requirements for embedding with multiple App Owns Data app registrations and may continue on publishing your asset.
Creating tiles with Multiple App Owns Data registrations
If you have configured more than one App Owns Data app registration, you will have an additional step when creating Power BI tiles.
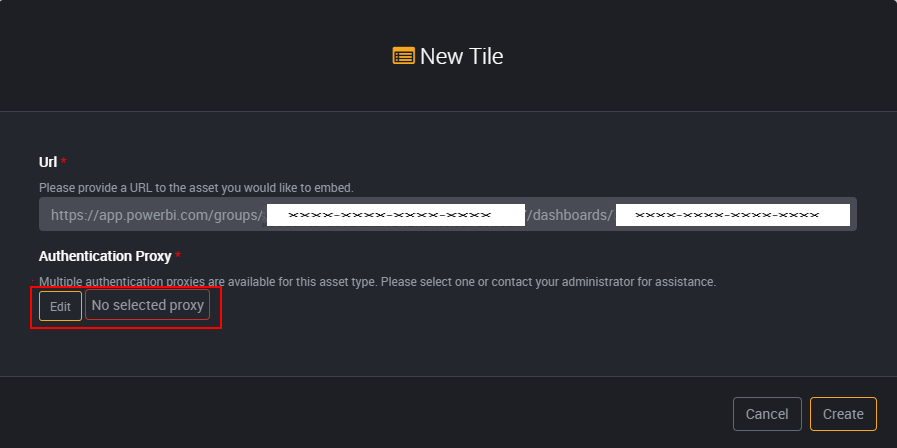
When creating a tile, you will now see that you have an additional required field. Go ahead and click on the Edit button for the Authentication Proxy field.

Click on the correct proxy for the asset that you are publishing.
You have now satisfied the additional configuration requirements for embedding with multiple App Owns Data app registrations and may continue creating your tile.
Configuring row level security on dashboards, reports, and tiles
Row level security (RLS) is configured on a per asset basis and is available for dashboards, reports, and tiles.
In order to configure RLS, you will need to edit the asset within Loome Publish, and go to the embedding tab.
Here you need to turn on RLS, configure one or more dataset IDs, and optionally configure one or more role names.
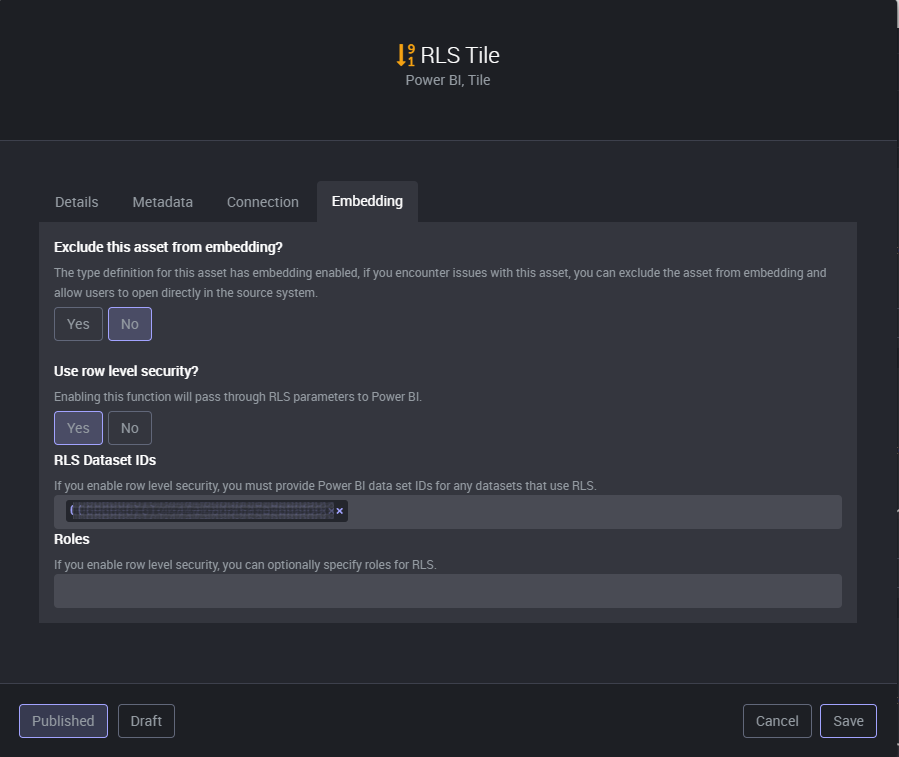
Dataset IDs
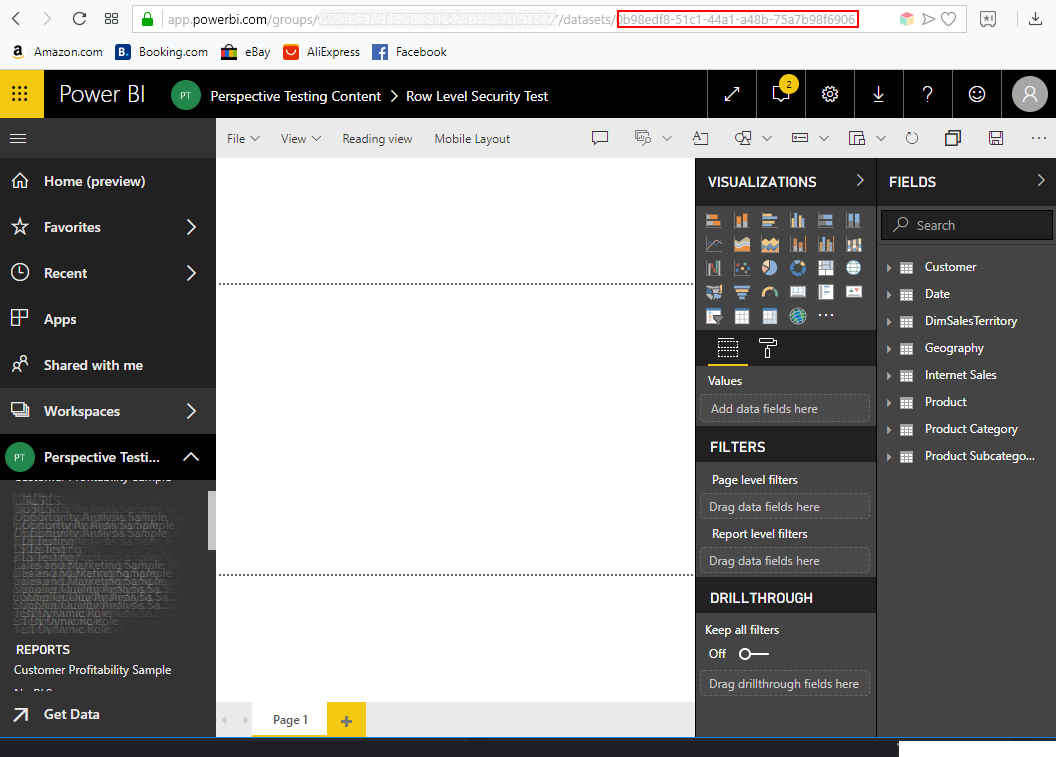
You will need to configure the IDs of the dataset(s) used in your asset that require RLS. To get these IDs, you should browse to the dataset in PowerBI.com and retrieve the dataset ID from the URL, and then enter it in to the Dataset IDs field on the Loome Publish asset.
Roles
If you are relying on the username to filter data, you should not specify a role. The user principal name (UPN, i.e. bob.smith@contoso.com) will be automatically passed to your data source.
If you are instead relying on roles to filter data, you should specify the roles to filter on. If you are trying to filter on the user within your PBI Desktop roles, you should create a singular dynamic role based on the user principal name, and enter this dynamic role within the Loome Publish asset.