Configuration
What is Manage Configuration?
Manage Configuration allows you to set and configure settings for Loome Publish.
Available configurations and setting options include:
- Configure dynamic view options for the navigation pane.
- Set the default browser behaviour of the navigation menu when viewing an embedded asset.
- Set the default sorting order for asset views.
- Enable preview features within the application.
- Configure the number of days for which you would like to keep usage log data.
- Configure the number of years for which you would like to keep asset usage data.
- Configure email settings to enable outgoing email notifications from Loome Publish.
- Configure whether the helpdesk system is enabled or external.
- Edit the email templates that are sent out as notifications.
- Enable and configure an End User License Agreement for your users.
General Configuration Settings
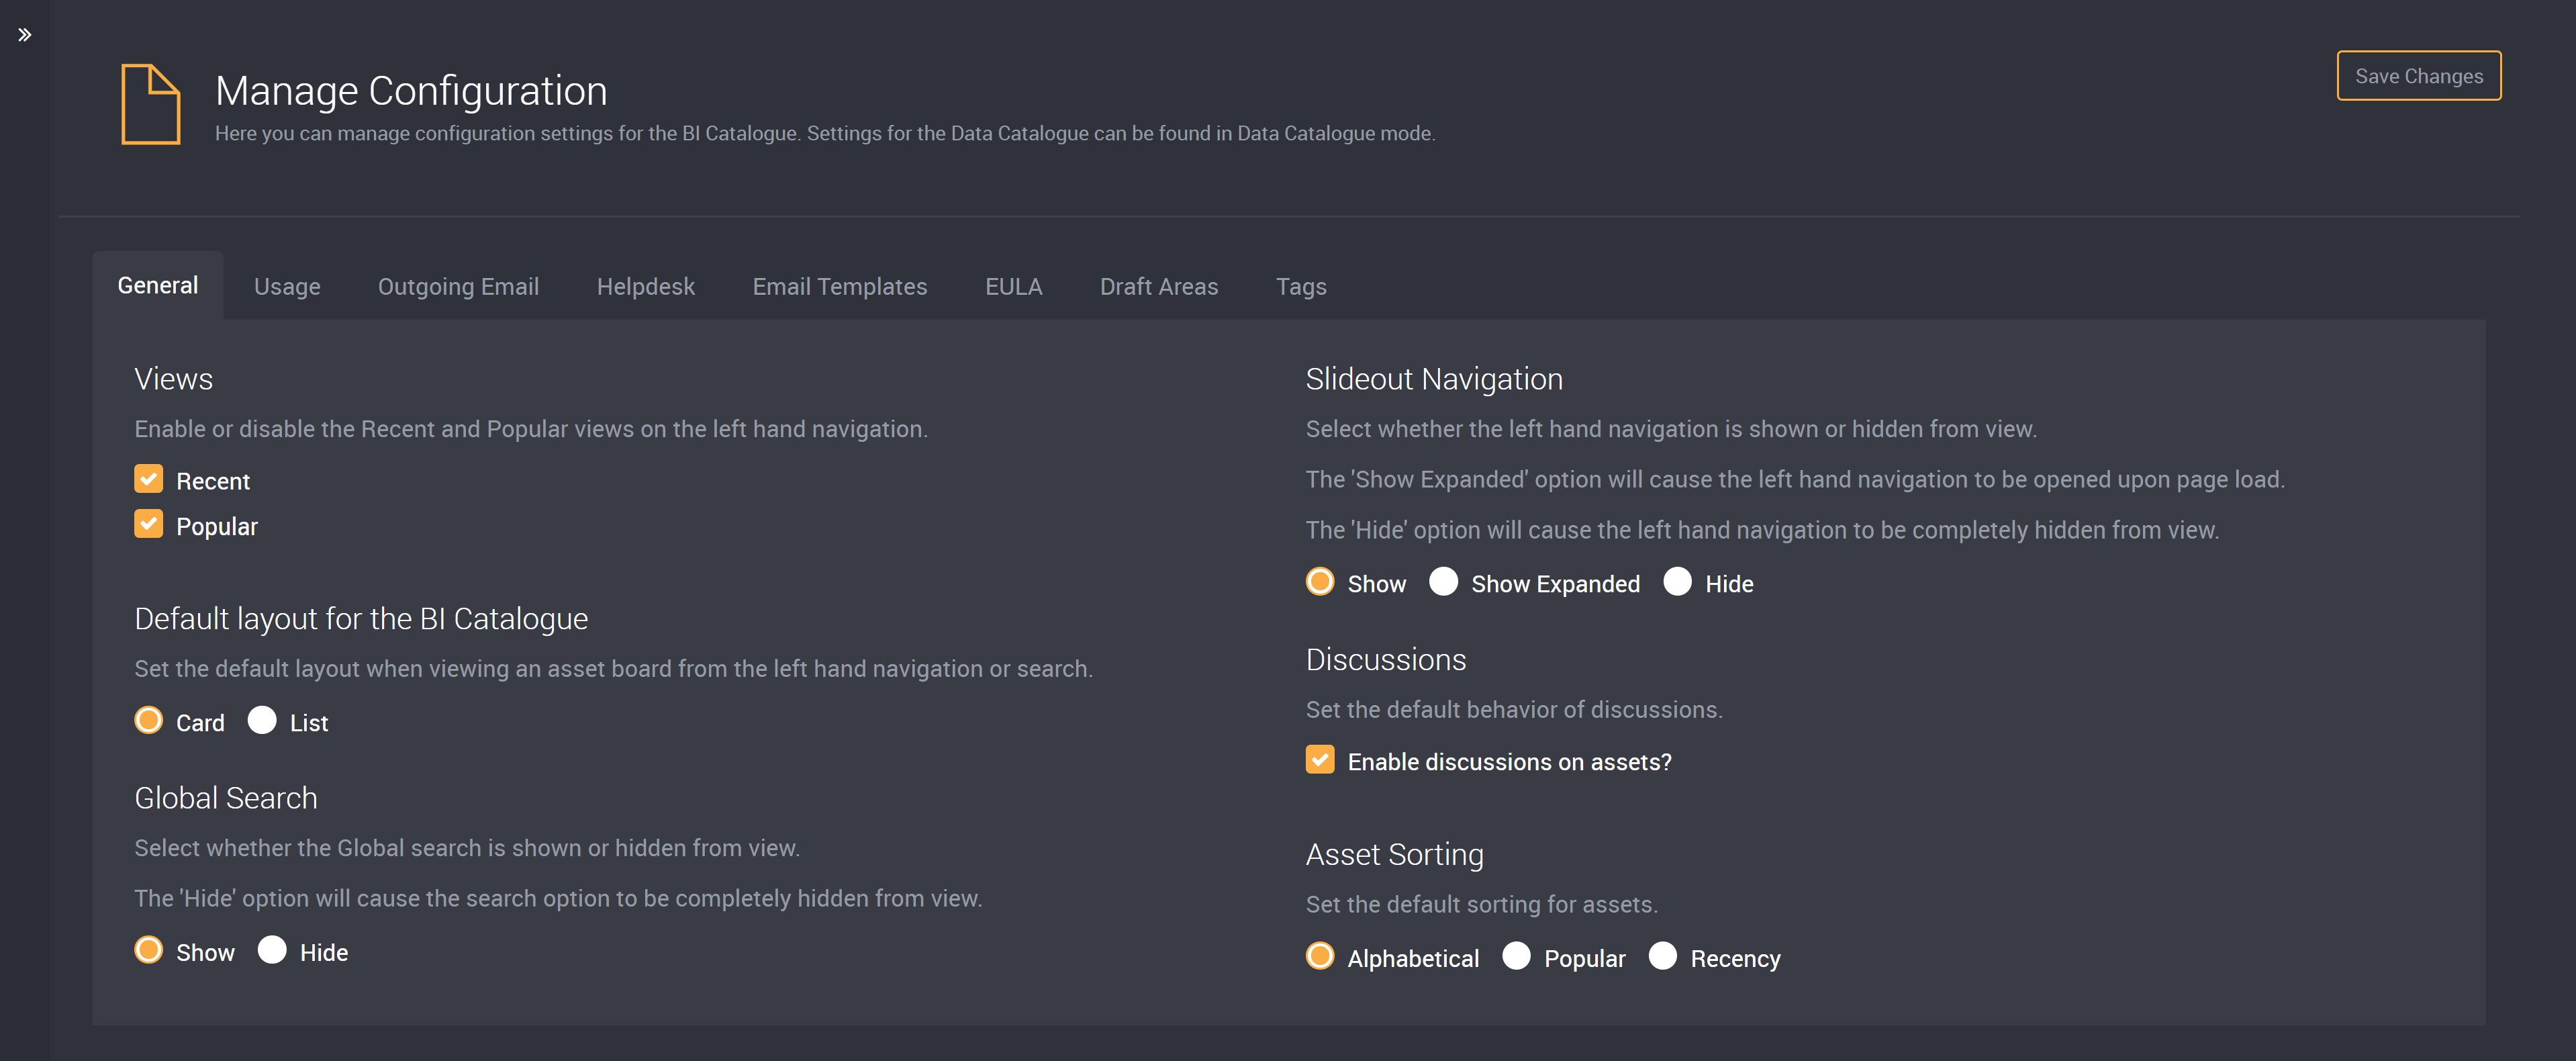
How do I configure which view options display in the navigation pane?
Under ‘Views’, select whether you would like Recent or Popular views displayed in the navigation pane.
Click Save changes.
How do I set the default view for the BI Catalogue?
Under ‘Default View for the BI Catalogue’, select the default view you want for viewing an asset board from the left hand navigation or search.
The options available are:
- Card (default with new installation)
- List
Click Save changes.
How do I enable or disable Discussions?
Under ‘Discussions’, tick the box to enable discussions on assets.
Click Save changes.
Discussions are enabled by default.
How do I set the default sorting order for viewing assets?
Under ‘Asset Sorting’, select the default sorting for assets.
The options available are:
- Alphabetical
- Popular
- Recency
Click Save changes.
How do I set the navigation to show expanded and minimise automatically?
If the navigation is set to Show Expanded, when a page in Loome Publish is first loaded the left-hand navigation will be expanded until you click somewhere else on the page that will minimise the left-hand navigation from view.
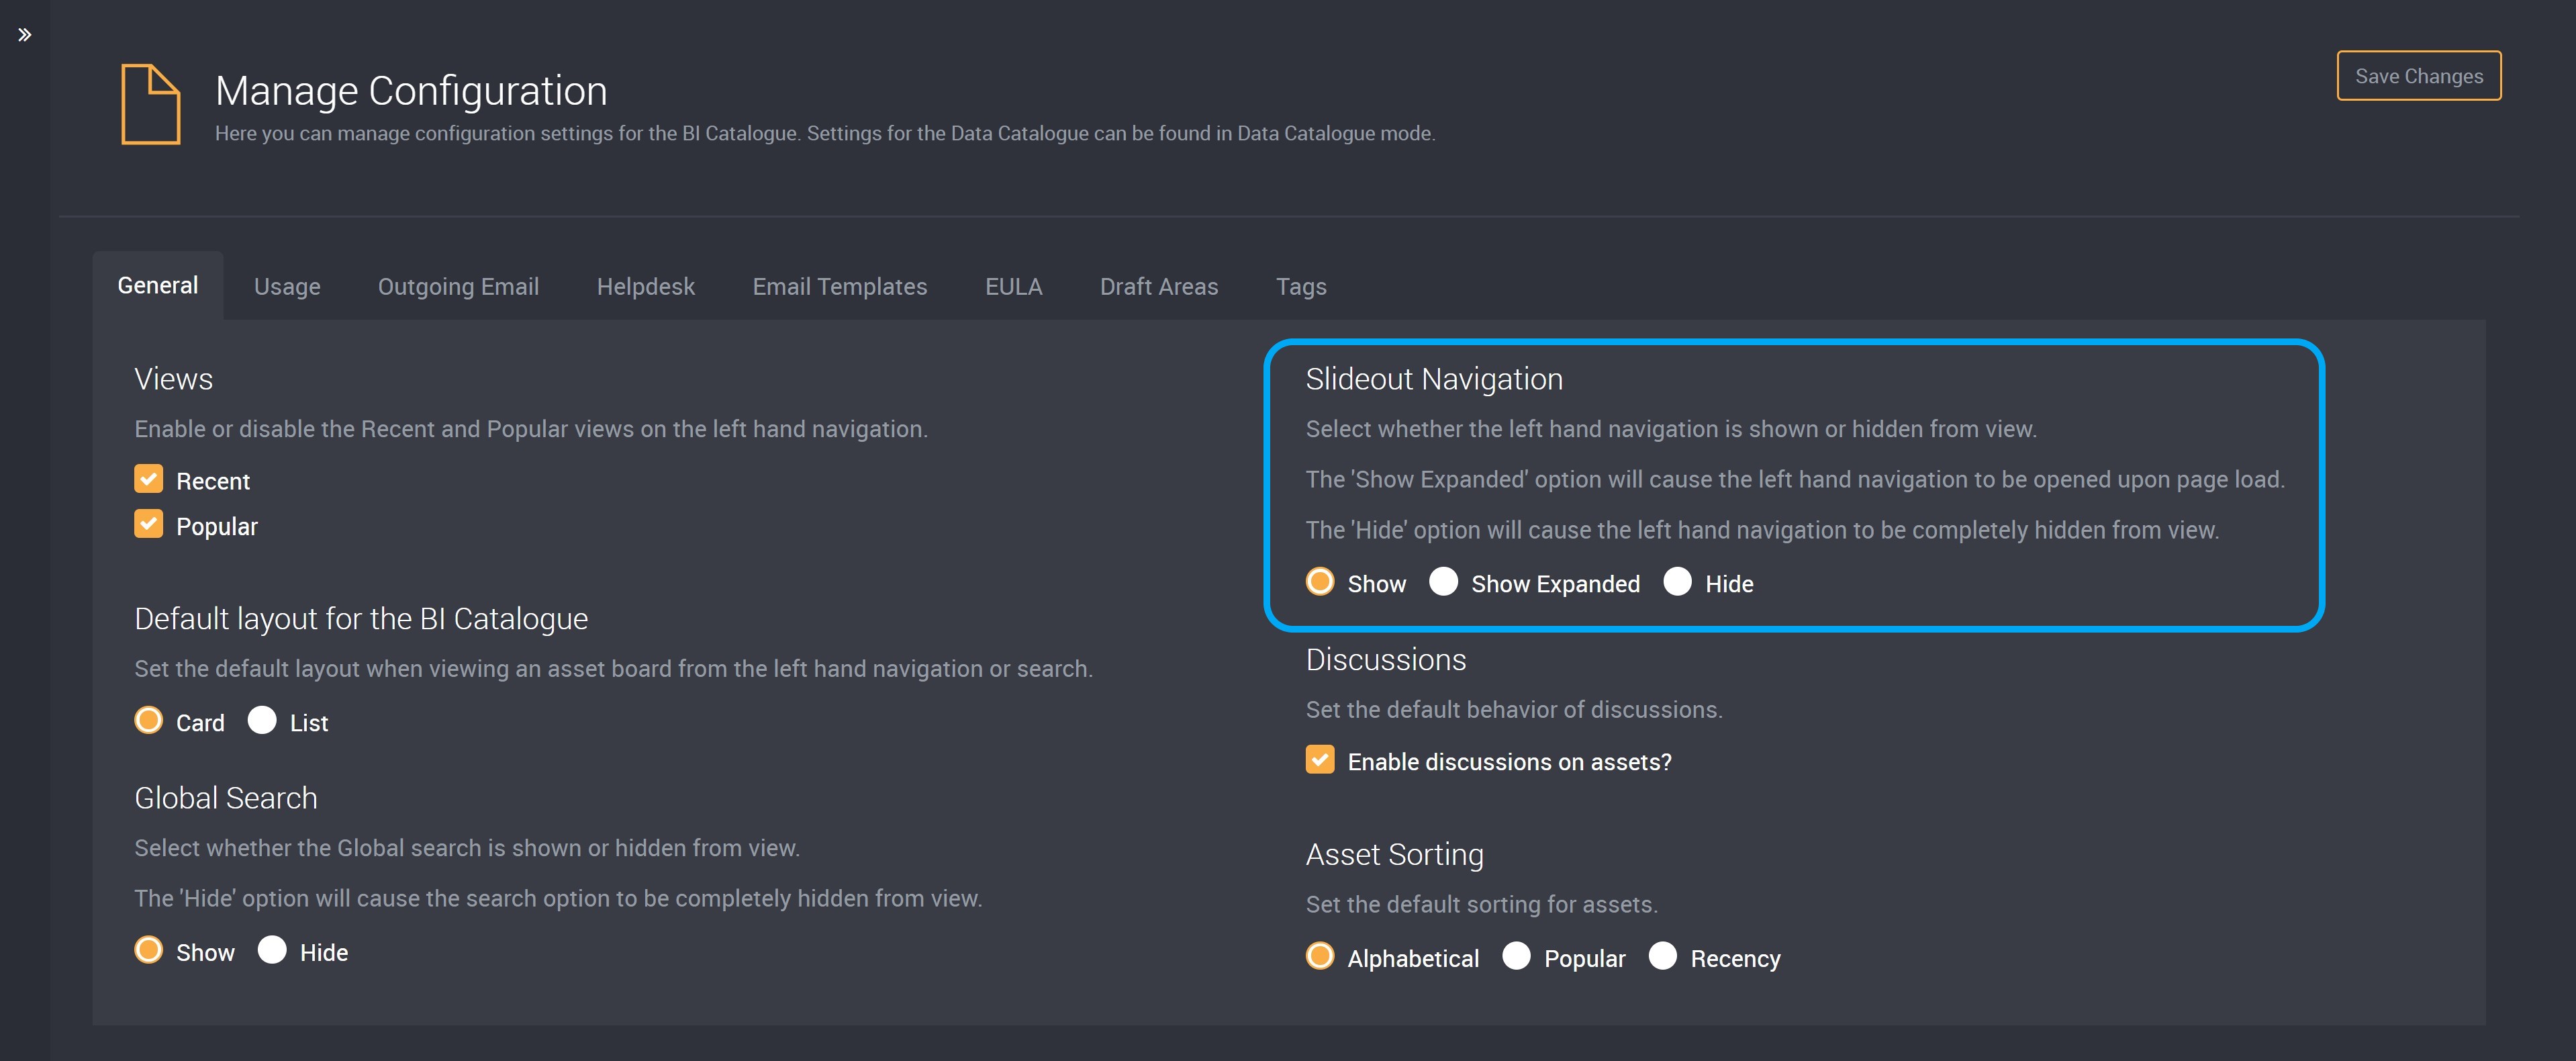
How do I show or hide the navigation from view?
Under ‘Slideout Navigation’, select whether you want to show or hide the left hand navigation.
Make your selection of Show, Show Expanded or Hide.
Click Save changes.
After saving your default selection of Show, Show Expanded or Hide, you may have to refresh your page to see your changes take affect.
Usage
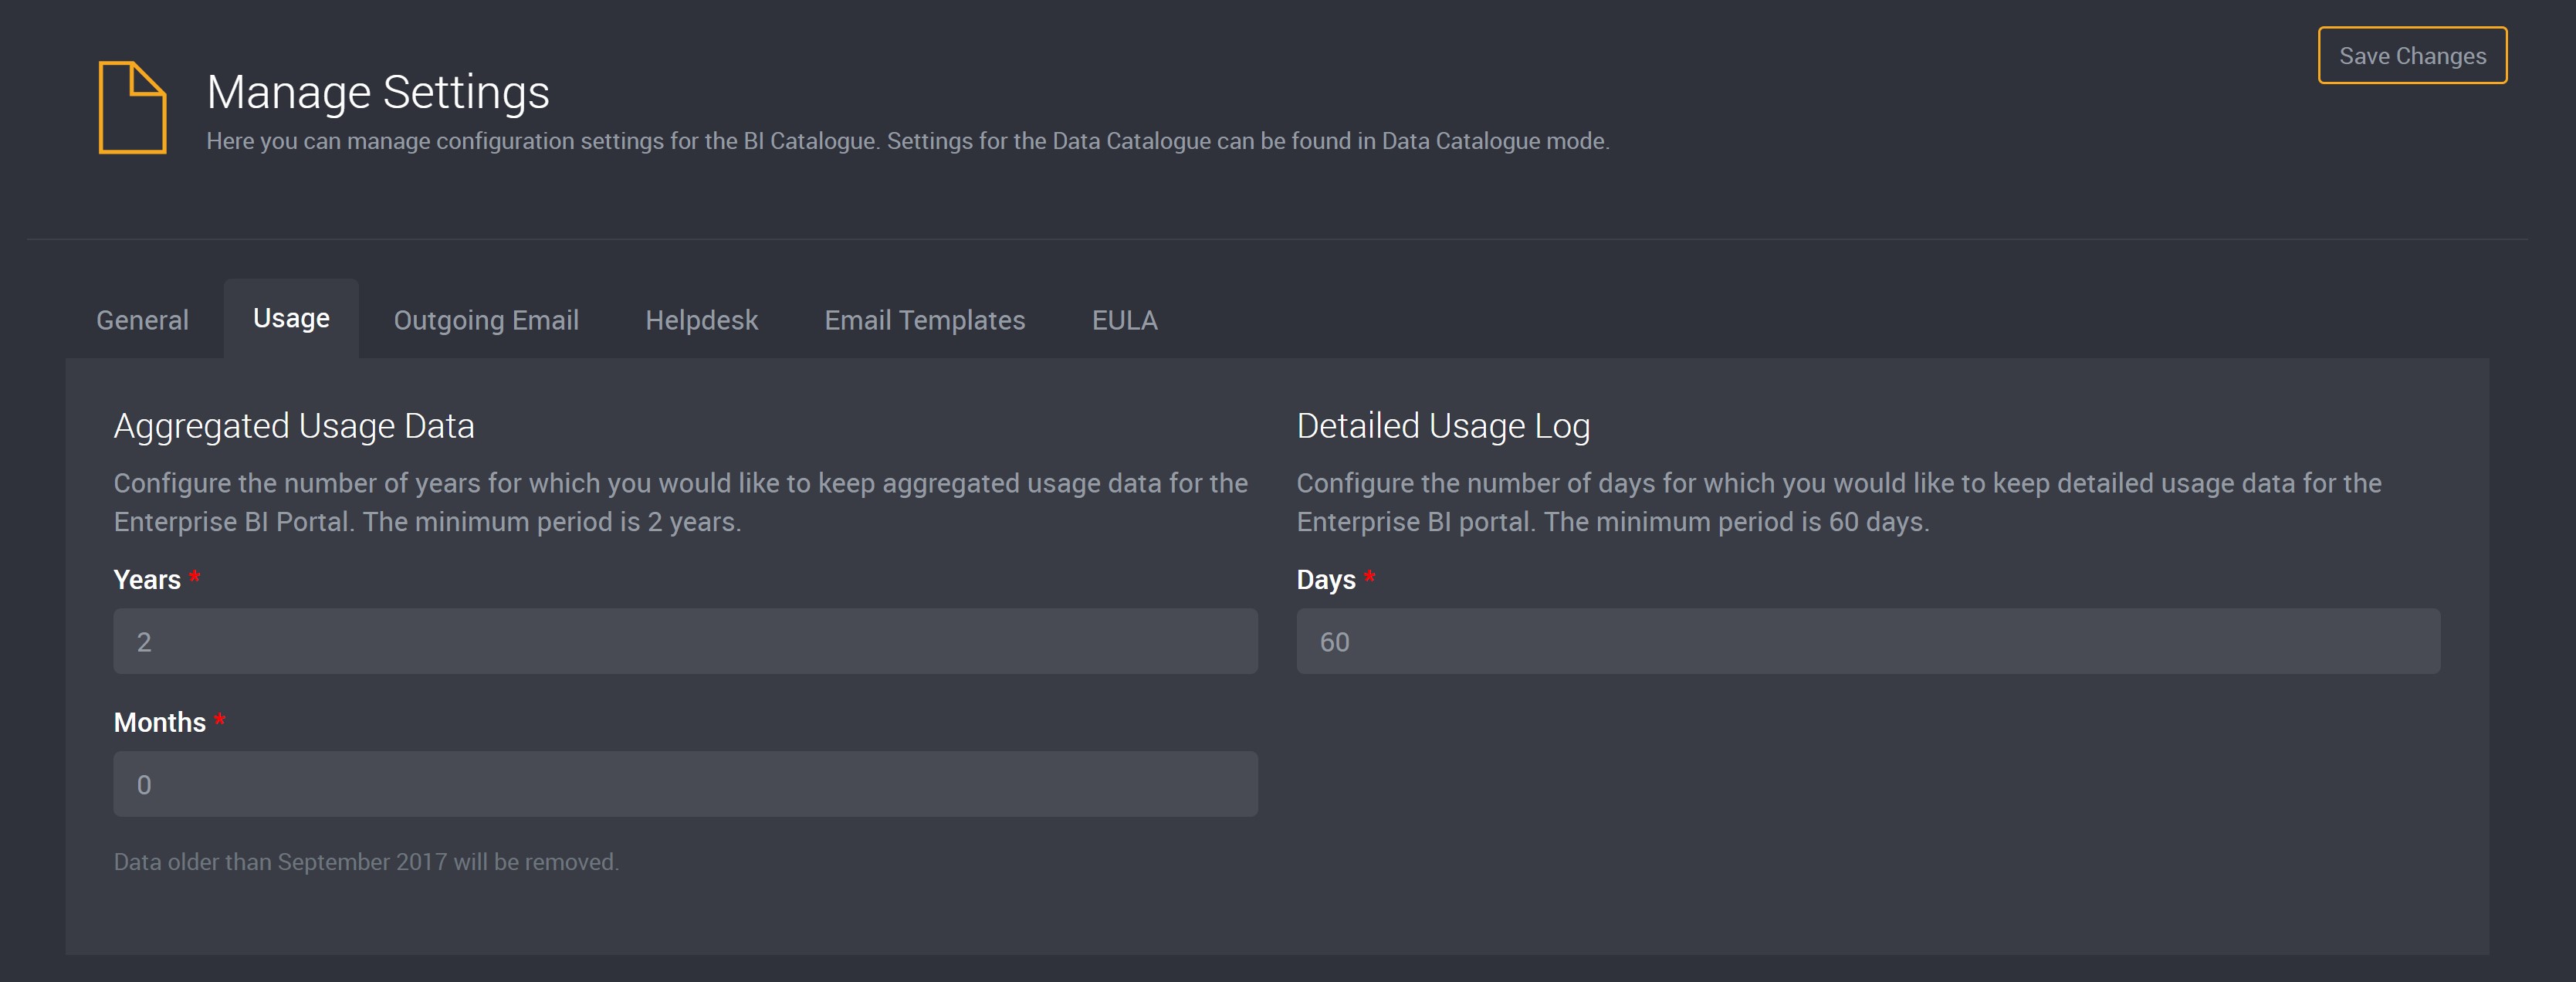
How do I configure how long usage logs are kept?
Under ‘Detailed Usage Log’, enter the number of days you would like to keep detailed usage log data for Loome Publish.
Click Save changes.
The minimum period allowed is 60 days.
How do I configure how long usage metrics are kept?
Under ‘Aggregated Asset Usage’, enter the number of years and months you would like to keep aggregated asset usage data for Loome Publish.
Click Save changes.
The minimum period allowed is 2 years.
Outgoing Email
How do I configure which email is used to send outgoing emails?
Configure email settings under the Outgoing Email tab in Configuration. This will send email notifications from Loome Publish using the provided email address.
SMTP
Enter an email address as Username and its password.
If you would prefer to use an alias email, such as a shared mailbox, please also complete the Sender Email field as highlighted in the image below. Loome Publish will send emails as this email account. Please skip this step if you do not wish to use an alias email address and Loome Publish will send emails as the Username field.
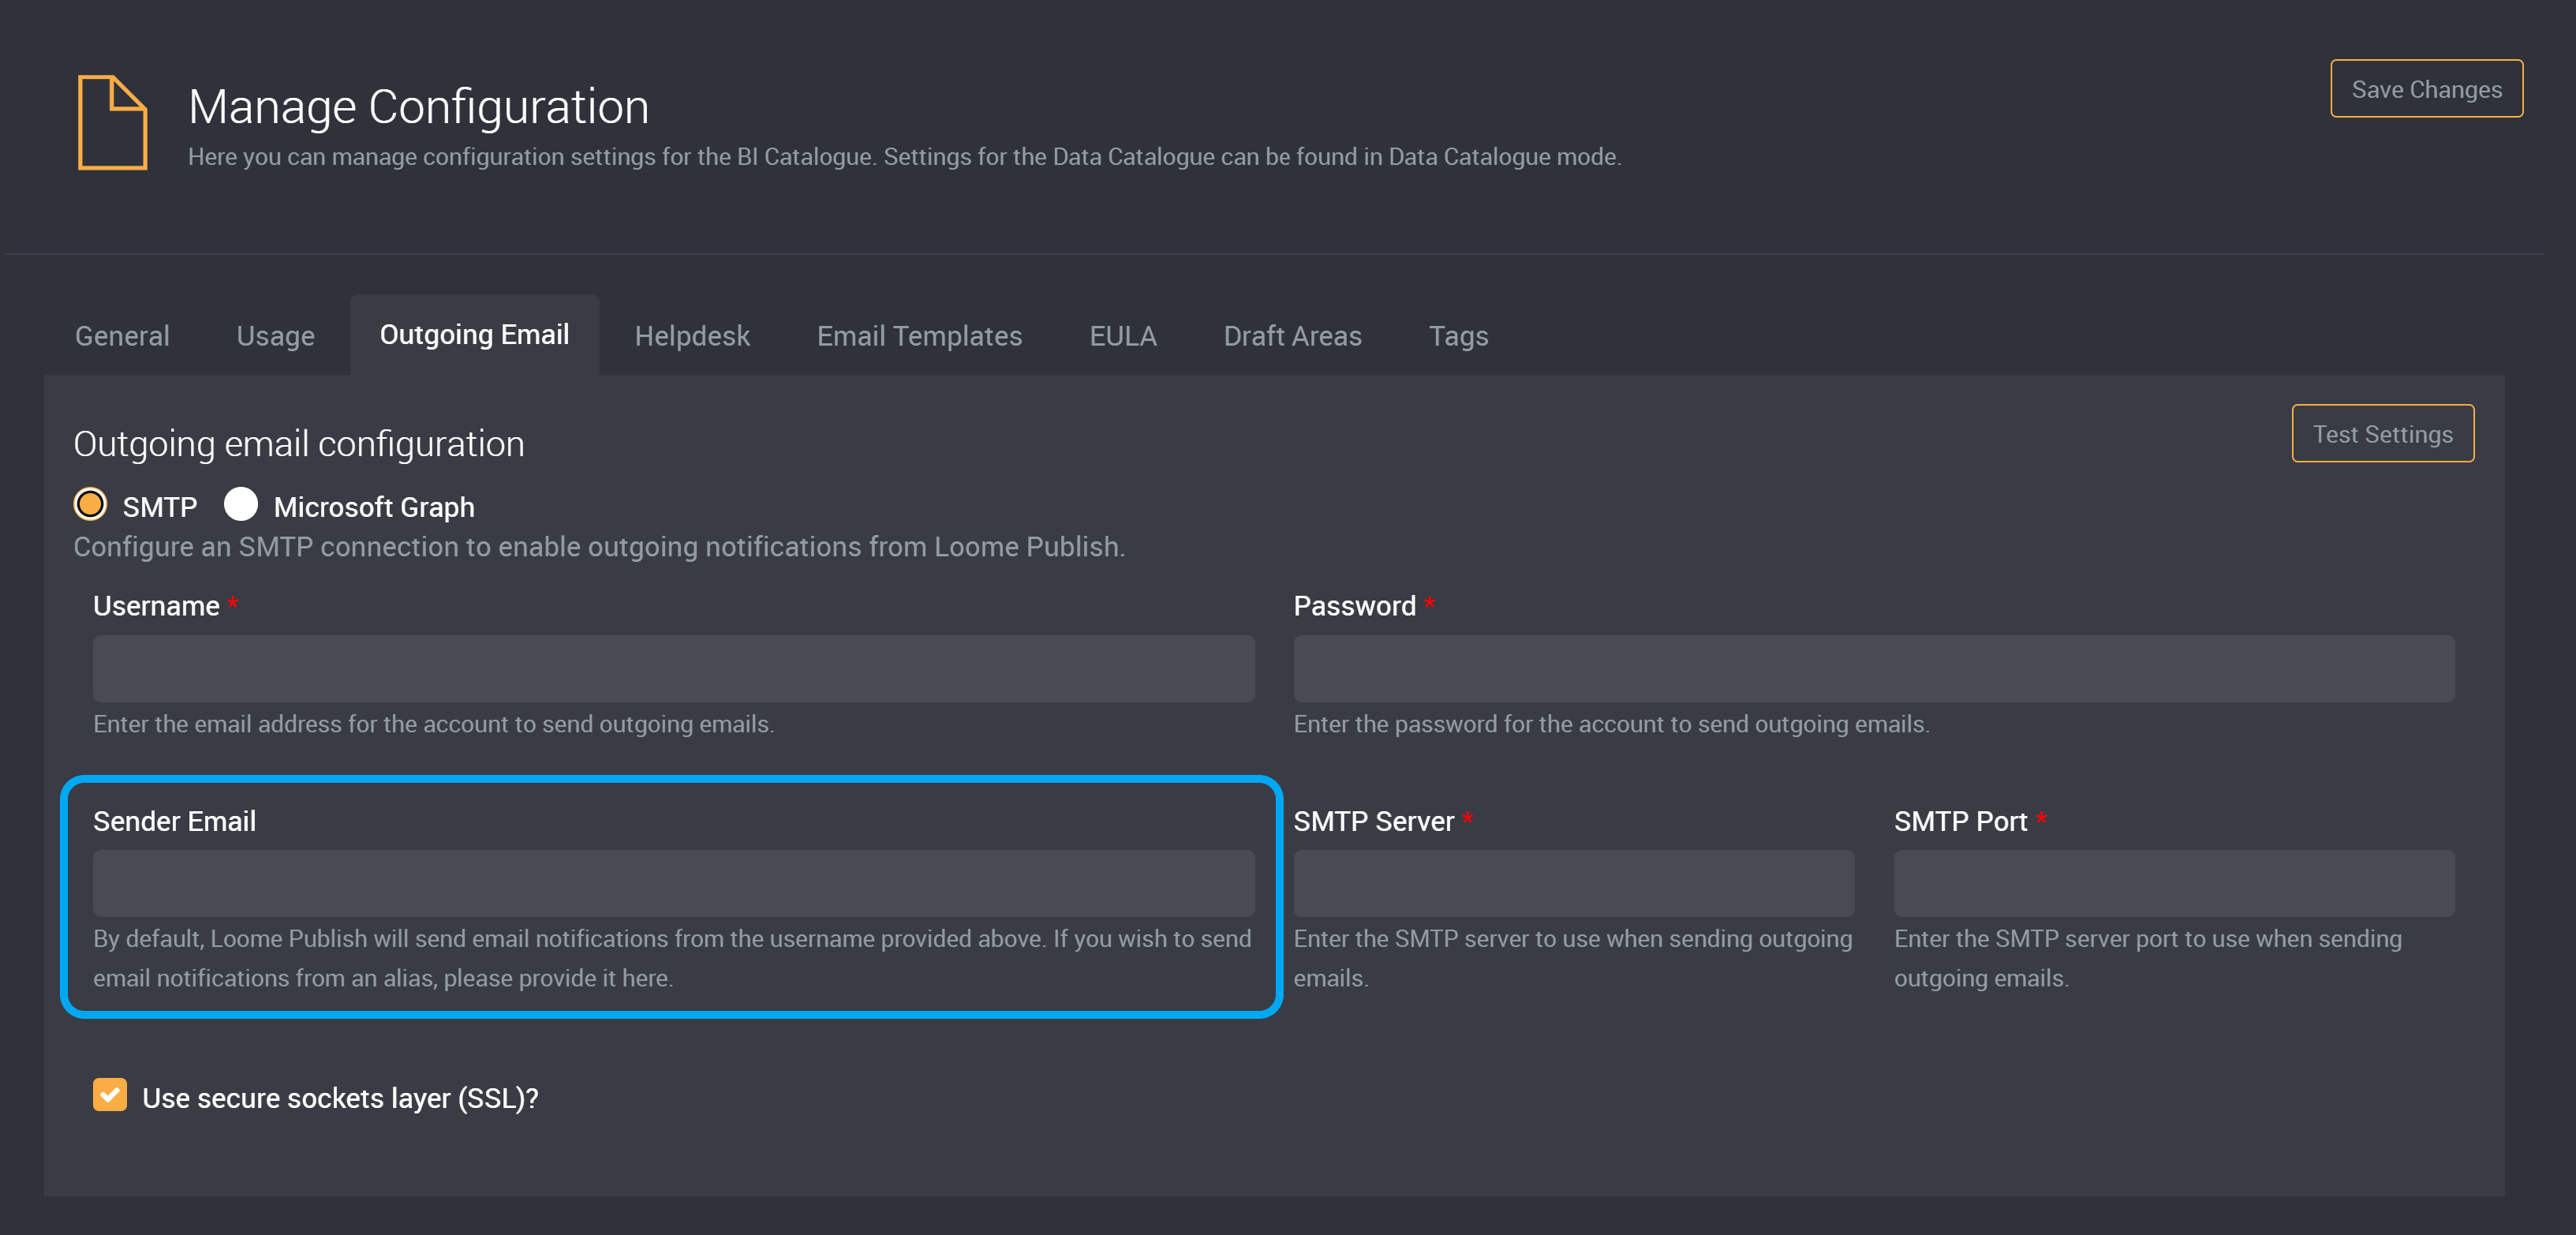
Enter the SMTP Server and SMTP Port, and select whether you want to use a secure sockets layer (SSL).
Save your changes at the top right of the screen.
Once saved, test these settings by clicking on Test Settings. This will send a test email to your email address using the Username email or Sender Email, and you can ensure you have saved the correct details.
If you no longer wish to use these email settings, just click on Delete Settings at the top right of the page beside Save Settings.
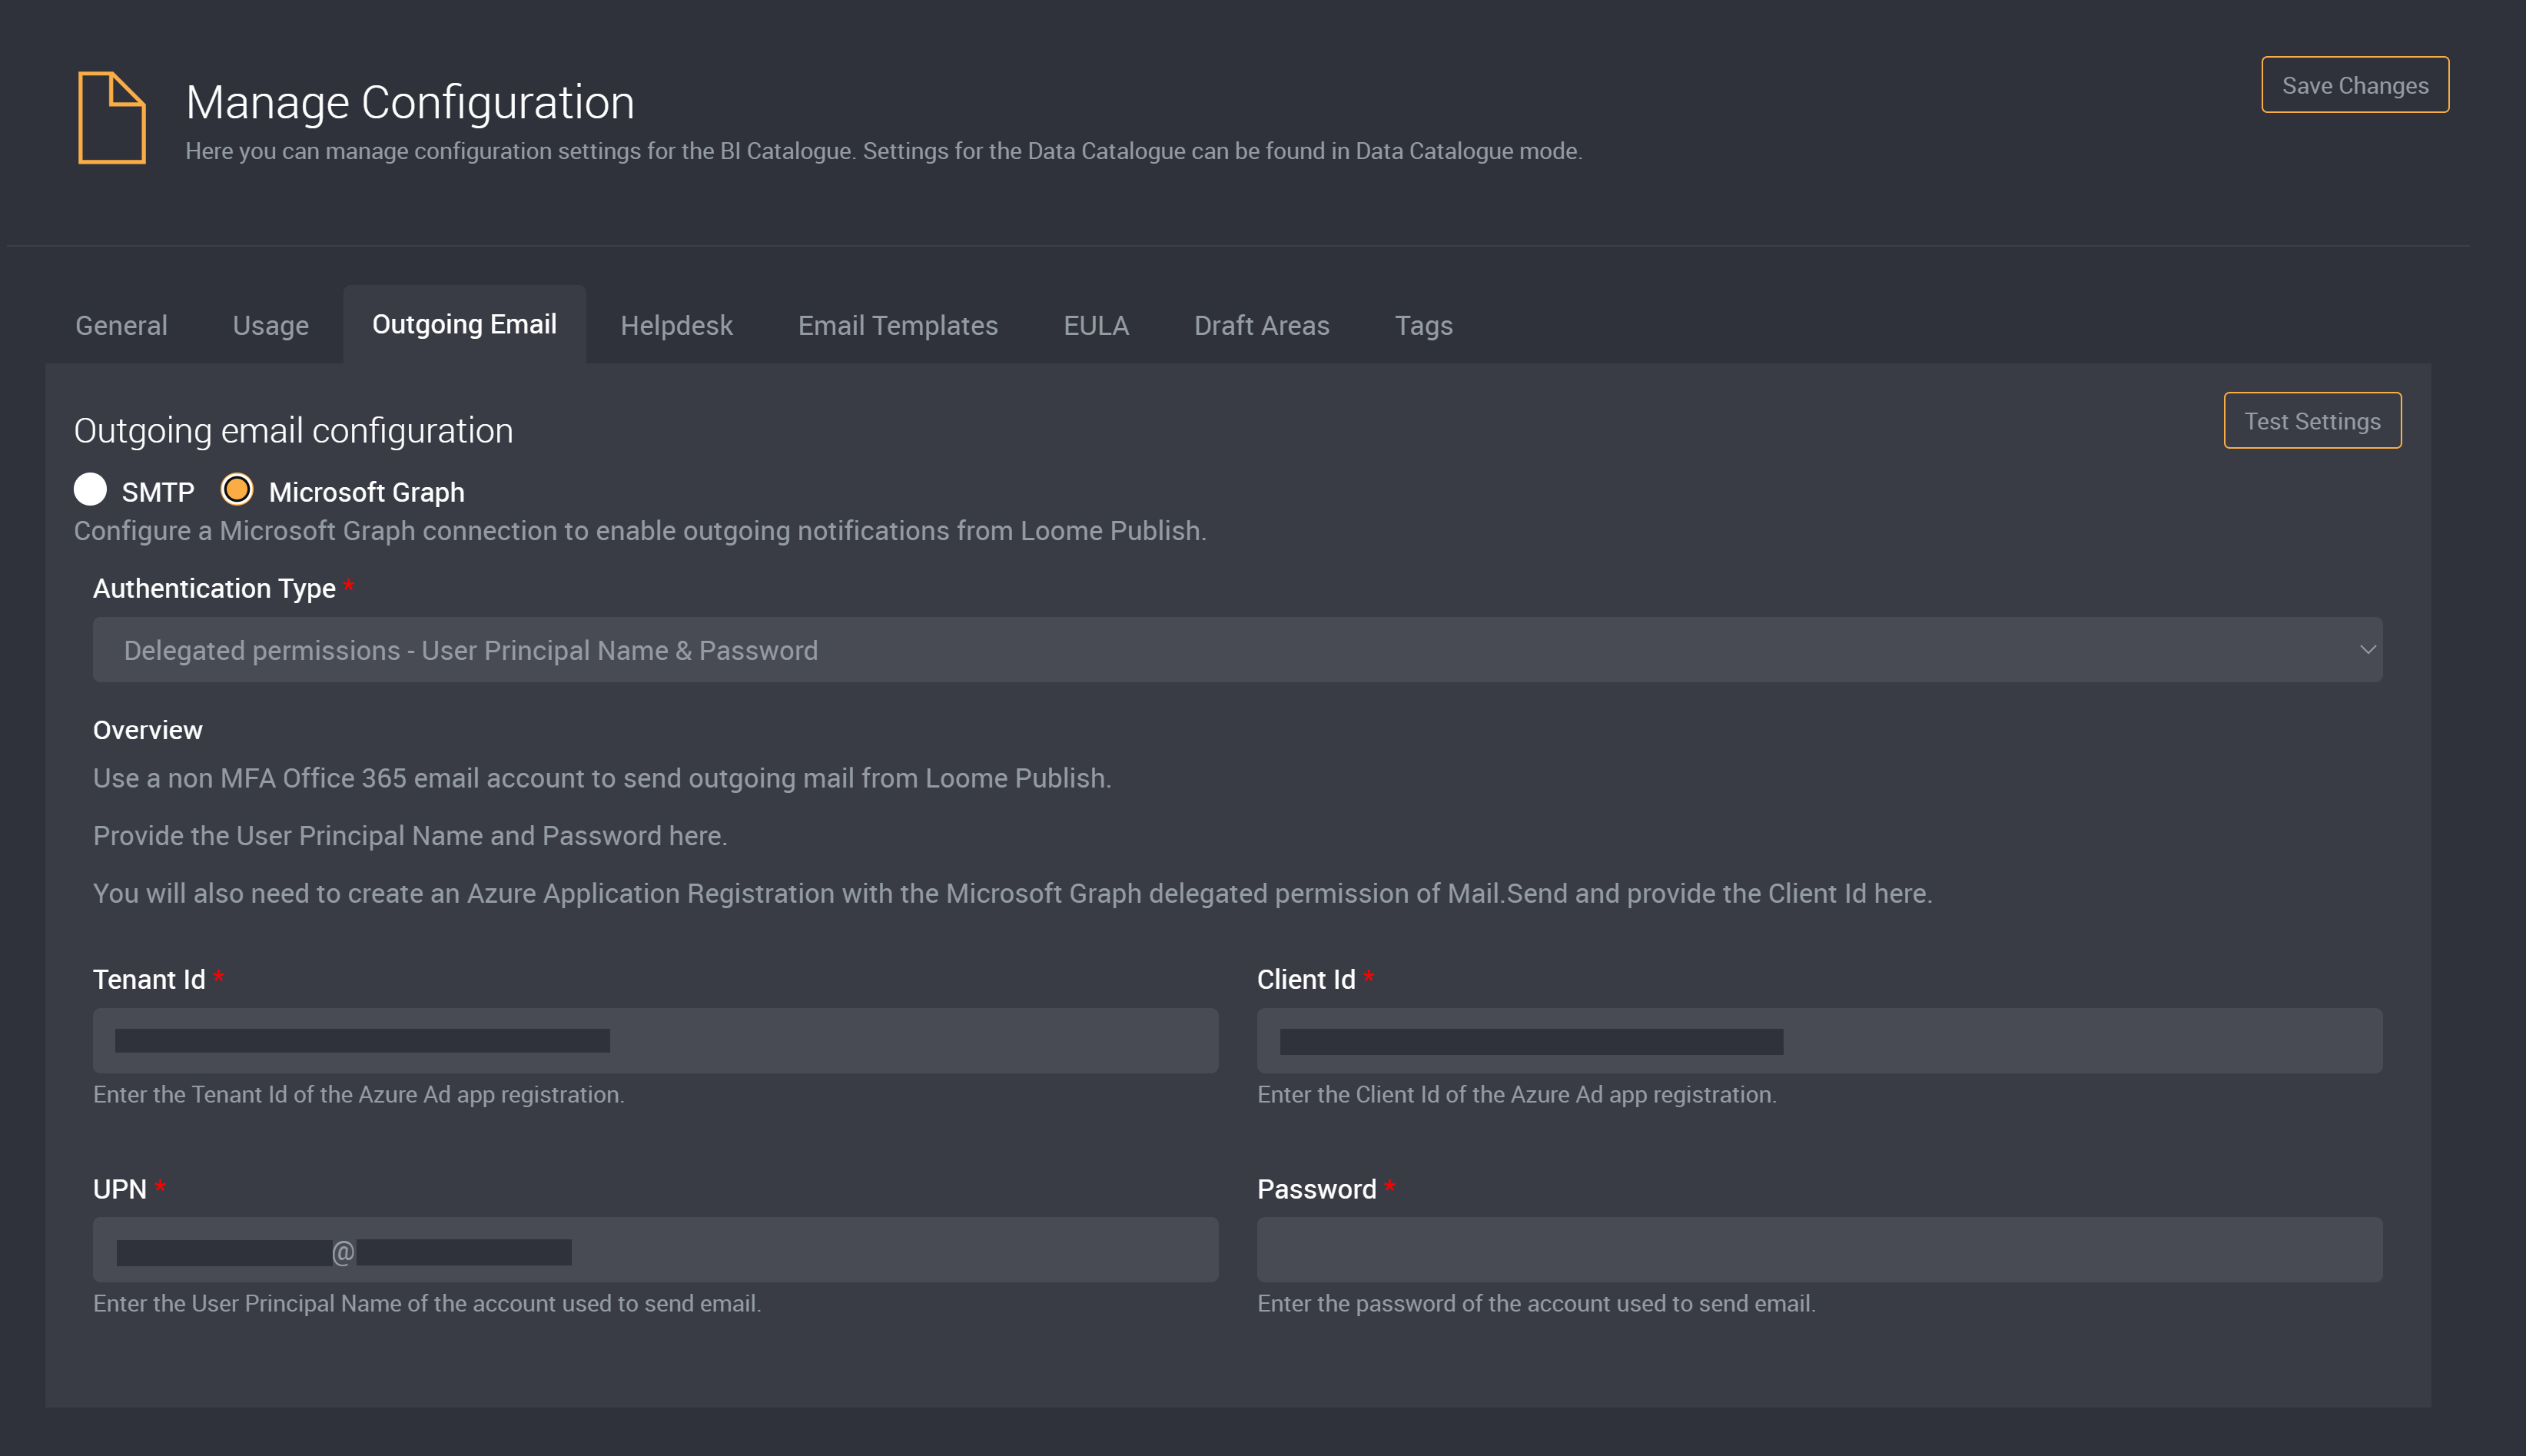
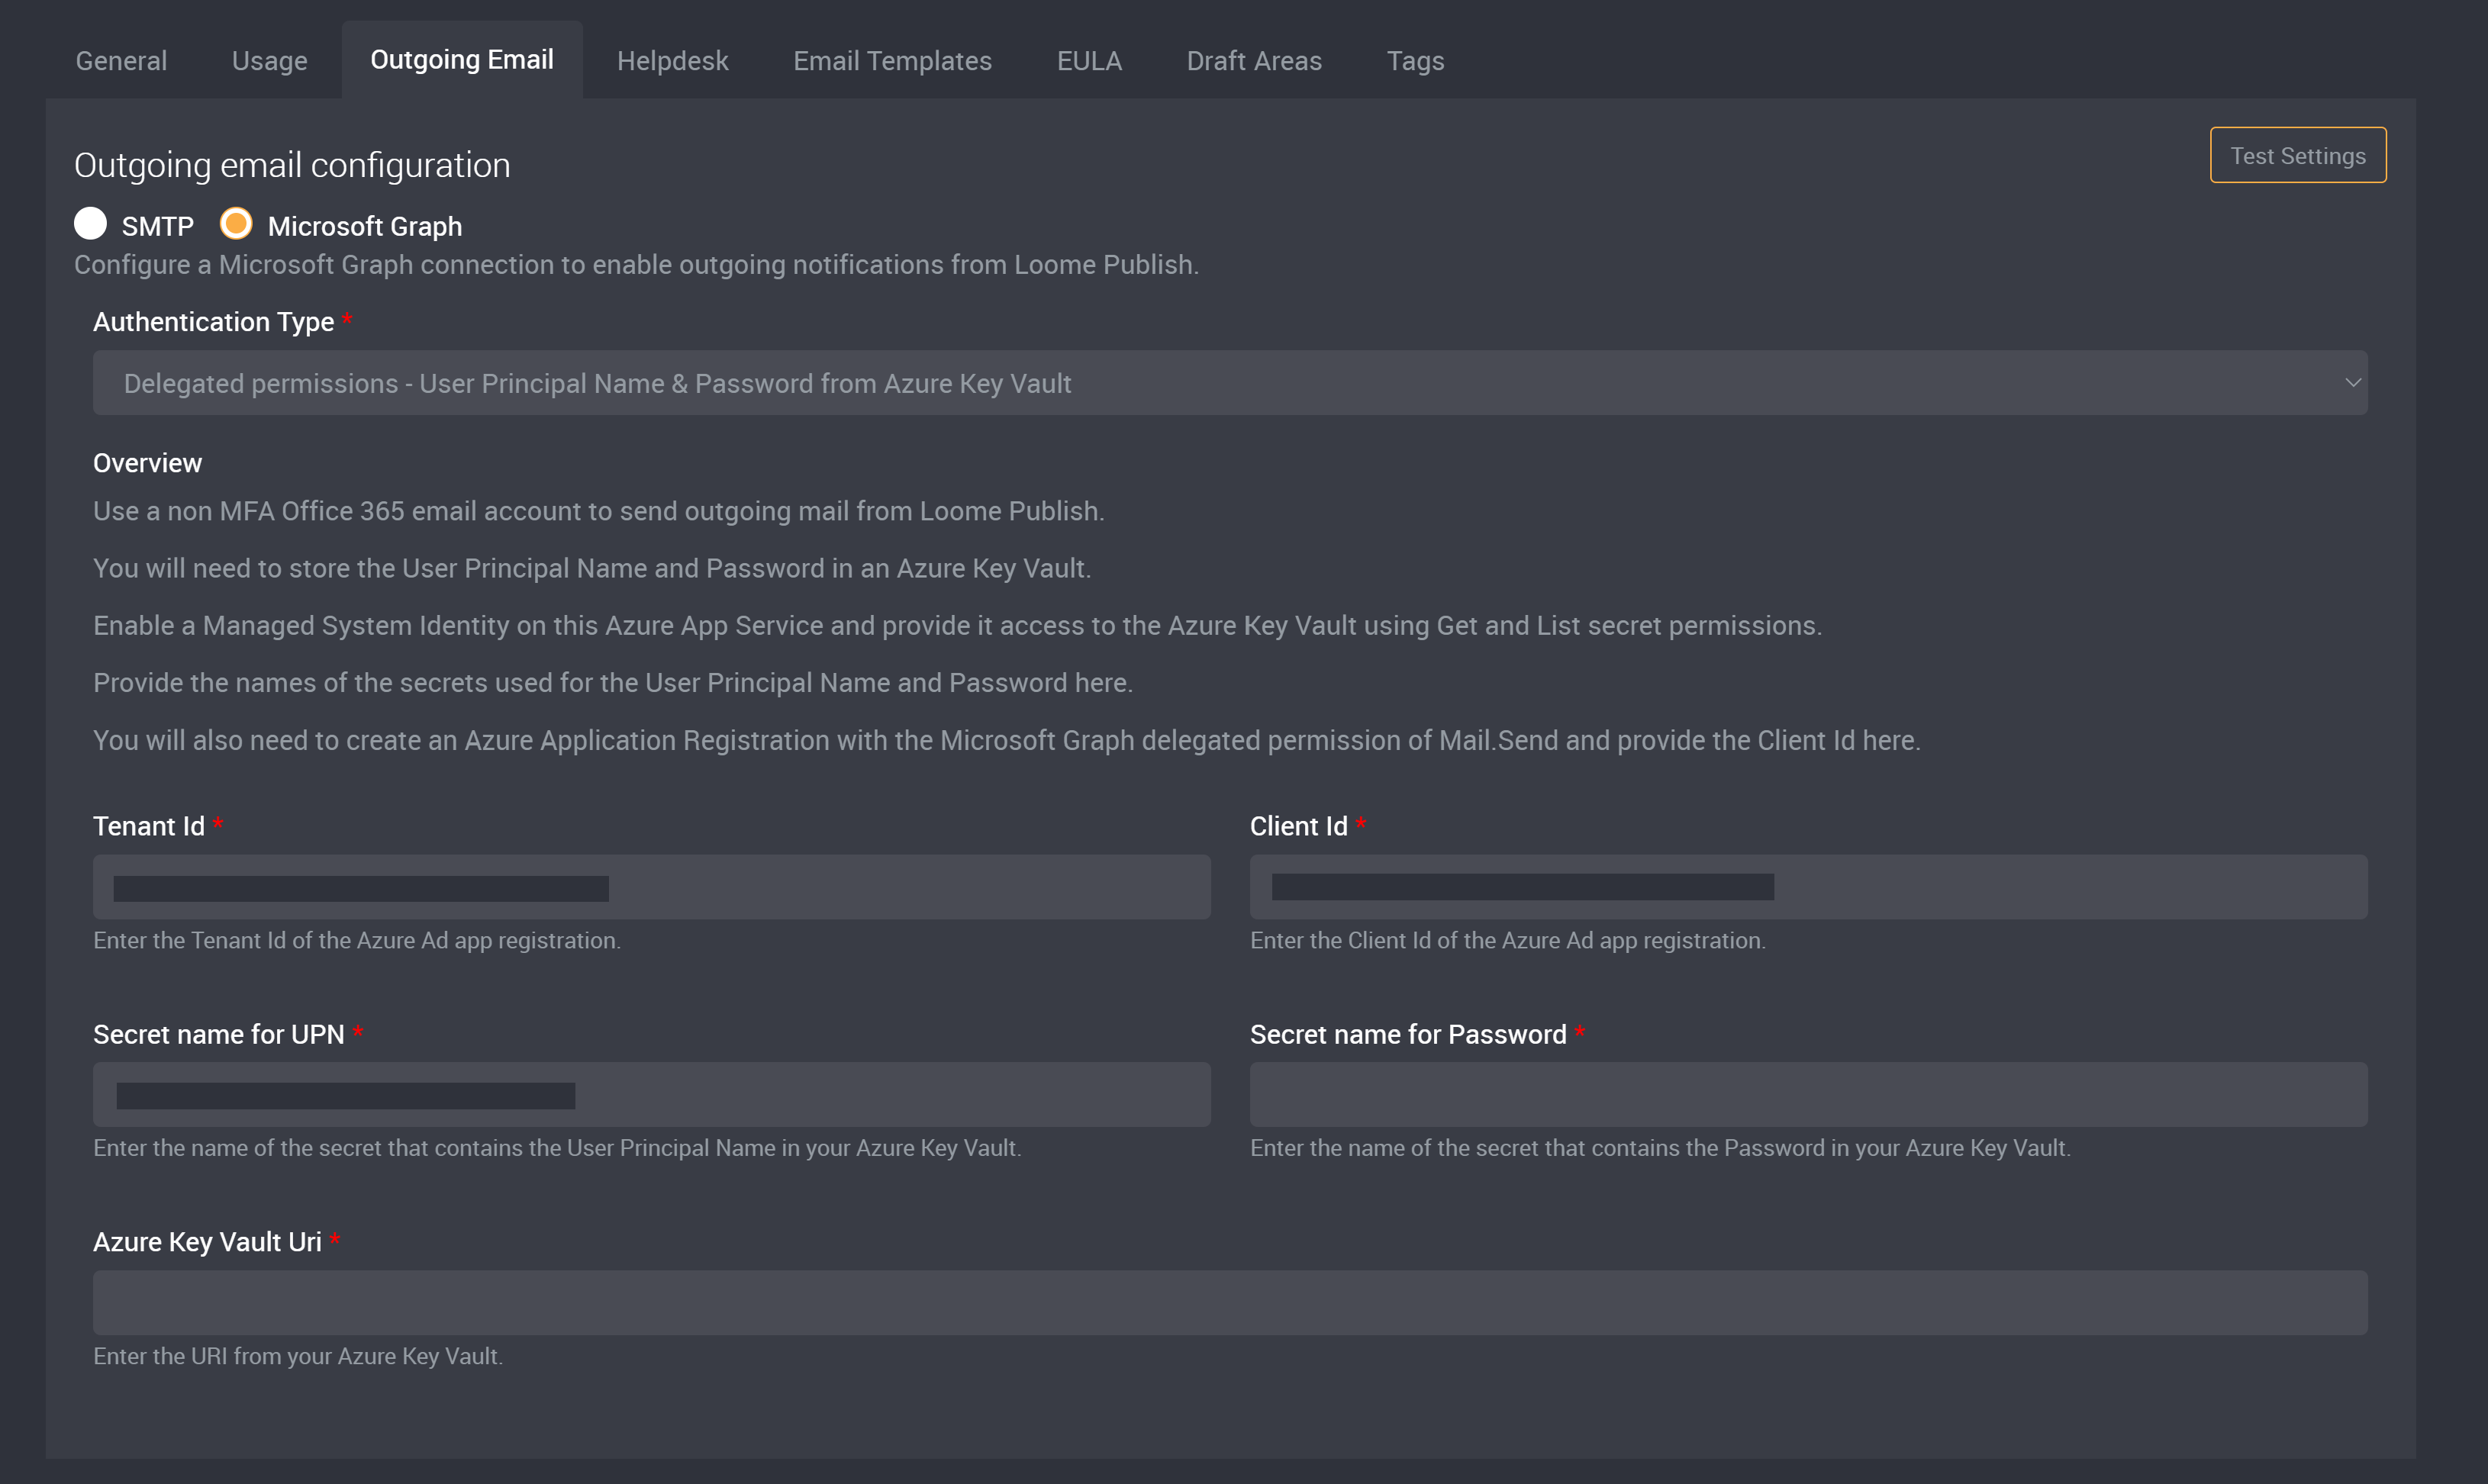
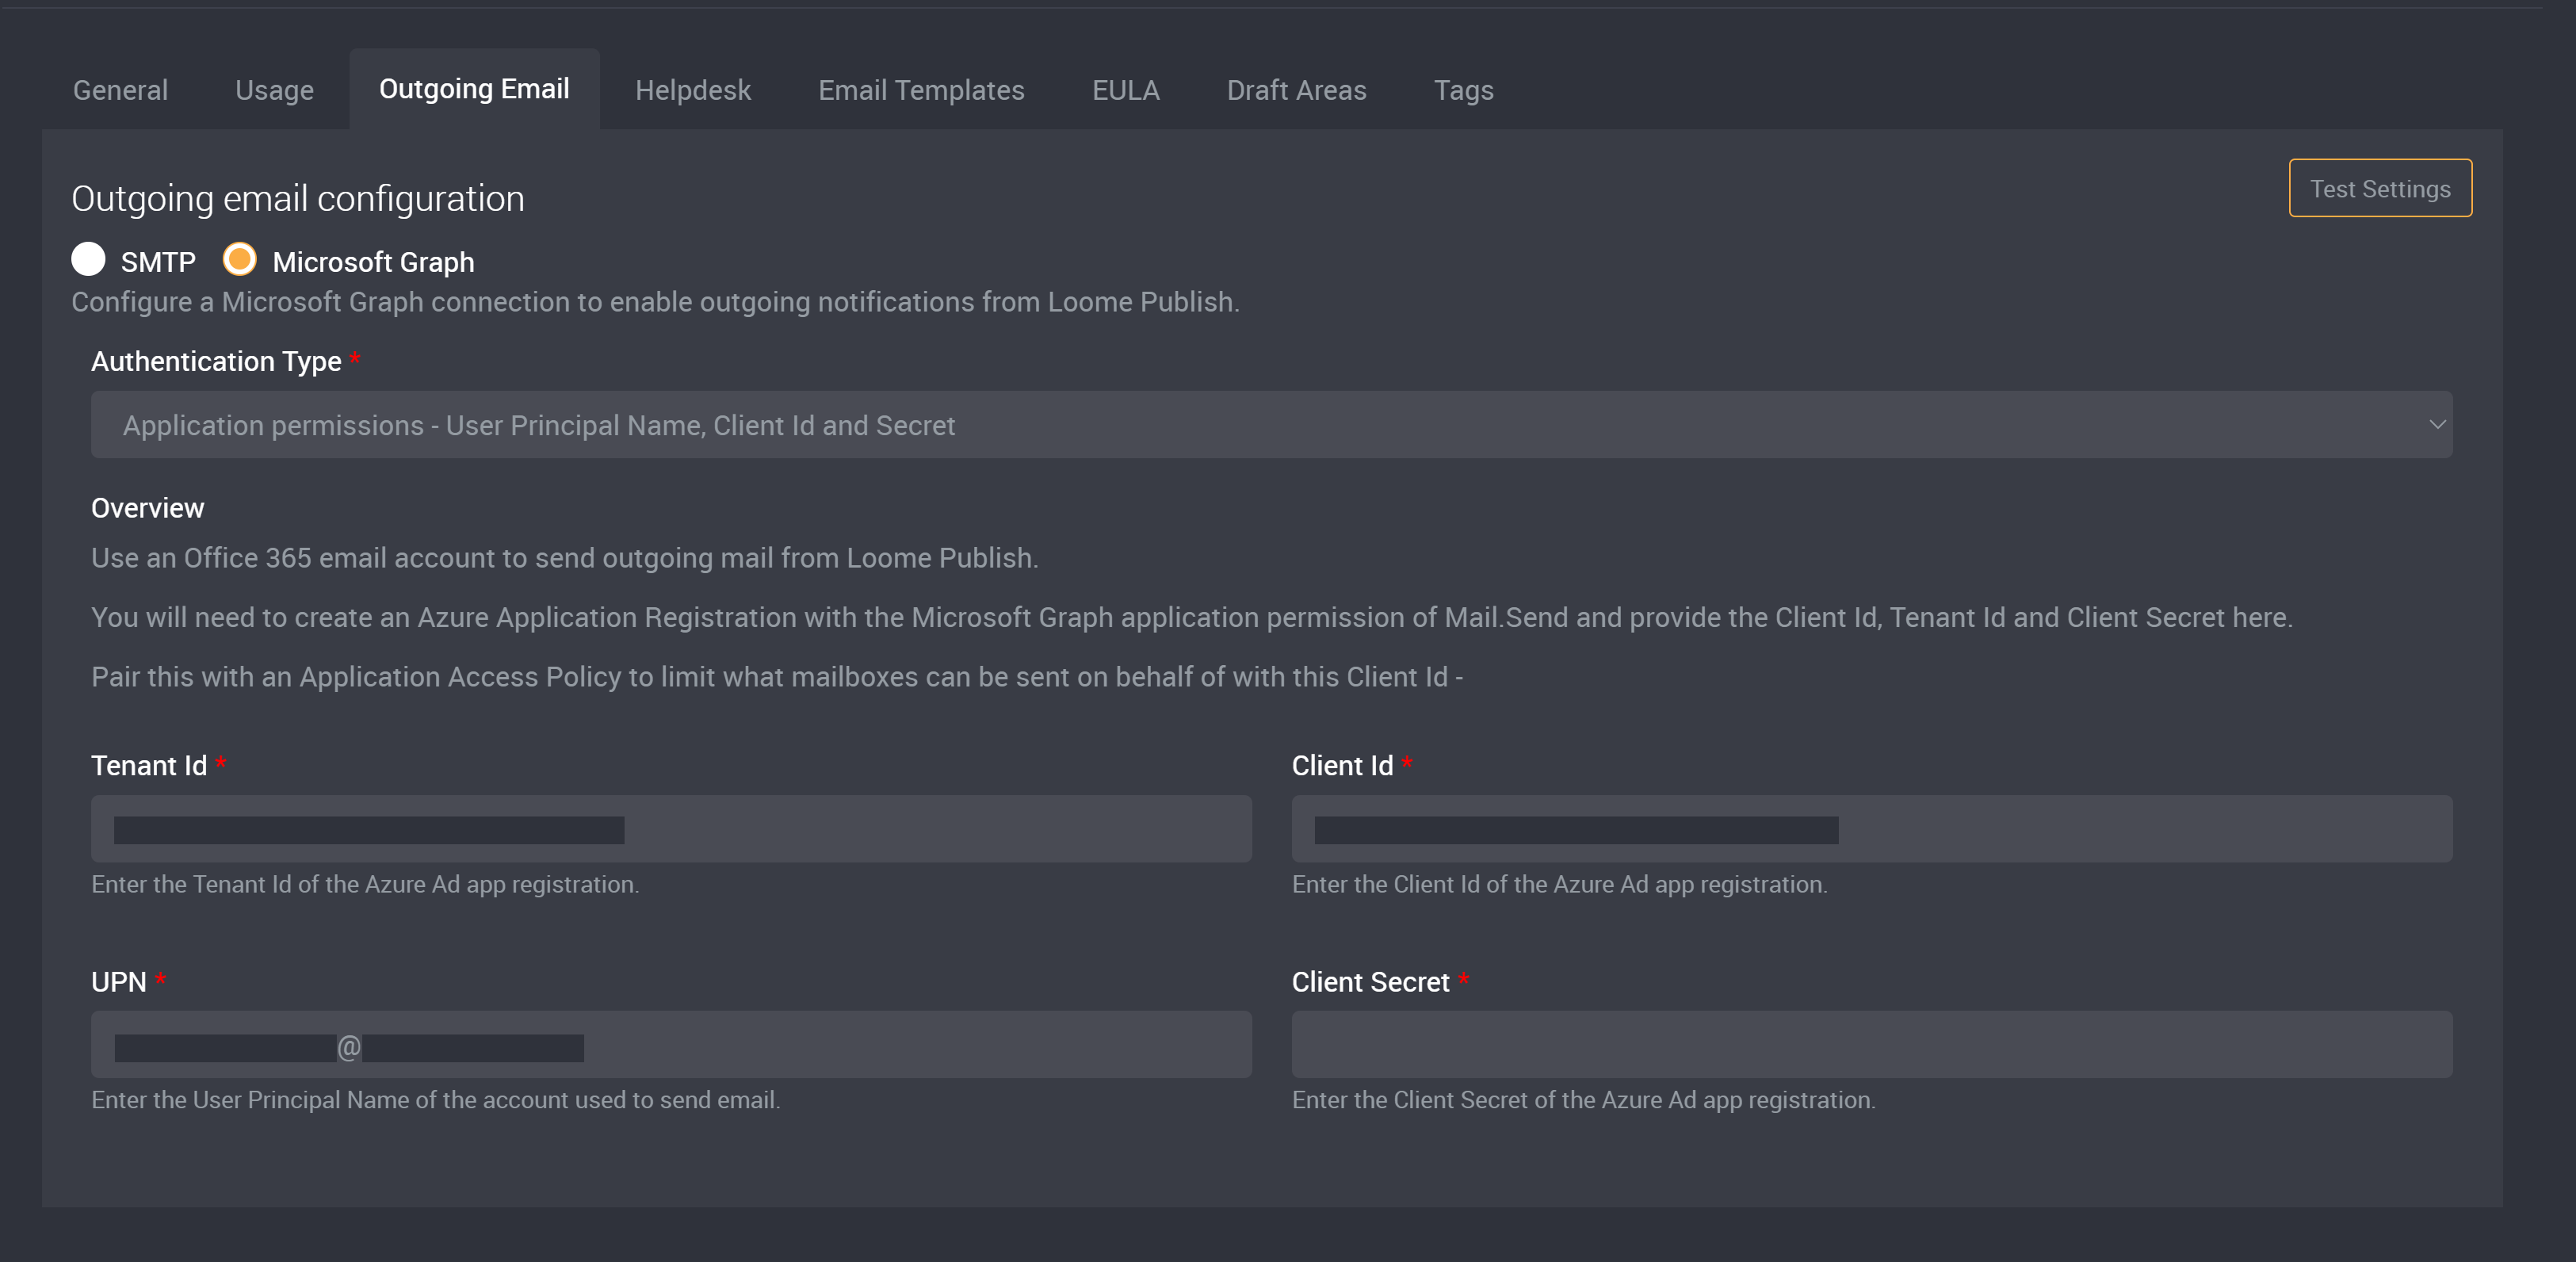
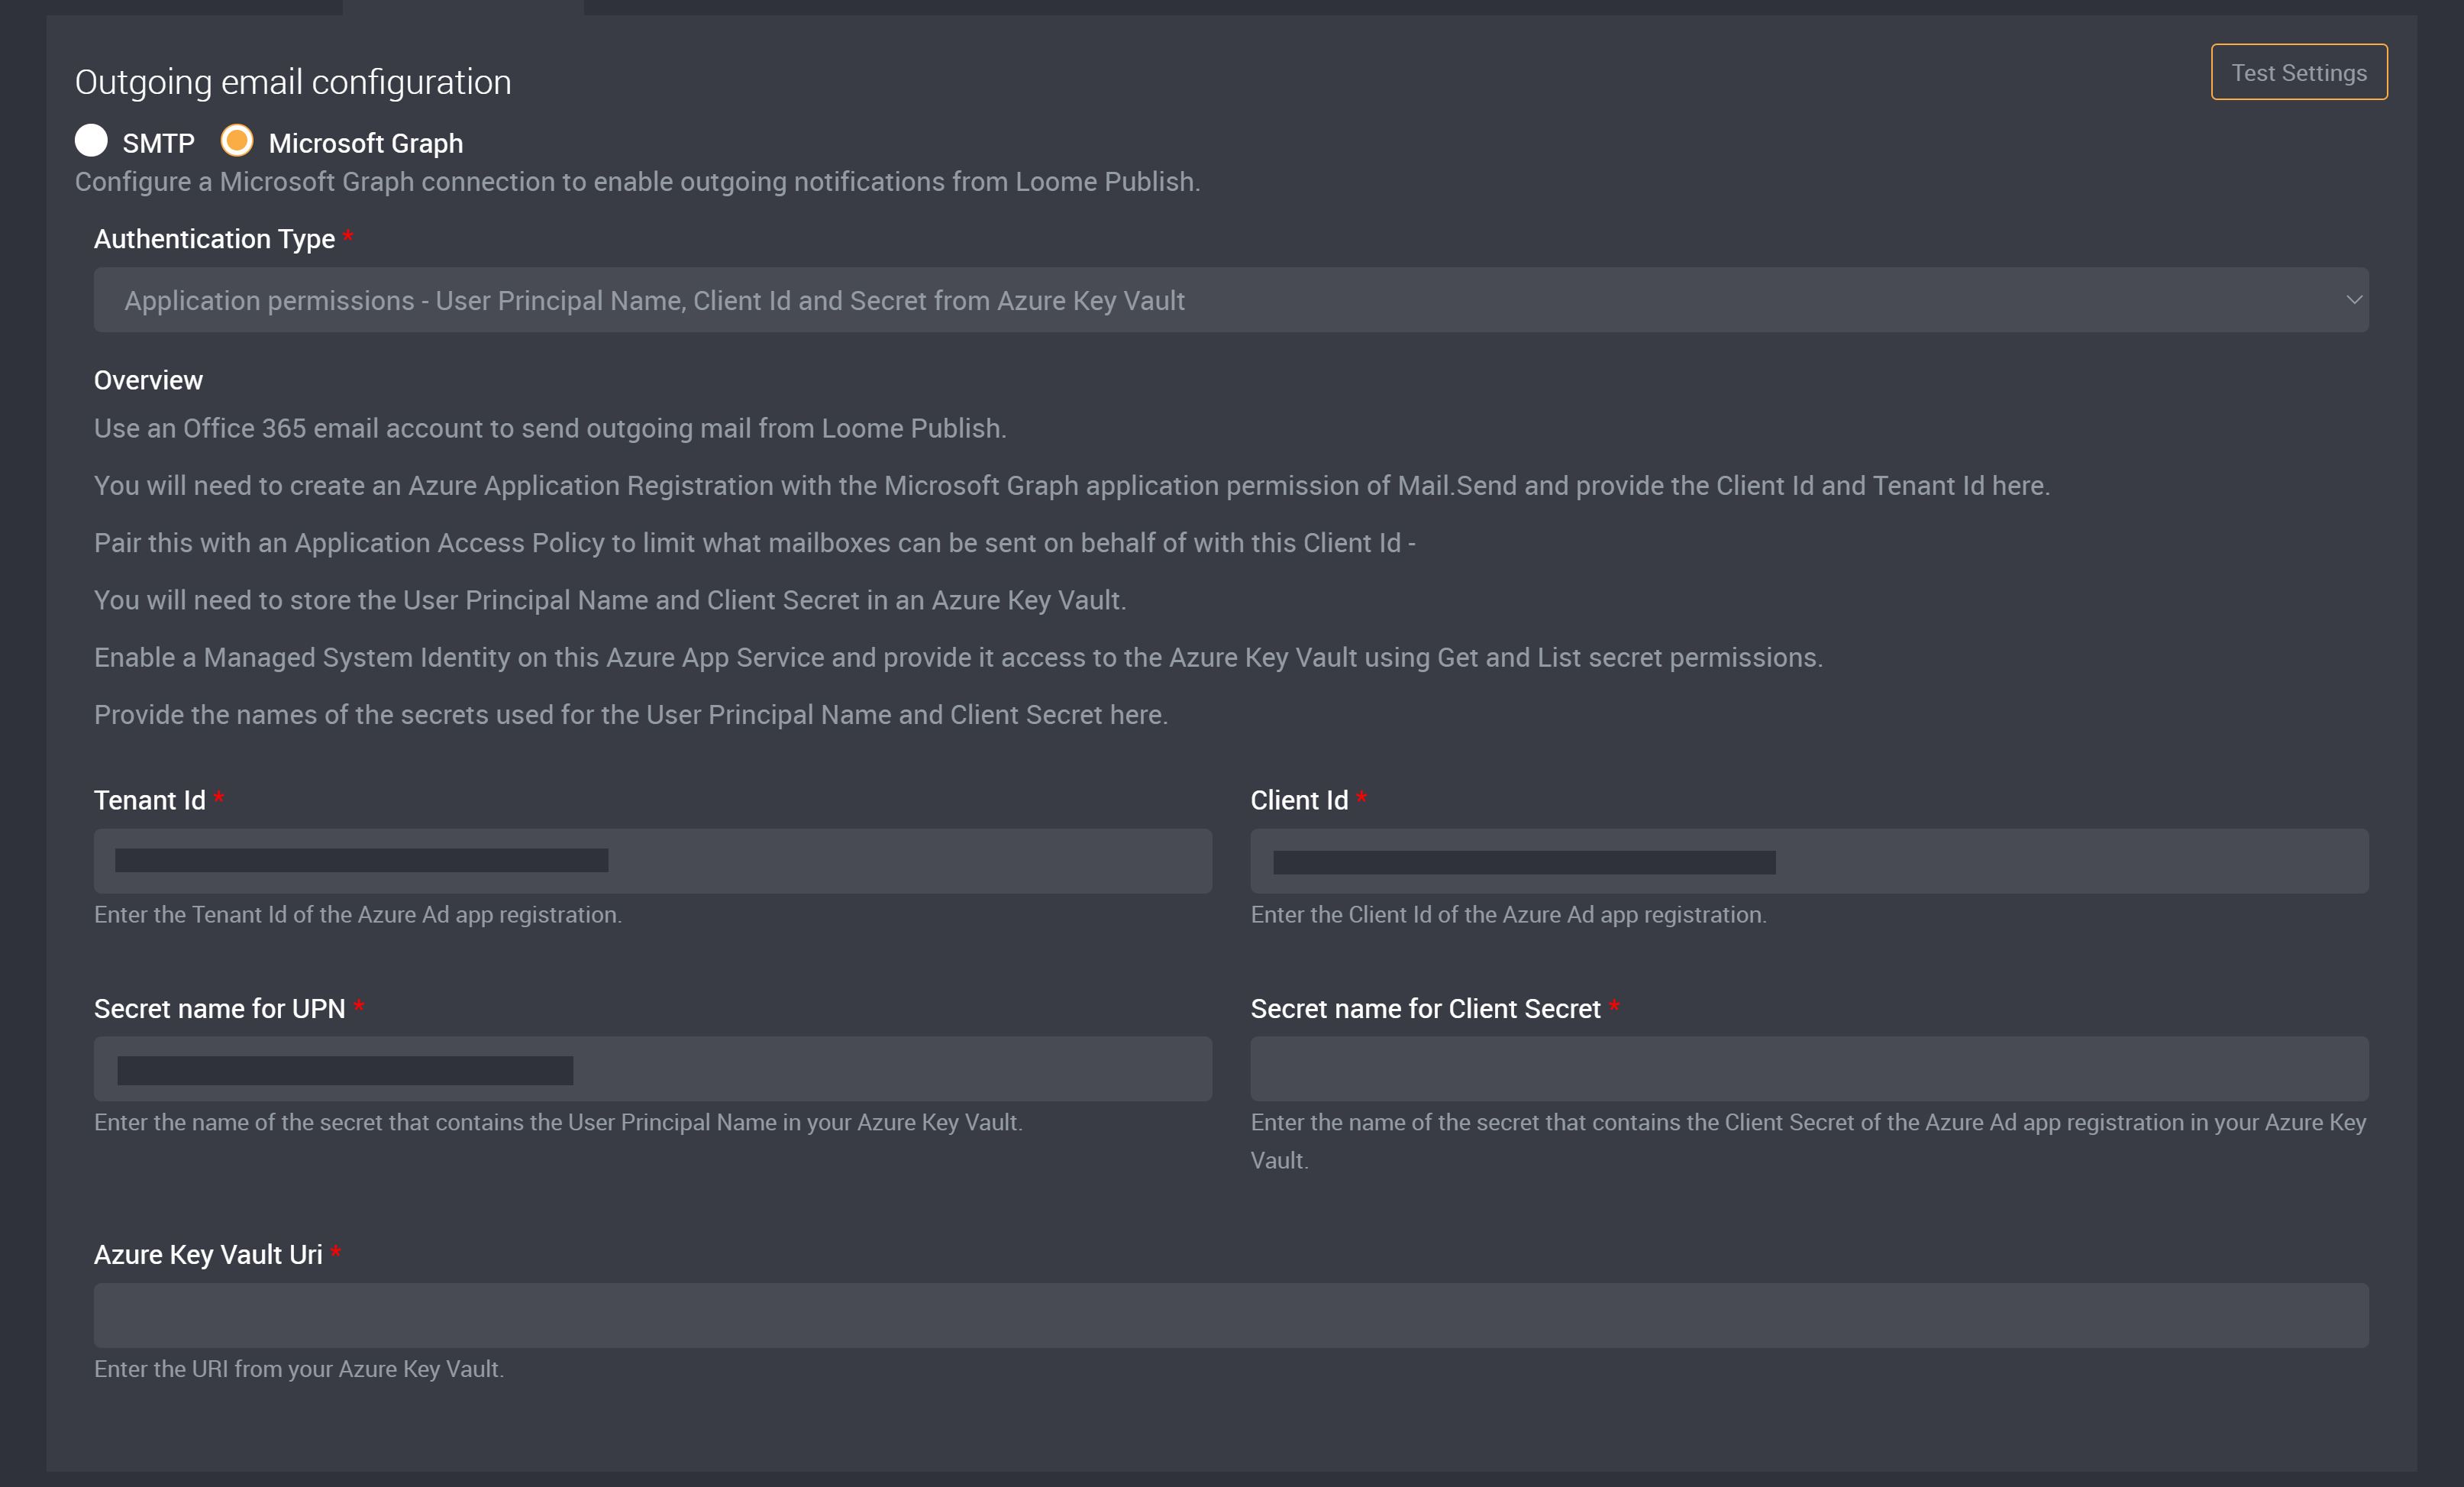
Microsoft Graph
Configure a Microsoft Graph connection to enable outgoing notifications from Loome Publish.
There are five authentication types that you can choose from the dropdown.
- Delegated permissions - User Principal Name & Password
- Delegated permissions - User Principal Name & Password from Azure Key Vault
- Application permissions - User Principal Name, Client Id and Secret
- Application permissions - User Principal Name, Client Id and Secret from Azure Key Vault
- Application permissions - User Principal Name, Client Id and Certificate from Azure Key Vault
Choose the Authentication Type that you prefer and then provide any required fields.
Delegated permissions - User Principal Name & Password
Use a non MFA Office 365 email account to send outgoing mail from Loome Publish.
You will need to create an Azure Application Registration with the Microsoft Graph delegated permission of Mail.Send and provide the Client Id here. Loome will check for this permission before it sends the email.
Enter the Tenant Id and Client Id of the Azure Ad app registration into the Tenant Id and Client Id fields.
Then provide the User Principal Name and Password.
Enter the User Principal Name and Password of the account used to send email into the UPN and Password fields.
Delegated permissions - User Principal Name & Password from Azure Key Vault
Use a non MFA Office 365 email account to send outgoing mail from Loome Publish.
You will need to store the User Principal Name and Password in an Azure Key Vault.
You will also need to create an Azure Application Registration with the Microsoft Graph delegated permission of Mail.Send and provide the Client Id here.
Loome will check for this permission and for the stored credentials in Azure Key Vault before it sends the email.
Enter the Tenant Id and Client Id of the Azure Ad app registration into the Tenant Id and Client Id fields in Loome.
Provide the name of the secret that contains the User Principal Name and Password in your Azure Key Vault in the Secret name for UPN and Secret name for Password fields.
Enable a Managed System Identity on this Azure App Service and provide it access to the Azure Key Vault using Get and List secret permissions.
Enter the URI from your Azure Key Vault into the Azure Key Vault Uri field.
Application permissions - User Principal Name, Client Id and Secret
Use an Office 365 email account to send outgoing mail from Loome Publish.
You will need to create an Azure Application Registration with the Microsoft Graph application permission of Mail.Send and provide the Client Id, Tenant Id and Client Secret here.
Enter the Tenant Id and Client Id of the Azure Ad app registration into the Tenant Id and Client Id fields in Loome.
Enter the User Principal Name of the account used to send email into the UPN field.
Enter the Client Secret of the Azure Ad app registration into the Client Secret field.
Pair this with an Application Access Policy to limit what mailboxes can be sent on behalf of this Client Id.
Application permissions - User Principal Name, Client Id and Secret from Azure Key Vault
Use an Office 365 email account to send outgoing mail from Loome Publish.
You will need to create an Azure Application Registration with the Microsoft Graph application permission of Mail.Send and provide the Client Id and Tenant Id here.
Enter the Tenant Id and Client Id of the Azure Ad app registration into the Tenant Id and Client Id fields in Loome.
Pair this with an Application Access Policy to limit what mailboxes can be sent with on behalf of this Client Id.
You will need to store the User Principal Name and Client Secret in an Azure Key Vault.
Provide the secret names used for the User Principal Name and Client Secret into the Secret name for UPN and Secret name for Client Secret fields.
Enable a Managed System Identity on this Azure App Service and provide it access to the Azure Key Vault using Get and List secret permissions.
Enter the URI from your Azure Key Vault into the Azure Key Vault Uri field.
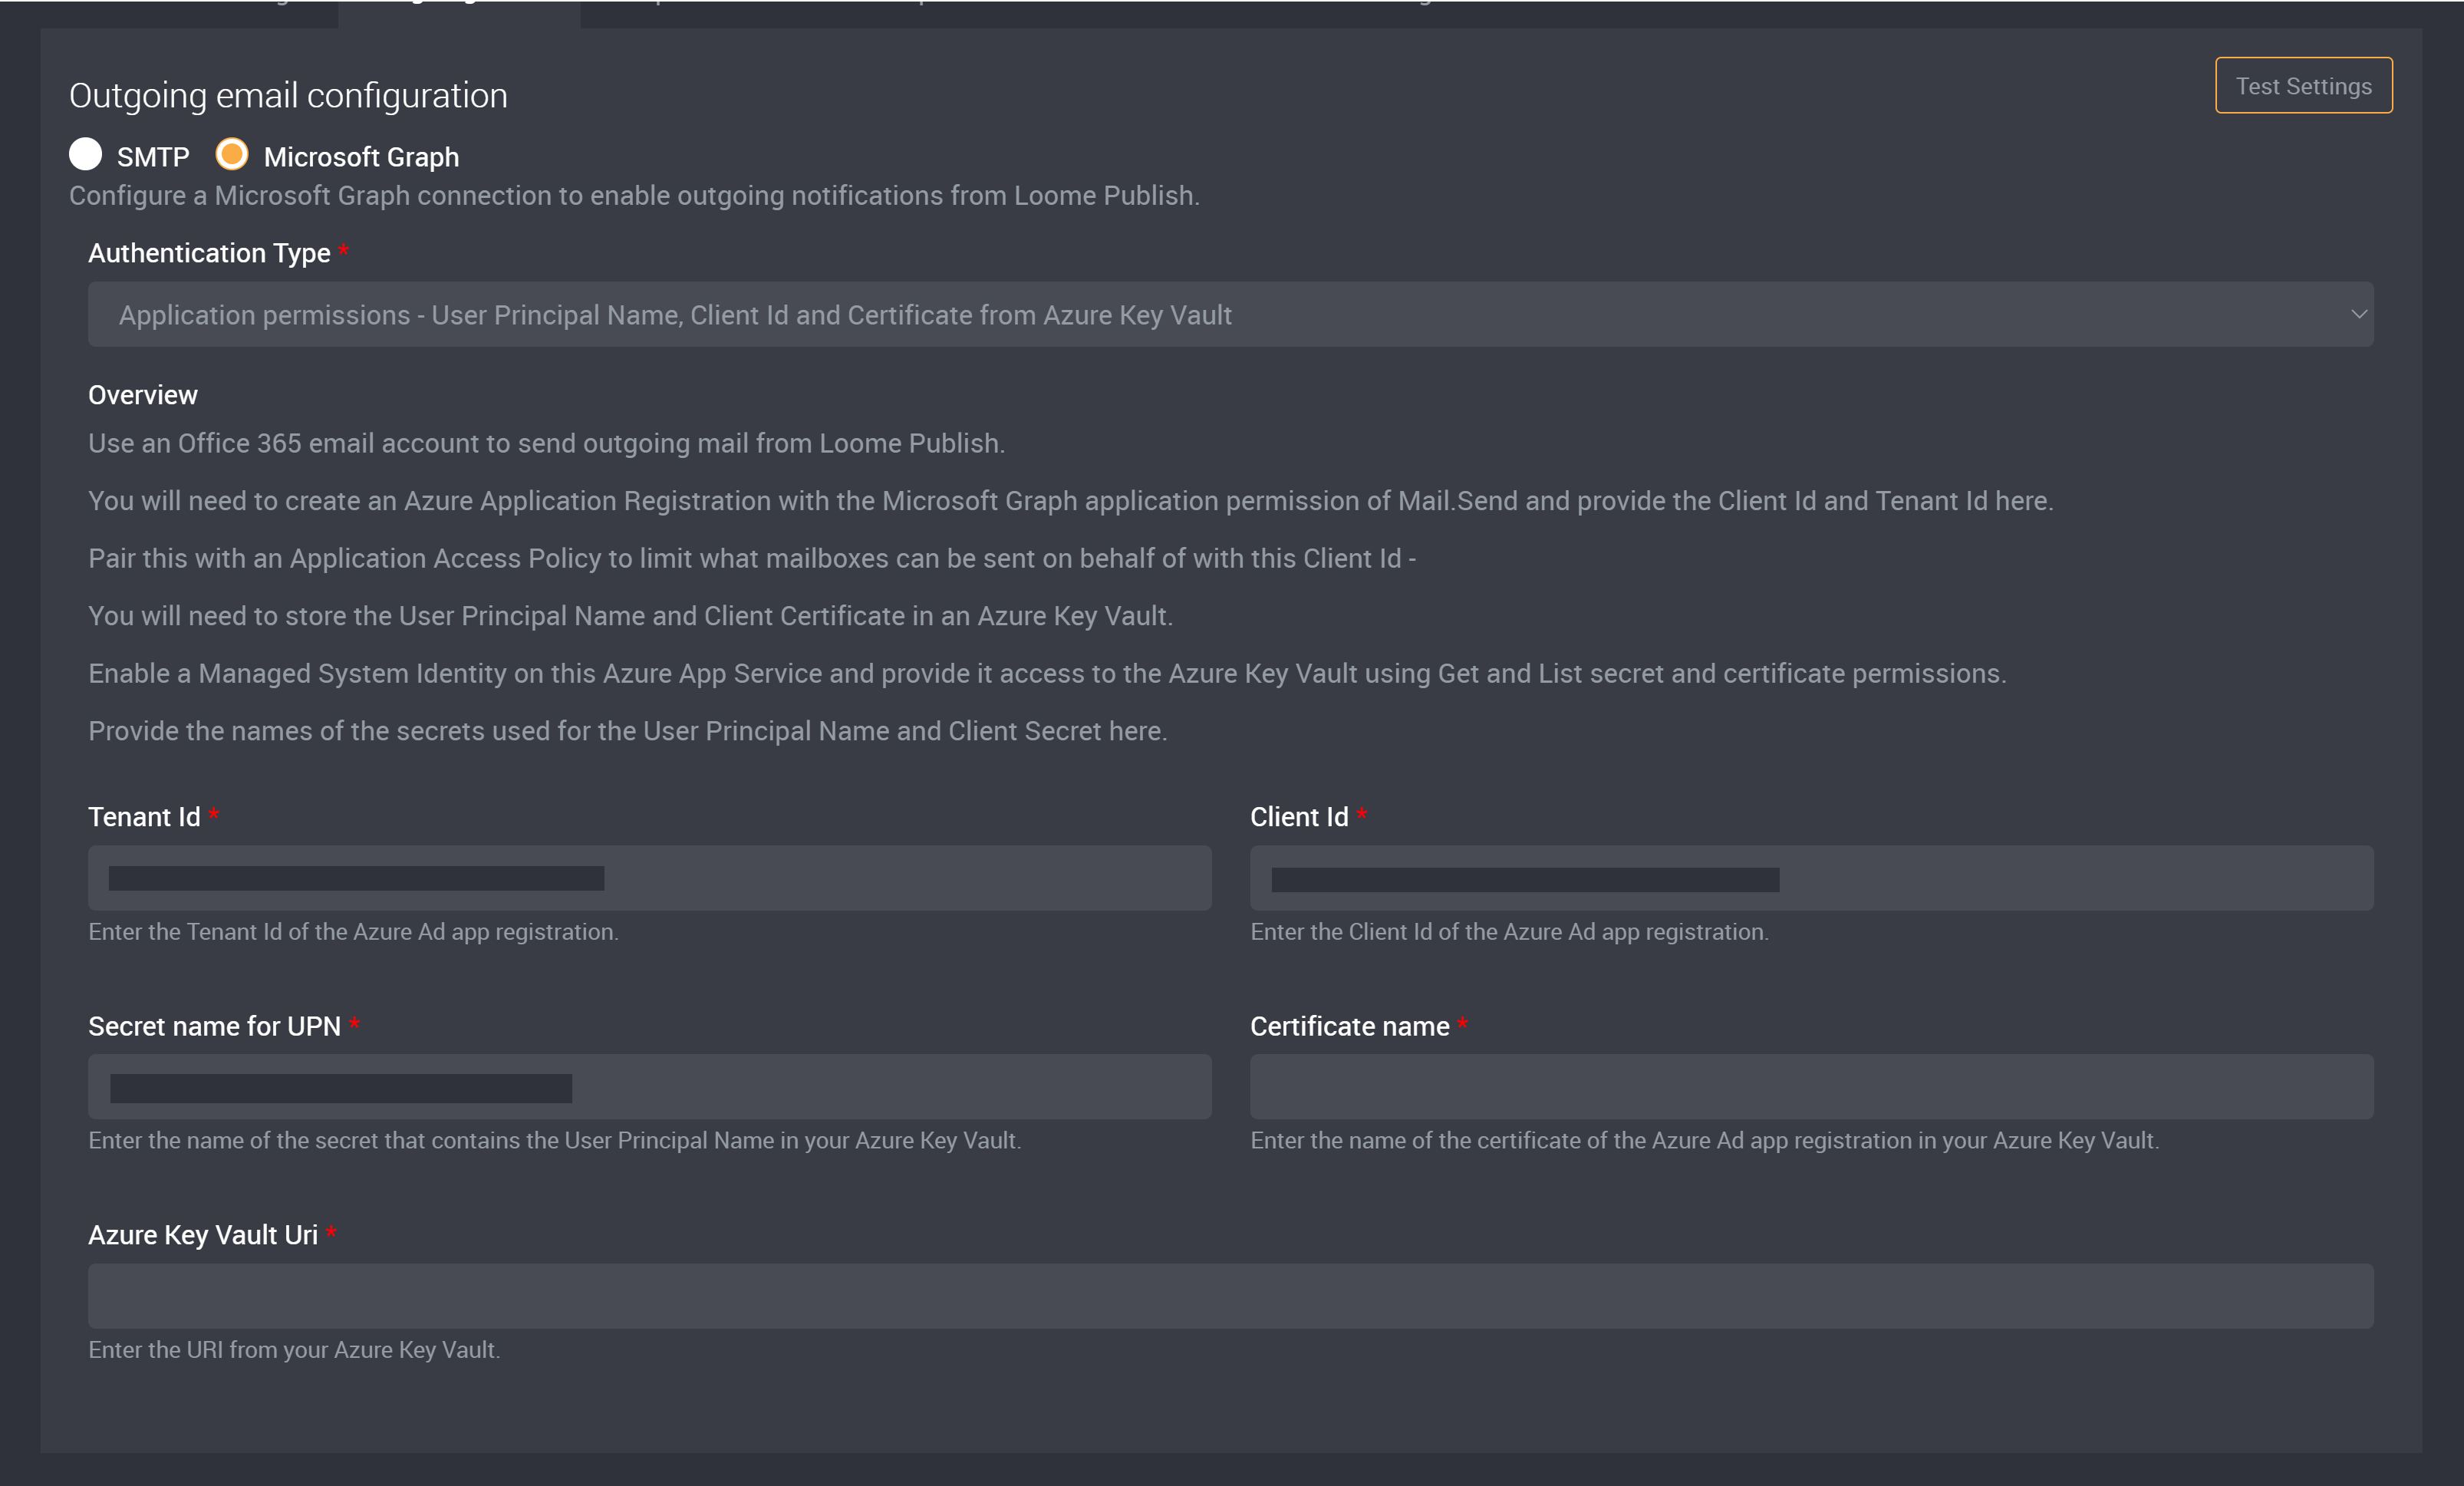
Application permissions - User Principal Name, Client Id and Certificate from Azure Key Vault
Use an Office 365 email account to send outgoing mail from Loome Publish.
You will need to create an Azure Application Registration with the Microsoft Graph application permission of Mail.Send and provide the Client Id and Tenant Id here.
Pair this with an Application Access Policy to limit what mailboxes can be sent with on behalf of this Client Id.
You will need to store the User Principal Name and Client Certificate in an Azure Key Vault.
Enable a Managed System Identity on this Azure App Service and provide it access to the Azure Key Vault using Get and List secret and certificate permissions.
Provide the secret name used for the User Principal Name and the Certificate name into the Secret name for UPN and Certificate name fields.
Enter the URI from your Azure Key Vault into the Azure Key Vault Uri field.
Helpdesk
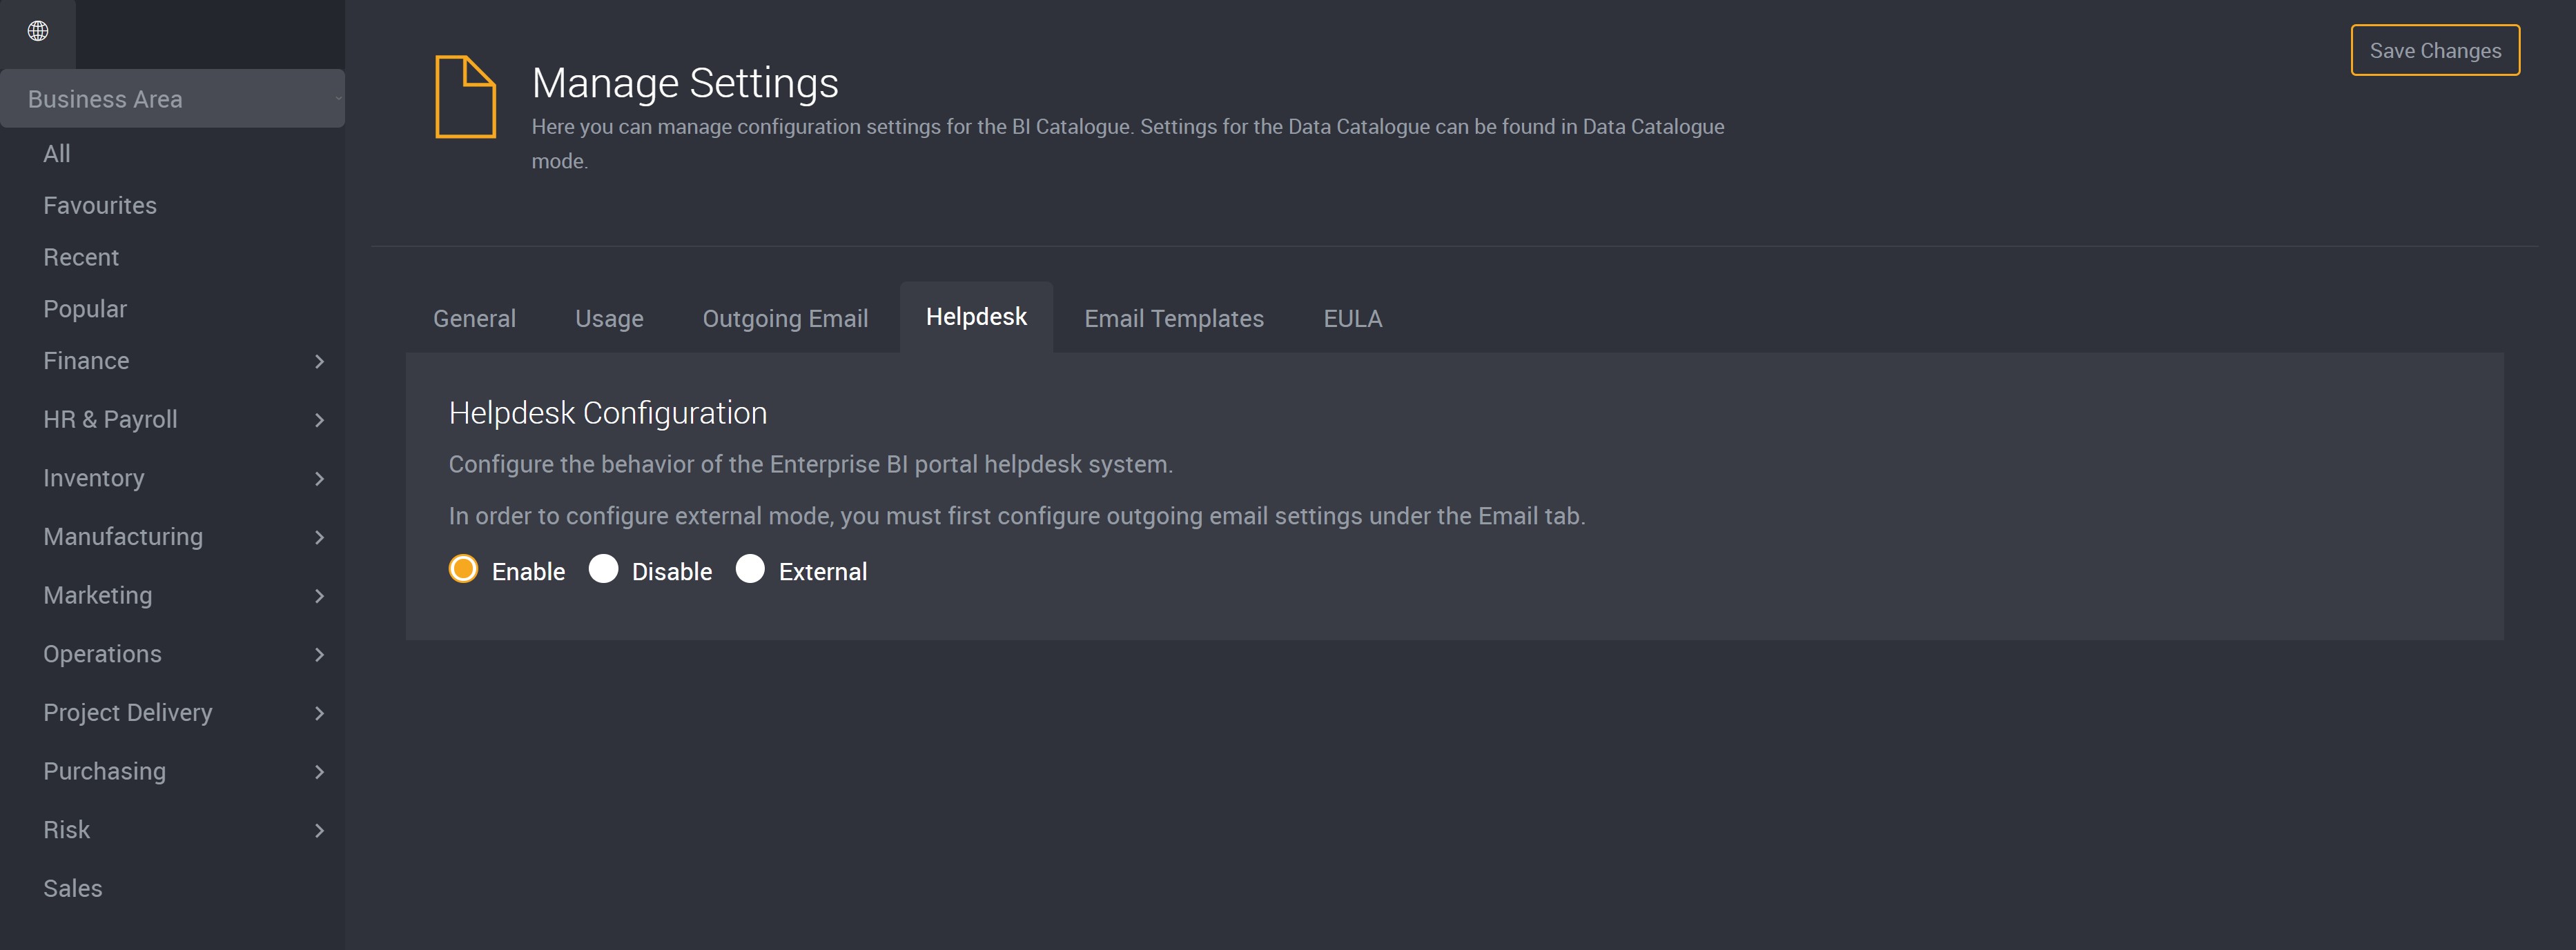
How do I enable the helpdesk system for Loome Publish?
Under the Helpdesk tab select ‘Enable’ or ‘Disable’ to configure the behaviour of the Loome Publish Helpdesk system.
Click ‘External’ to use an external helpdesk system, but to use this first configure your outgoing email settings. This setting will generate and send helpdesk tickets as an email to an external system, but will still allow users to raise helpdesk tickets using the Loome Publish UI. Though this means the menu options ‘My Tickets’ and ‘Helpdesk Tickets’ will not be available, as tickets will be managed externally and not using Loome Publish.
If the helpdesk system is not enabled, any helpdesk related buttons will not be visible in Loome Publish.
Click Save Changes for changes to take effect.
Email Templates
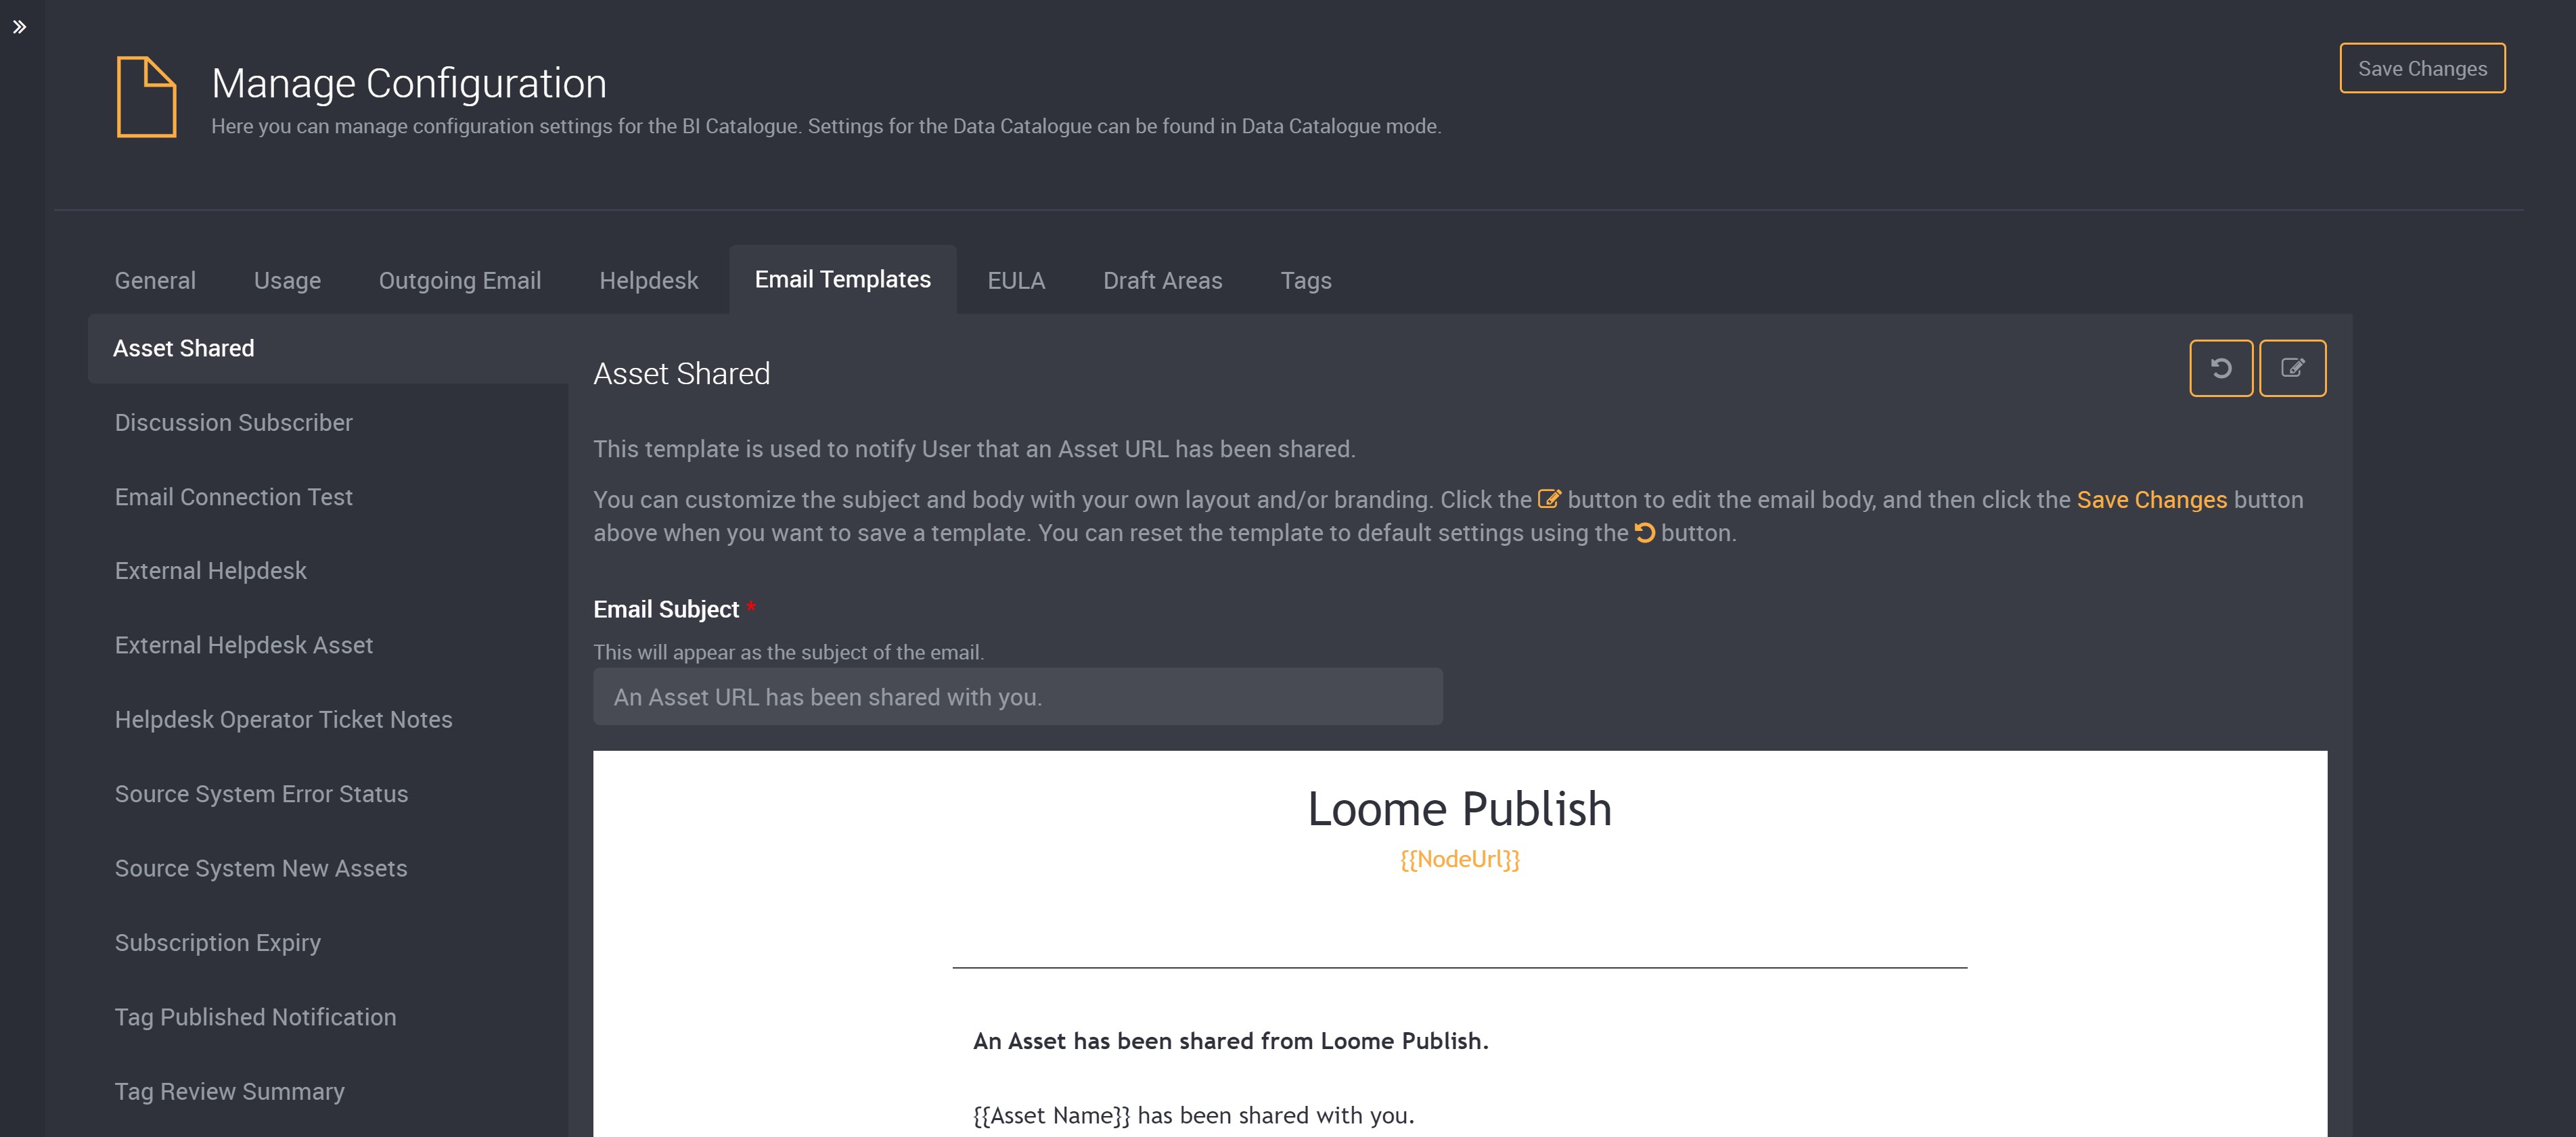
How do I edit email templates?
The Email Templates tab is where Administrators can add branding and change the layouts of their email templates.
Email Templates are used to send customised email notifications to users of your Loome Publish portal. It will provide the details of a notification event (each available notification template is listed on the left) that has occurred in Loome Publish if a user has opted to receive them. There are different templates according to the notification and the Administrator will have to edit each individual template.
Click on the Edit button in the top right corner of each template to customise the layout, branding, and email subject and body. The body is edited using HTML and users can choose where to use tokens in their markup.
The NodeUrl you find under the title of an email template will tell you the URL of the Loome Publish instance that sent a notification. This is useful for users of multi-node environments, so you can easily learn which of your Loome Publish instances caused this notification. If you do not wish to see the URL then you can remove it here while editing.
Click Save Changes to save your template.
Reset your changes to default using the button at the top right of the page.
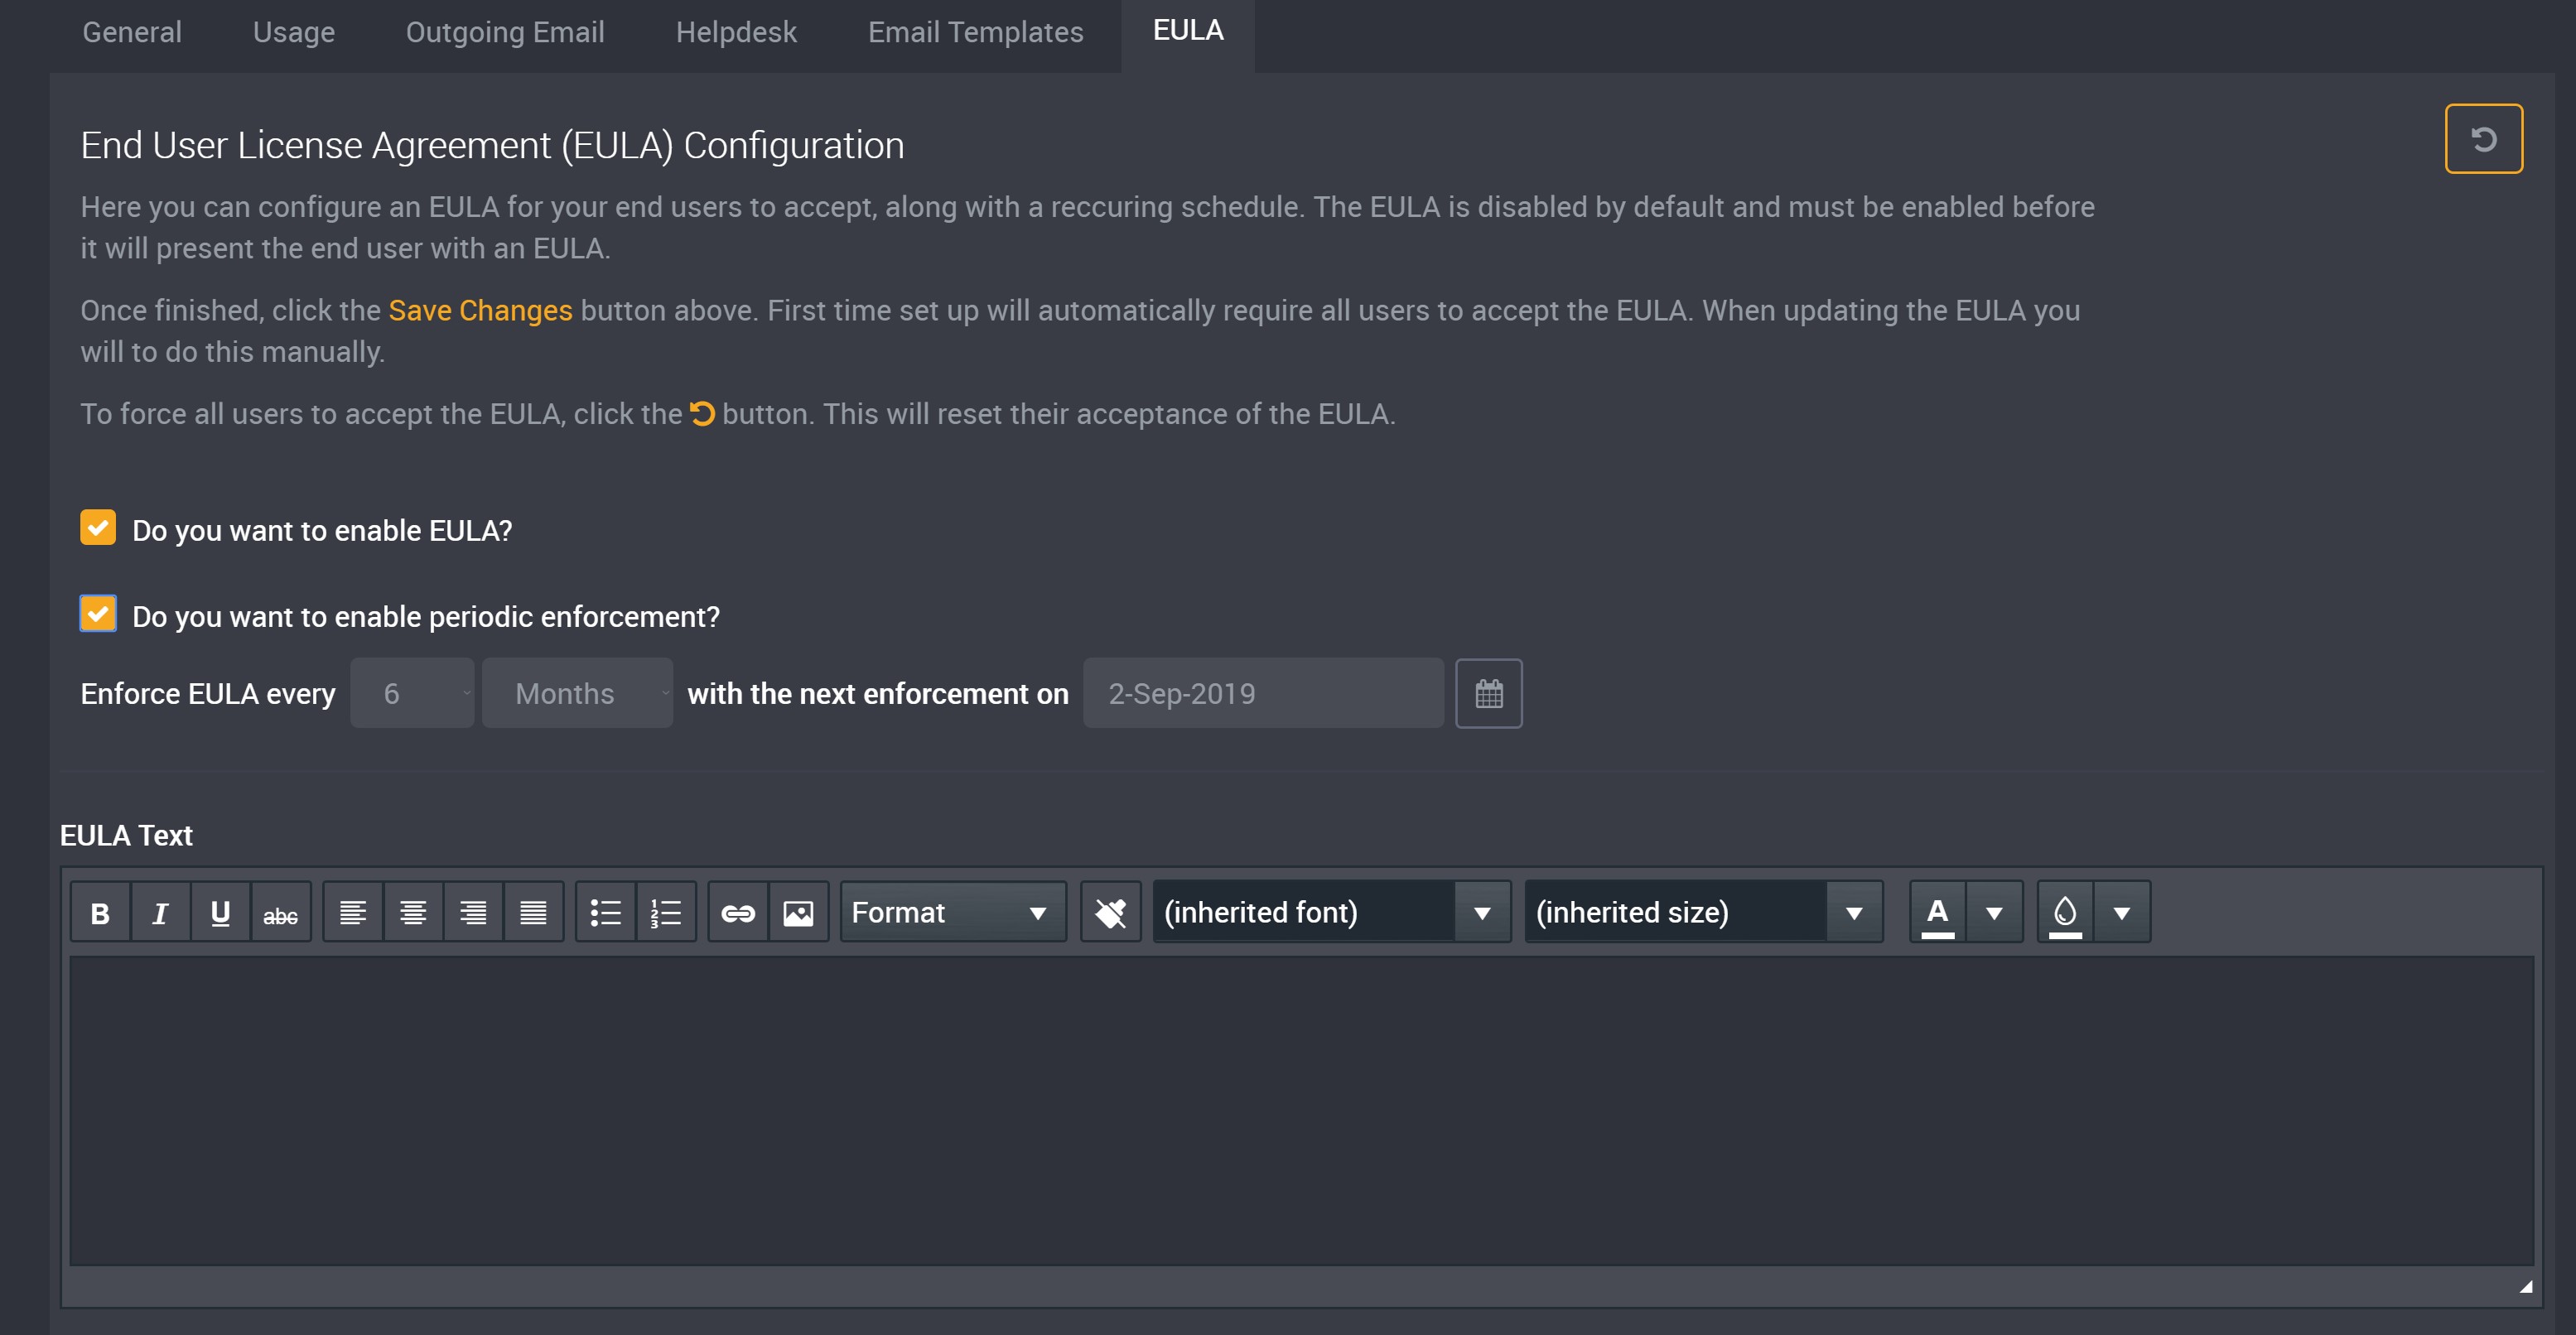
End User License Agreement
Administrators can enable and create an End User License Agreement, EULA, that will require all users of their Loome Publish portal to accept in order to use Loome Publish. This can be a scheduled occurrence, and Administrators can also reset acceptance of the EULA that will force all users to accept the EULA at any time using the Reset button at the top right corner.
The EULA is disabled by default and can be enabled using the checkbox on this page. Once you enable it, this first time set up will automatically require all users to accept the EULA.
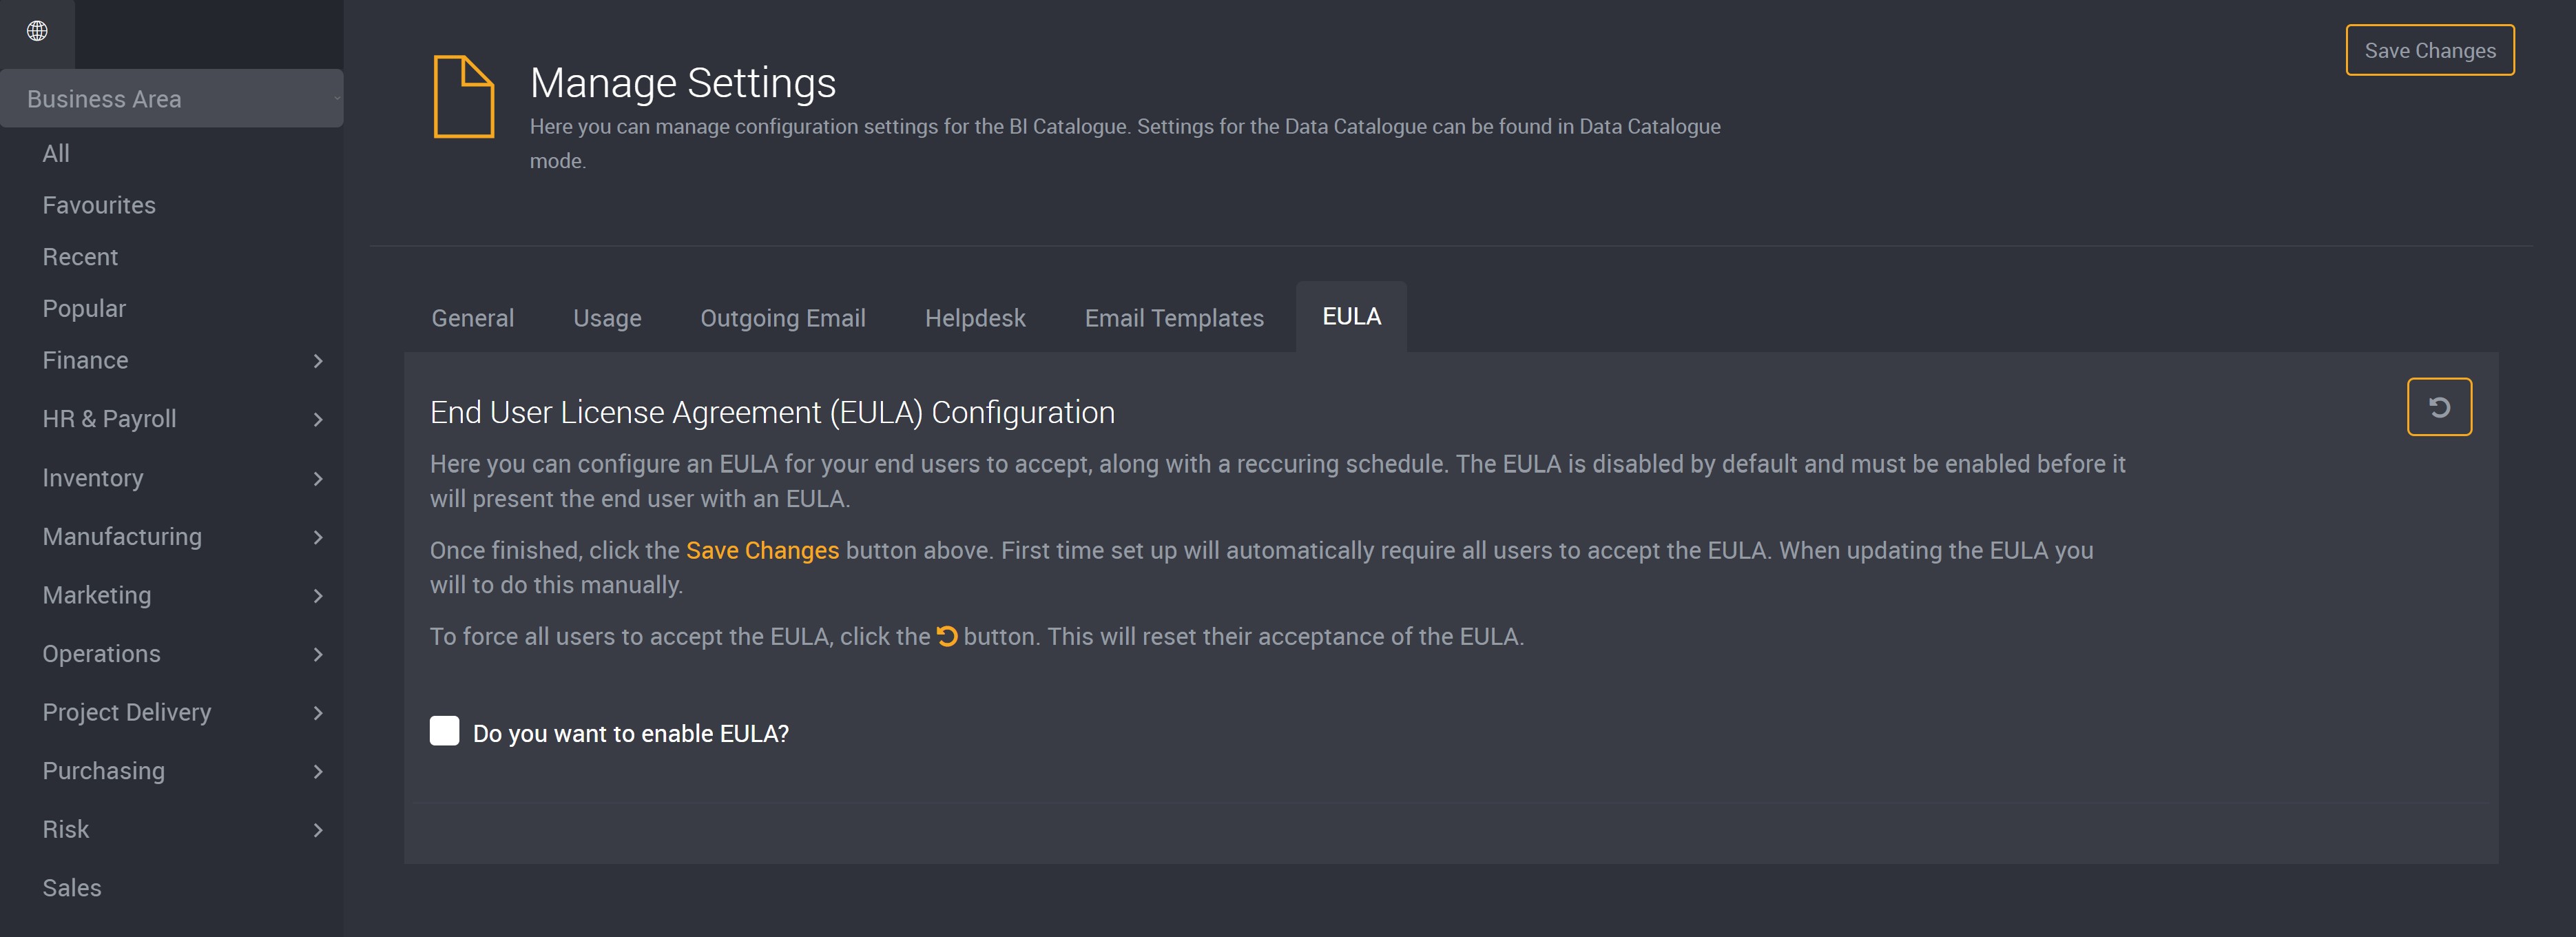
Once enabled, the Administrator will then select whether there will be periodic enforcement of the EULA and if so, when users will need to re-accept. For example, this could be every six months and the notice will pop up on schedule every six months for users to accept.
The text of the EULA can be entered and formatted here.
Once completed, Save Changes at the top right of the screen.
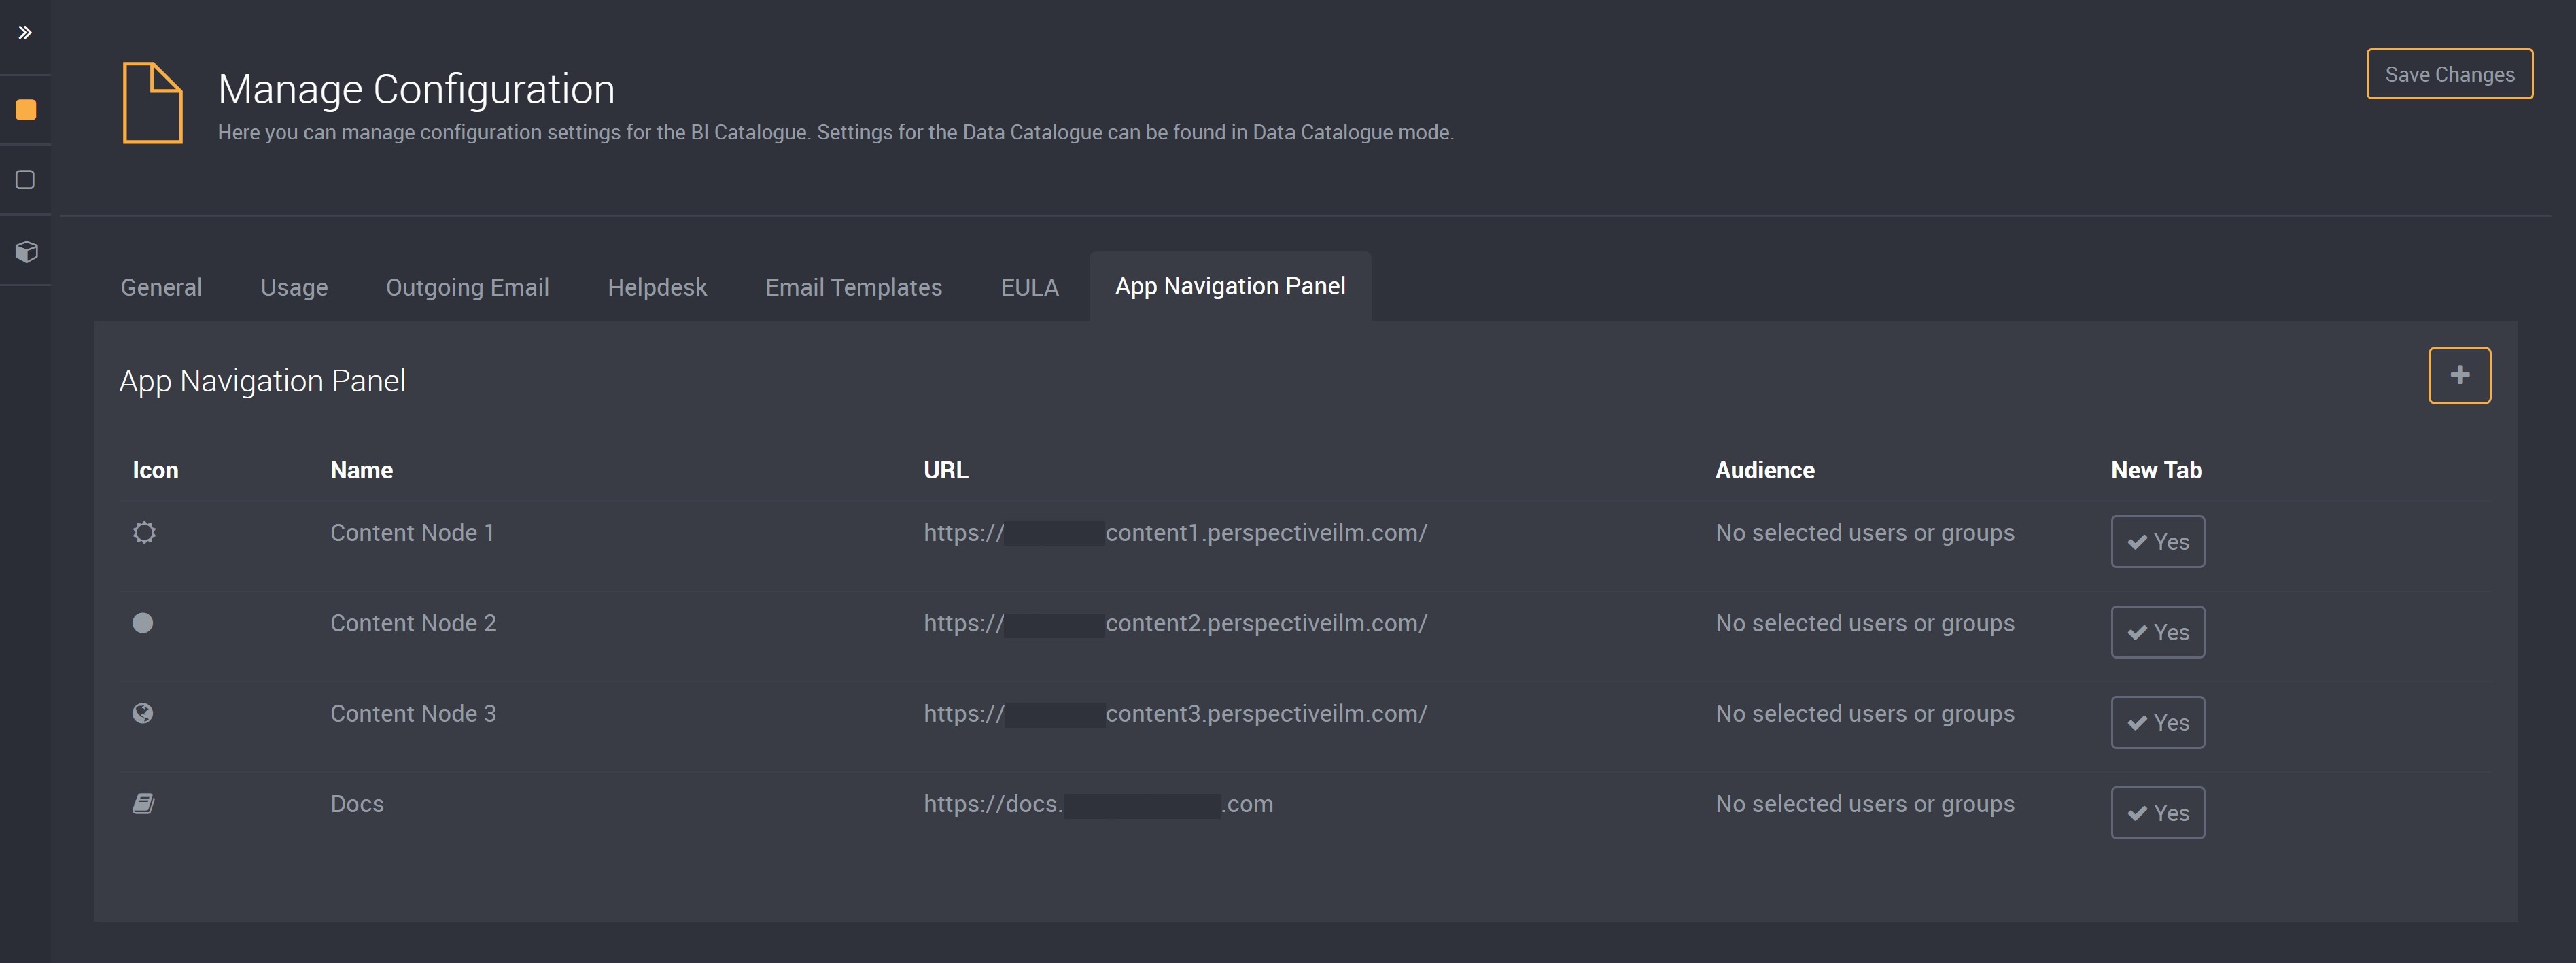
App Navigation Panel
This following feature is only available in a Control Node.
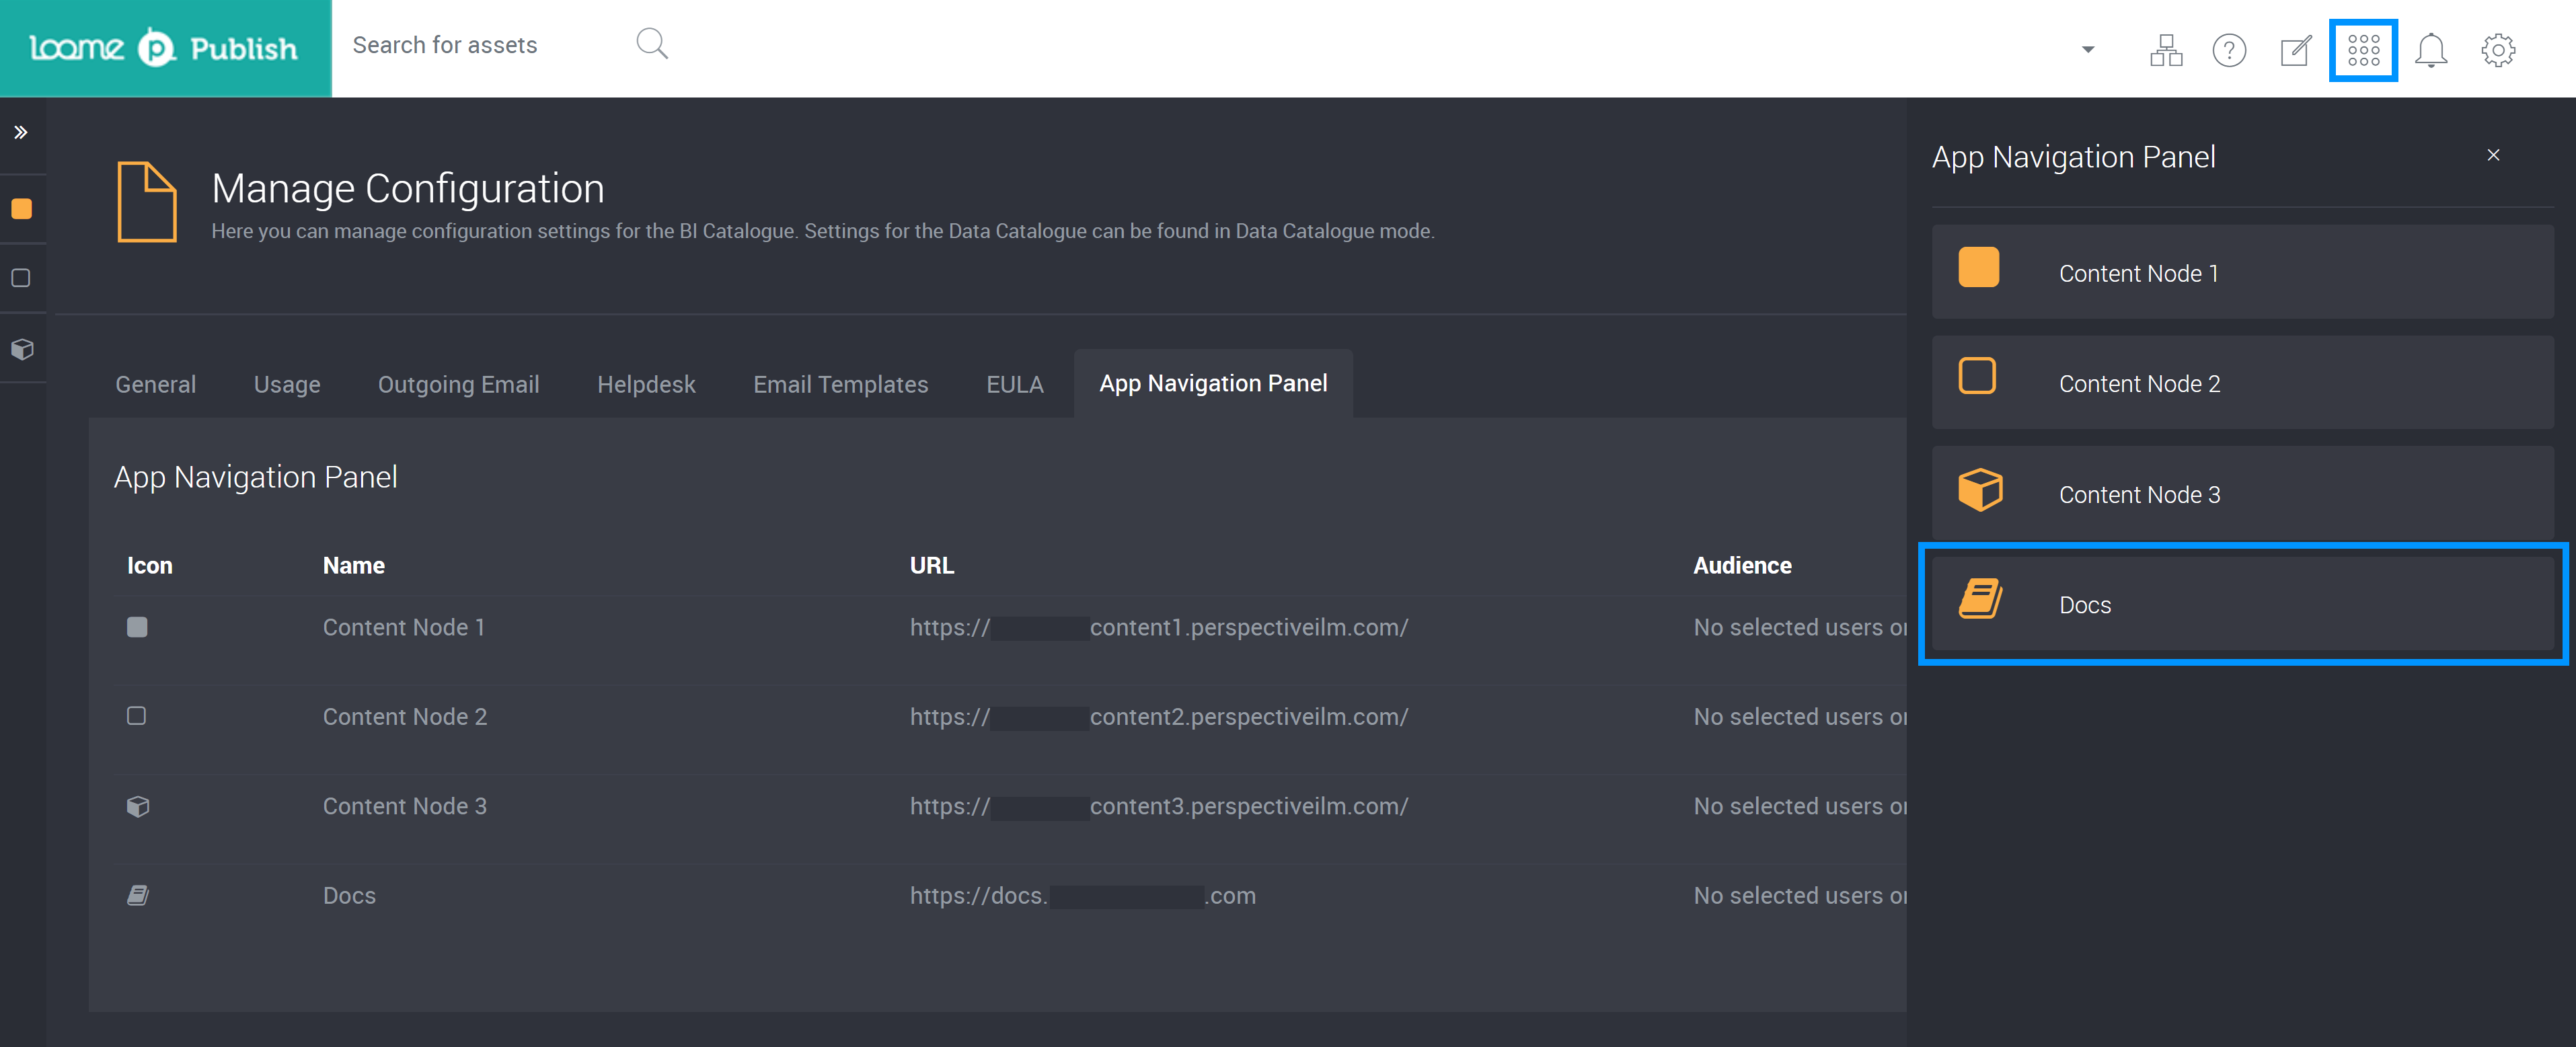
In the Control Node, you can add shortcuts to apps and websites, with optional audiences, in Loome Publish by using the App Navigation Panel situated beside the Notification Hub and Settings Cog.
Administrators can view all links and can edit these Apps in Configuration.
To edit an App, click on an App from the list and an editable configuration will display.
How do I create an App shortcut?
You can add another App by clicking on the ‘+’ icon in the top right corner.
In this next window, type in a name and the URL of your App shortcut.
Select an icon.
Select whether you would like it to open in a new tab.
Select if you would like this App available only to a specific audience.
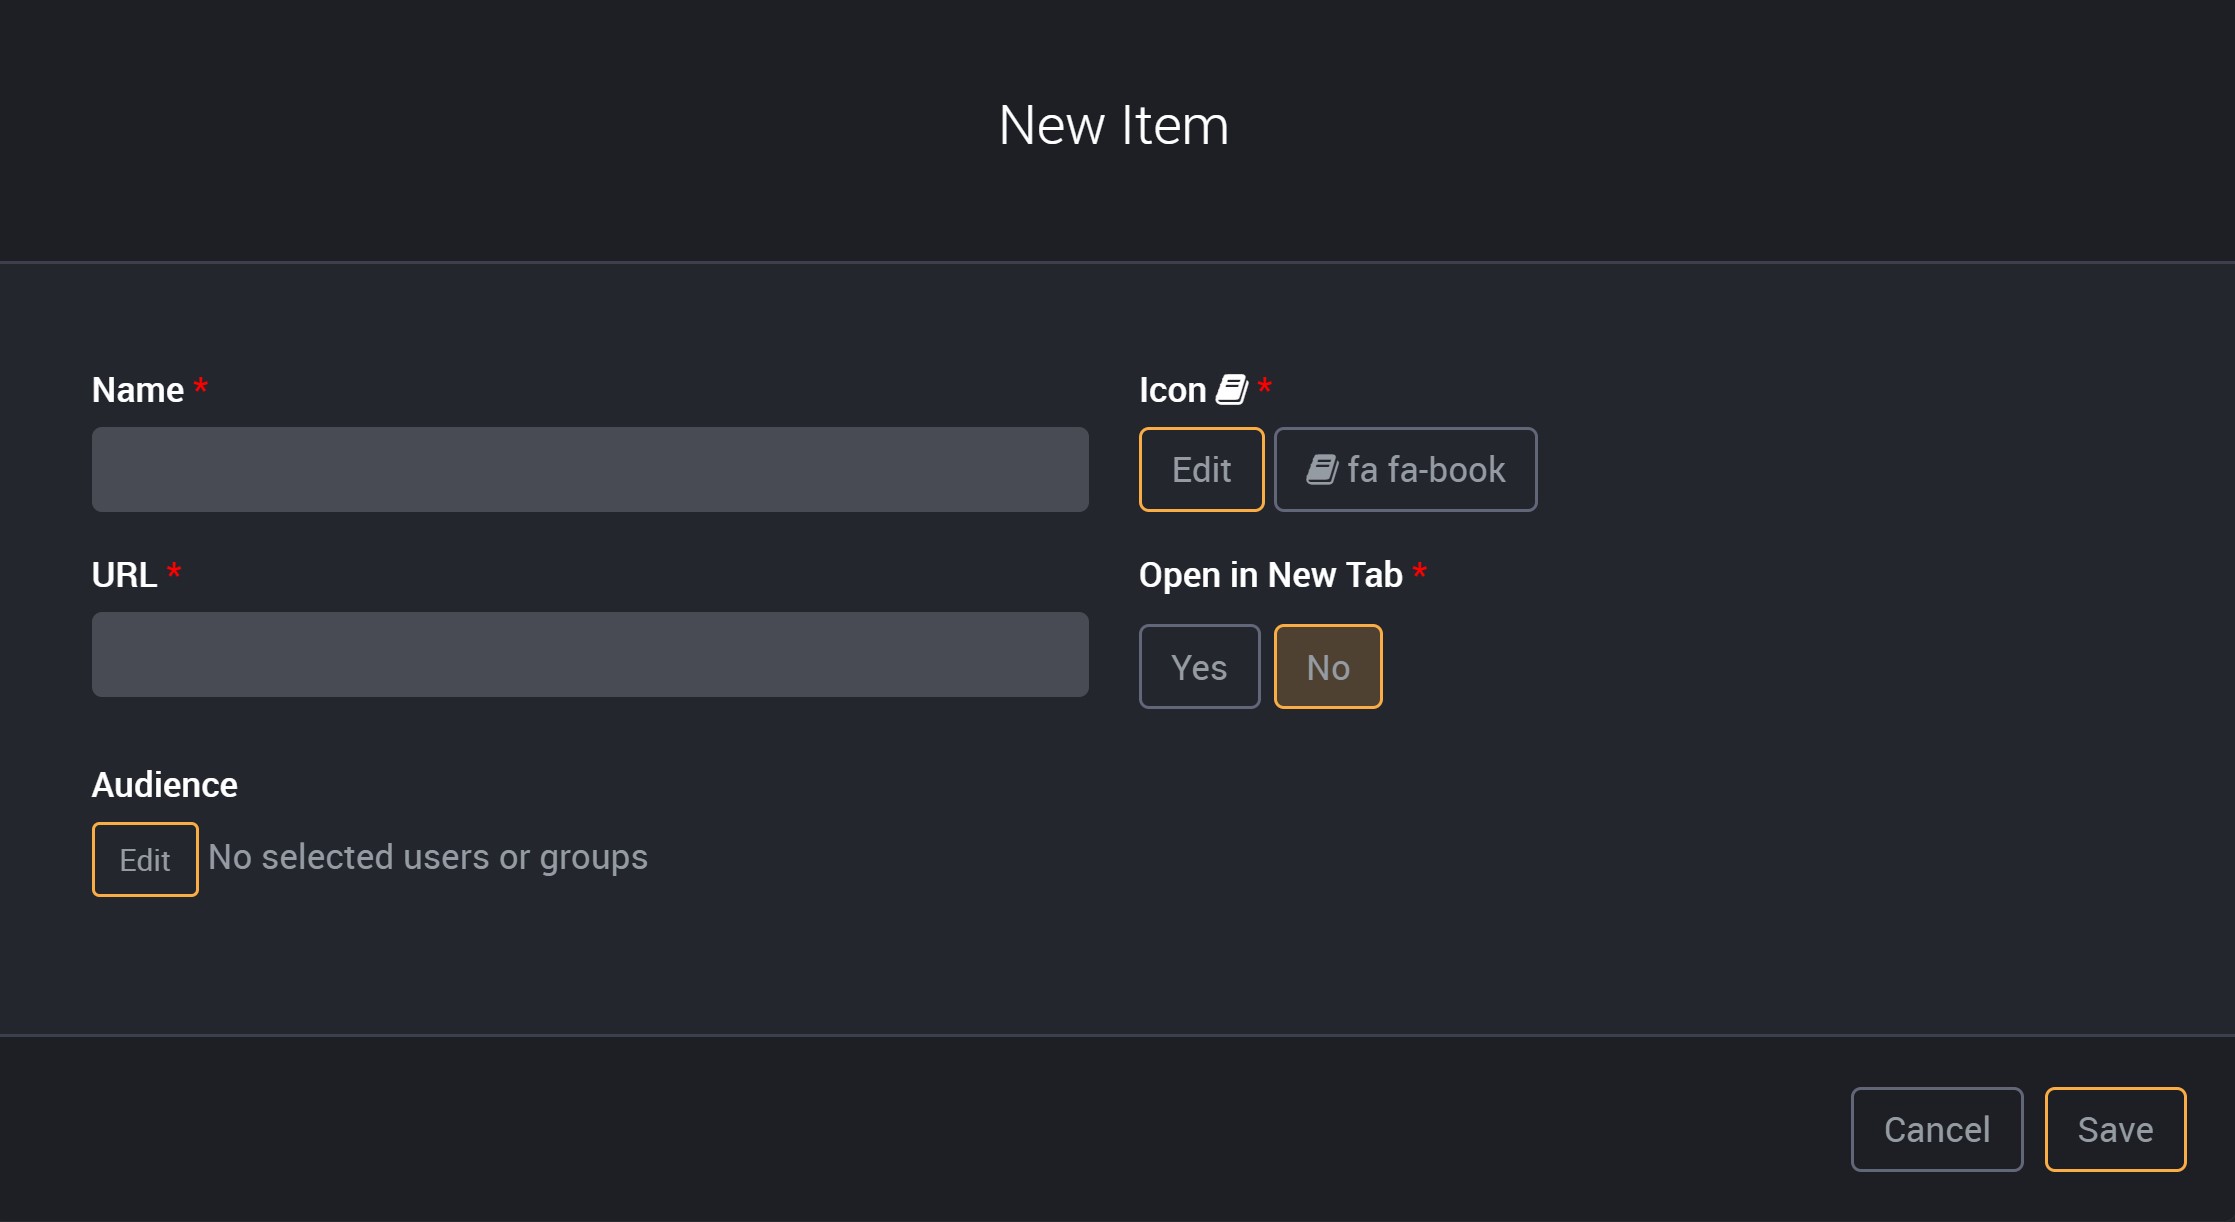
Once you save, this new App will now be available in the App Navigation Panel at the top right of your page.
Note that whilst an App Navigation Shortcut will be added automatically when a new Source System is created, they will not be updated when the Source System is edited, renamed and/or deleted. Changes made to a content node on the source systems page will also have to be manually updated here to navigate to the same content node.
Tags
You can select your preferences for Case Sensitivity and Submission Behaviour here.
If you would like to select users as Tag Managers, please find our guide here.
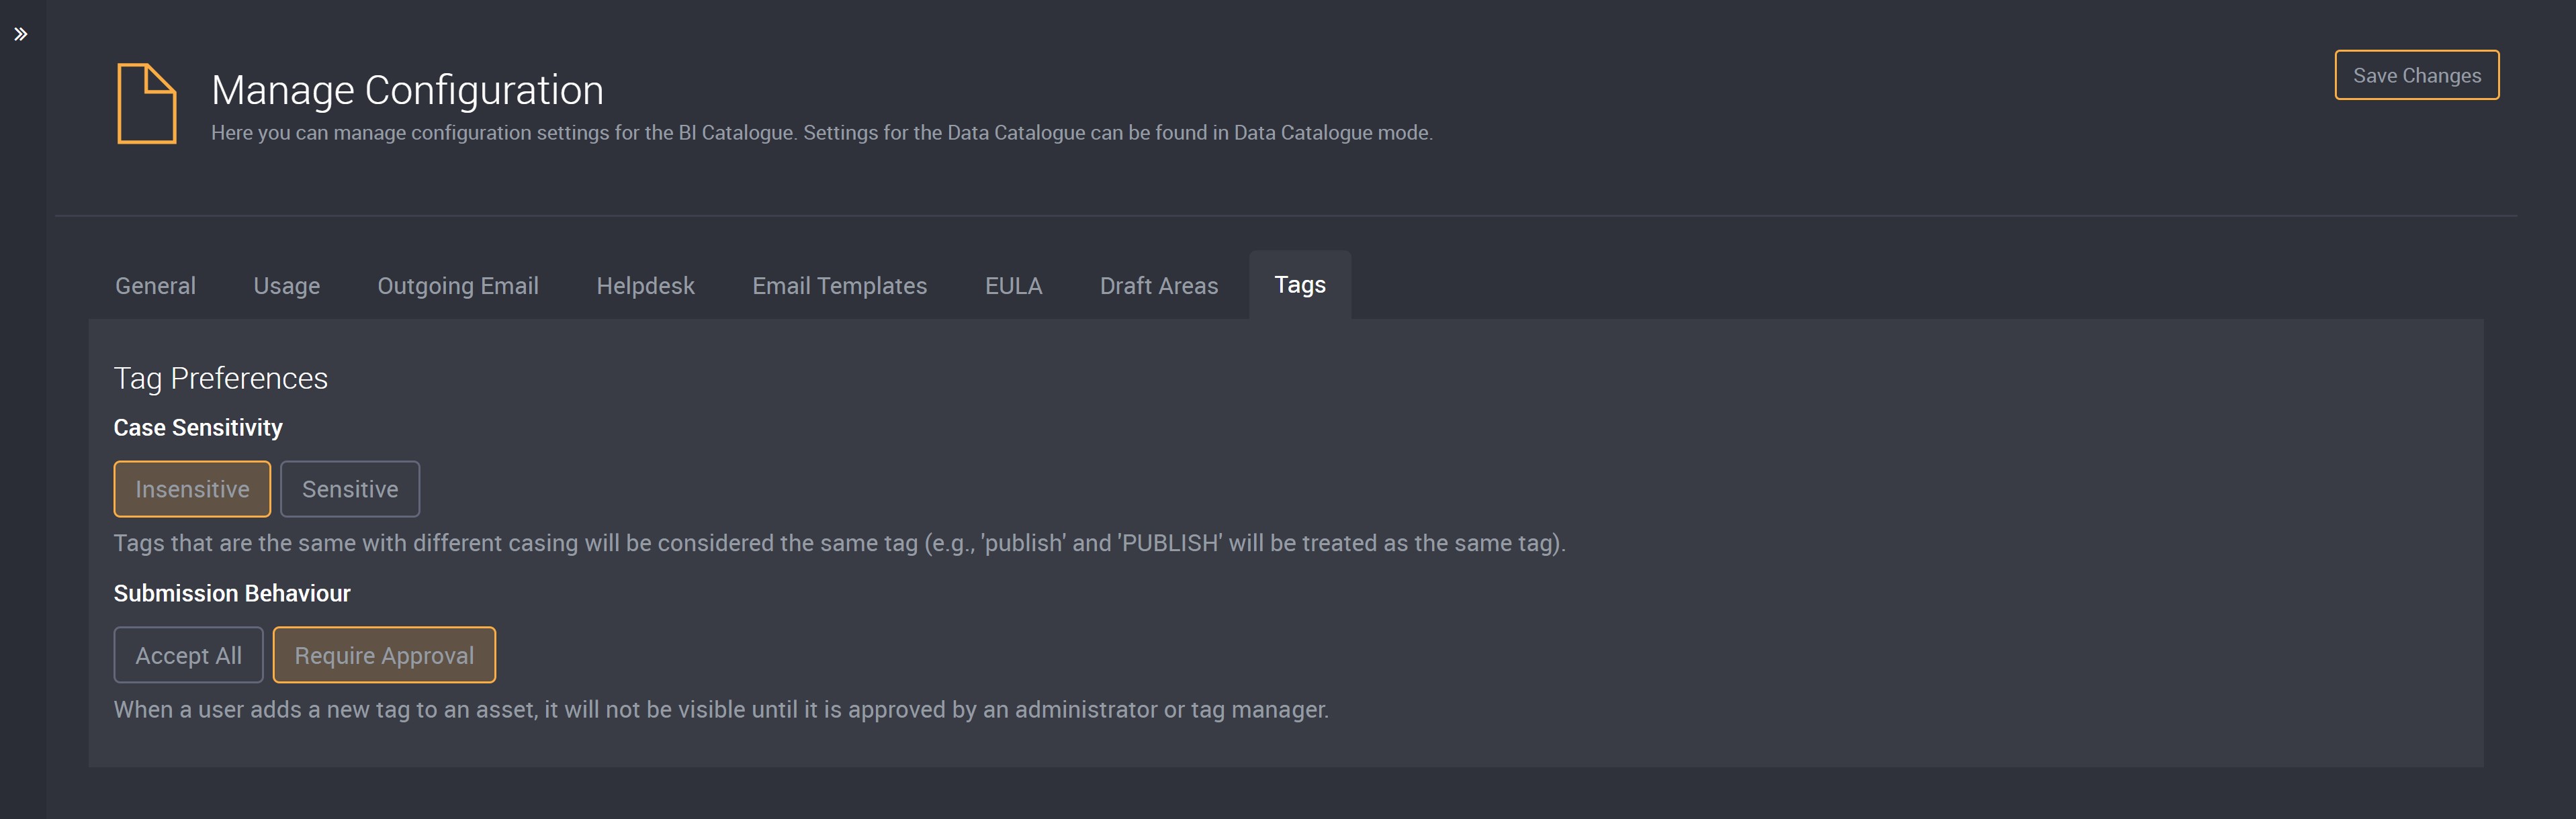
Case Sensitivity
Insensitive
If you would prefer that tags that are the same text but have different casing are not duplicated, select Insensitive and those tags will be considered the same tag (e.g., ‘publish’, ‘Publish’ and ‘PUBLISH’ will be treated as the same tag).
If you had created ‘Publish’ and ‘publish’ as two separate tags while case sensitivity was Sensitive, when changing case sensitivity to Insensitive these two tags will be merged into one tag, and only one tag ‘Publish’ will display on the tags page and on assets.
When changing case sensitivity from Sensitive to Insensitive you will be asked to confirm this change as the above scenario will occur and your duplicate tags with different casing will merge.
Sensitive
If you select Sensitive, tags that are the same text with different casing will be considered separate tags. ‘Publish’, ‘publish’ and ‘PUBLISH’ will be three separate tags.
Submission Behaviour
You can select whether a tag will be visible to all users of Loome Publish or whether it will require approval before other users can see user-submitted tags.
Accept All
If Accept All is selected, user-submitted tags will be visible to all users without being approved by an administrator or tag manager.
Require Approval
If Require Approval is selected, user-submitted tags will not be visible to other users (except to the user that submitted it and to administrators and tag managers) until they are approved by an administrator or tag manager.
Multiple Draft Areas
Administrators can create additional draft areas so that different parts of your business can create and publish content independently of each other. Administrators will be able to edit all draft areas even when a draft area has been assigned to other users.
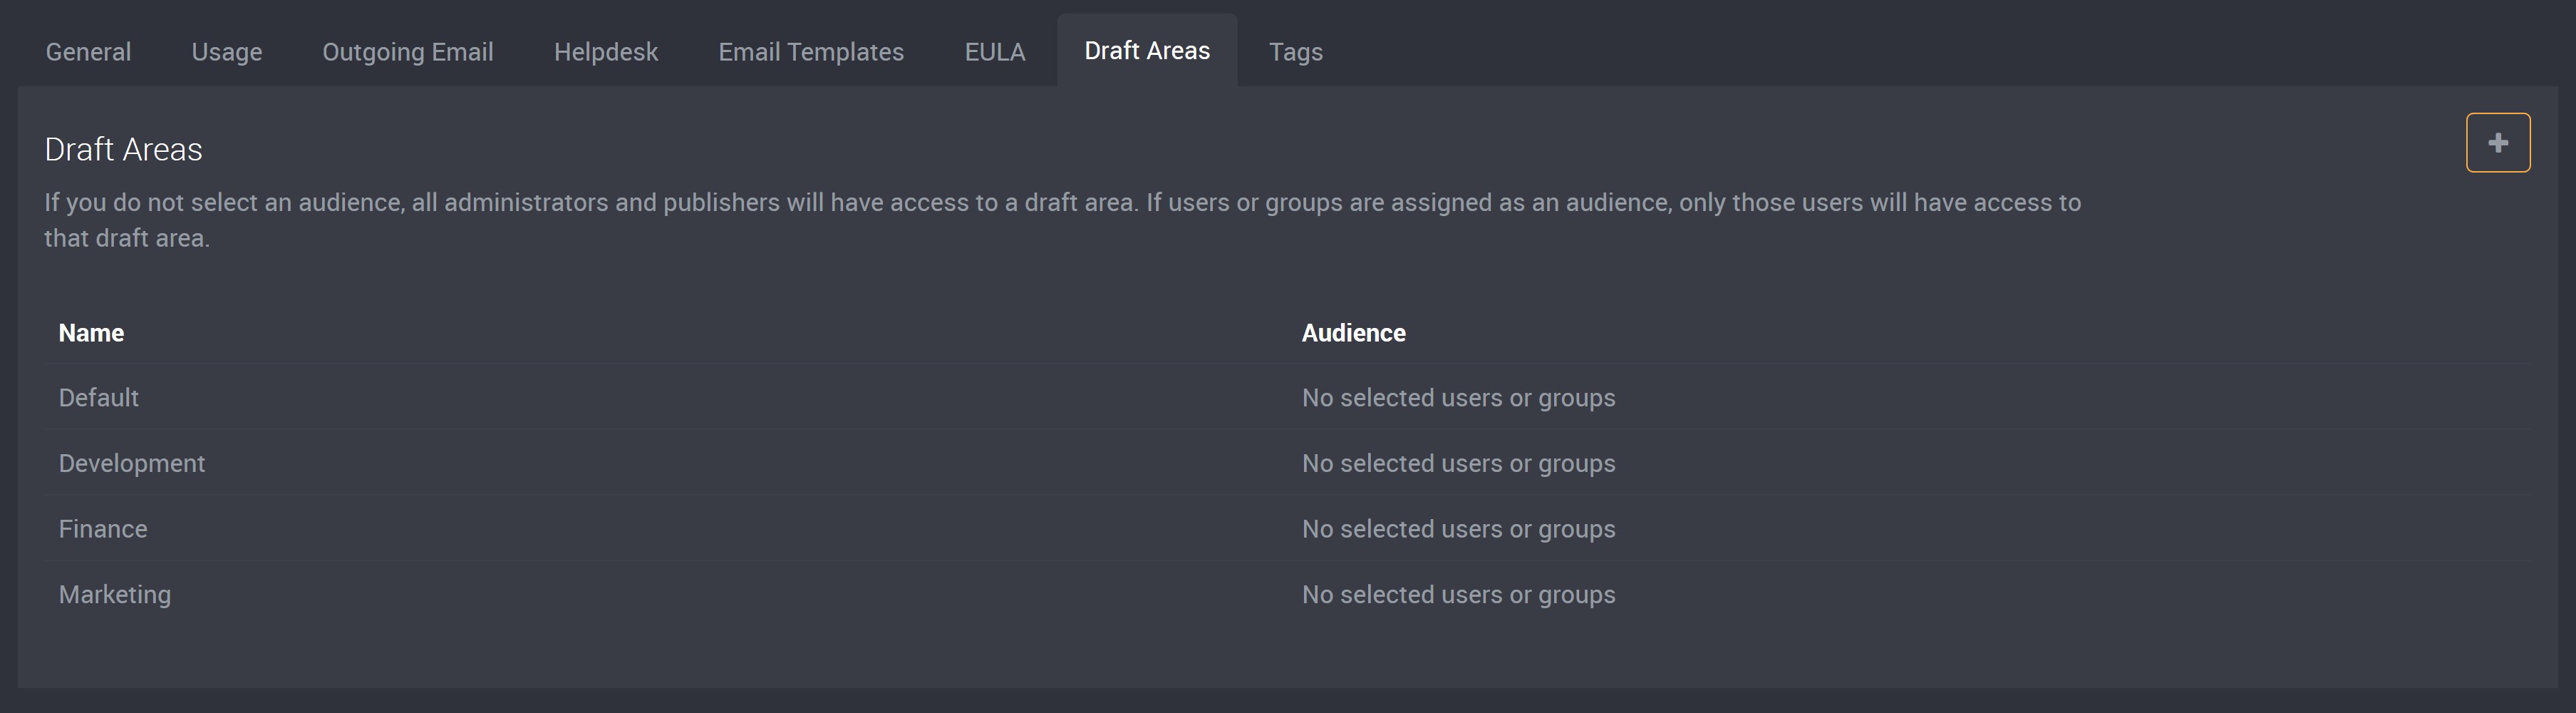
Audiences
Administrators can assign an audience to each draft area that will hide the draft area from other users.
If a draft area does not have an assigned audience all publishers will be able to see and publish to that draft area.
For example, as shown in the image below, a publisher assigned only to the Finance draft area (while the Default draft area has not been assigned an audience) can see both the Finance and Default draft areas and can register a Finance report to the Finance draft area, while they cannot see the other hidden Marketing and Development draft areas. Otherwise, publishers will be able to publish to any draft area that does not have an audience such as Default.

Draft Area Selection
- When registering an asset, you will be provided with a field to select a draft area for the asset. Learn more about how to register an asset here.
When importing assets from a reporting service you can configure the source system to only publish to a specific draft area from the source system page. Just select a draft area from the draft area selector.
If you have one draft area, you will not be prompted to select a draft area and it will be published to your one draft area.
If you have been assigned to only one draft area and all other draft areas have been assigned to others, assets will be published to your one assigned draft area.