Communication Rules

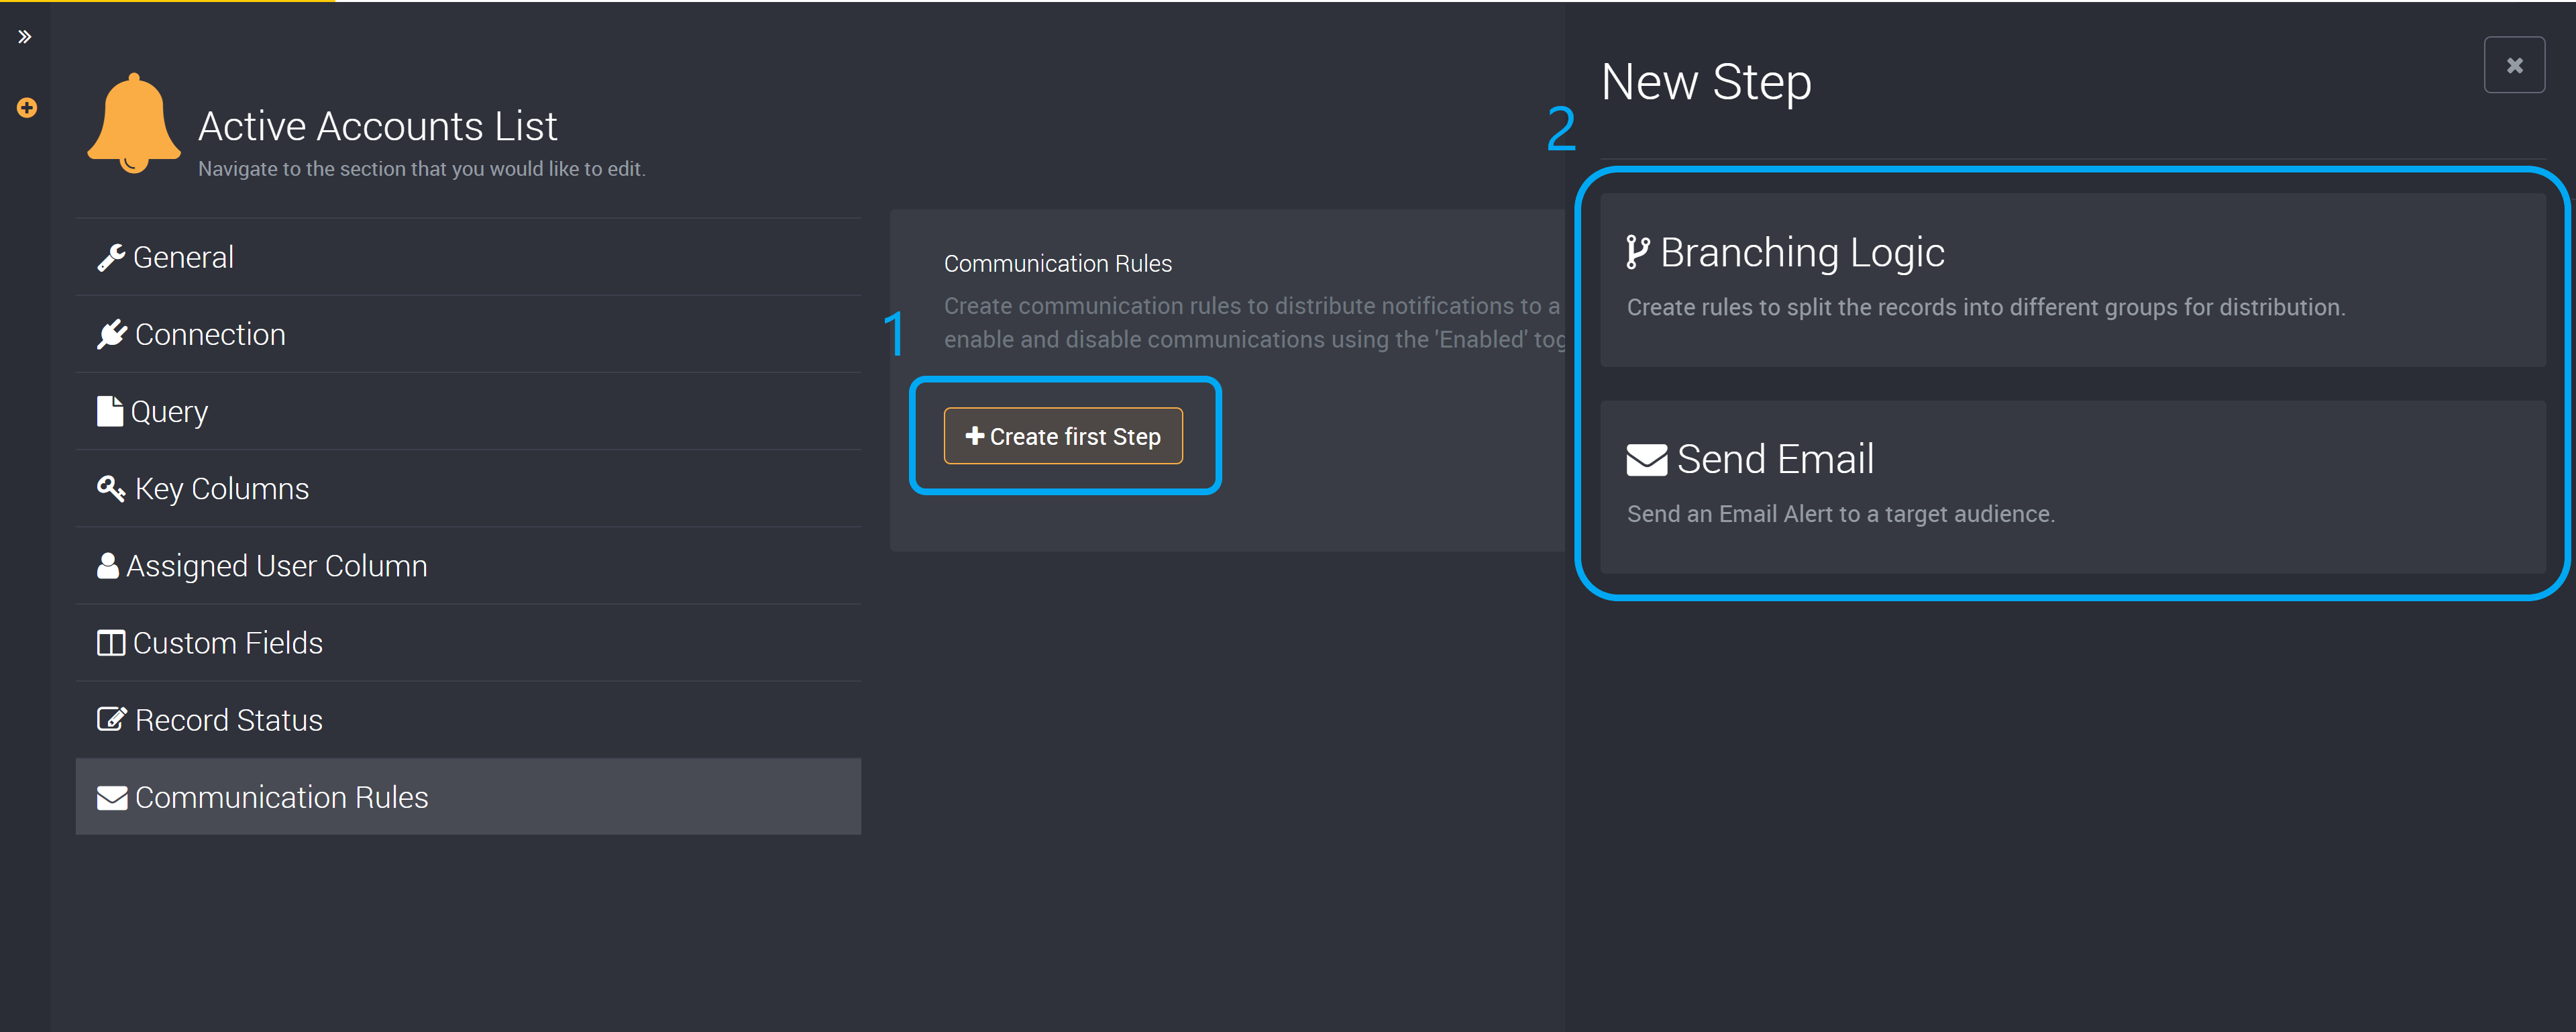
How to Add Communication Rules

Once you have run a rule, you can choose to add Communication Rules.

Click on Edit on the review page shown above or find the edit button from the project page.

You can then find the communication rules tab on the left of the page.

You can create multiple communication steps, and either choose to create a branch that will send communications only on specific conditions or send an overall email to a target audience.

Choose either to add branching logic or send an email

How to Send Communications for Specific Conditions

The following section is a guide to create different branches that will only email an audience if a specific condition has been met.

To create a new branch, click on Create first step.

Click on Branching Logic in the slide-out that is expanded.

Add a name that will easily identify the purpose of this branch.

Complete the fields for a new branch

Select the column that this condition will apply to from the dropdown.

This dropdown will display all available columns for this rule, including Assigned to, New Record and custom field columns.

In the next dropdown, select the condition type.

Choose a condition type for this branch

Then write the value that this condition will apply to.

For example, a condition for the Active Account column could be ‘Contains’ and ‘Active’ as the value that is used in this column. This means that any unresolved row that contains ‘Active’ in the column ‘Active Accounts’ will be emailed when this rule is executed.

Next, you can select a ‘True’ or ‘False’ step, as seen in the images below.

If a condition is true, the step you configure as the true step will be performed.

Add a true step

If the condition is false, the condition you save as the false step will instead take place.

Add a false step

This will expand the slide-out to add another communication step.

You can then follow our guide in the next section to send emails when the conditions we configured for this step are met.

Using the above example, this means this email will only be sent out for results where the ‘Active Account’ column contains ‘Active’.

How to Send Email Communications to a Target Audience

If you would like to send an email communication, regardless of any result conditions, then click on ‘Send Email’ as your first step.

You can also follow these steps when creating an email that will only be sent when a condition is met, as per the instructions above.

Send Email Communication Rule

Provide a communication name so you can easily identify the content and audience of this email communication.

Select whether you would like to:

Send One Email for all Results, Manually Entering Addresses

This will send a single email to a static list of recipients. For example, if you were checking for overdue timesheets, this could be used to send an email that was along the lines of ’50 people have not submitted their timesheets today’.

Group by an Email Column and Send an Email per Unique Address

This will aggregate a single email for all records that relate to a particular email in an email column in the results table. If for example the results table contained unresolved leads in a CRM database, and each lead recorded the email address of an assigned salesperson, Loome Monitor could generate individual emails for each salesperson providing information such as ’You have 24 unresolved leads assigned to you’. So if this results table had 5 rows assigned to another salesperson. They would receive one email for the five rows, instead of 5 emails.

Send One Email per Result, using an Email Column

You can send one email per result based on a dynamic email column. This will send one email per result to each assigned email address in the email column of the results table.

Send One Email per Result, Manually Entering Addresses

You can send one email per result based on a static list that you have entered into the email field manually. This will send one email for each result to the email addresses you add to this communication step in the UI.

Manually Add Email Addresses

If you have chosen to manually add email addresses, please follow the next few steps.

You can add the audience for this email communication in the Recipient List field.

Add multiple emails by separating them with a semi-colon.

Add emails manually

Click on the + Add button once you have provided the email address(es) to this field, and any email addresses that have been added can be viewed below.

View emails added here

Please provide email addresses in a complete email format so these email communications are successfully sent.

Send using an Email Address Column

If you have chosen to send emails using an email column, under the title Recipient Column select the column that contains the email address(es) you would like to communicate with from the dropdown. This dropdown will display all available columns for this rule, including Assigned to, source data columns and custom field columns.

Save the rule from the right-hand dropdown if you have added a new custom field column to be able to select it in this recipient dropdown.

Recipient Column

When this rule is executed, the email addresses in this column will receive the email content created in the next step.

Please ensure that the email addresses in your selected column are in a complete email format so that your email communications are successfully processed.

Add Email Content

Next, type in the subject of the email communication that will be sent out to users.

Type in the content of the email in the next field.

You can use HTML or you can use the text editor above this field.

Create your email content here

Tokens

Tokens represent available data from the data source your query selected that you can insert into the subject and content of your email.

The types of tokens that are available differ depending on the email type that you selected earlier.

If you selected:

  • Send one email for all results, manually entering addresses
    • You can add a link to the results page, the number of results, and the number of newly added records from the last run of the rule.

Tokens for a single email

  • Group by an email column and send an email per unique address.
    • This is where one email will be sent for multiple rows to the same email address in an email column
    • You can add a link to the results page, the number of new records added in the last run of the rule, and the number of unresolved results.

Tokens for one email for one user and multiple rows

Please note that the New Record token is not available in manual rules.

  • Send one email per result, using an email column
    • You can use any data column available in this rule, as well as the link to the results page.

Tokens using an email column

  • Send one email per result, manually entering addresses
    • You can use any data column available in this rule, as well as the link to the results page.

Tokens for an email per result

How to Add a Token to your Email Subject or Content

Tokens are available above the subject field.

Select where you would like this data to display.

Drag the token into the content field, and it will be visible where you last clicked.

View the process in the gif below.

For example, if you were to drag in the Results URL link, the audience that is sent this email will be able to follow this link to view the results they were informed about.

How to add tokens to emails

Save your Communication Step

Click on the tick button at the top-right corner to save this communication step.

You can repeat this process to add multiple communication steps with different conditions by clicking on the + beside a communication step.

Please note that communication branches filter down. Each branch filters data down to the next step. If you have a branch from a false step then only data with these false values will be available to subsequent branches, so that means there will not be any fields that are true in the next branch.

If you have added multiple communication steps, please note that if one fails it will not prevent the other communication steps from being processed. For example, if I have three email communications and one failed due to an incorrect email address, the other two email communications will still be sent.

Delete a Communication Step

If you would like to delete this communication step, then click on the top-right delete button to confirm that you would like to delete this step.

Enable or Disable all Communication Steps

Click on the Enabled toggle to disable communications when you would like to run this rule but not send any emails. This is useful when you would like to test a rule or check for results that have been resolved without notifying multiple team members.

Save your Communication Rules

If you want to send these communications out immediately you can click on Save and Execute Rule in the execution slideout and any emails you have set up will be sent to their recipients.

If you want to only save these communication rules, so that they are ready to send out at a later time either manually or using a schedule, you can instead click on Save in the execution slideout.