Solution Collections
You can provision Solution Collections and users can add these resources to their projects.
Solution collections can provide different actions in a project, such as a Media Services Account, deploying a SLURM Cluster for HPC, or deploying a Linux VM.
Page Summary:
Solution Collection Structure
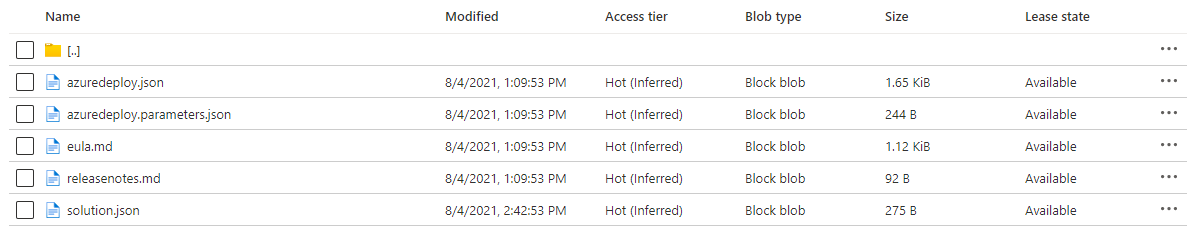
The Solution Collection Repository should be structured as follows;
A publisher.json File
In the publisher.json file, you should include:
| Field | Description |
|---|---|
| Name | The name of the publisher. |
| Support Email | An email address that users can contact for any issues or queries with the solution collection. |
| Description | A description of the publisher and repository. |

The Solution Collection Folder
In the Solution collection folder, you should include:
A solution.json File
A solution.json file should include:
| Field | Description |
|---|---|
| Name | The name of the solution collection. |
| Description | The description of the solution collection. This will explain what it contains when users are choosing which solution collection they will add to their project. |
| Version | A build version in the format of year.day.month.number. For example, 2021.16.01.1. |
| UpgradeAllowed | This determines whether users can upgrade a solution once it is provisioned. You can set this to ‘false’ if upgrading the solution collection would cause issues. Please read more about upgrades below. |
| Icon | You can also choose an icon. The selected icon will display beside the name of the solution collection. Loome Assist supports version 4.7 of Font Awesome. You can view the icons available at Font Awesome here. |
| Deployment mode | You can also provide a deploymentModeproperty, which can be Complete , Incremental, or User. It will determine whether all resources will be deleted when this solution collection is updated. |
Please note that you can use icons in your solution collection. Loome Assist supports version 4.7 of Font Awesome. You can view the icons available at Font Awesome here.
Upgrade Allowed
You can set whether a user will be able to upgrade if any changes are made to the solution collection once the user has added the solution collection to a project. If upgrading the solution collection would cause issues, you can set it to ‘false’ and the option to upgrade will not display for any provisioned solution collections.
Deployment Mode
Please note that if you select Complete mode, resources will be deployed again and upgraded, so any existing resources that were not included in the solution collection will be deleted.
If you are using Incremental mode, resources will be deployed incrementally when updating, so existing resources that aren’t included in the solution collection will not be deleted.
If you have chosen User mode, the user of the provisioned solution collection will be able to choose from the above two methods of ‘Complete’ or ‘Incremental’.
Please ensure you are using a deployment mode with your preferred update method, as users may unintentionally delete resources when updating this solution collection.
End-User Licence Agreement
You can then include an optional End-User Licence Agreement.
The eula.md file will contain the EULA that the user will need to accept in order to use this solution collection. This file will need to be in the format of .md.
Release Notes
The next file that you will need to include is releasenotes.md. It will contain the release notes of this solution collection, which can be viewed on the solution collection card, and will display to the user when updating the solution collection. releasenotes.md is a required file. This file will need to be in the format of .md.
Other Artifacts
You can then include all other existing artifacts in this folder, such as the ARM template file, parameters (if present), actions.json, and any action PowerShell script files.
Order
In summary, files for a solution collection must be in the order of:
solution.jsoneula.md(Optional)releasenotes.mdactions.json(Optional)- Any PowerShell action files (Optional)
- The ARM template file (
azuredeploy.json) - Any ARM template parameters, if supplied (
azuredeploy.parameters.json)
If you have any required fields in your solution collection, please include these requirements in your description of that field in the ARM template. These fields cannot be validated by Loome Assist as the solution collection is dependent on the ARM template.
ARM Template
Information about the account/project/resource from Loome will be injected into the variable section of the ARM template at runtime.
Following is a sample ARM template that includes our standard list of parameter names.
Please note that if you update the project, it will not automatically update the template variables.
Please note that the variables property will be injected at runtime, so please do not declare it in your template. The following is an example during deployment.
Sample ARM Template:
{
    "$schema": "https://schema.management.azure.com/schemas/2019-04-01/deploymentTemplate.json#",
    "contentVersion": "1.0.0.0",
    "parameters": {
        "storageAccountName": {
            "defaultValue": "[concat('storage', uniqueString(resourceGroup().id))]",
            "type": "String",
            "metadata": {
                "description": "Specifies the name of the Azure Storage account."
            }
        },
        "fileShareName": {
            "minLength": 3,
            "maxLength": 63,
            "type": "String",
            "metadata": {
                "description": "Specifies the name of the File Share. File share names must be between 3 and 63 characters in length and use numbers, lower-case letters and dash (-) only."
            }
        },
        "location": {
            "defaultValue": "[resourceGroup().location]",
            "type": "String",
            "metadata": {
                "description": "Specifies the location in which the Azure Storage resources should be deployed."
            }
        }
    },

    "variables": {
        "loome": {
            "Account": {
                "SecureVnet": {
                    "VnetName": "",
                    "ResourceGroupName": "",
                    "SubscriptionId": "",
                    "FirewallIpRanges": []
                }
            },
            "Project": {
                "Name": "Sample Project",
                "Creator": null,
                "Owners": [
                    {
                        "Name": "****@****.com",
                        "Type": "User"
                    },
                    {
                        "Name": "API Key 1",
                        "Type": "ApiKey"
                    }
                ],
                "Contributors": [
                    {
                        "Name": "API Key 1",
                        "Type": "ApiKey"
                    }
                ],
                "Readers": [],
                "Account": "Sample Account Template",
                "CostCenter": "Sample Cost Center",
                "Affiliation": "Sample Affiliation",
                "DataClassification": "Public"
            },
            "Deployment": {
                "Name": "",
                "Description": ""
            },
            "ProjectResources": {
                "SecureVnet": {
                    "NsgName": "",
                    "SubnetName": ""
                },
                "DataRepositories": [
                    {
                        "StorageAccountName": "stdrepo1",
                        "StorageAccountKey": "***********",
                        "FileshareName": "d-repo-1"
                    },
                    {
                        "StorageAccountName": "stdrepo2",
                        "StorageAccountKey": "************",
                        "FileshareName": "d-repo-2"
                    }
                ],
                "ApiKeys": [
                    {
                        "Name": "API Key",
                        "ClientId": "**********",
                        "ClientSecret": "***********"
                    }
                ]
            }
        }
    },

    "resources": [
        {
            "type": "Microsoft.Storage/storageAccounts",
            "apiVersion": "2019-06-01",
            "name": "[parameters('storageAccountName')]",
            "location": "[parameters('location')]",
            "sku": {
                "name": "Standard_LRS",
                "tier": "Standard"
            },
            "kind": "StorageV2",
            "properties": {
                "accessTier": "Hot"
            }
        },
        {
            "type": "Microsoft.Storage/storageAccounts/fileServices/shares",
            "apiVersion": "2019-06-01",
            "name": "[concat(parameters('storageAccountName'), '/default/', parameters('fileShareName'))]",
            "dependsOn": [
                "[resourceId('Microsoft.Storage/storageAccounts', parameters('storageAccountName'))]"
            ]
        }
    ],
    "outputs": {
        "testLoomeParameters": {
            "type": "String",
            "value": "[variables('loome').Project.Name]"
        }
    }
}
Sample Template for an Action File:
$subscriptionId = '**********';
$resourceGroupName = 'rg-*********';
$location = 'australiaeast';
$loome = '{"Account":{"SecureVnet":{"VnetName":"********","FirewallIpRanges":["2******"]}},
"Project":{"Name":"Sample","Creator":"******@*****.com",
"Owners":[{"Name":"******@*****.com.au","Type":"User"},{"Name":"******@*****.com.au","Type":"PendingInvite"}],
"Contributors":[{"Name":"*****@****.com.au","Type":"PendingInvite"},{"Name":"API Key","Type":"ApiKey"}],
"Readers":[{"Name":"API Key","Type":"ApiKey"}],"Account":"AccountSample","CostCenter":"Sample","Affiliation":"Sample"},
"Deployment": [{"Name": "SampleSolutionCollectionName","Description": "SampleDescription"}],
"ProjectResources":{"SecureVnet":{"NsgName":"rg-Sample-nsg","SubnetName":"sn-Sample-rg-Sample"},
"DataRepositories":[{"StorageAccountName":"sample*****.file.core.windows.net",
"StorageAccountKey":"**********",
"FileshareName":"Sample"},{"StorageAccountName":"sample*****.file.core.windows.net",
"StorageAccountKey":"**********",
"FileshareName":"Sample"},{"StorageAccountName":"sample*****.file.core.windows.net",
"StorageAccountKey":"**********",
"FileshareName":"Sample"},{"StorageAccountName":"sample*****.file.core.windows.net",
"StorageAccountKey":"**********",
"FileshareName":"Sample"}],"ApiKeys":[{"Name":"API Key 1","ClientId":"**********",
"ClientSecret":"**********"},{"Name":"API Key 2","ClientId":"**********",
"ClientSecret":"**********"}]}}';
$storageAccountName = '******';
$fileShareName = '******';
# Make sure these two vars are at the top
$executionPolicy = 'RemoteSigned'
$keepFile = 'True'

$result = "The action has been invoked successfully"

$result | Out-File "C:\Users\******\Documents\Loome\Loome.Agent\bin\Debug\net6.0\temp\loome*****.txt"
Adding Actions to Solution Collections
You can add actions to a solution collection via an actions.json file.
This file will specify the actions that can be performed via the solution collection once it has been added to a project, such as connecting to a VM.
Information about the account/project/resource will be injected as variables in to the PowerShell script at runtime.
If you have added an actions.json file, users that add this solution collection to a project will see additional action buttons on the solution collection card.
A solution collection with actions will have additional files related to the actions.json file.
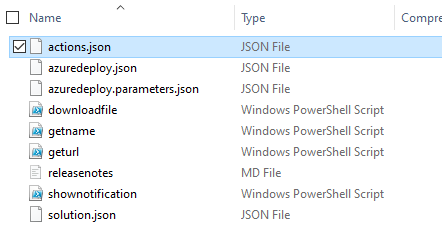
For each action, you will need to add a name, icon and PS1 file name. The PowerShell file will need to be written in PowerShell Core.
Each PS1 file that has been included in your solution collection will be run when the corresponding action is clicked in the UI.
In the actions.json file, you can use the following variables for writing action scripts:
subscriptionId,resourceGroupName,location,$sourceIpfor the source IP address,- and
$upnfor the User Principal Name.
The solution collection parameters and outputs values will be injected as a string during runtime.
For example, in the following solution collection, $mediaServiceName = 'mediaservicesample' will be injected into the action script.
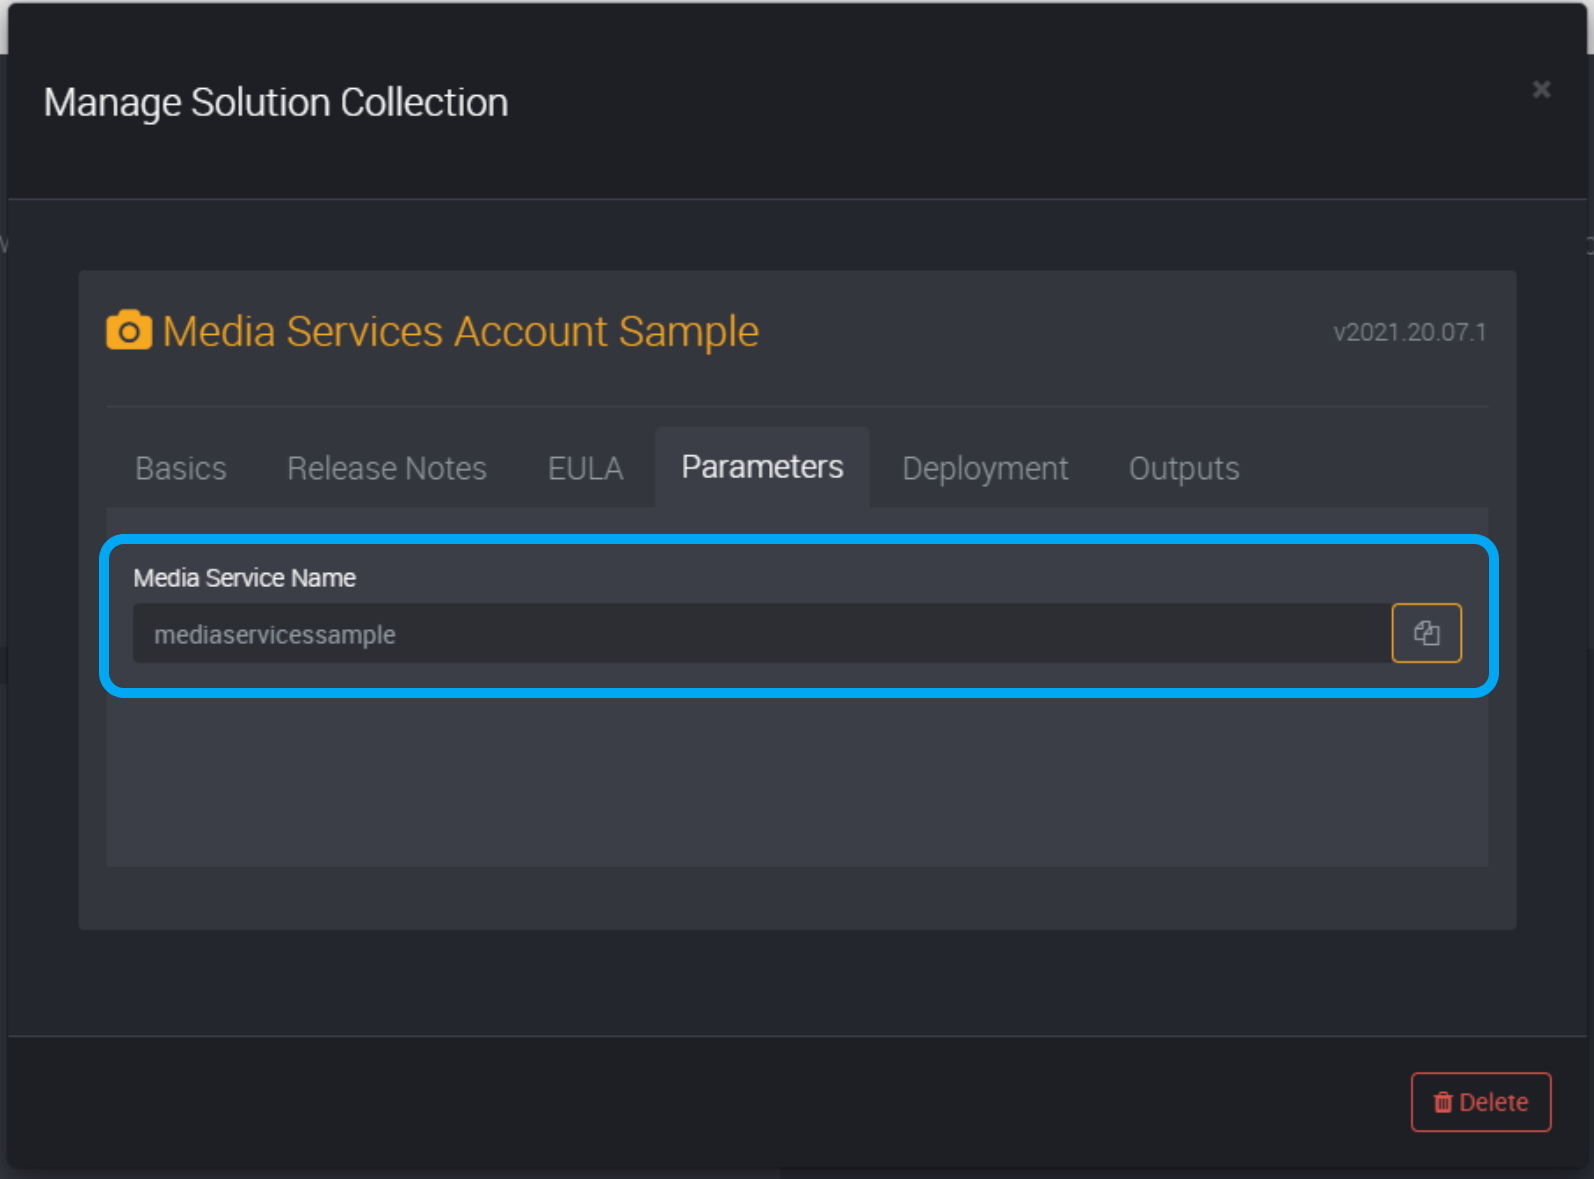
Please note that these values cannot be overwritten if specified in the deployment parameters or deployment outputs.
You can keep the script once it has run for debugging purposes by adding $keepFile = 'True' at the top of your script.
Action Types
Currently, there are four types of actions that a publisher can provide in a solution collection:
| Action | Description |
|---|---|
| String | Users will be able to copy a string value. |
| Notification | Users will see a notification with the information you have provided. |
| Url | Users will find a Url that will direct them to the Url you provided. The declaration used in the PSh script is “Url”. |
| File | Users will find a download link where they can download a file you have provided. File actions only use txt/ASCII files. |
| Get Markdown | Users will see a modal with markdown from your action script. |
Other Action Examples:
When adding actions to your actions.json file, please follow these useful tips.
- First, add the keepfile variable.
- Then run a blank/minimal action.
- Then go to the agent, login, find the script and copy all the injected variables (outputs from ARM).
- Please remember to add them as a comment to your action so that you can remember which variable names you have to use and a sample value for them.
- Second, always use the new format for PS1 with no ‘params’ and simple PowerShell.
- Always add a try catch. This will help with debug and will help ensure that you and users of this solution collection get a sensible error message.
- Action speed can be improved, for example if it is slow to retrieve, by including more in the ARM template. E.g., a FQDN (that won’t change) is output from ARM, then the action is to simply return the string.
String Action
Users of this solution collection will be able to copy a string value when you add this to the actions.json file.
Sample String Action:
    {
        "name": "Get Name",
        "icon": "fa fa-arrow-down",
        "fileName": "getname.ps1",
        "actionType": "String"
    },
Notification Action
Users of this solution collection will see a notification with the information you have provided when you add this to the actions.json file.
Sample Notification Action:
    {
        "name": "Show Notification",
        "icon": "fa fa-bell",
        "fileName": "shownotification.ps1",
        "actionType": "Notificaiton"
    },
Url Action
Add this to the actions.json file, and when users of this solution collection click on this action in Loome, they will see the Url that will direct them to your provided Url. The declaration used in the PSh script is Url.
Sample Url Action:
    {
        "name": "Get Url",
        "icon": "fa fa-external-link",
        "fileName": "geturl.ps1",
        "actionType": "Url"
    },
Get Markdown Action
Users of this solution collection will see a modal with the content you have provided in markdown when you add this to the actions.json file.
Sample Get Markdown Action:
    {
        "name": "Get Markdown",
        "icon": "fa fa-external-link",
        "fileName": "vmstatus.ps1",
        "actionType": "Markdown"
    },
File Action
Add this to the actions.json file, and when users of this solution collection click on this action in Loome, they will find a download link where they can download a file you have provided. File actions only use txt/ASCII files.
File actions only work for text files, like SSH certificates or RDP files, and these must be appropriately escaped.
Sample File Action:
 {
        "name": "Download File",
        "icon": "fa fa-download",
        "fileName": "downloadfile.ps1",
        "actionType": "File"
    }
If you have a binary file, or a file that cannot be escaped as required, you can instead use a URL action to provide a link to download it directly (see example below).
Example URL action script to download a binary file:
$fileShareName = "fileshare1"
$downloadFileName = "my.file"
$filePath = "folder1/" + $downloadFileName

try {
    # Only install modules that are used to avoid agent timeout (3mins)
    if (-Not (Get-Module -ListAvailable -Name Az.Accounts)) {
        Install-Module -Name Az.Accounts -Repository PSGallery -Force
    }
    if (-Not (Get-Module -ListAvailable -Name Az.Storage)) {
        Install-Module -Name Az.Storage -Repository PSGallery -Force
    }

    # Connect to the Azure account using the managed identity of the Loome agent
    Connect-AzAccount -Identity

    # Set the context to the current subscription
    Set-AzContext -Subscription $subscriptionId

    # Get the storage account access key (key1)
    $storageAccountKey = (Get-AzStorageAccountKey -ResourceGroupName $resourceGroupName -AccountName $storageAccount | Where-Object {$_.KeyName -eq "key1"}).Value

    # Create the context for the target storage account
    $storageContext = New-AzStorageContext -StorageAccountName $storageAccount -StorageAccountKey $storageAccountKey

    # Get a read-only SAS URL for the file and make it valid for 30 minutes
    $StartTime = Get-Date
    $EndTime = $StartTime.AddMinutes(30.0)
    $DownloadURL = New-AzStorageFileSASToken -ShareName $fileShareName -Path $filePath -Context $storageContext -Permission "r" -StartTime $StartTime -ExpiryTime $EndTime -FullUri

    # Disconnect from the account
    Disconnect-AzAccount

    # Assign the SAS URL value to $result so it can be returned on the Loome UI
    $result = "$($DownloadURL)"
}
catch {
    Write-Host "Unable to download the file: " $_.Exception.Message
}
Example text file download:
$containerName = "container1"
$filename = "myFile.txt"

try {
    # Only install modules that are used to avoid agent timeout (3mins)
    if (-Not (Get-Module -ListAvailable -Name Az.Accounts)) {
        Install-Module -Name Az.Accounts -Repository PSGallery -Force
    }
    if (-Not (Get-Module -ListAvailable -Name Az.Storage)) {
        Install-Module -Name Az.Storage -Repository PSGallery -Force
    }

    # Connect to the Azure account using the managed identity of the Loome agent
    Connect-AzAccount -Identity

    # Set the context to the current subscription
    Set-AzContext -Subscription $subscriptionId

    # Get the storage account (with the assumption that we would have only one storage account in the resource group)
    $storageAccountName = (Get-AzStorageAccount -ResourceGroupName $resourceGroupName).StorageAccountName

    # Get the storage account access key (key1)
    $storageAccountKey = (Get-AzStorageAccountKey -ResourceGroupName $resourceGroupName -AccountName $storageAccountName | Where-Object {$_.KeyName -eq "key1"}).Value

    # Create the context for target storage account
    $storageContext = New-AzStorageContext -StorageAccountName $storageAccountName -StorageAccountKey $storageAccountKey

    # Load the blob storage container
    $storageContainer = Get-AzStorageContainer -Name $containerName -Context $storageContext

    # Download the content of the text file
    $sourceBlob = $storageContainer.CloudBlobContainer.GetBlockBlobReference($fileName)
    $fileContent = $sourceBlob.DownloadText()

    # Disconnect from account
    Disconnect-AzAccount

    # Assign value of the text file to $result so it can be returned on the Loome UI
    $result = "{""fileName"":""$($fileName)"", ""fileContent"":""$($fileContent.Replace("`r`n", "\n"))""}"
}
catch {
    Write-Host "Unable to download the text file: " $_.Exception.Message
}
It is recommended to use ConvertTo-Json from Powershell cmdlet to convert file content to a JSON format. Learn more here. See an example below.
Example using ConvertTo-Json:
# We have a downloadfile.ps1 from File action type

$vmName = "MyVM"

$fileContent =
"This is a ""$vmName"" <, >, &, ' \ / \\


";

$jsonStringContent = $fileContent | ConvertTo-Json

$result = "{""fileName"":""$vmName.txt"", ""fileContent"": $jsonStringContent}"

# The output of $result:  {"fileName":"MyVM.txt", "fileContent": "This is a \"MyVM\" <, >, &, ' \\ / \\\\\r\n\r\n"}
Confirmation Option (Optional)
You can also add a confirmation string for each action in your Solution Collection, so that the user of the solution collection is prompted if they want to complete an action.
You can include this setting in the actions.json file.
Write "confirmationMessage": followed with your confirmation message.
It is an optional setting that can be left out if you do not require a confirmation prompt.
If you provide this setting, the user of this solution collection will be prompted with a confirmation box when they click on the action.
- If they click ‘OK’, the action will be performed.
- If they click ‘Cancel’, the action will not be performed.
The following is an example of a actions.json file that includes a confirmation option.
{
    "name": "Download File",
    "icon": "fa fa-download",
    "fileName": "downloadfile.ps1",
    "confirmationMessage": "Are you sure you would like to download this file?",
    "actionType": "File"
}
Status Check Option (Optional)
You can also add a status check function to Solution Collections. A status check will indicate the status of the solution collection such as ‘Running’ or ‘Failed’ at the top right of the solution collection card in the project it is added.
You can add the status check property field to the solution.json file by including "statusCheckFileName": followed with the name of the PowerShell script file.
You will need to specify the name of the PowerShell script file that provides the status of the solution collection, "statusCheckFileName":"{File Name}",.
For example, "statusCheckFileName":"checkStatus.ps1",. See below for a full example.
The PowerShell script file will provide statuses as string values.
Possible statuses are: - Ok - will display a green icon, along with its string value - Information - will display a blue icon, along with its string value - Warning - will display an orange icon, along with its string value - Failed - will display a red icon, along with its string value
You also have the option to add an ongoing status using isOnGoing. If = true the icon will blink to show it is ongoing, if you write = false it will not.
Following is an example of a solution.json file.
{
    "name": "Create a Media Services Account with Actions",
    "description": "This template creates an Azure Media Services Account with its Storage account.",
    "version": "2021.07.09.1",
    "icon": "fa fa-camera",
    "upgradeAllowed": true,
    "statusCheckFileName": "checkStatus.ps1",
    "deploymentMode": "User"
}
Following is an example of a checkStatus.ps1 file.
# *** Return Object ***
#   code: string
#       Possible values are:
#           OK          - Green Icon
#           Information - Blue Icon
#           Warning     - Yellow Icon
#           Failed      - Red Icon
#
#   message: string
#       Return message that is displayed in the UI and has the same color as code property.
#
#   isOngoing: boolean (Optional)
#       An icon is added with style to indicate that this status is ongoing.


# Assign value  to $result so it can be return to the UI
$result = "{""code"":""OK"", ""message"":""Running"", ""isOngoing"": false}";
Installing Modules (Optional)
You can install modules into the action script.
The following sample script is an example of how a user could get the public IP address of a Linux VM.
# Make sure these two vars are at the top
$executionPolicy = 'RemoteSigned'
$keepFile = 'True'

try {
    # Only install modules that are used to avoid agent timeout (3mins)
    if (-Not (Get-Module -ListAvailable -Name Az.Accounts)) {
        Install-Module -Name Az.Accounts -Repository PSGallery -Force
    }

    if (-Not (Get-Module -ListAvailable -Name Az.Network)) {
        Install-Module -Name Az.Network -Repository PSGallery -Force
    }

    # Connect to azure account via managed identity
    Connect-AzAccount -Identity

    # Set context for current subscription
    Set-AzContext -Subscription $subscriptionId

    # Get public IP address
    $publicIpAddressContent = Get-AzPublicIpAddress -Name $publicIpAddressName -ResourceGroupName $resourceGroupName

    if (!$publicIpAddressContent.IpAddress) { throw "IP address does not exist." }

    $ipAddress = $publicIpAddressContent.IpAddress

    # Disconnect account after use
    Disconnect-AzAccount

    # Assign value  to $result so it can be return to the UI
    $result = "$adminUserName@$ipAddress";
}
catch {
    Write-Host "Unable to get IP address." $_.Exception.Message
}
ARM Template Parameters
When naming ARM template parameters and outputs, identify words by initial capital letters. For example, the parameter ‘Number of Worker Nodes’ will be recognized when the injected parameters in the PowerShell script for actions is ‘NumberofWorkerNodes’. If all words are in lowercase, it will not recognize lowercase as separate words such as ‘numberofworkernodes’.
If using the parameter adminUsername, so users can provide a username in solution collections, users will not be able to provide invalid usernames (which include usernames invalid for Microsoft) such as ‘administrator’, ‘admin’, ‘admin1’, ‘admin2’, ‘user’, ‘user1’, ‘user2’, ‘user3’, ‘user4’, ‘user5’, ‘test’, ‘test1’, ‘test2’, ‘test3’, ‘1’, ‘123’, ‘a’, ‘owner’, ‘guest’, ‘server’, ‘actuser’, ‘aspnet’, ‘root’, ‘sql’, ‘support’, ‘backup’, ‘console’, ‘adm’, ‘sys’, ‘david’, ‘john’, or ‘support_388945a0’.’
ARM Template Configuration
You can add validation for a parameter by declaring regex and validationMessage in your template.
ARM Template Example:
{
  "$schema": "https://schema.management.azure.com/schemas/2019-04-01/deploymentTemplate.json#",
  "parameters": {
    "storageAccountName": {
      "type": "string",
      "metadata": {
        "description": "Storage account name",
        "regex": "^[a-z0-9]{3,24}$",
        "validationMessage": "Storage account name must be 3-24 characters, lowercase letters and numbers only"
      }
    }
  }
}
Updating a Solution Collection
Once you have made your changes to a solution collection, such as the solution.json file, you can provide a new version number so any provisioned solution collections in projects will indicate that there is a new version that a user can update to as seen here.
You can also update your release notes in releasenotes.md to inform users of the changes you have made to the solution collection and they can then choose whether they would like to upgrade their existing solution collection.
Depending on your chosen deployment mode, users will either choose from the ‘Complete’ mode or the ‘Incremental’ mode when upgrading if you selected ‘User’ or will confirm they want to upgrade using the ‘Complete’ or ‘Incremental’ mode you have selected. As mentioned above, each deployment mode has differing outcomes so please choose carefully.