Accounts
Find the following sections below:
How to Create an Account
Find the accounts page from the top-right dropdown menu.

Click on New Account at the top right of the page to add an account.

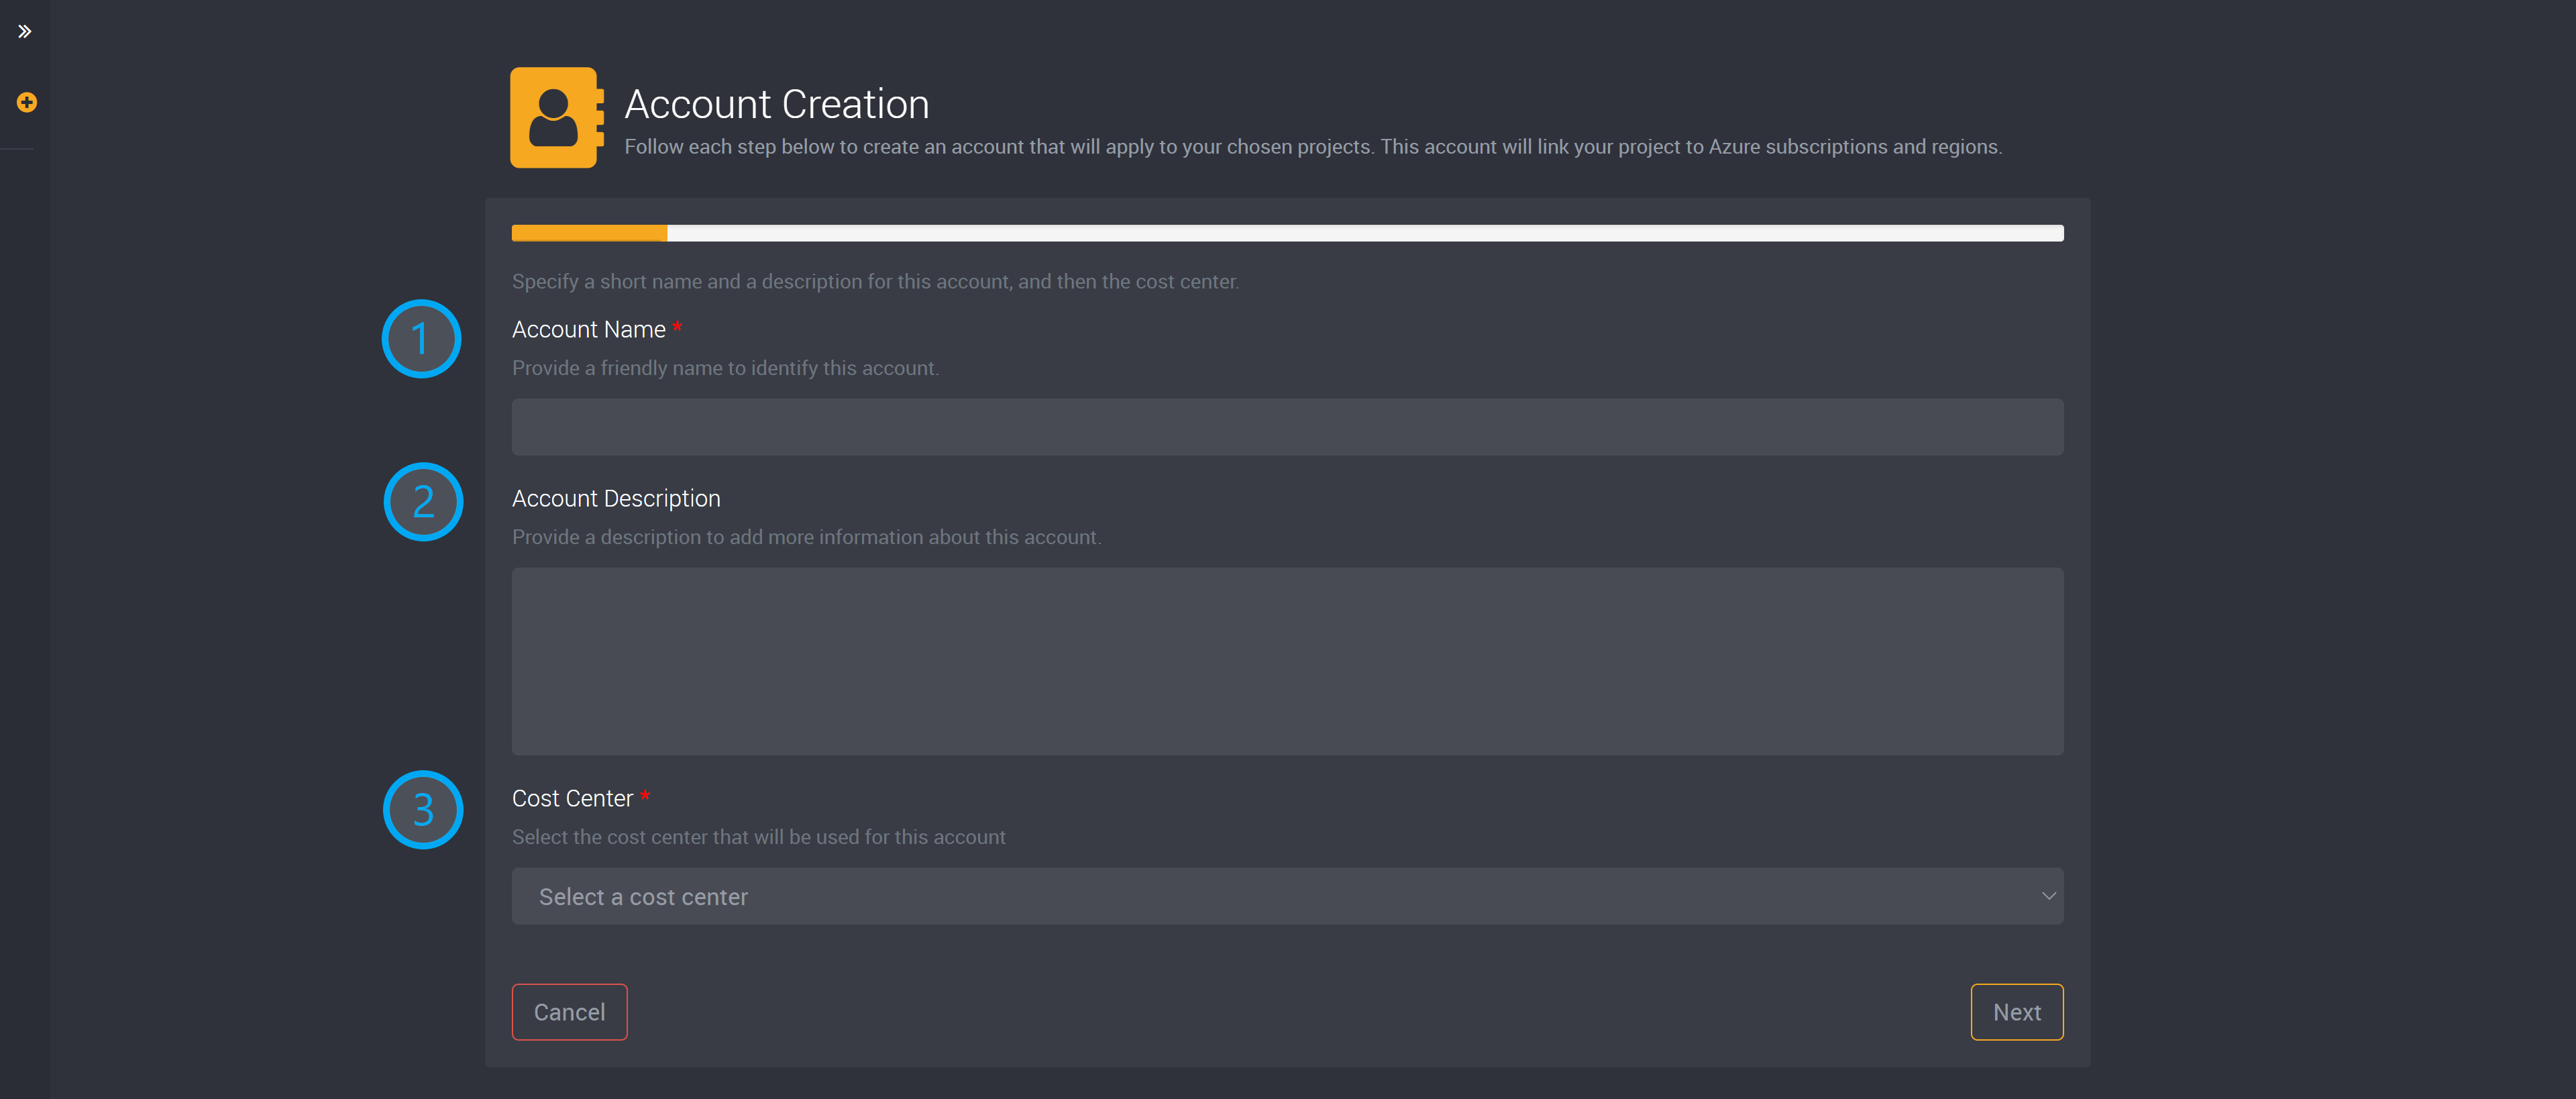
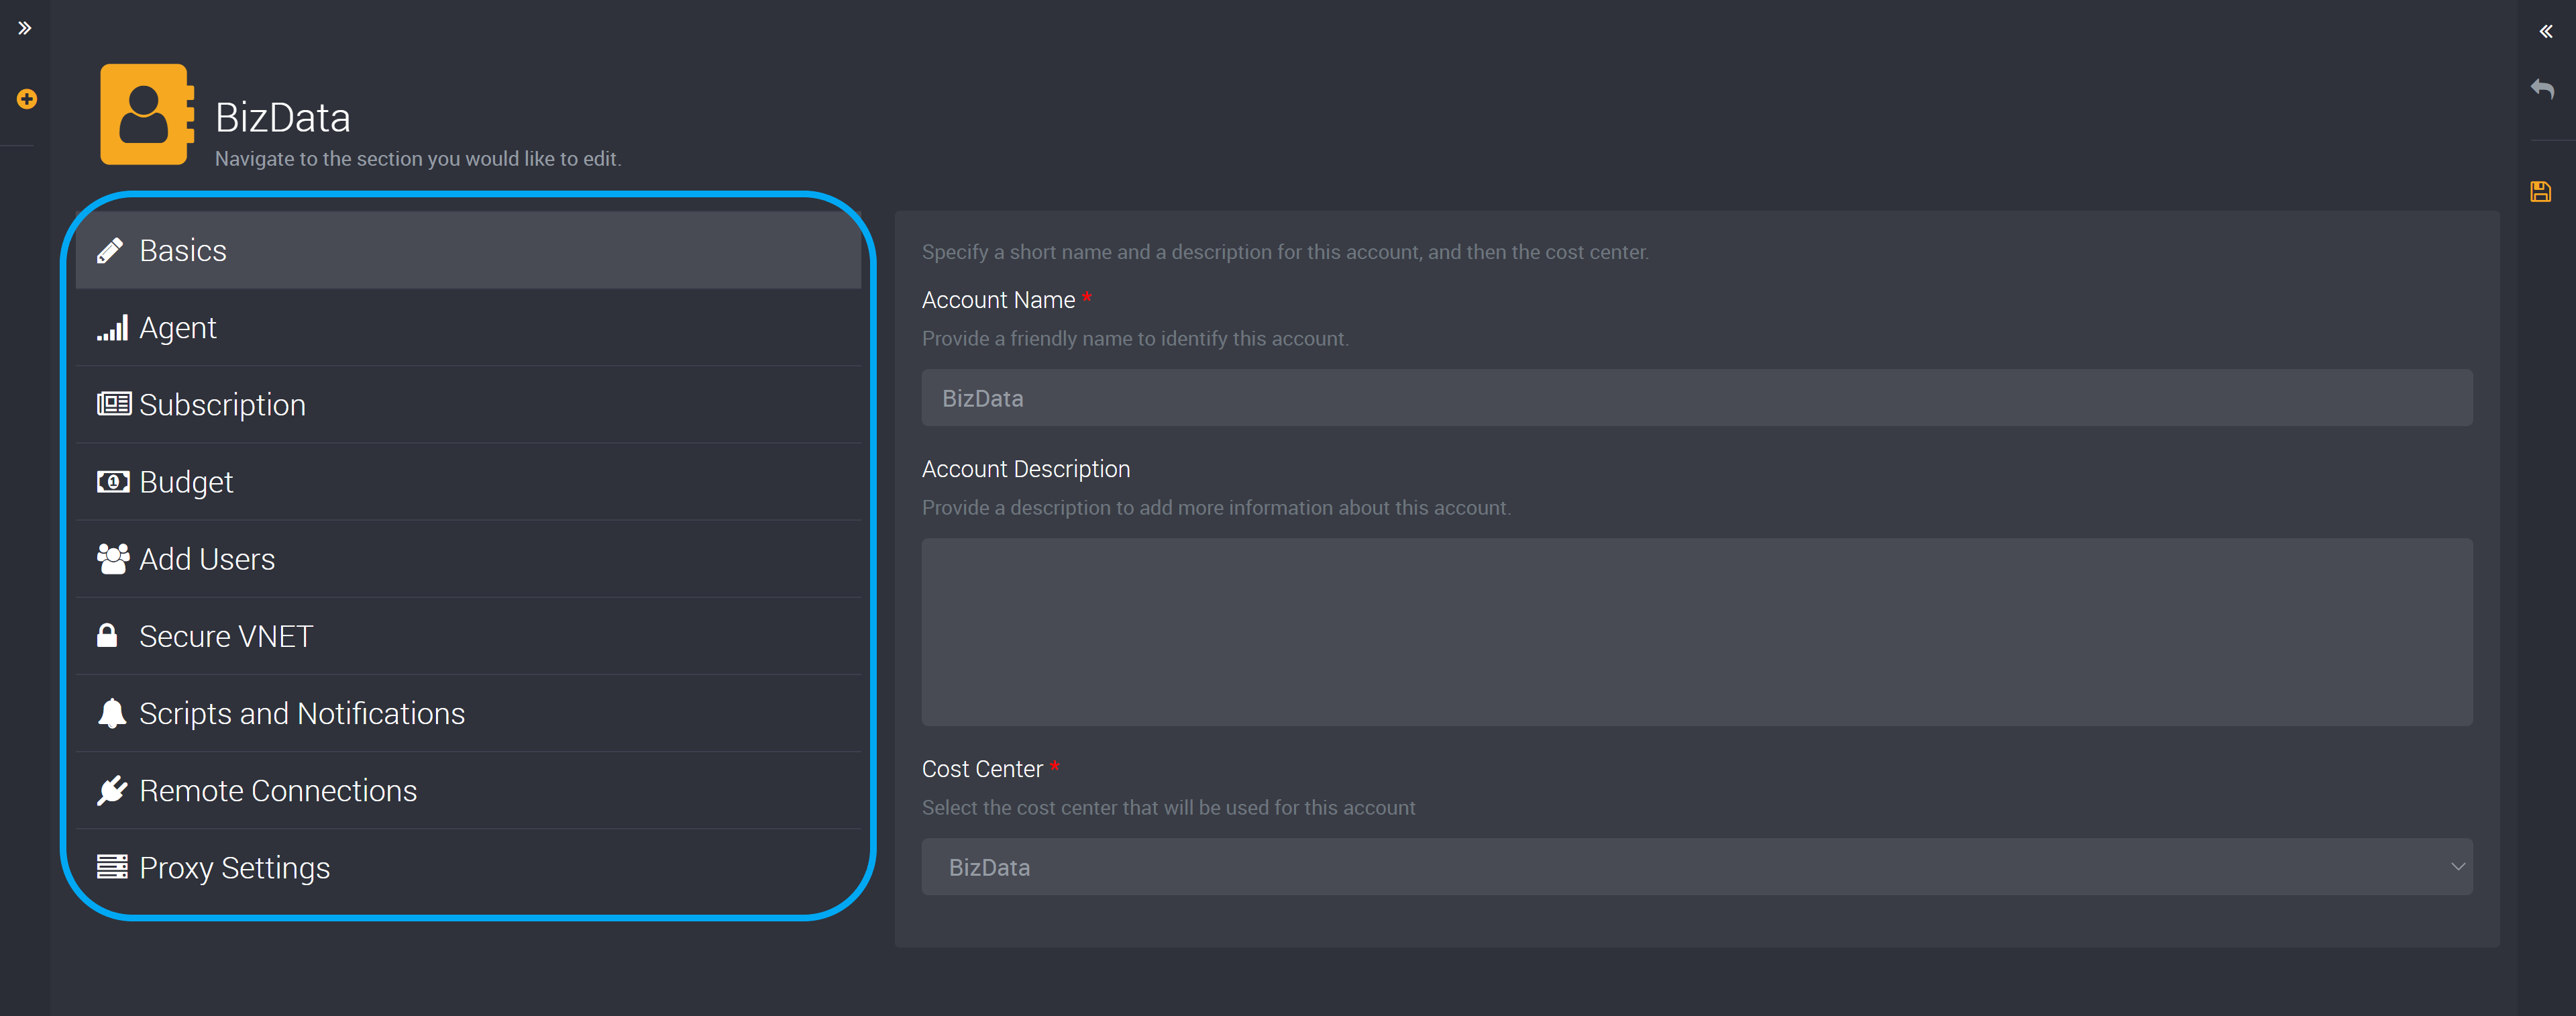
Basics
Provide a name that will easily identify this account.
Then add a description. Here you can write a summary about this account.
The third step on this page is to select a cost center for this account.
Agent
Select your agent from this dropdown list. This agent will manage your resources in Azure.
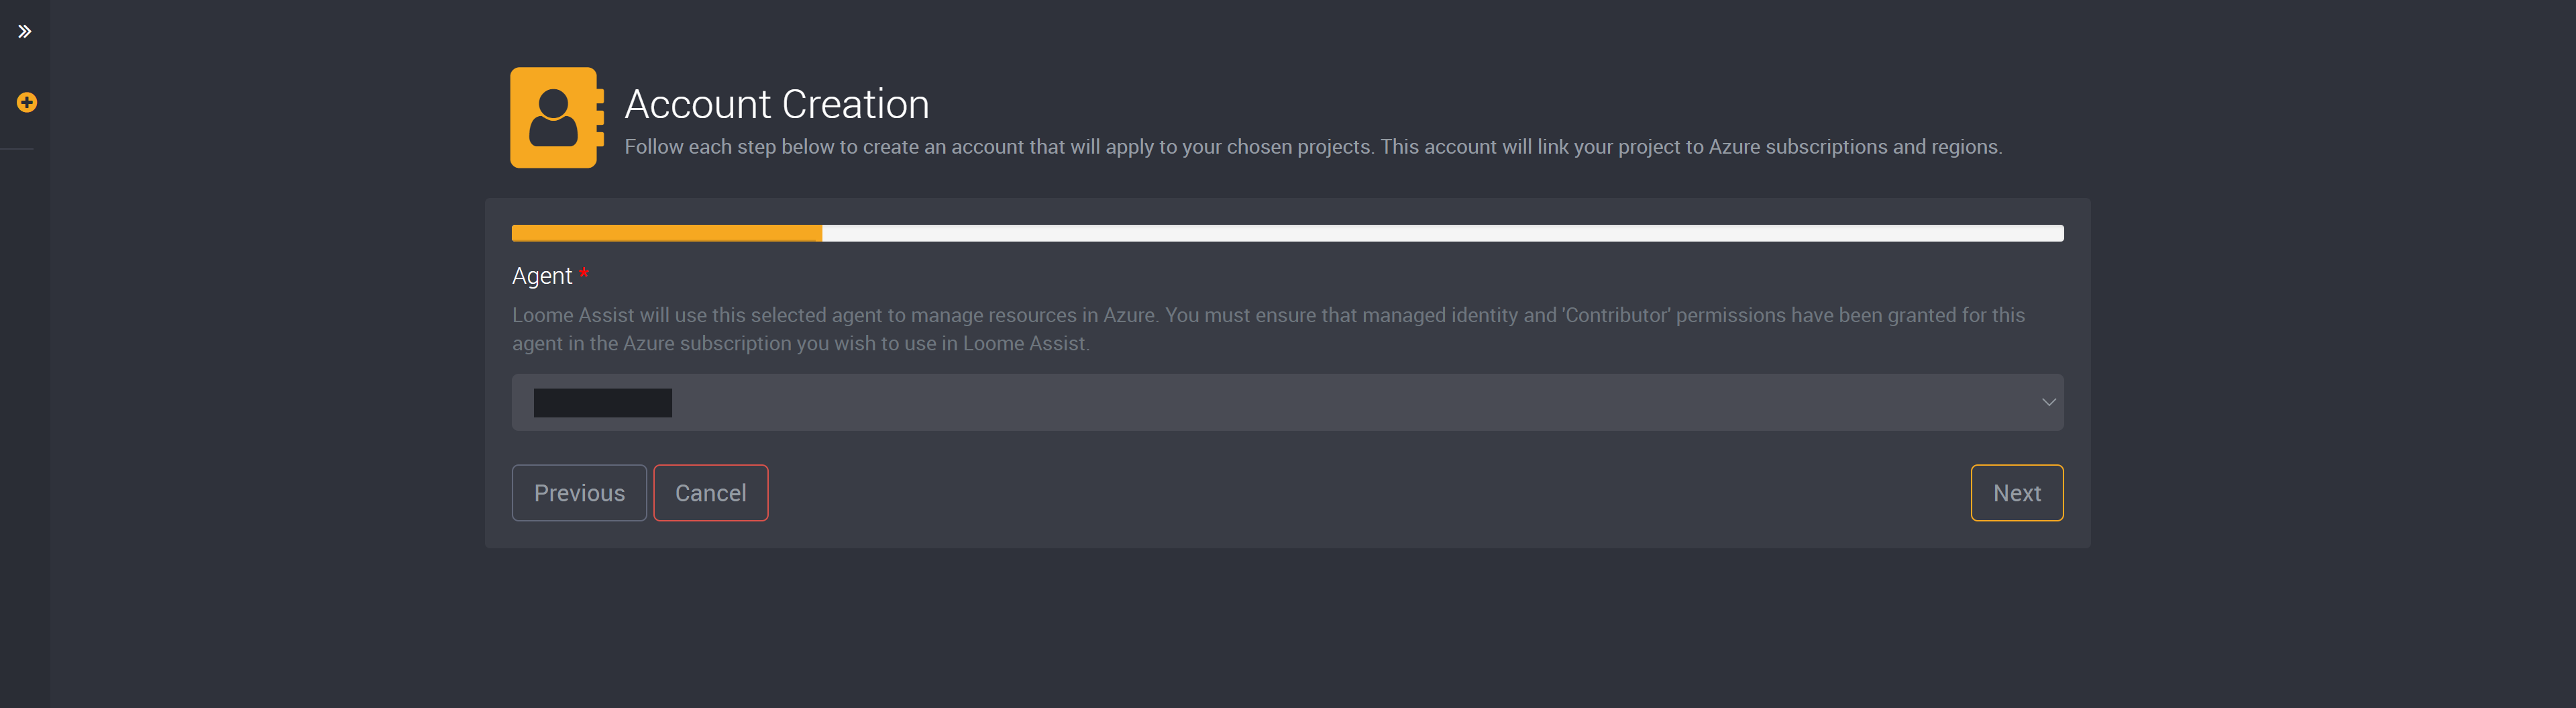
You must ensure that managed identity and ‘Contributor’ permissions have been granted for this agent in the Azure subscription you wish to use in Loome Assist. Learn more about agents here.
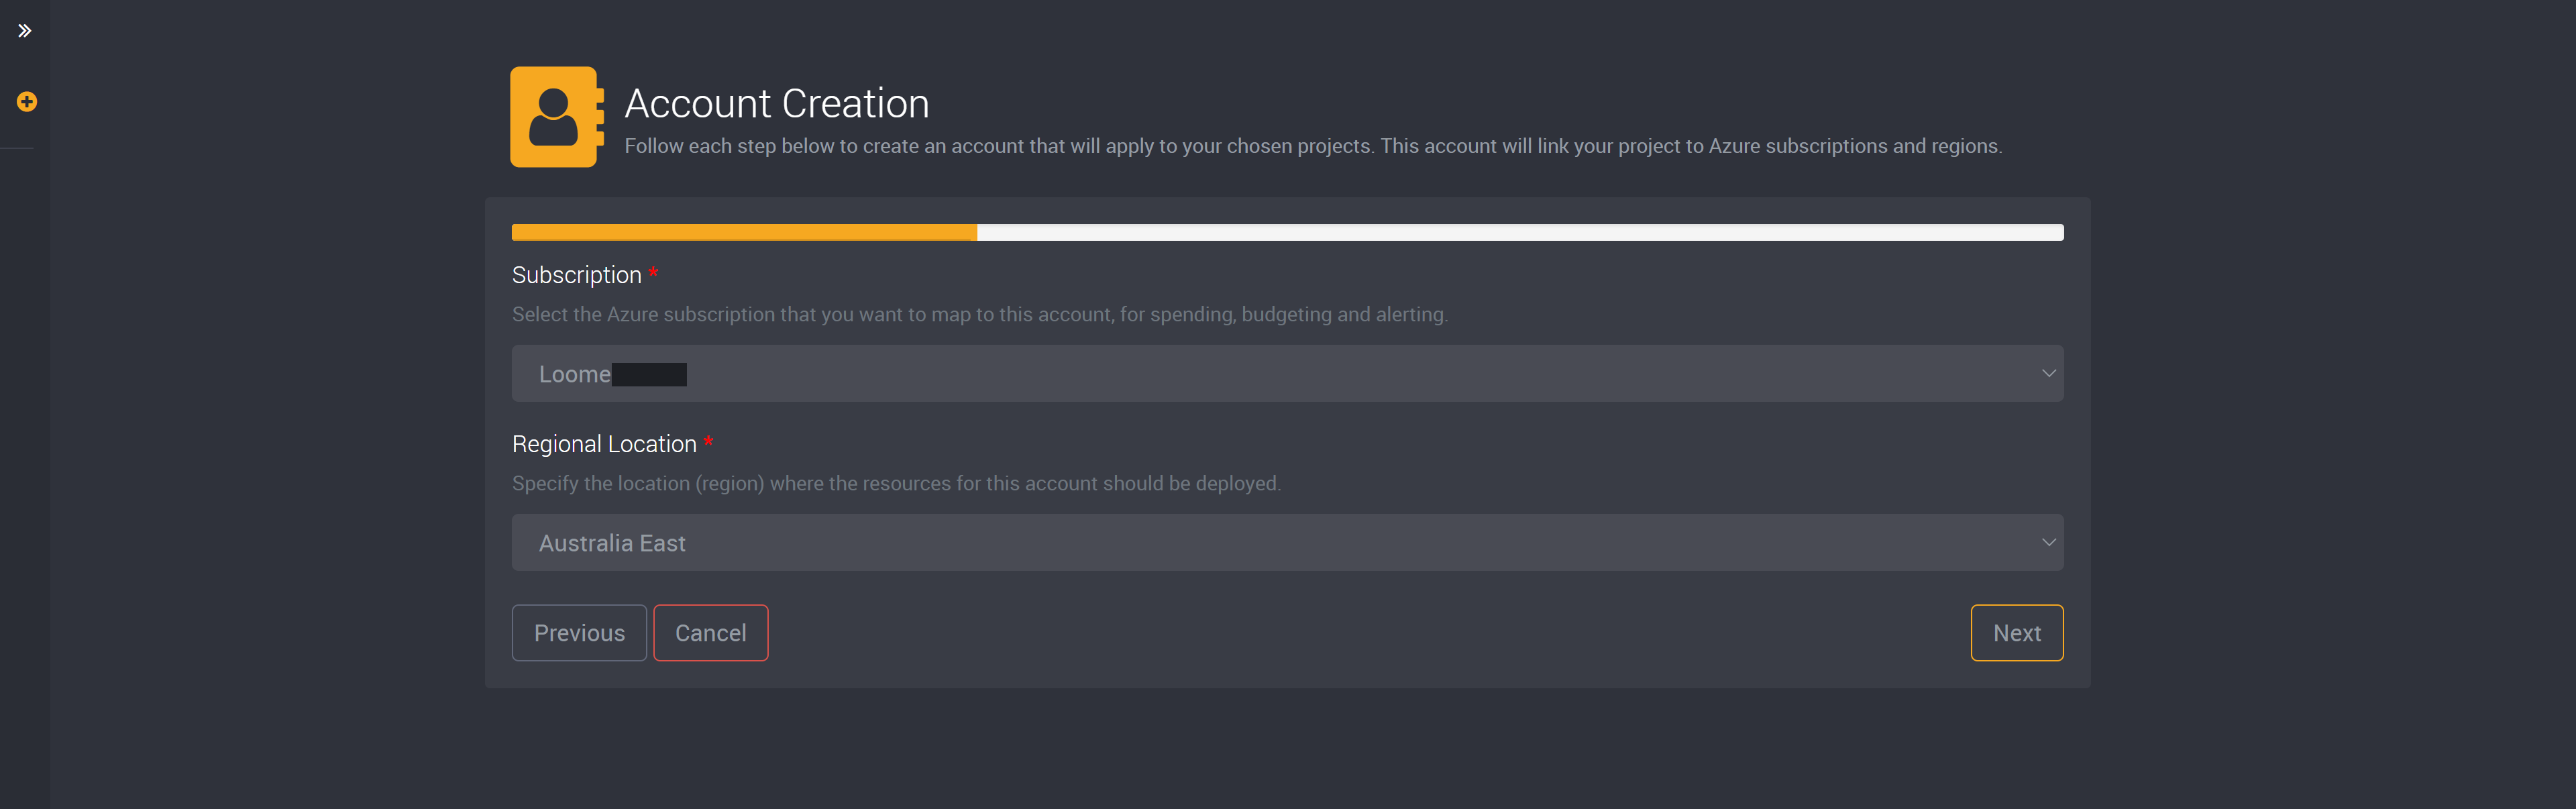
Subscription
Select the Azure subscription that you want to map to this account for spending, budgeting and alerting.
Once you select your subscription, the available regions will display in the next dropdown.
Specify the regional location where the resources for this account will be deployed.
Please note that due to technical restrictions, you cannot change the name, agent, location, and the subscription of an account as they are related to the resource group, resources and their locations, and the installed agent.
Budget
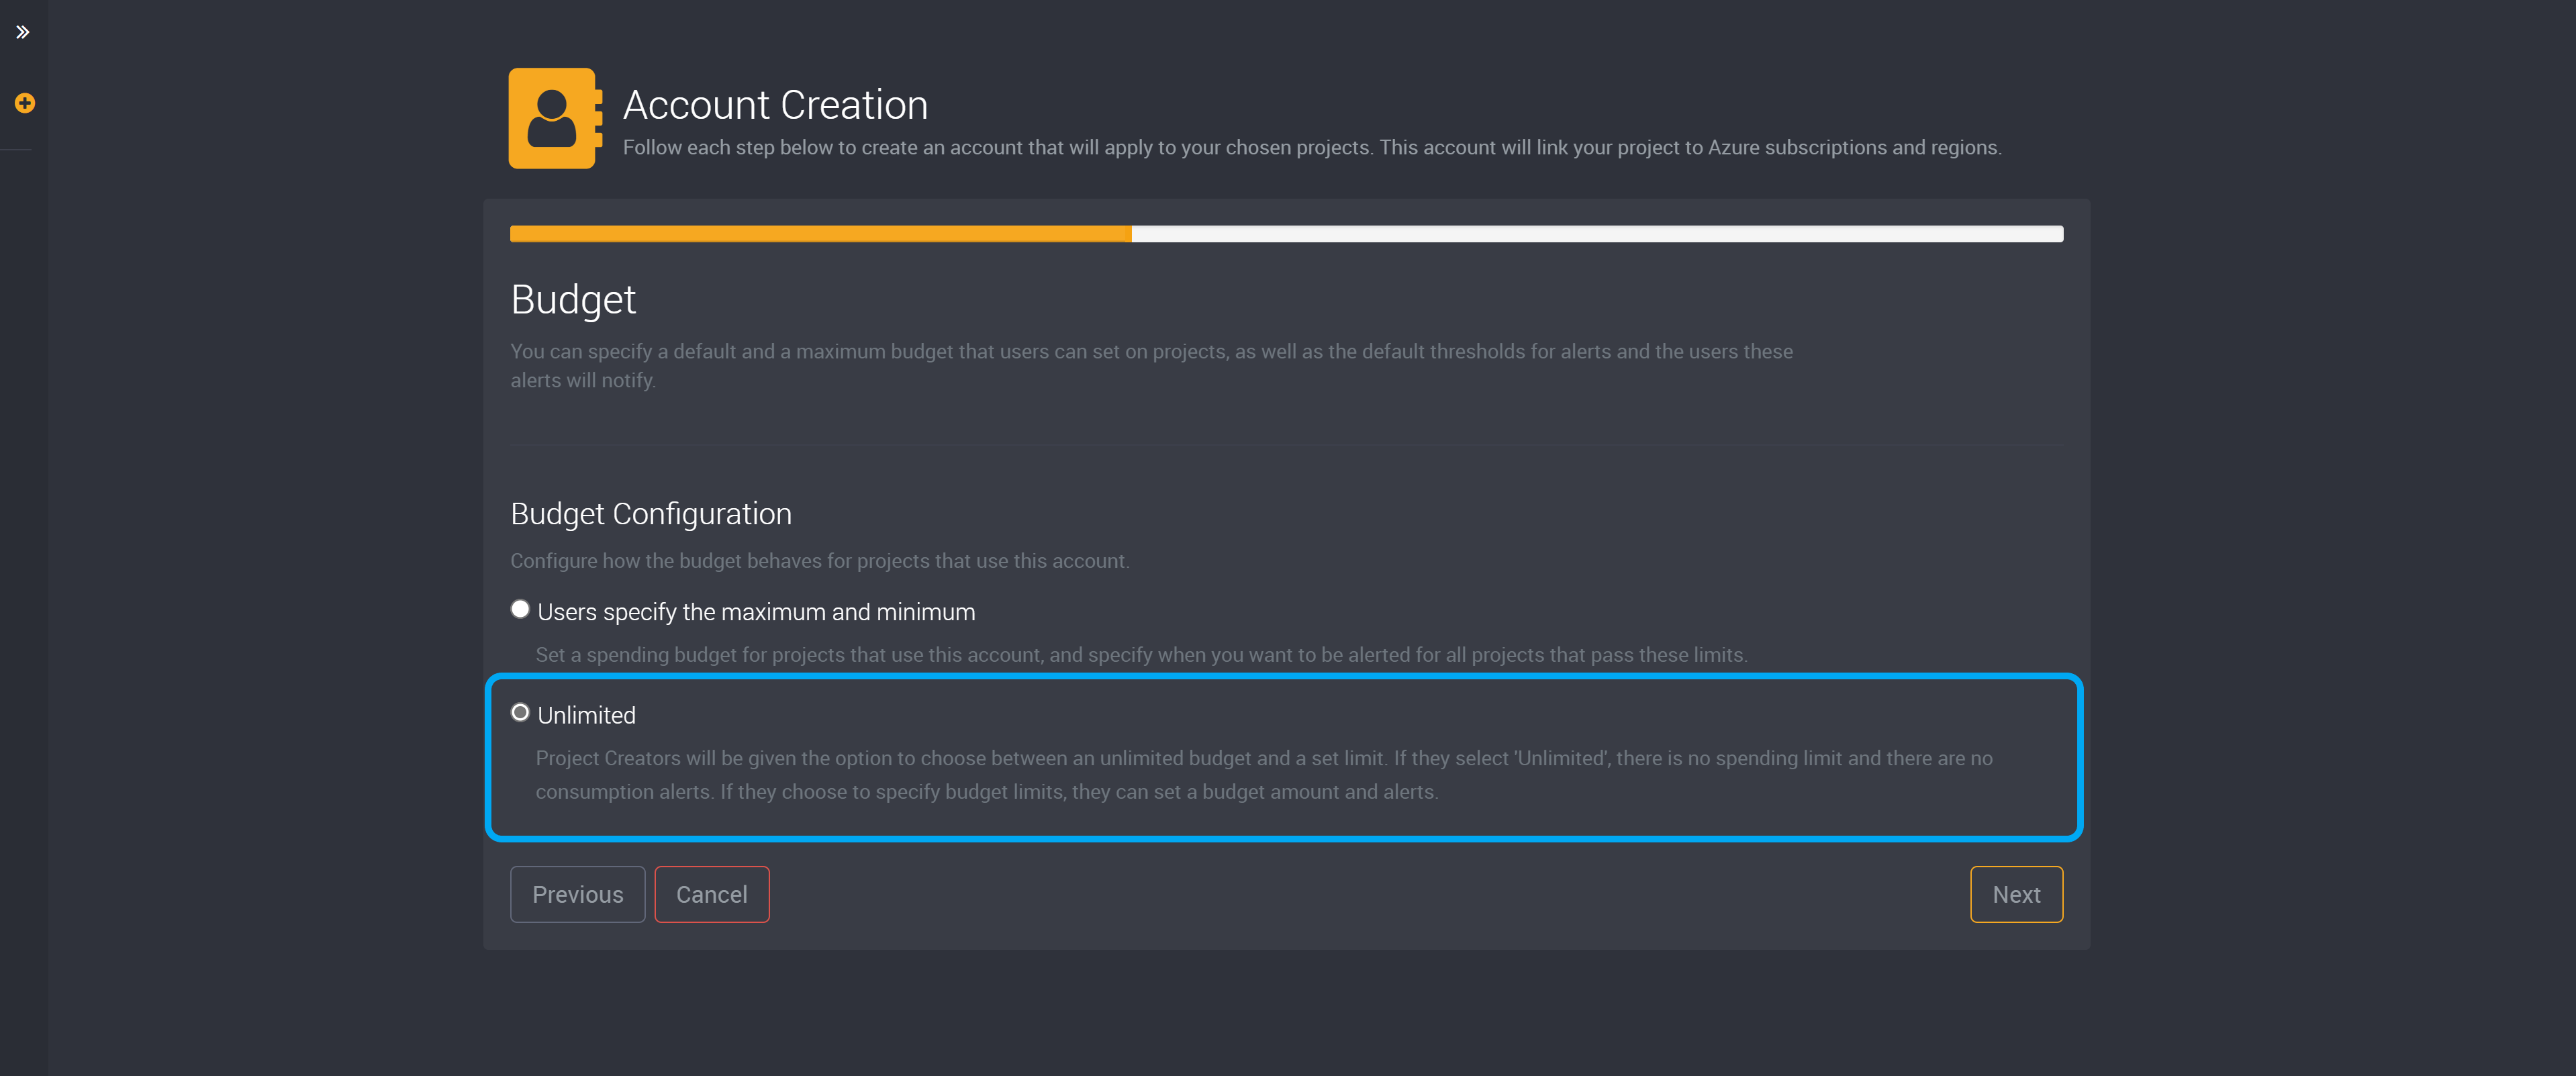
Next you will have to select the budget specifications that will apply to all projects that use this account.
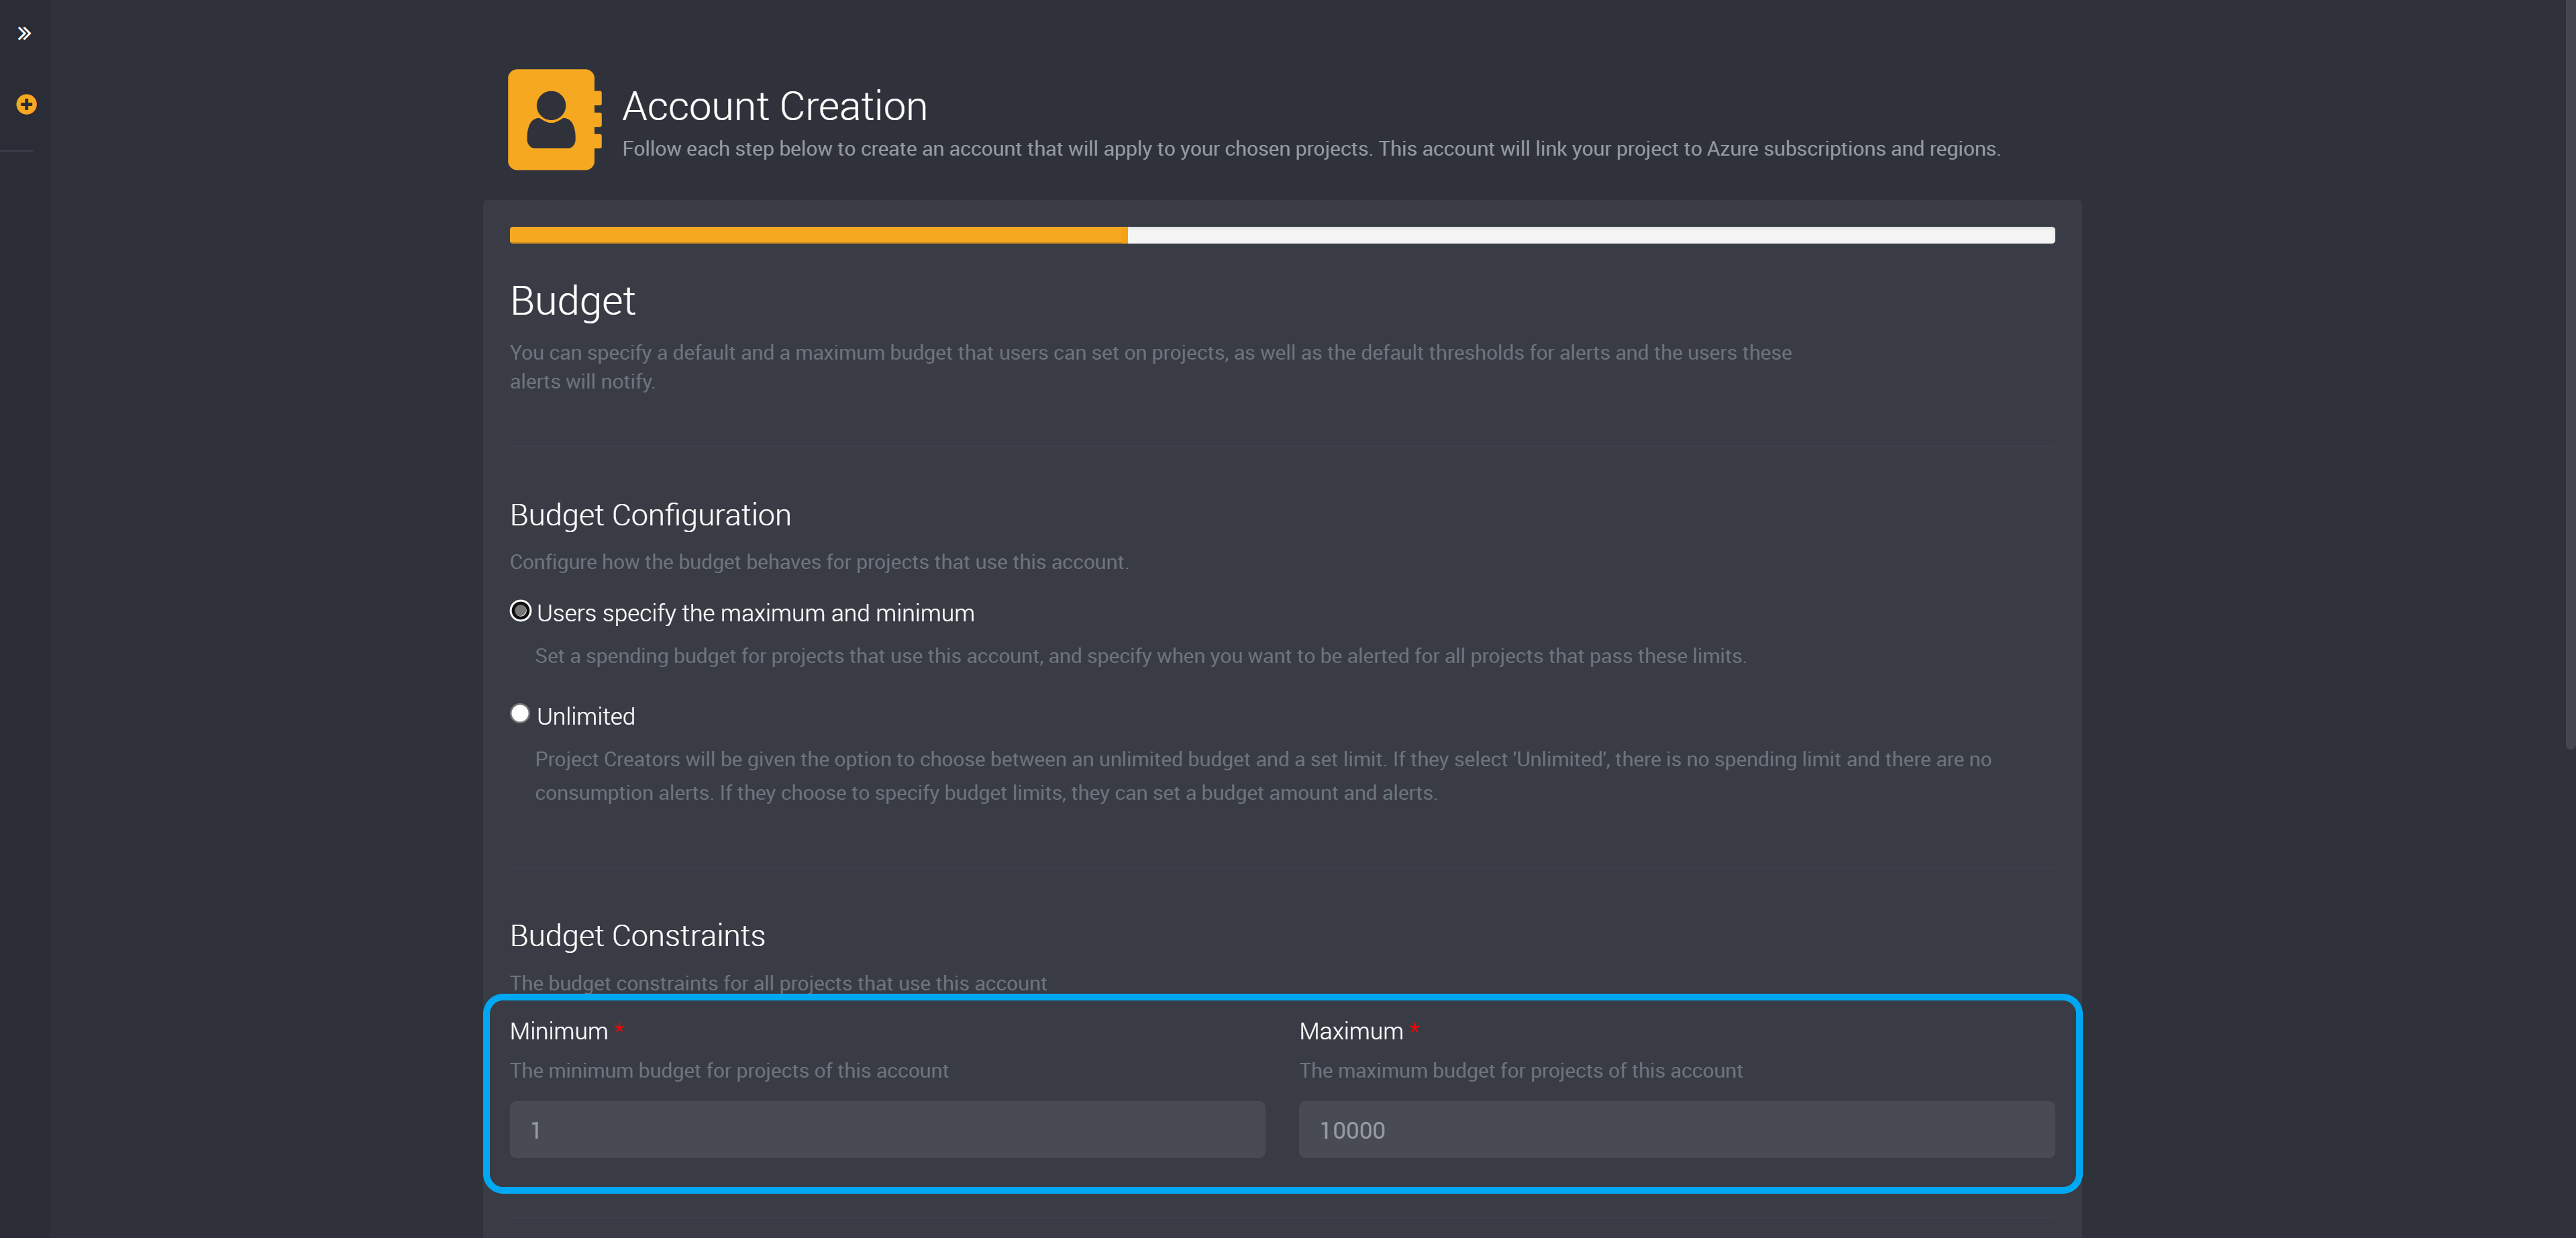
First, set whether users can choose a project’s budget from your selected maximum and minimum, or whether you want to provide users with an unlimited budget.
An unlimited budget will not have a spending limit and will not have consumption alerts.
When creating a project, Project Creators will still be given the option to choose between an unlimited budget and a set limit. If they select ‘Unlimited’, there is no spending limit and there are no consumption alerts. If they choose to specify budget limits, they can set a budget amount and alerts.
If you choose an unlimited budget, you can move onto the next step where you can add the users that can create projects using this account.
If you specify a limit, you can set a spending budget for projects that use this account, and specify when you want us to alert you and others.
By setting a spending budget for this account, projects that use this account will have a limited budget and you will be alerted for all projects that pass the alert thresholds.
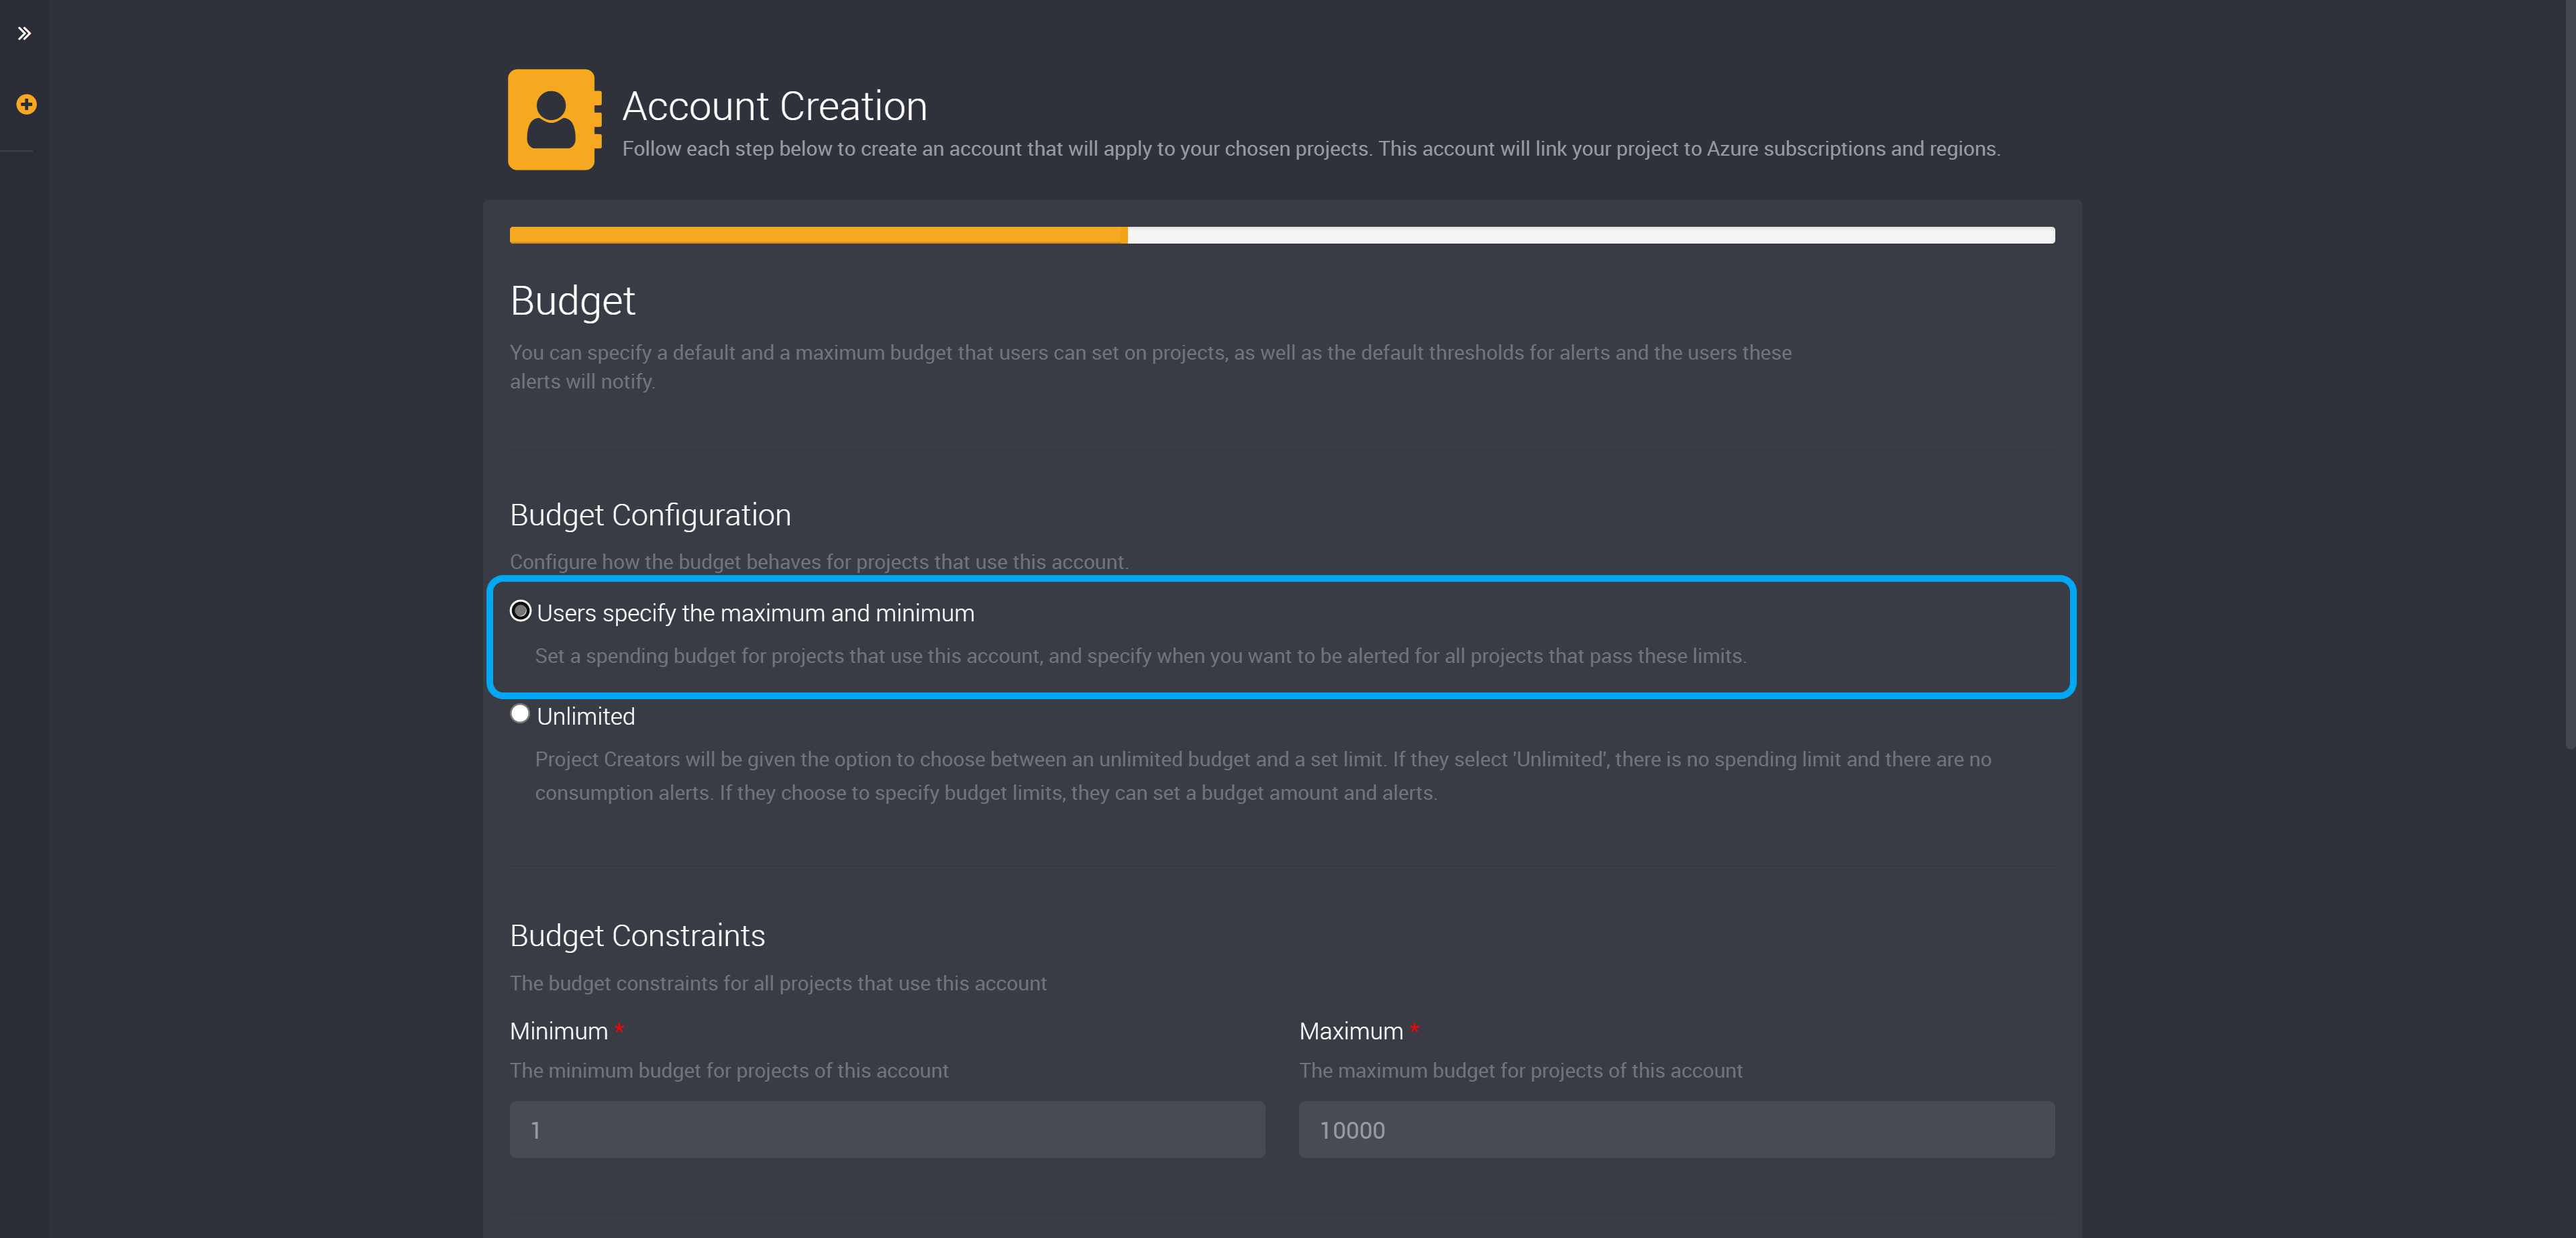
If you choose to set a maximum and minimum, you will next have to complete the next few options.
The default budget set here will define the minimum and maximum values that can be set for each project.
First, provide the minimum and maximum amount.
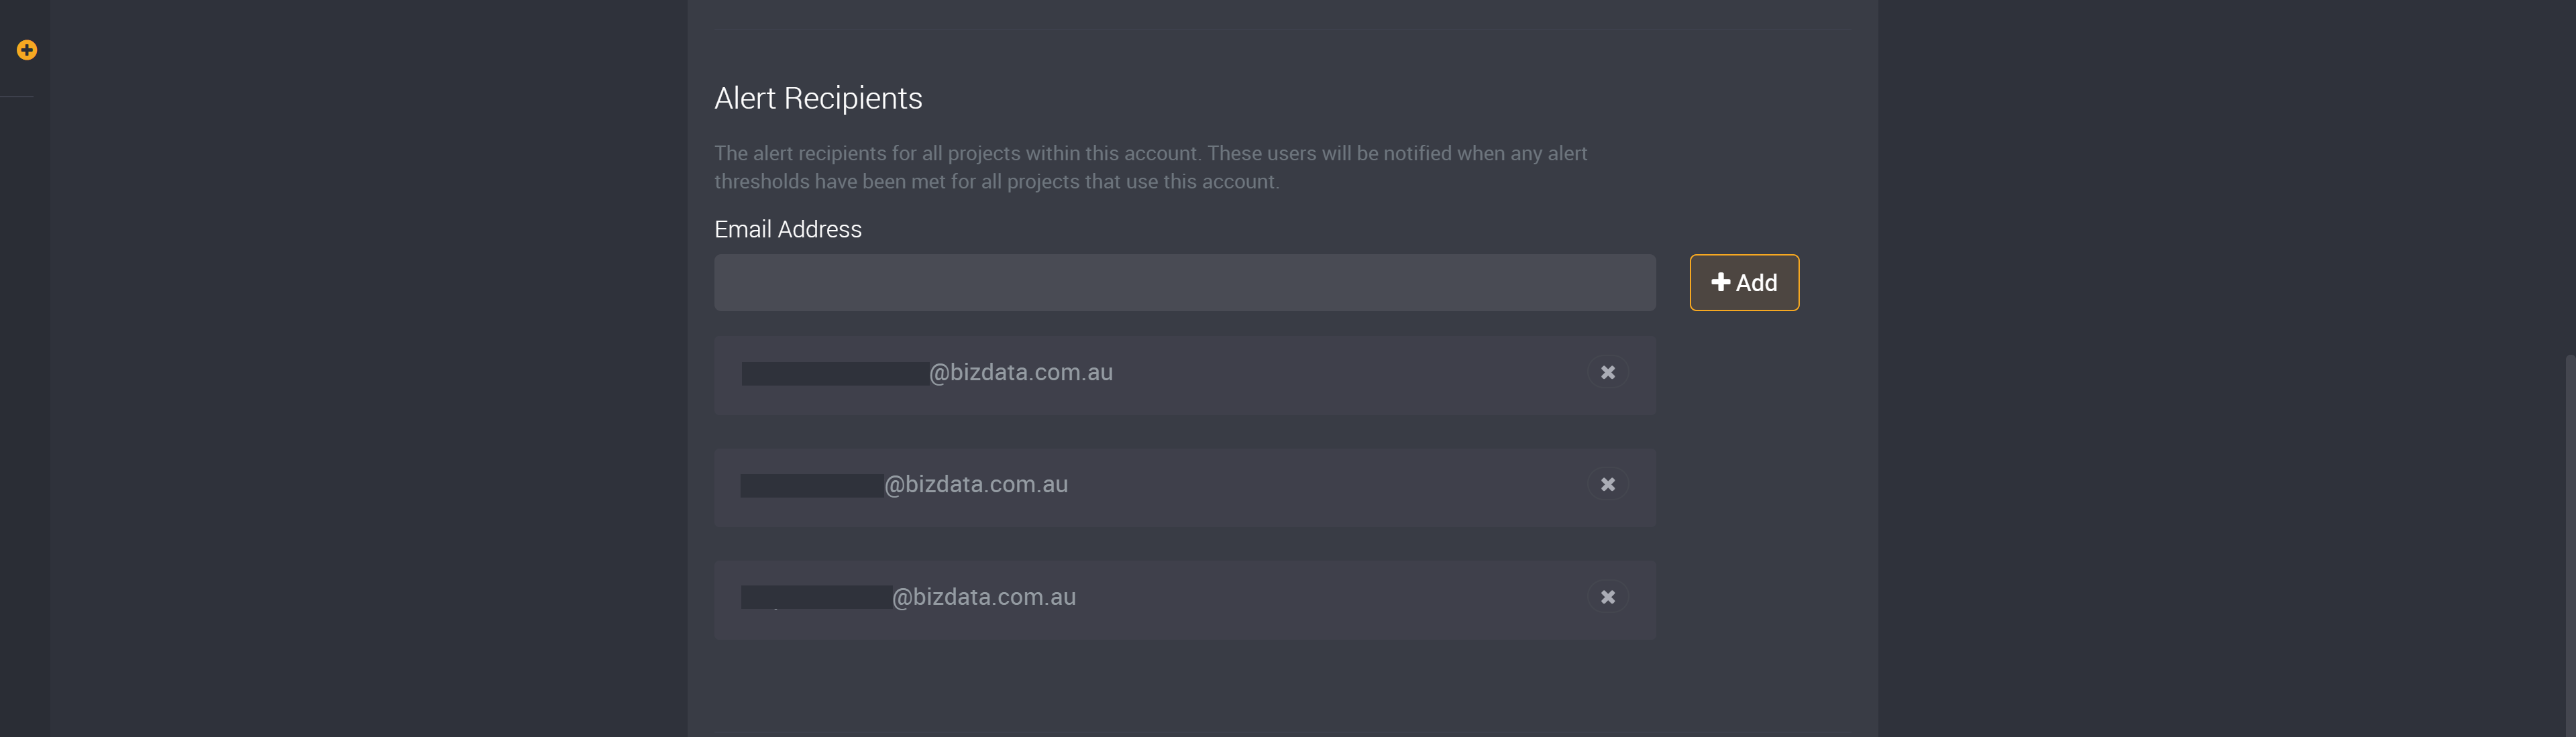
Next, you can select the users that will be notified if a project passes an alert threshold.
Your account will be added here by default.
If any project that uses this account passes an alert threshold you have set here, all users you have added to this field will be notified with an email every four hours. These users cannot be deleted from the list of alert recipients in a project that uses this account by its project creator.
Please note that an alert threshold is only a notification and not a limit, so if a budget exceeds your set threshold Loome cannot stop a workstation from continuing to use this account. You will need to log in and stop the workstation manually.

First add the email address of your selected recipient and then click on Add beside this field.
If you would like to add multiple email addresses at once, separate them by a semi-colon as shown in the image above.
You can see that each email address has been added in the following image.
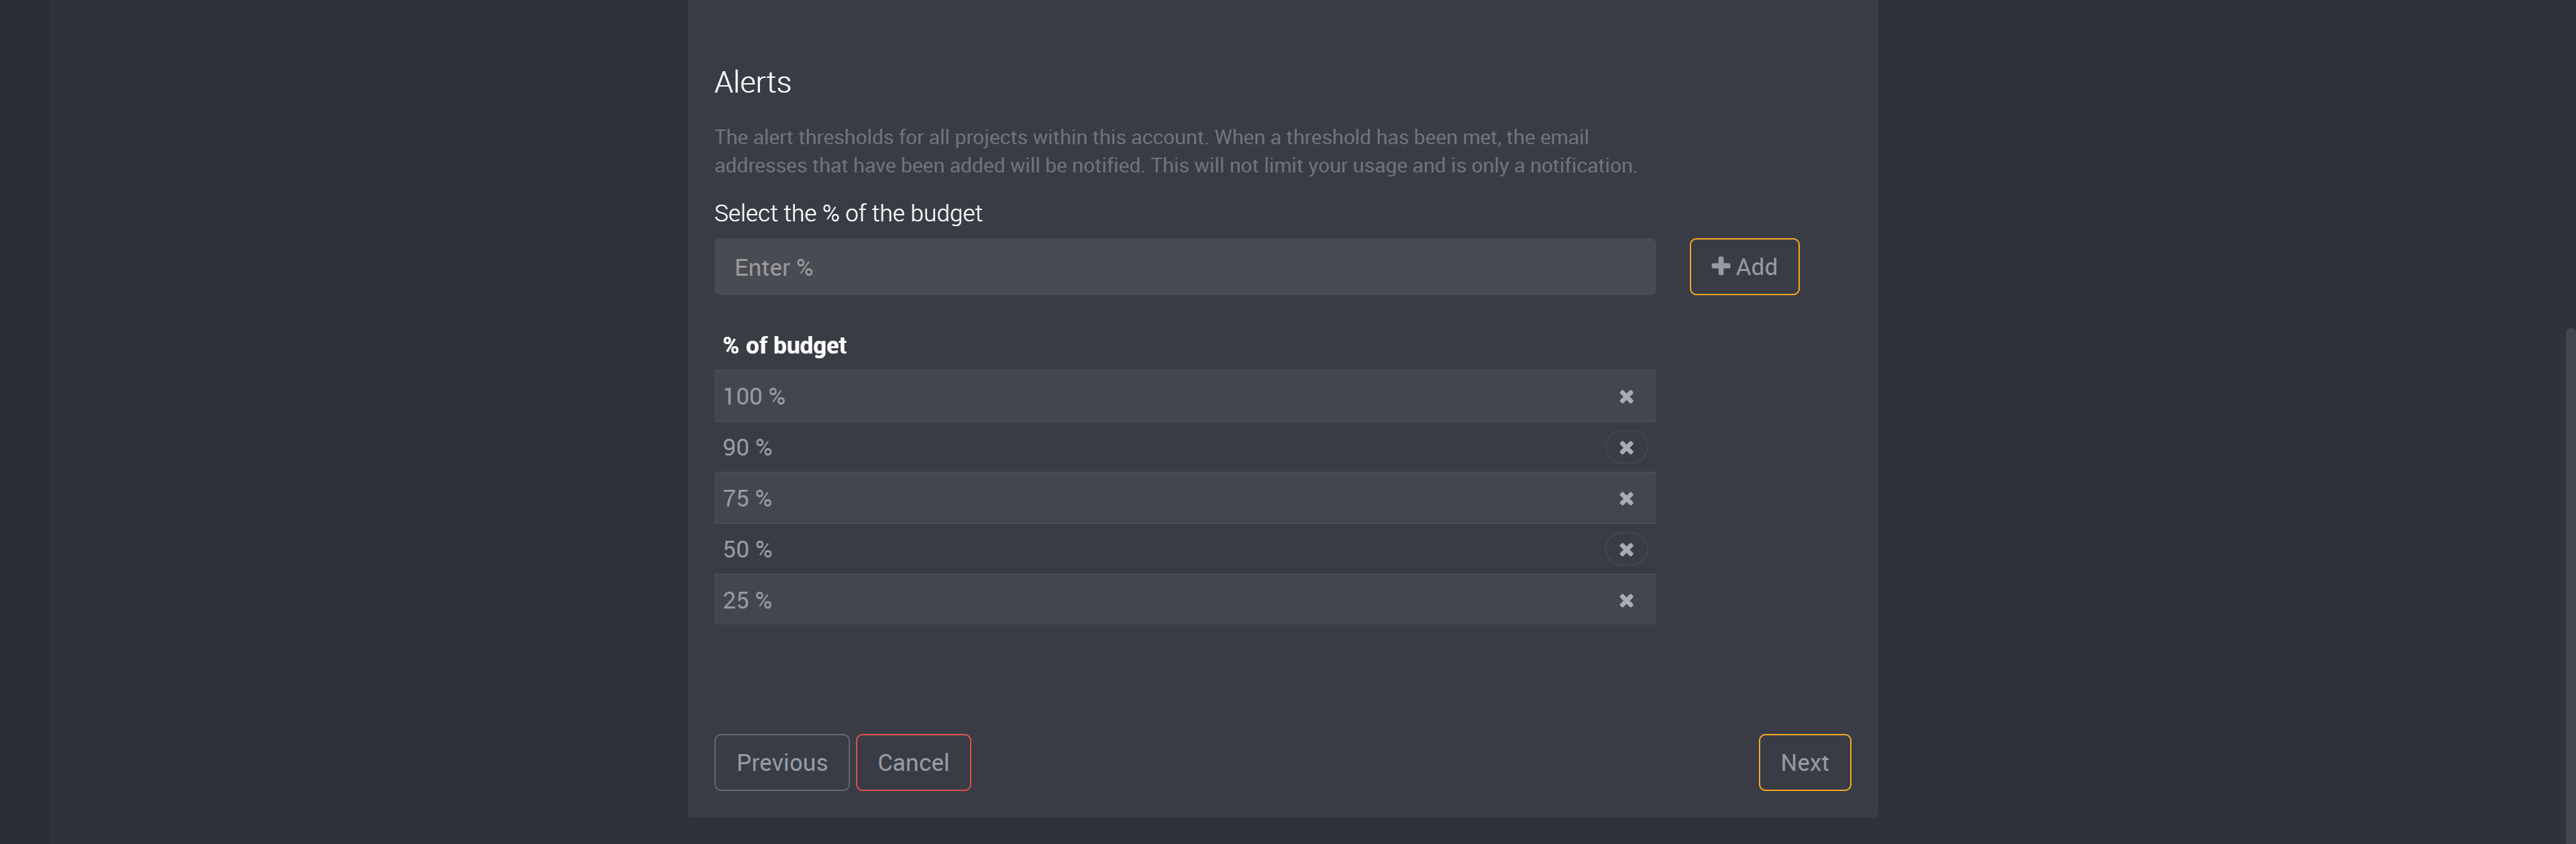
Next you can choose the alert threshold, which is the percentage of the budget that needs to be met, that will cause an email to be sent to your selected recipients above.
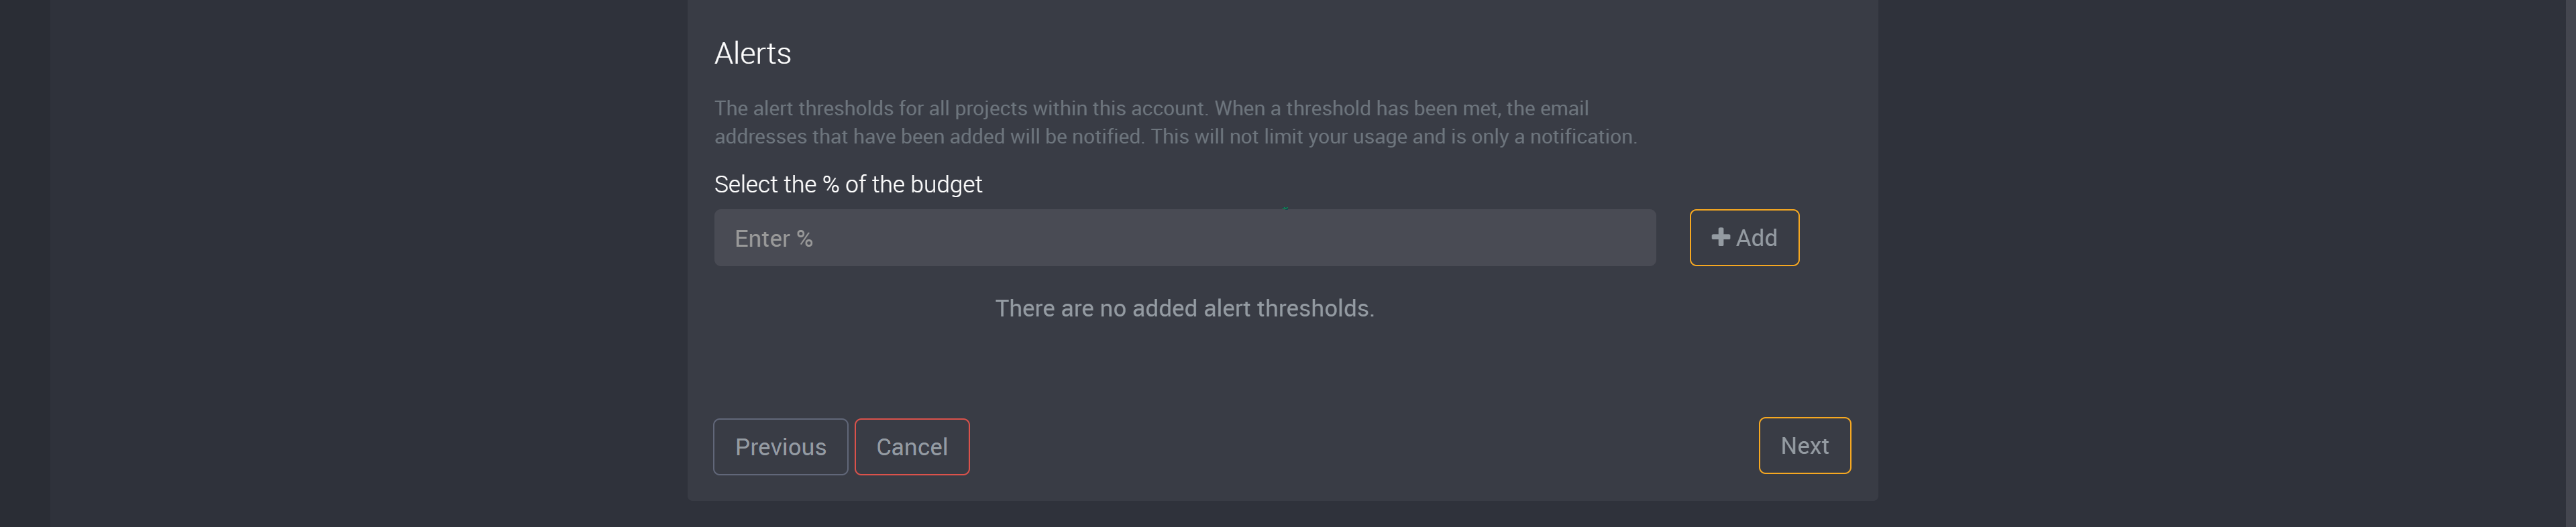
Add in the percentage of the budget that when reached will send an email to your selected recipients.
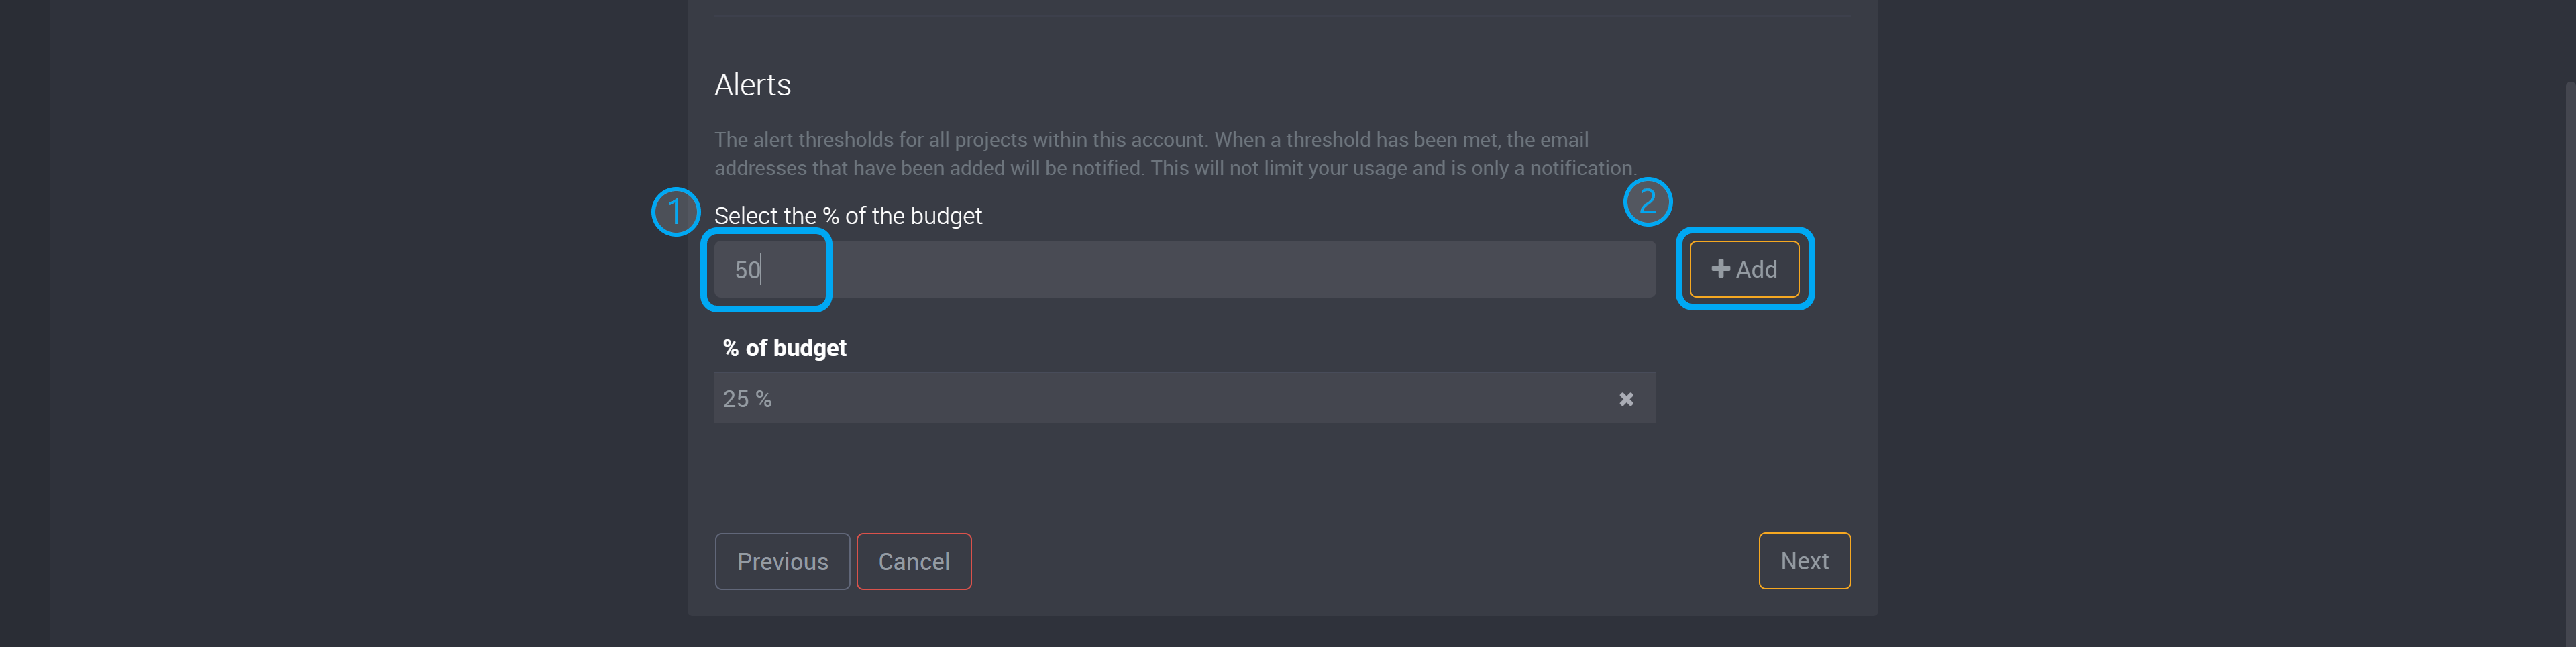
Once you have added your alert thresholds, click on Next at the bottom right.
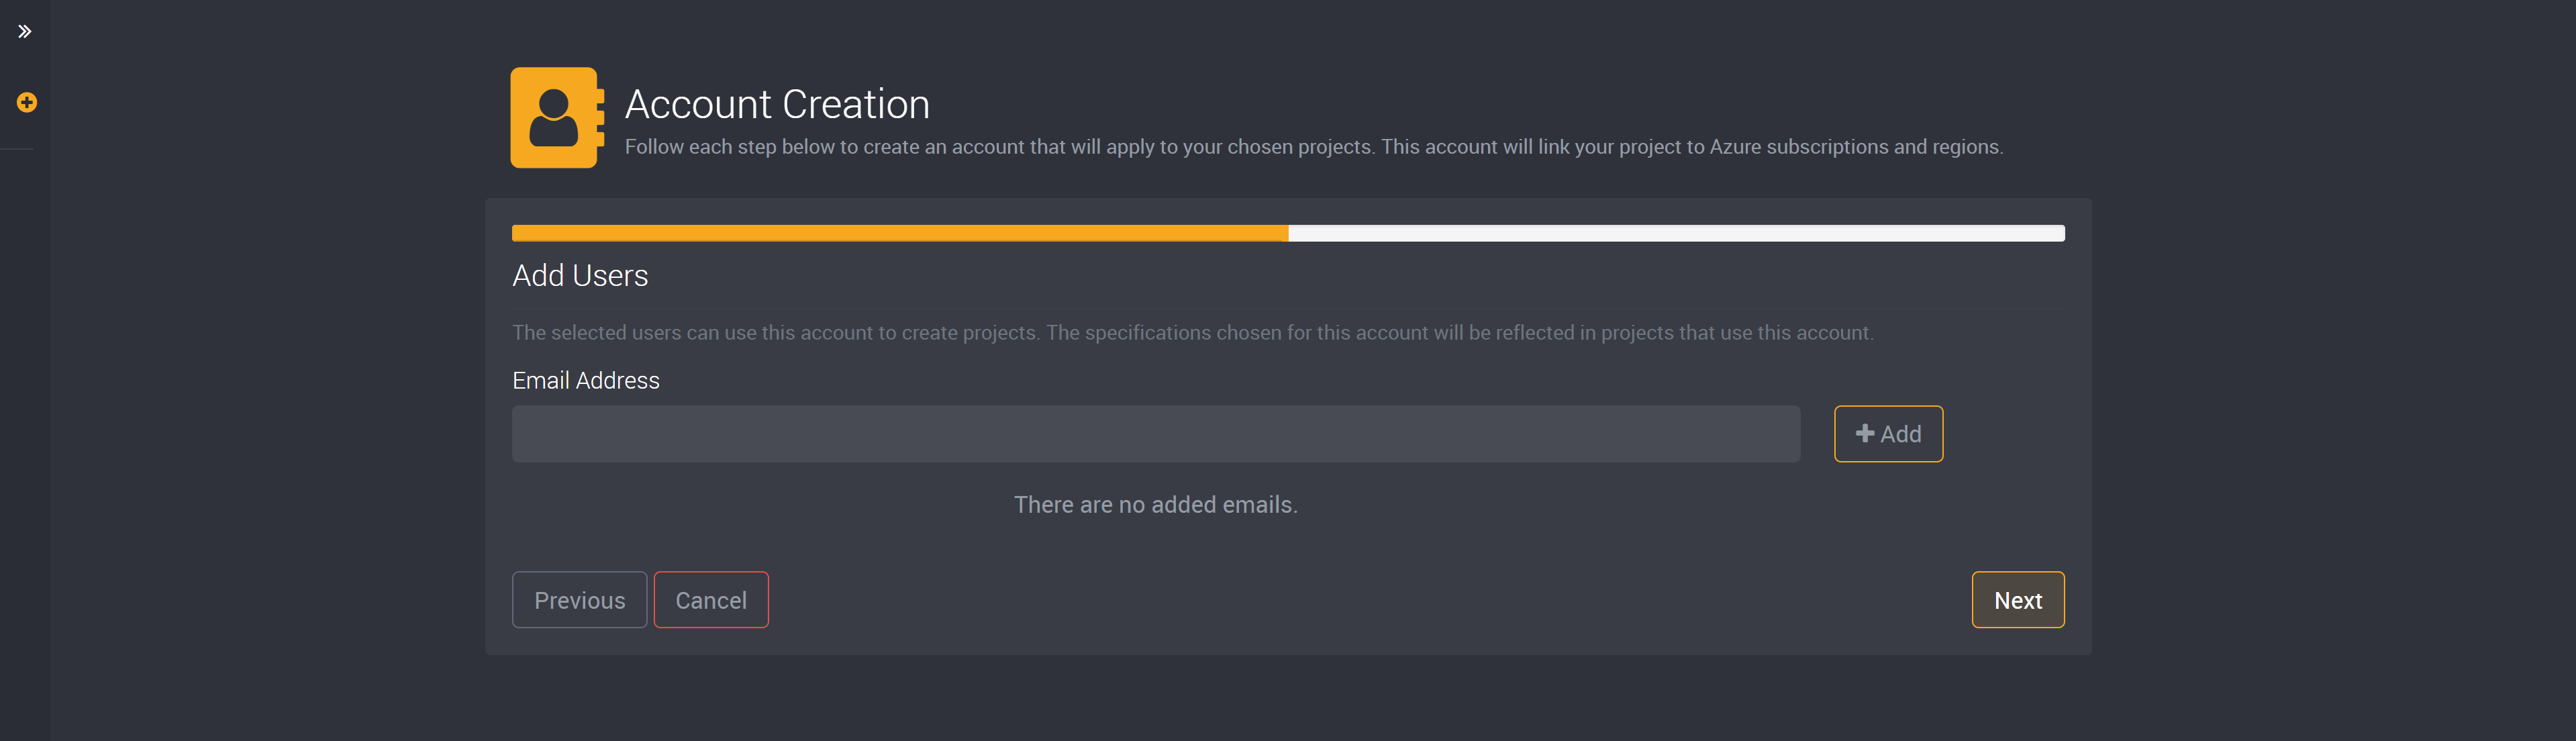
Add Users
On this page, you can choose which users can create a project using this account. This account will be visible only to the users you add here.
Please note that administrators have the ability to see and edit all accounts.
You can then continue and enable a secure VNET, scripts and notifications, remote connections and proxy settings. These steps are optional and you can skip these steps, if preferred, until you reach the final review page where you can then review each selection made for this account and confirm. Once you have confirmed these choices, you can click on Create to save this account. You will be able to select this account when creating a project.
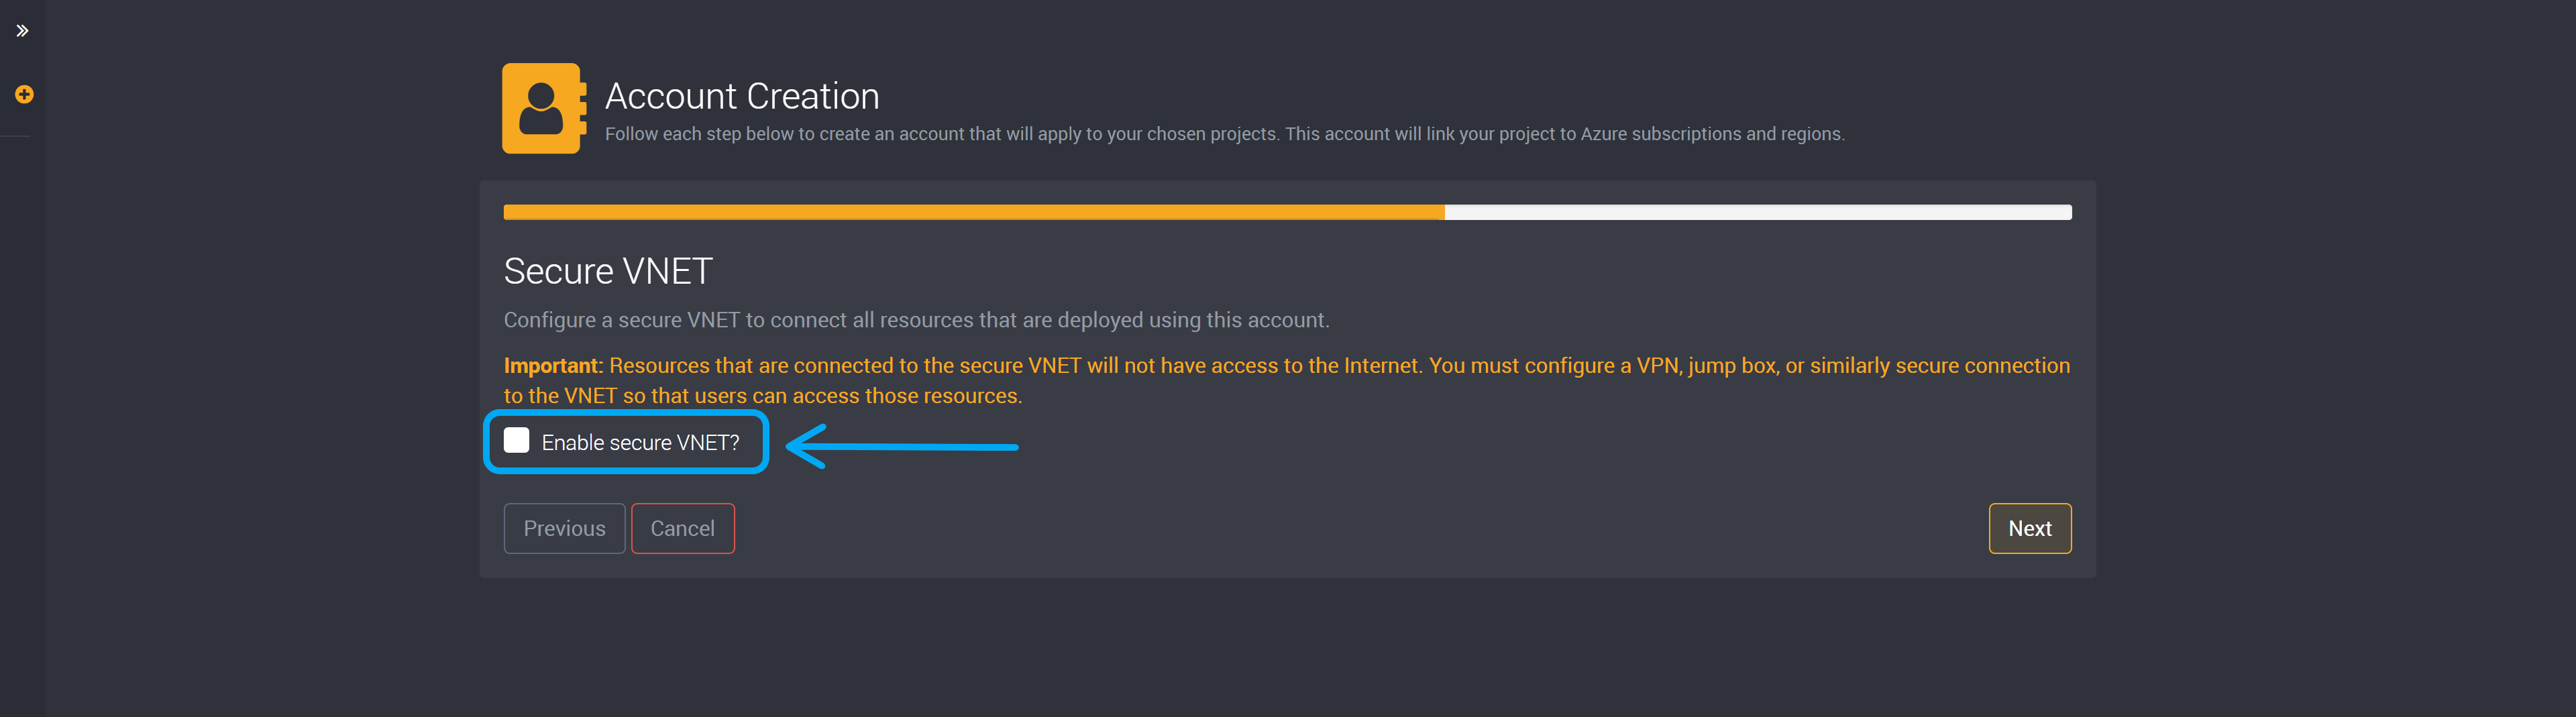
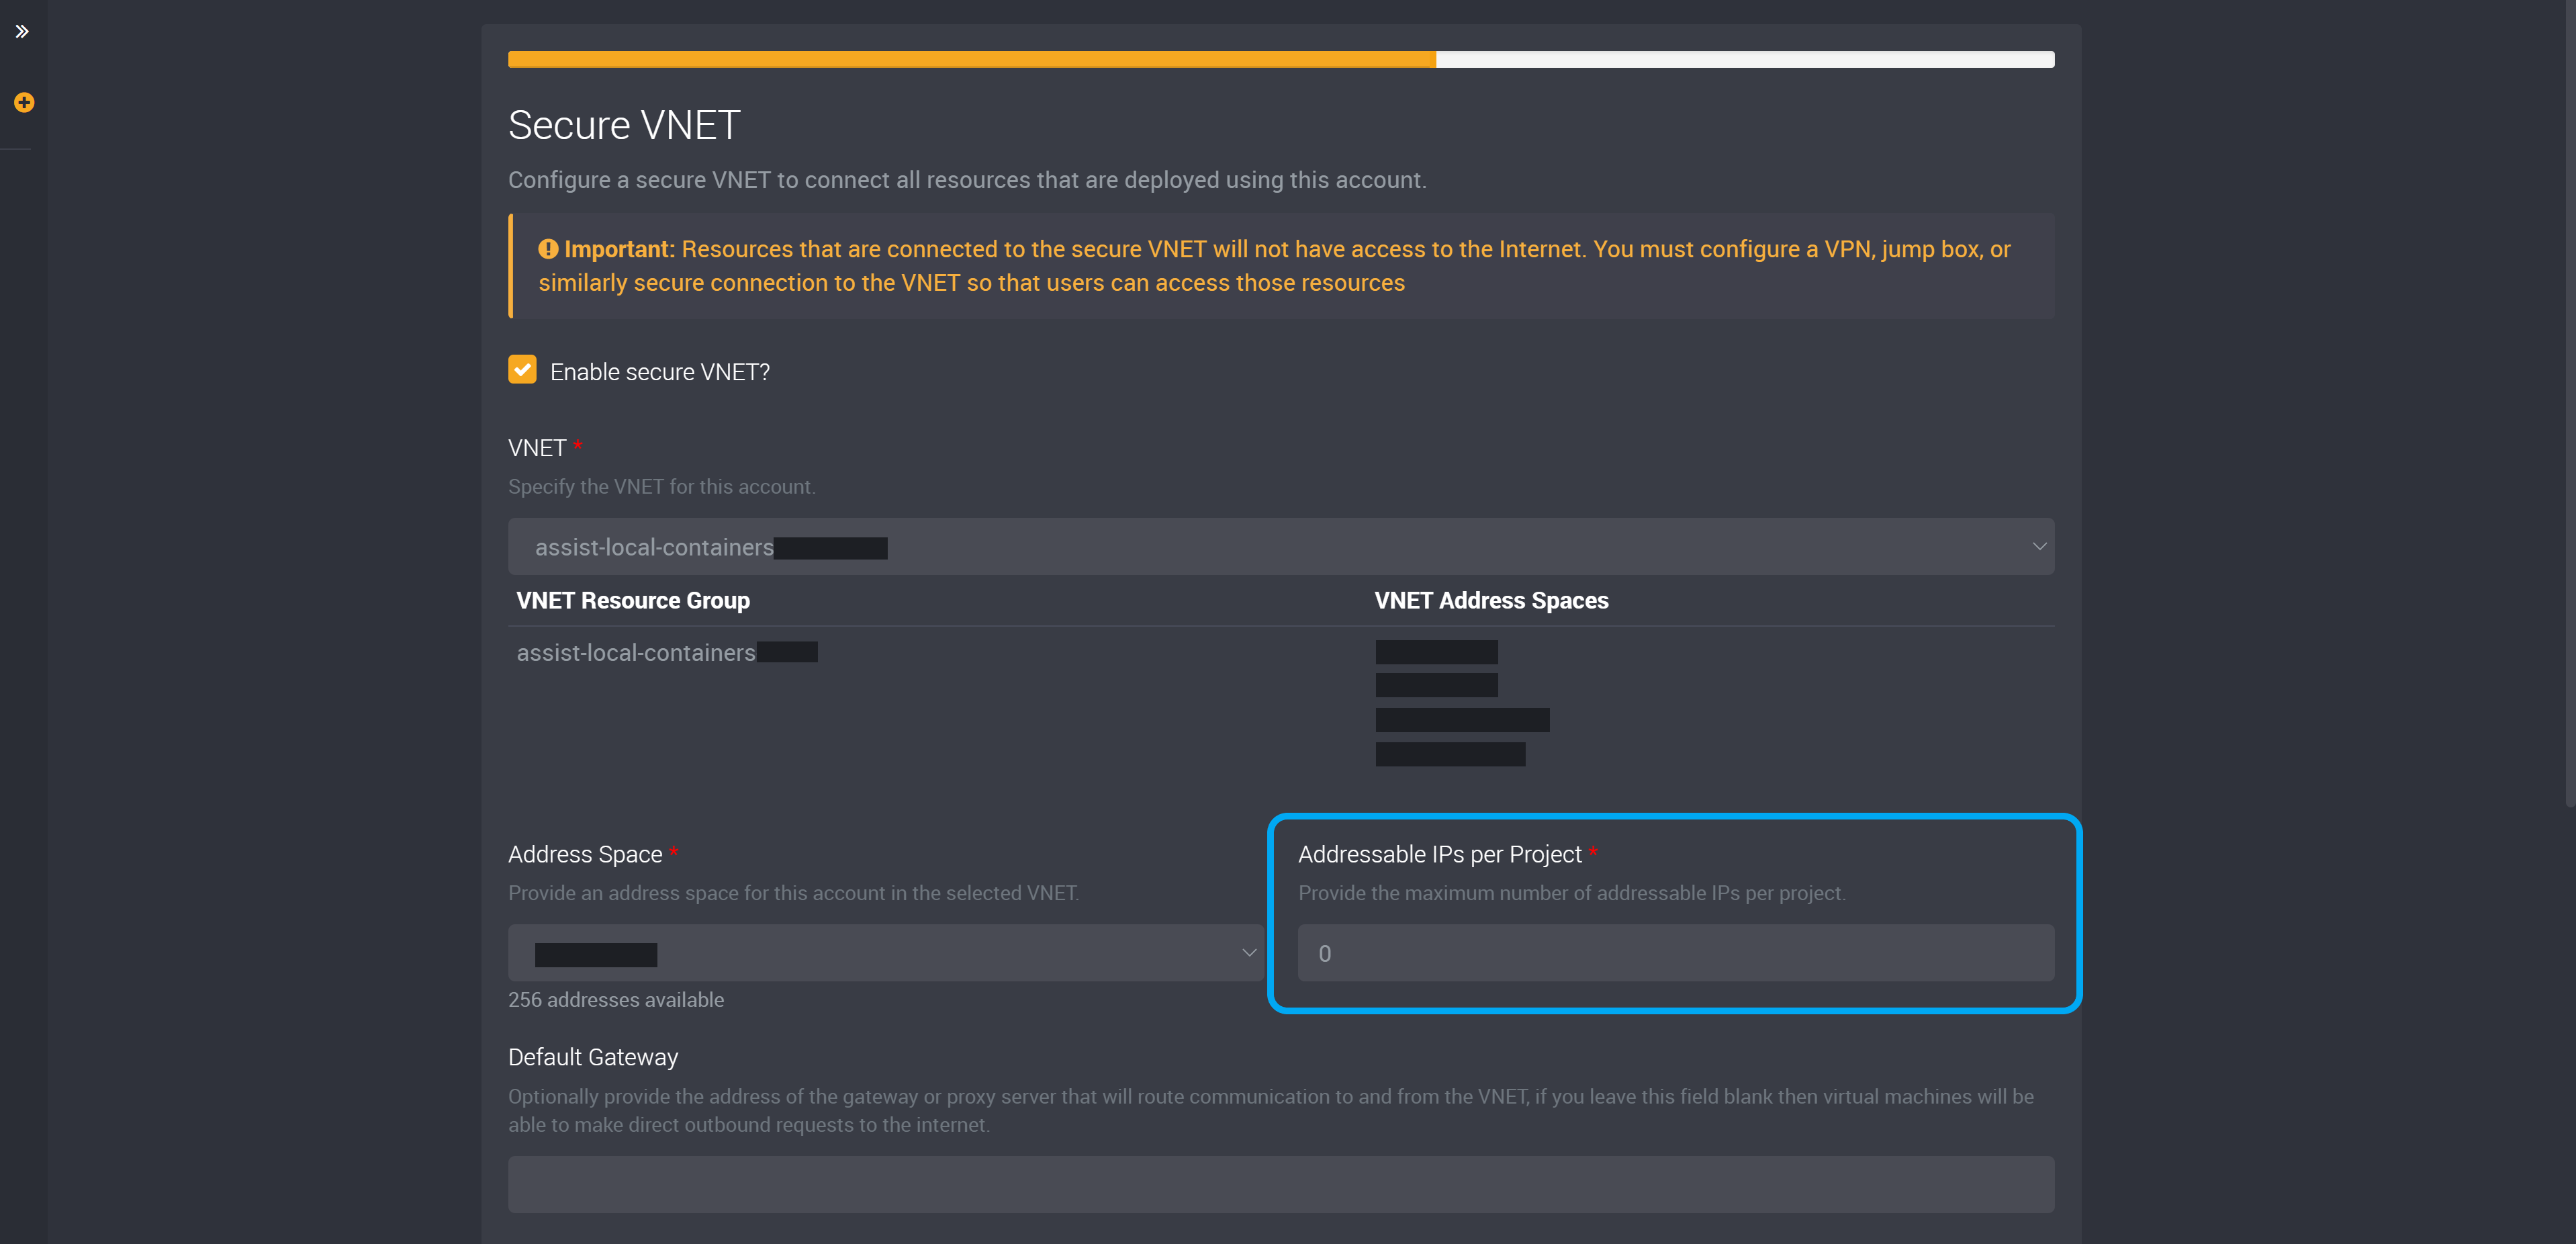
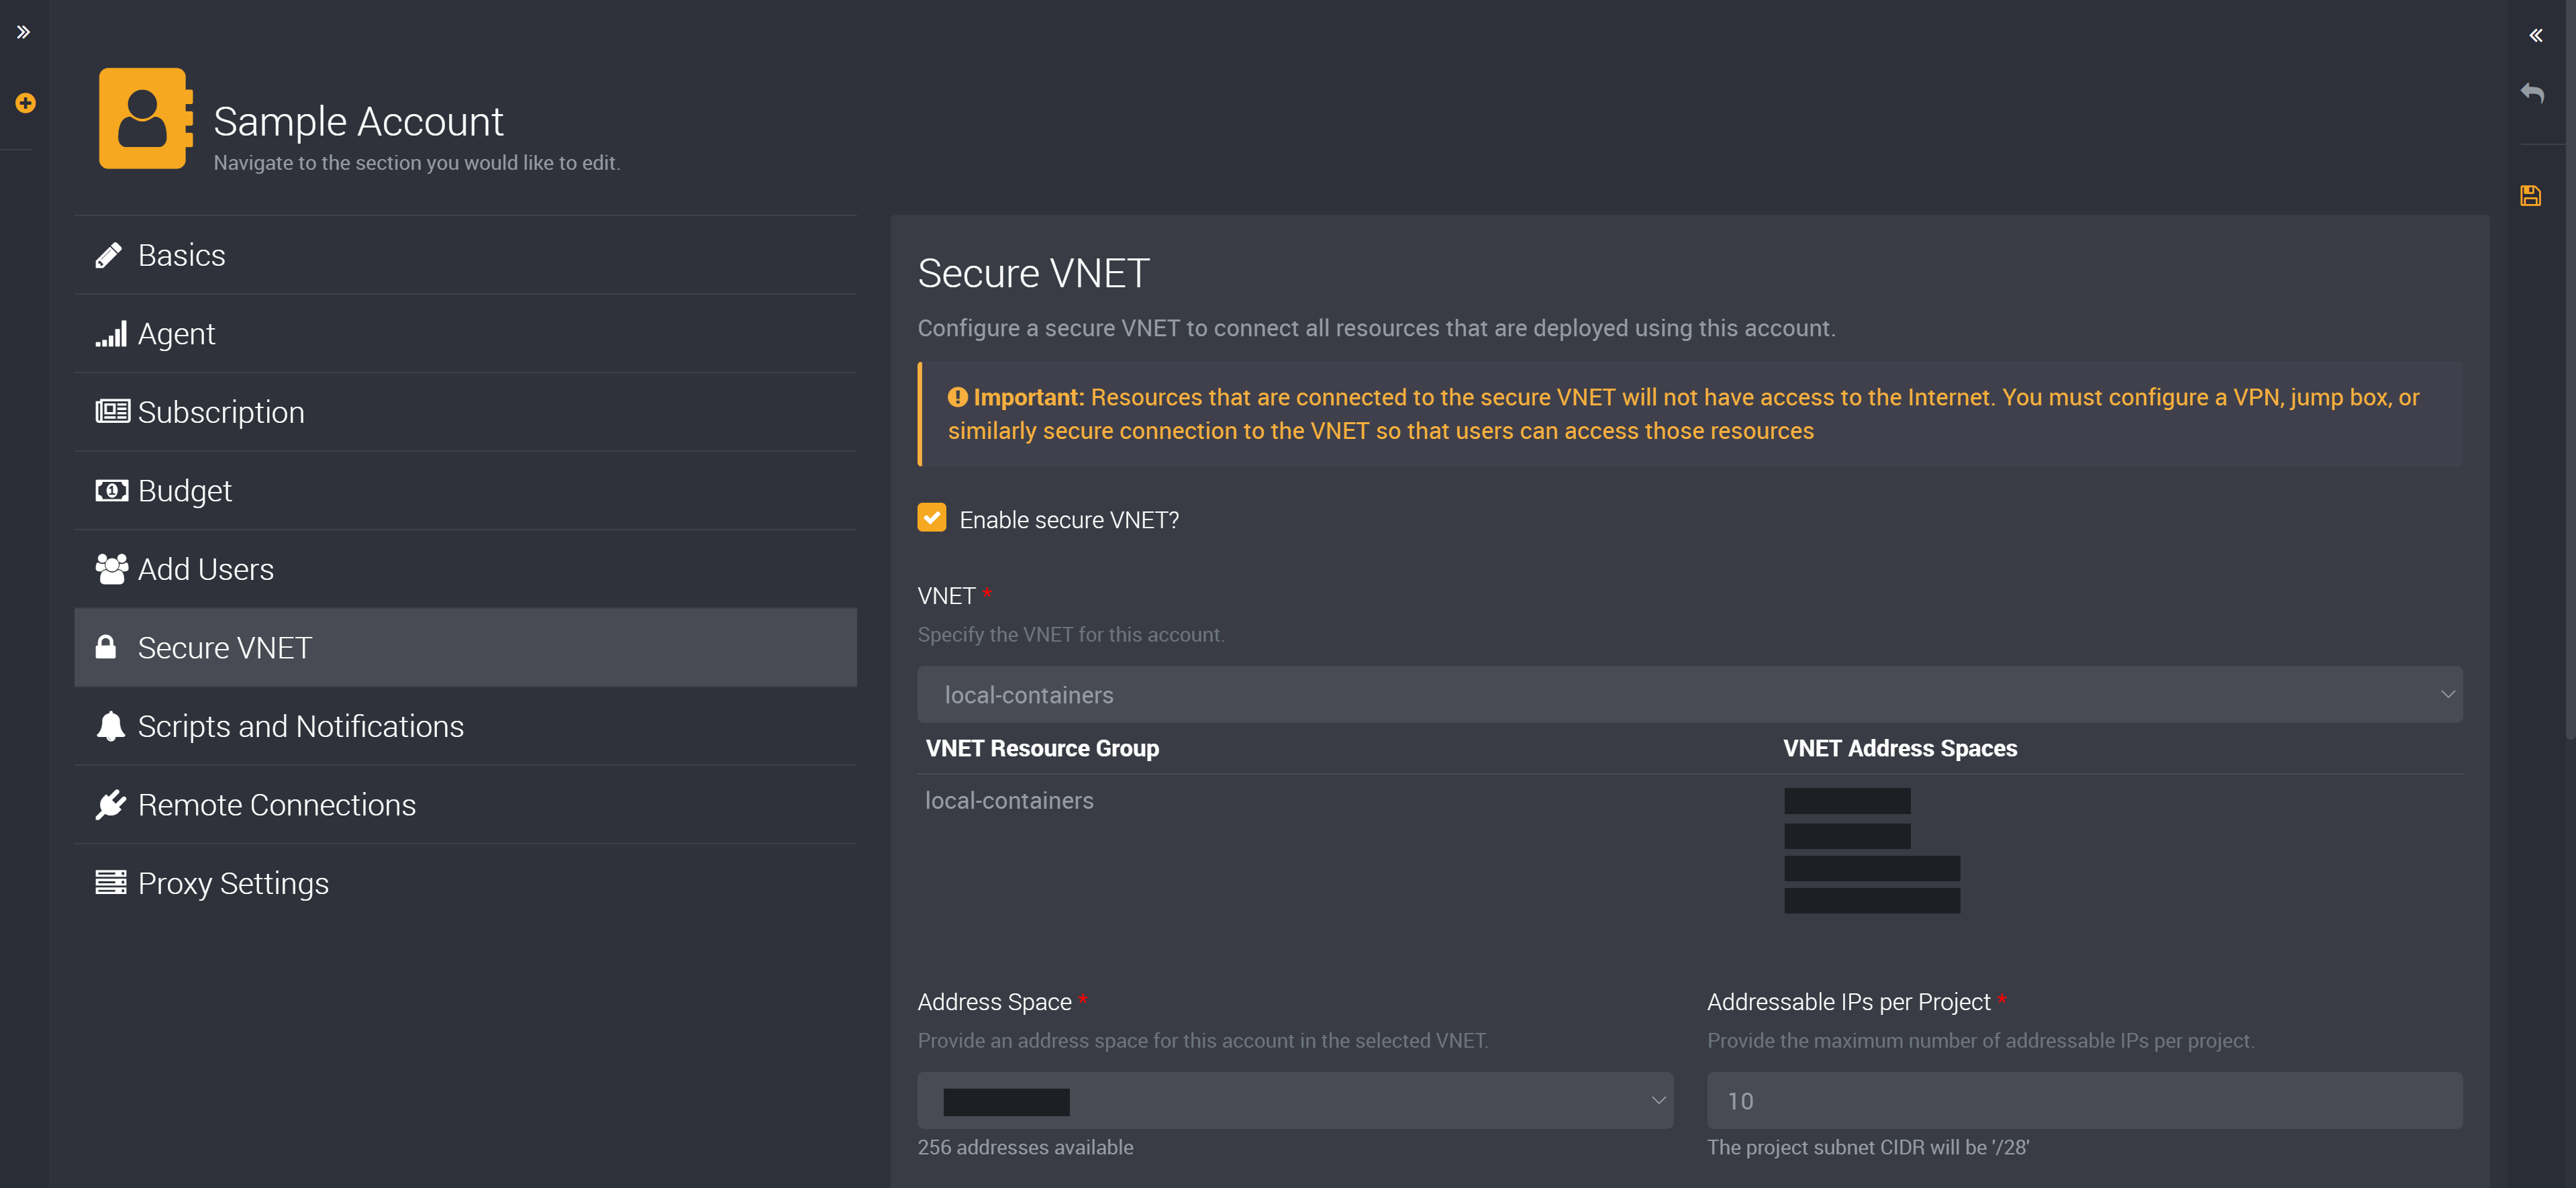
Secure VNET
A Secure VNET will connect all resources that are deployed using this account.
You can choose to enable a Secure VNET when creating or editing an account.
Important: Resources that are connected to the secure VNET will not have access to the internet. You must configure a VPN, jump box, or similarly secure connection to the VNET so that users can access those resources.
Once enabled, you can specify which VNET, selected from the dropdown, will be used for this account.
Please note that the selected VNET and address space cannot be changed once you have created the account.
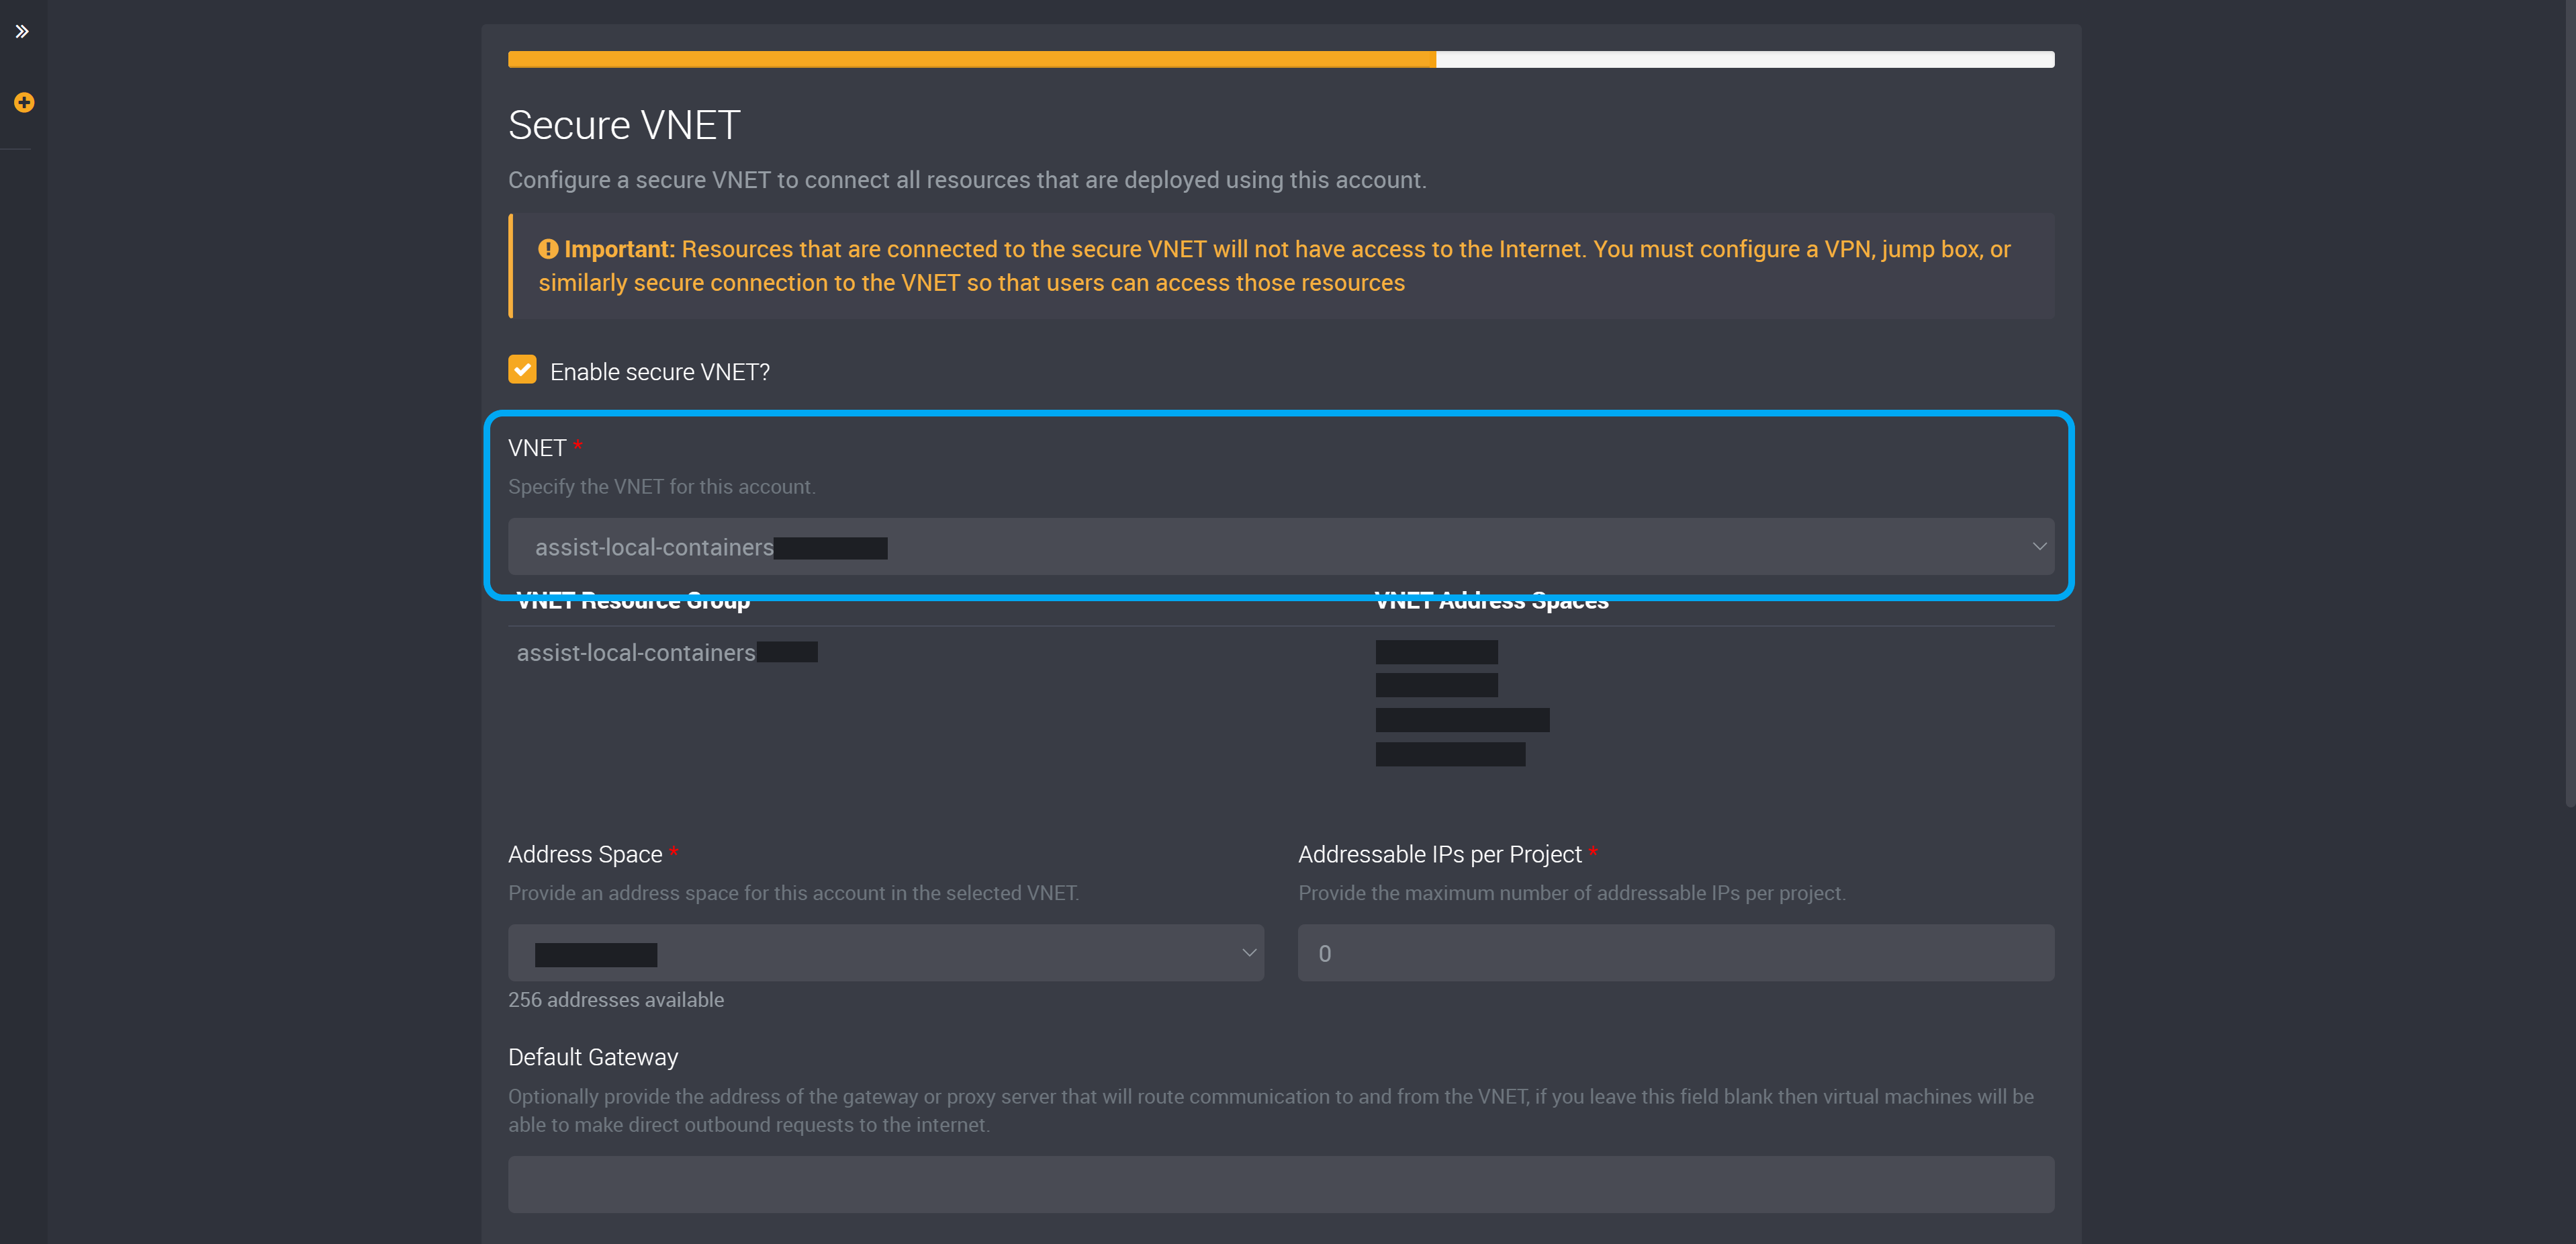
It will display below under VNET Resource Group and VNET Address Spaces.
You can then choose an address space for this VNET from the dropdown.
Or you can click on ‘Edit’ beside the dropdown to manually add an address space.
Please ensure you have access to your chosen IP address space in order to later access any added data repositories that use this account.

Provide the maximum number of addressable IPs per project for the projects that use this account.
The project subnet CIDR will display below this field after you choose the addressable IPs per project. A message will also appear below this field if you provide a number that exceeds the number of available addresses.
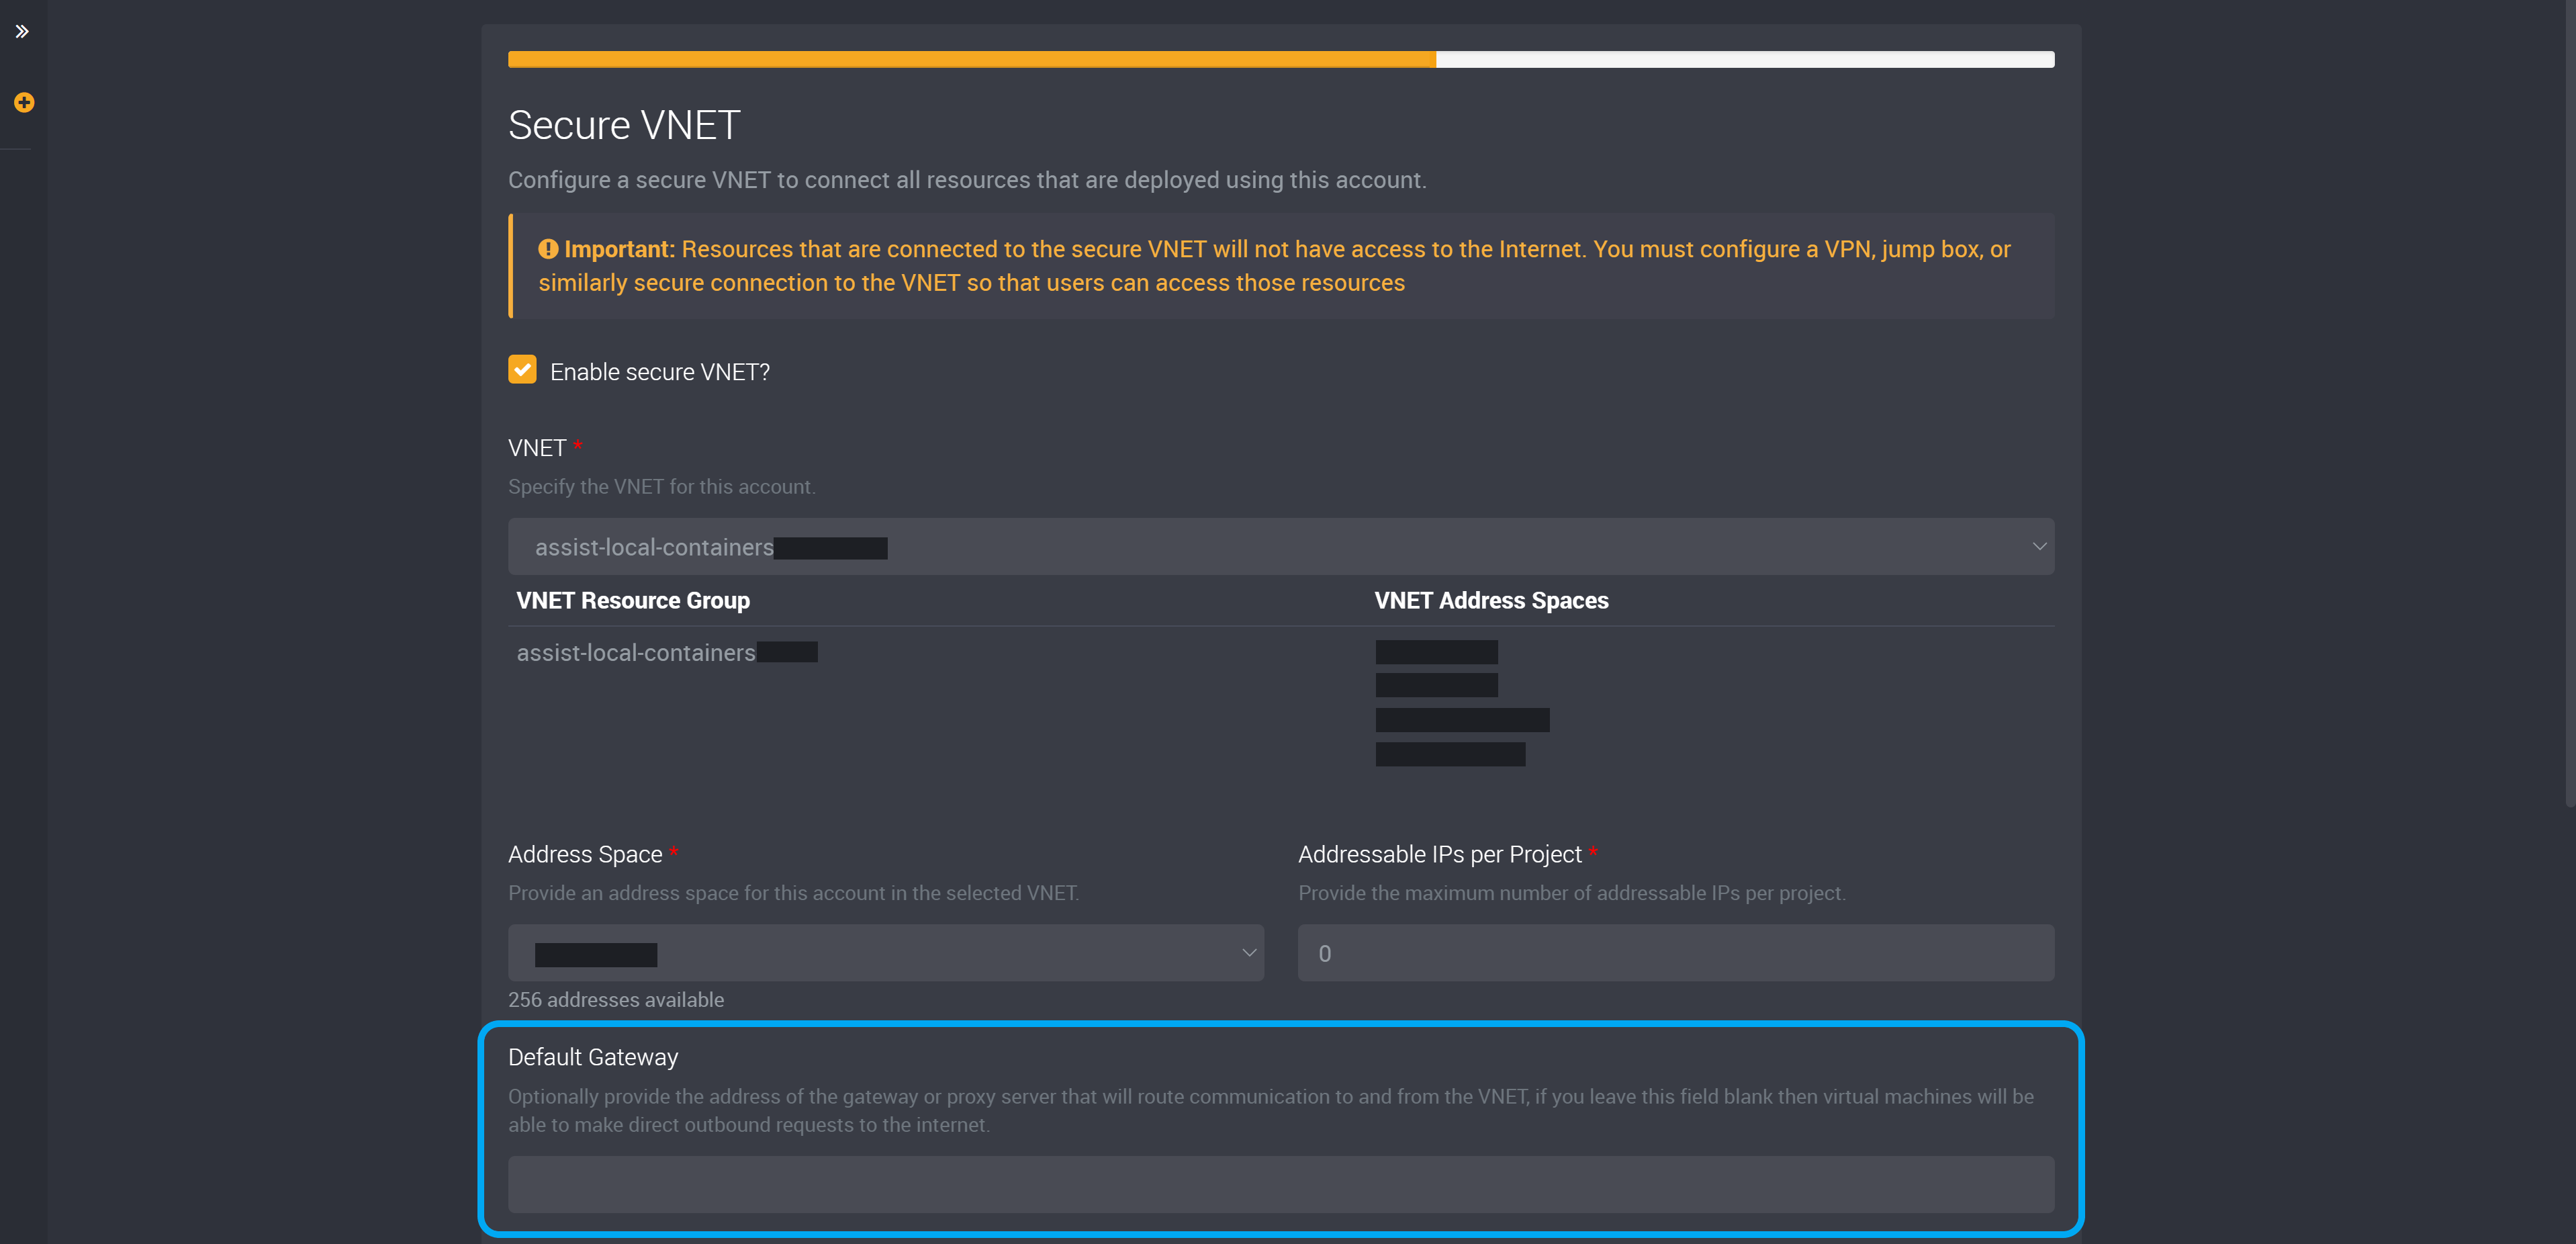
You also have the option to select a default gateway.
Provide the address of the gateway or proxy server that will route communication to and from the VNET.
If you leave this field blank, virtual machines will be able to make direct outbound requests to the internet.
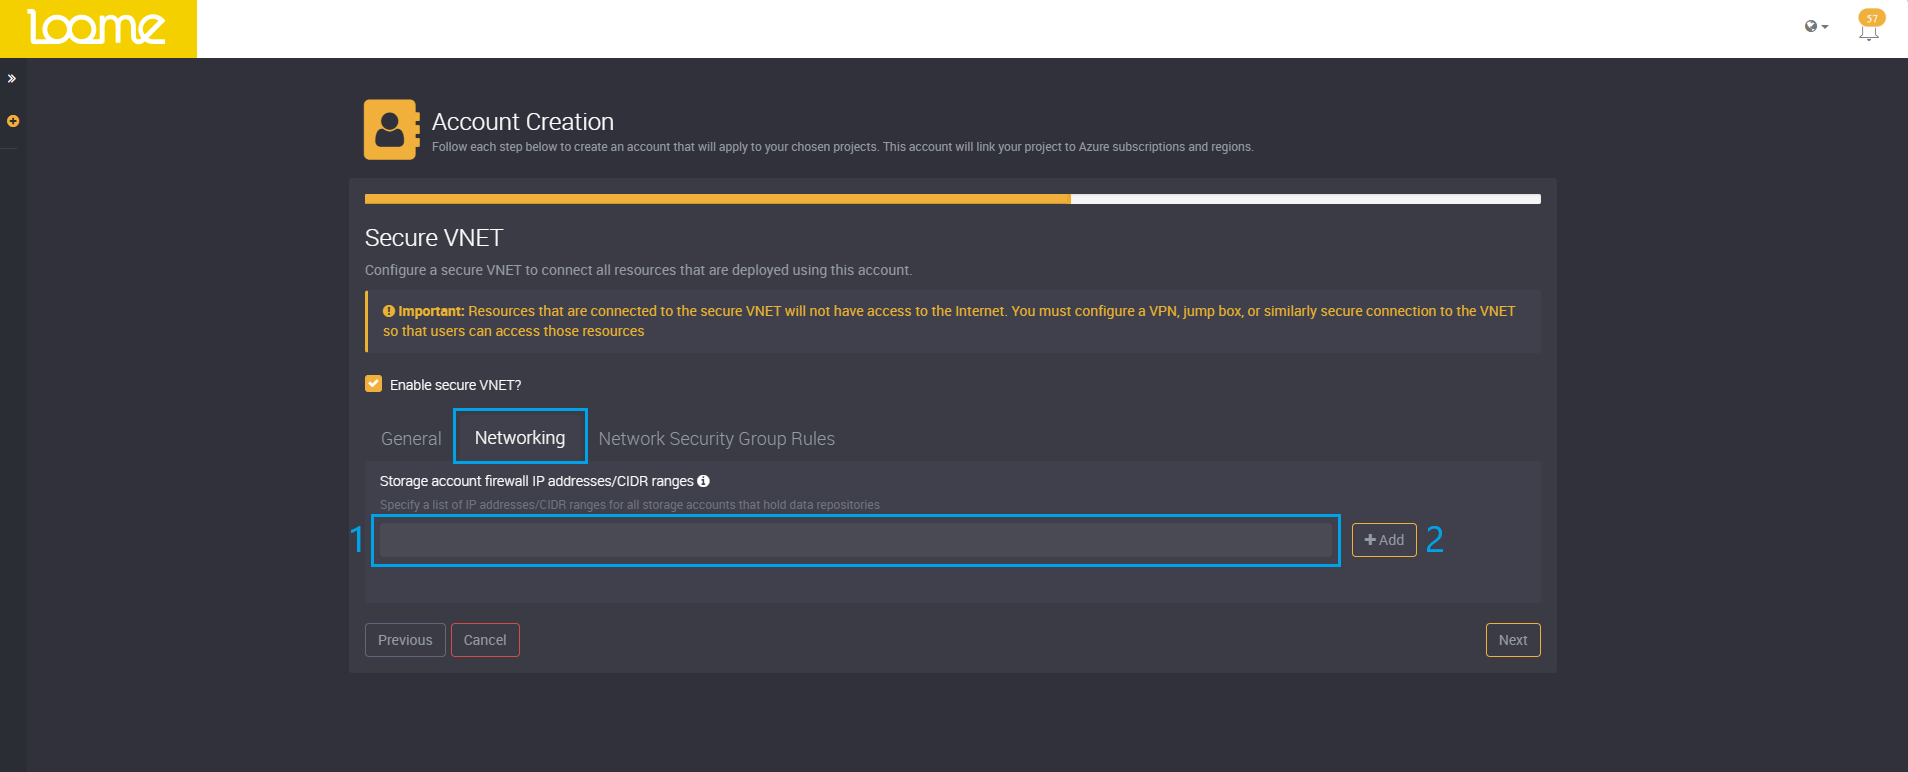
Networking
In the ‘Networking’ tab of the Secure VNET, you have the option to add ‘Storage account firewall IP addresses/CIDR ranges’.
To complete firewall settings and specify firewall rules on new or deployed storage accounts, you can provide IP address/CIDR ranges when deploying into a secure VNET.
Specify a list of IP addresses/CIDR ranges for all storage accounts that hold data repositories.
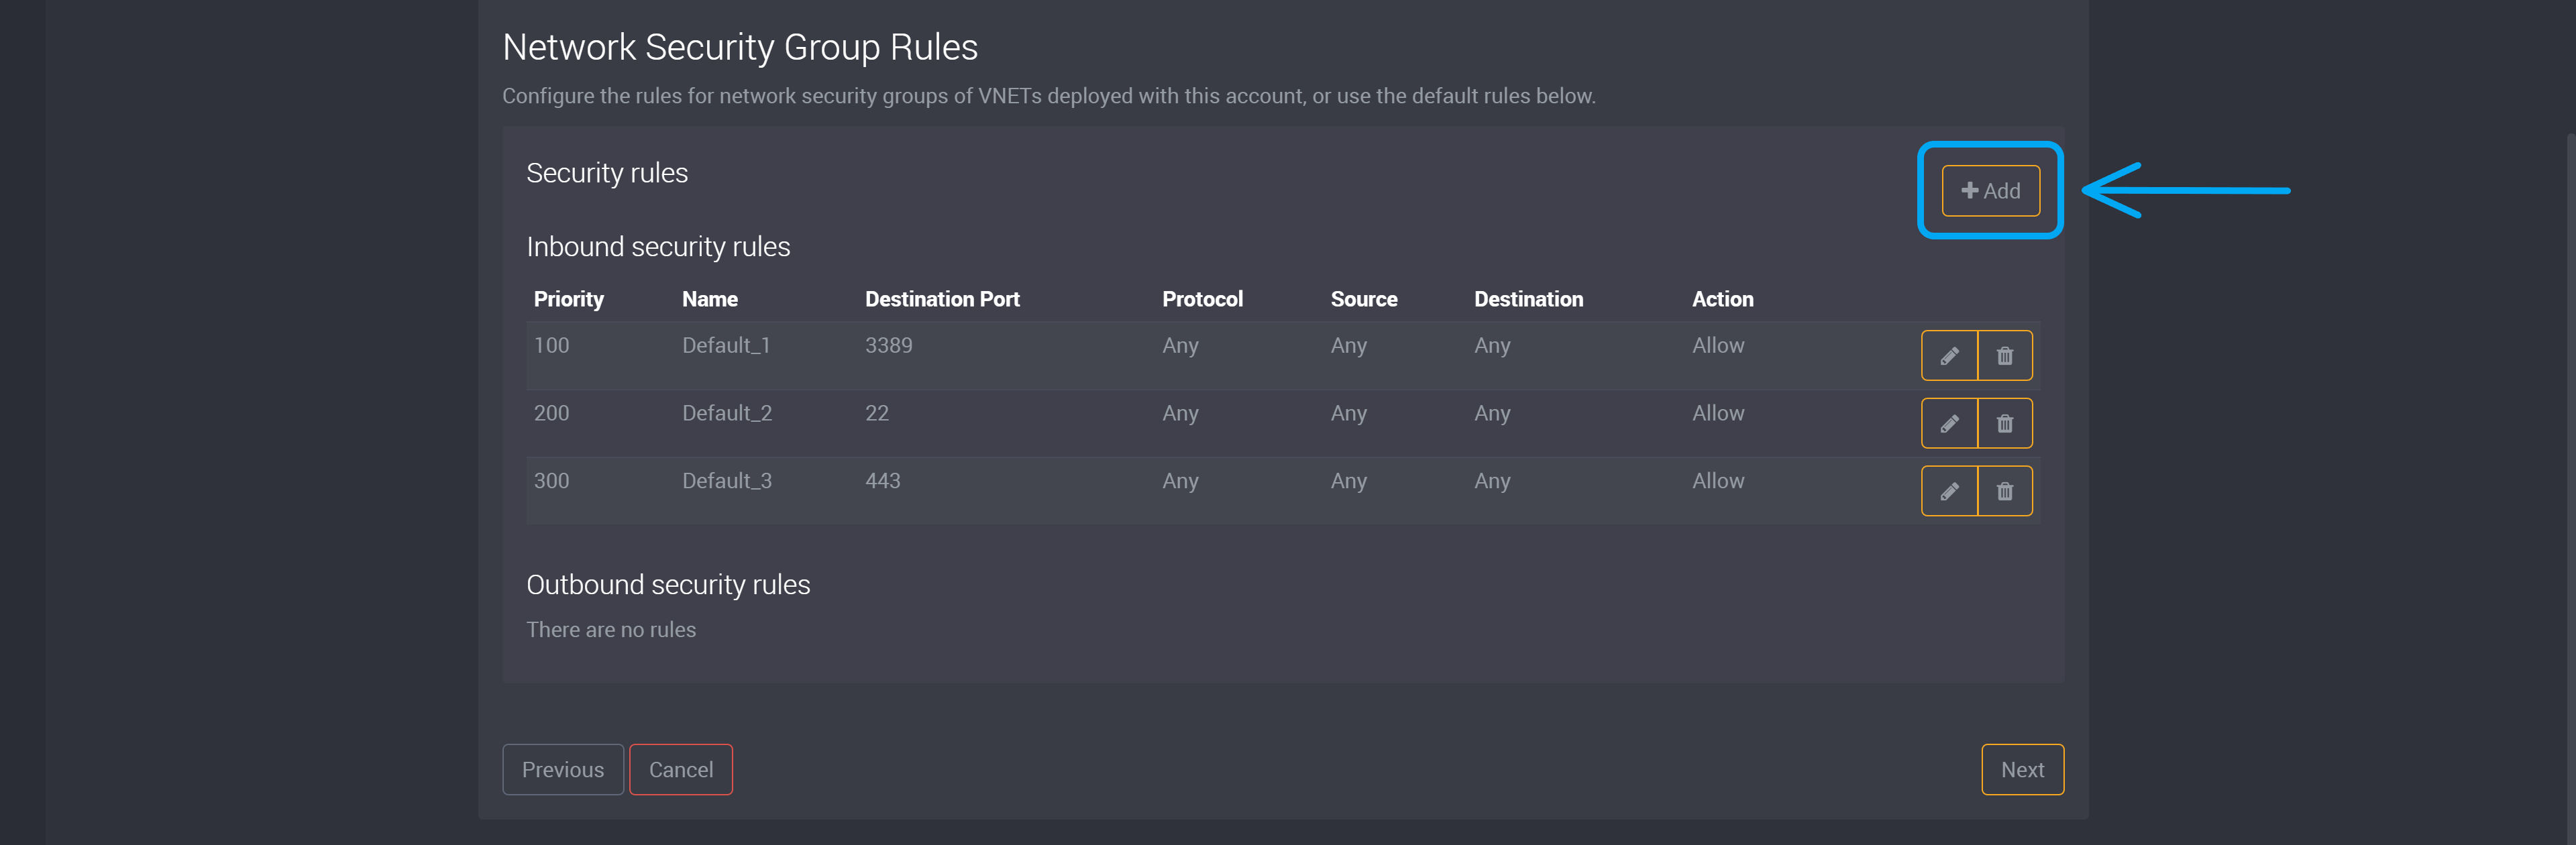
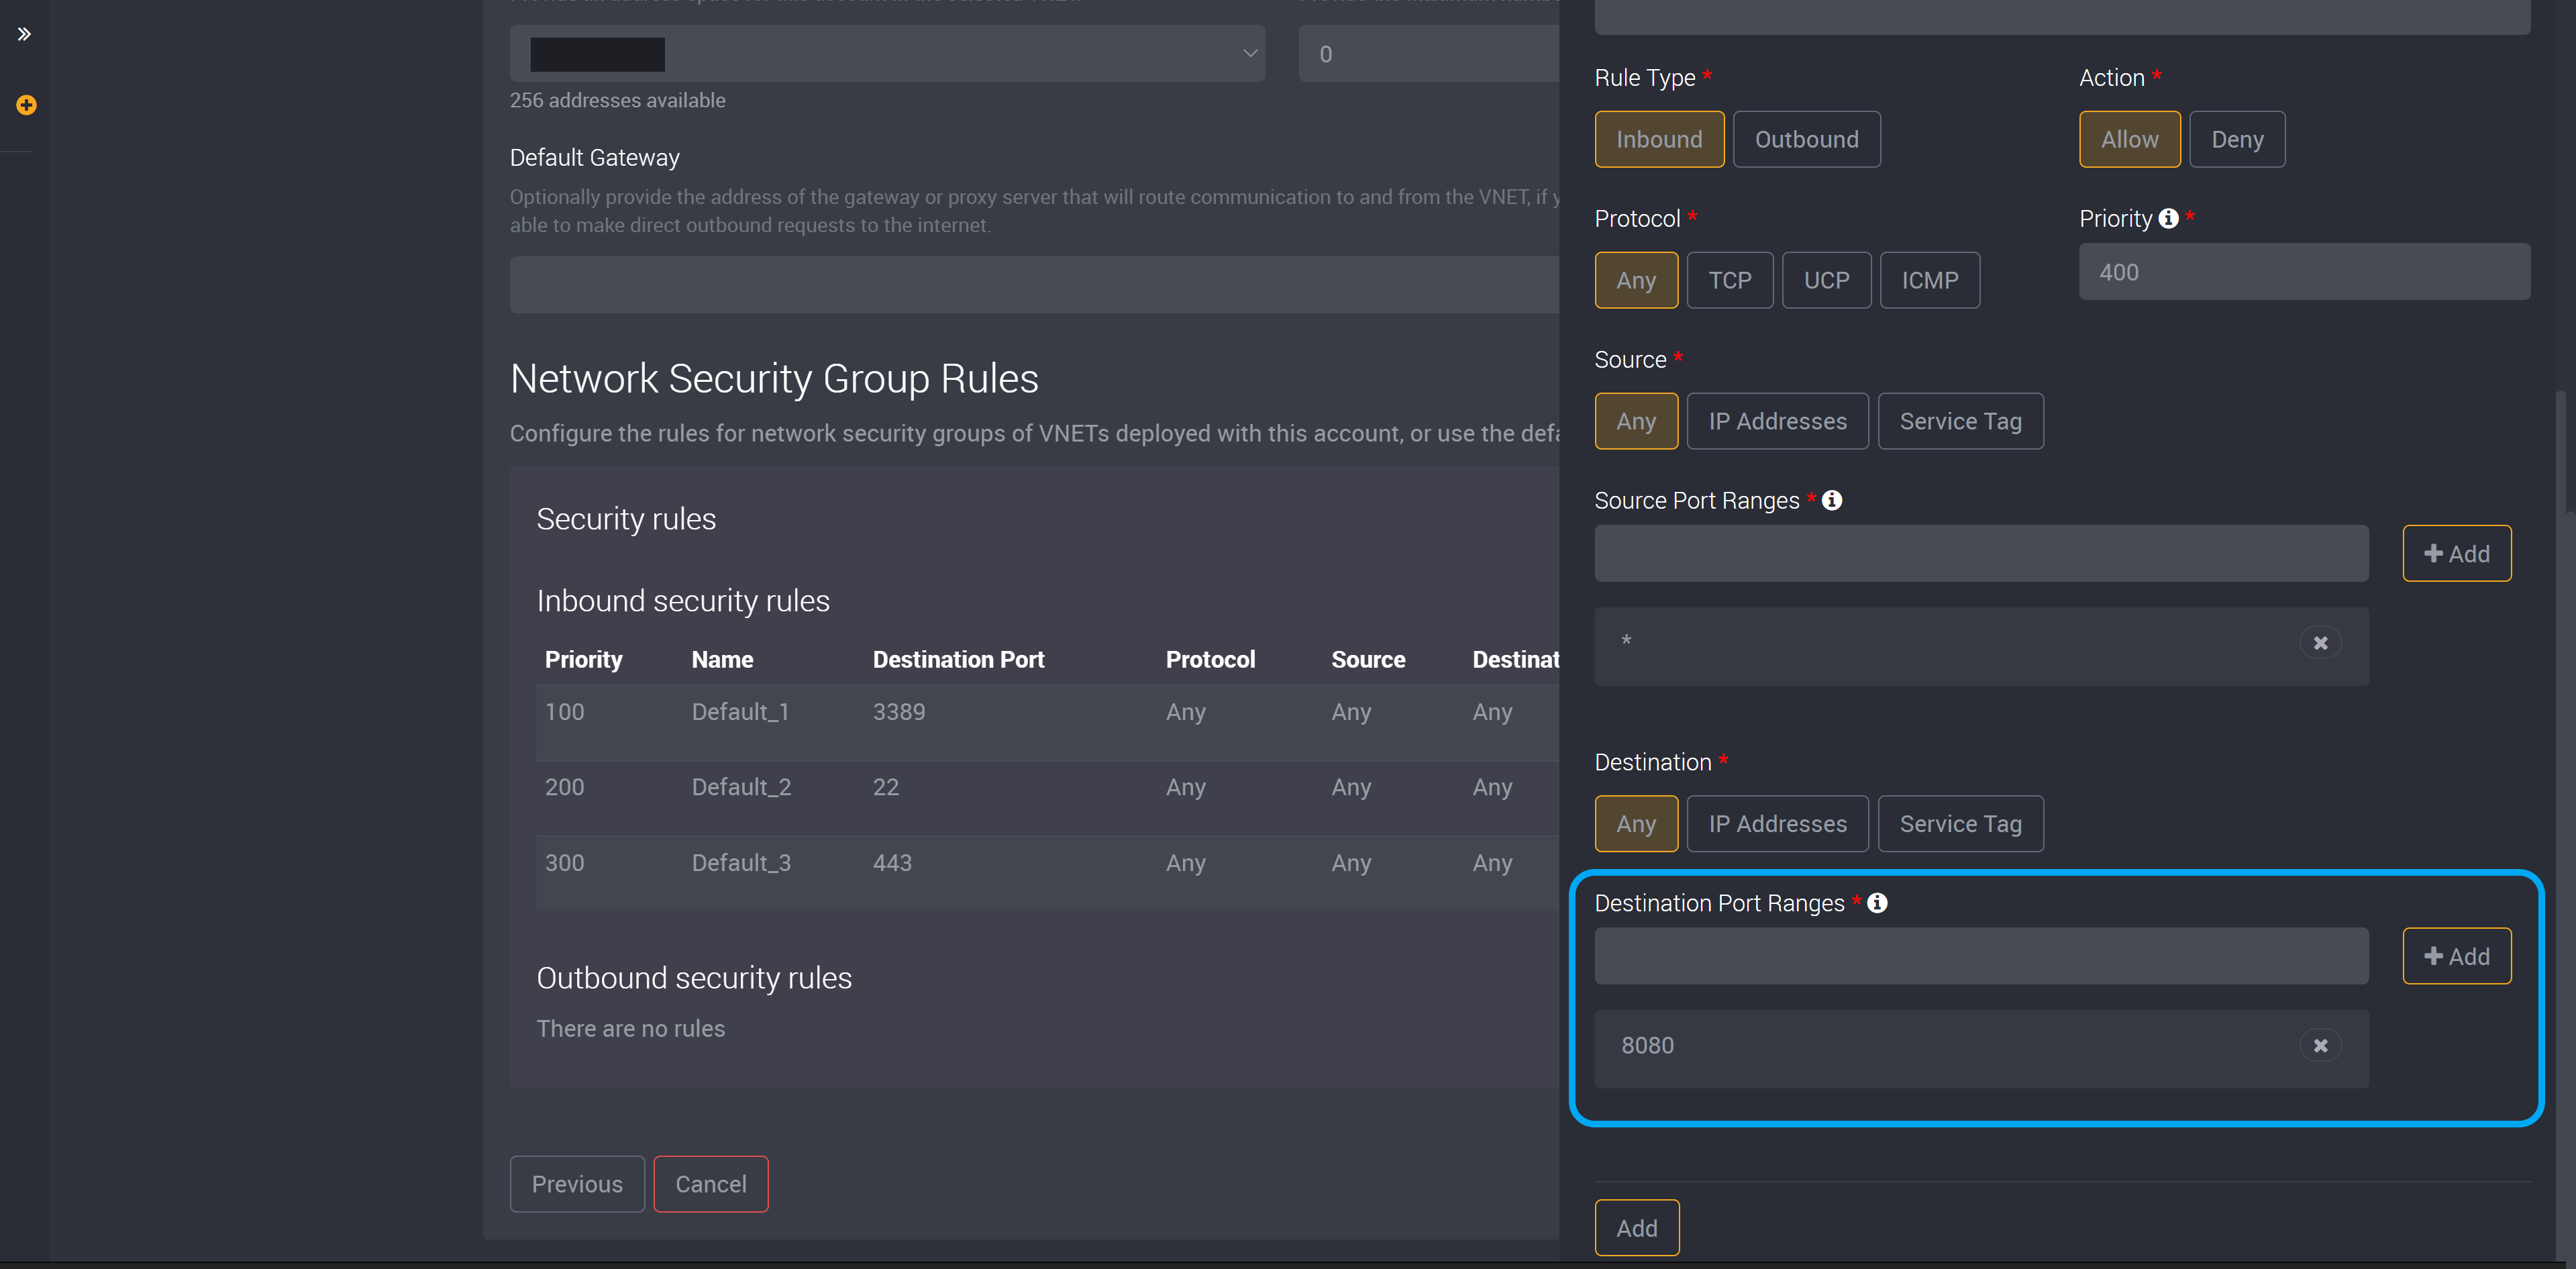
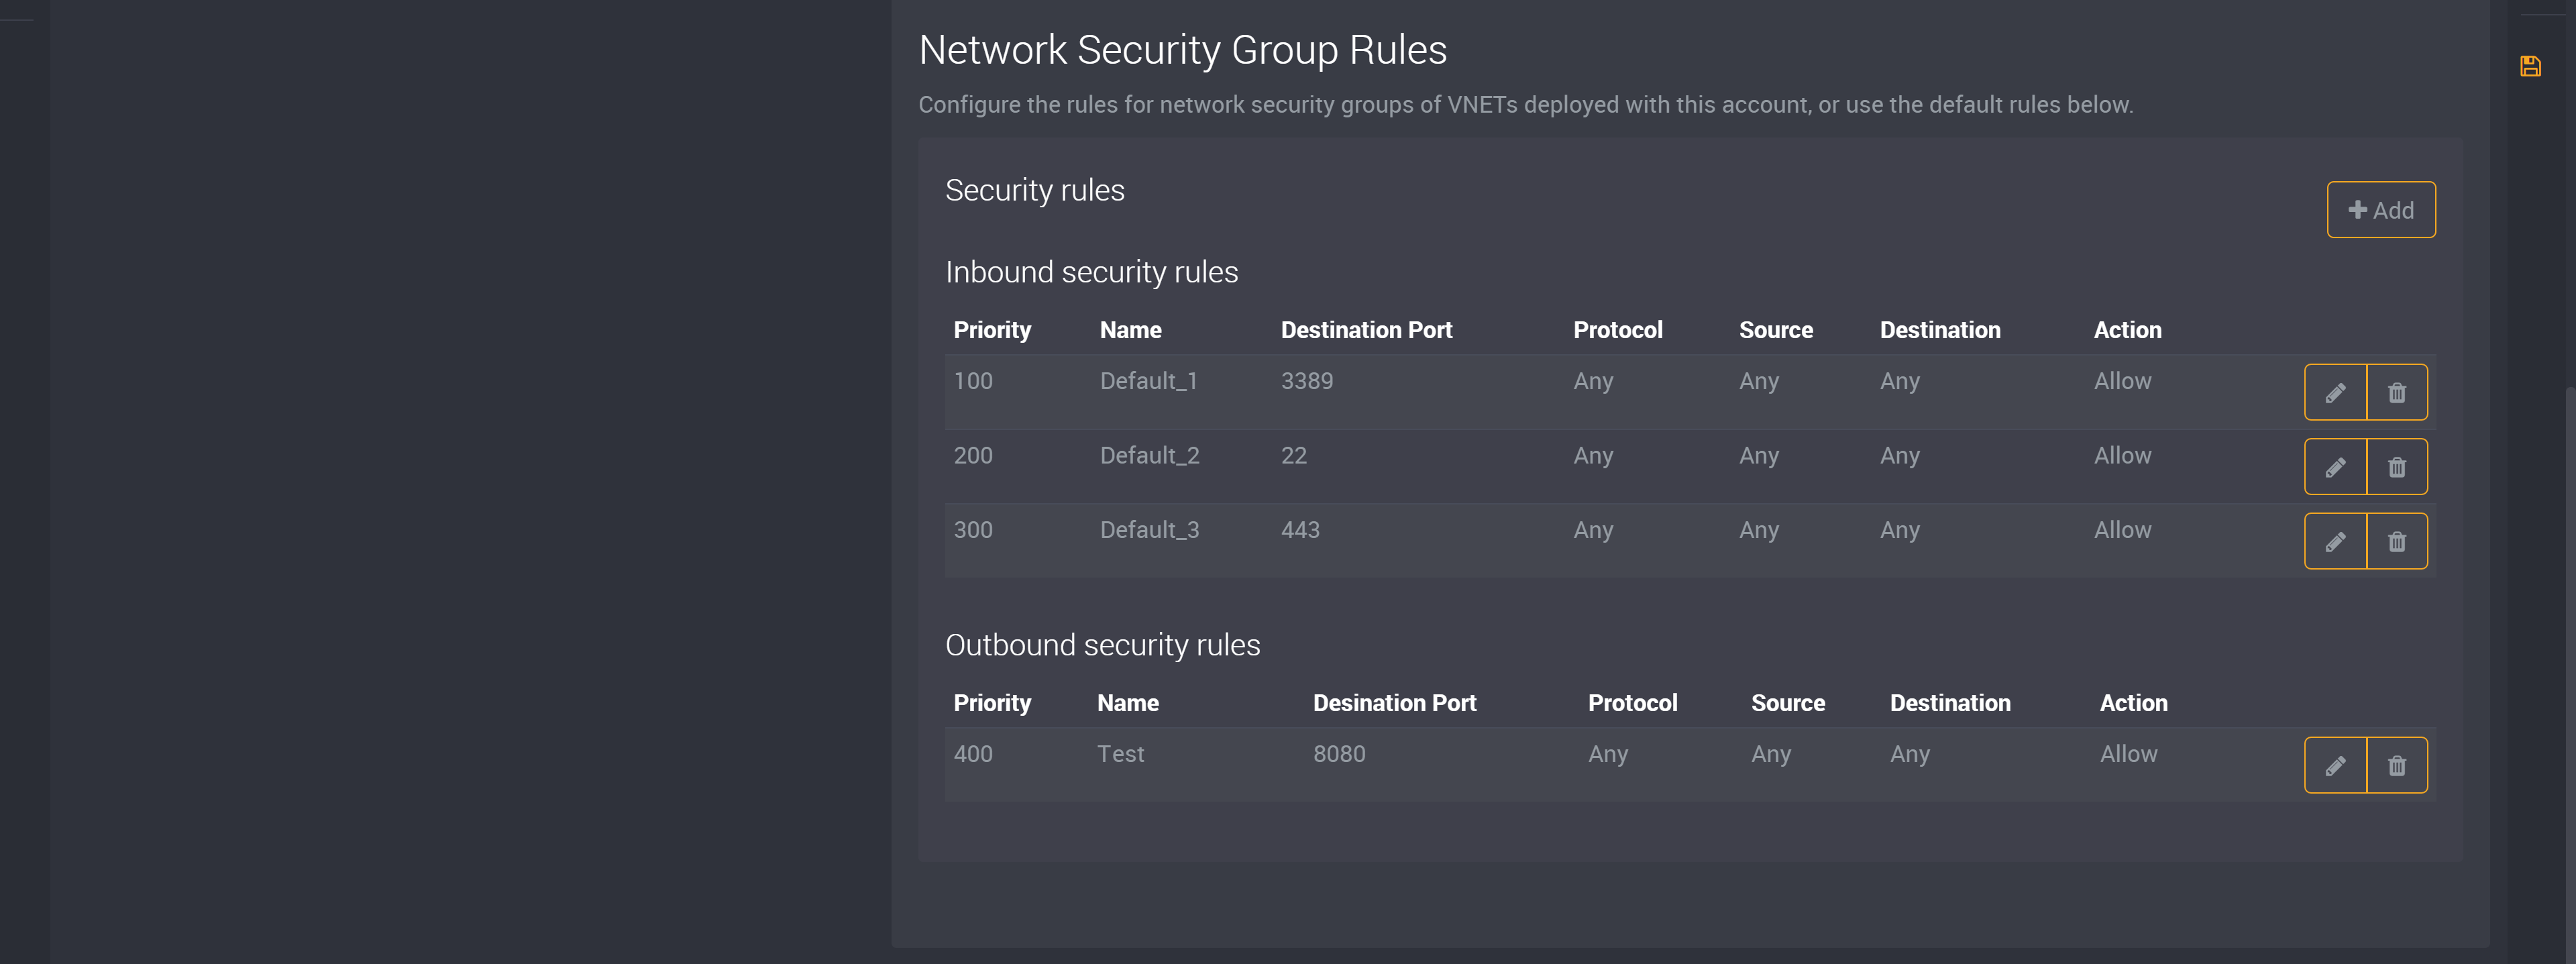
Network Security Group Rules
Network Security Group Rules are the rules for network security groups of VNETs deployed with this account. They can be inbound or outbound, and Loome has default inbound security rules for an enabled Secure VNET.
You can configure new rules for network security groups of VNETs deployed with this account, or you can use the default rules below.

If you choose to add a new security rule, click on ‘Add’ at the top right corner of this section. It will expand a slideout where you can provide the specifications to your rule.
First provide a name and description.
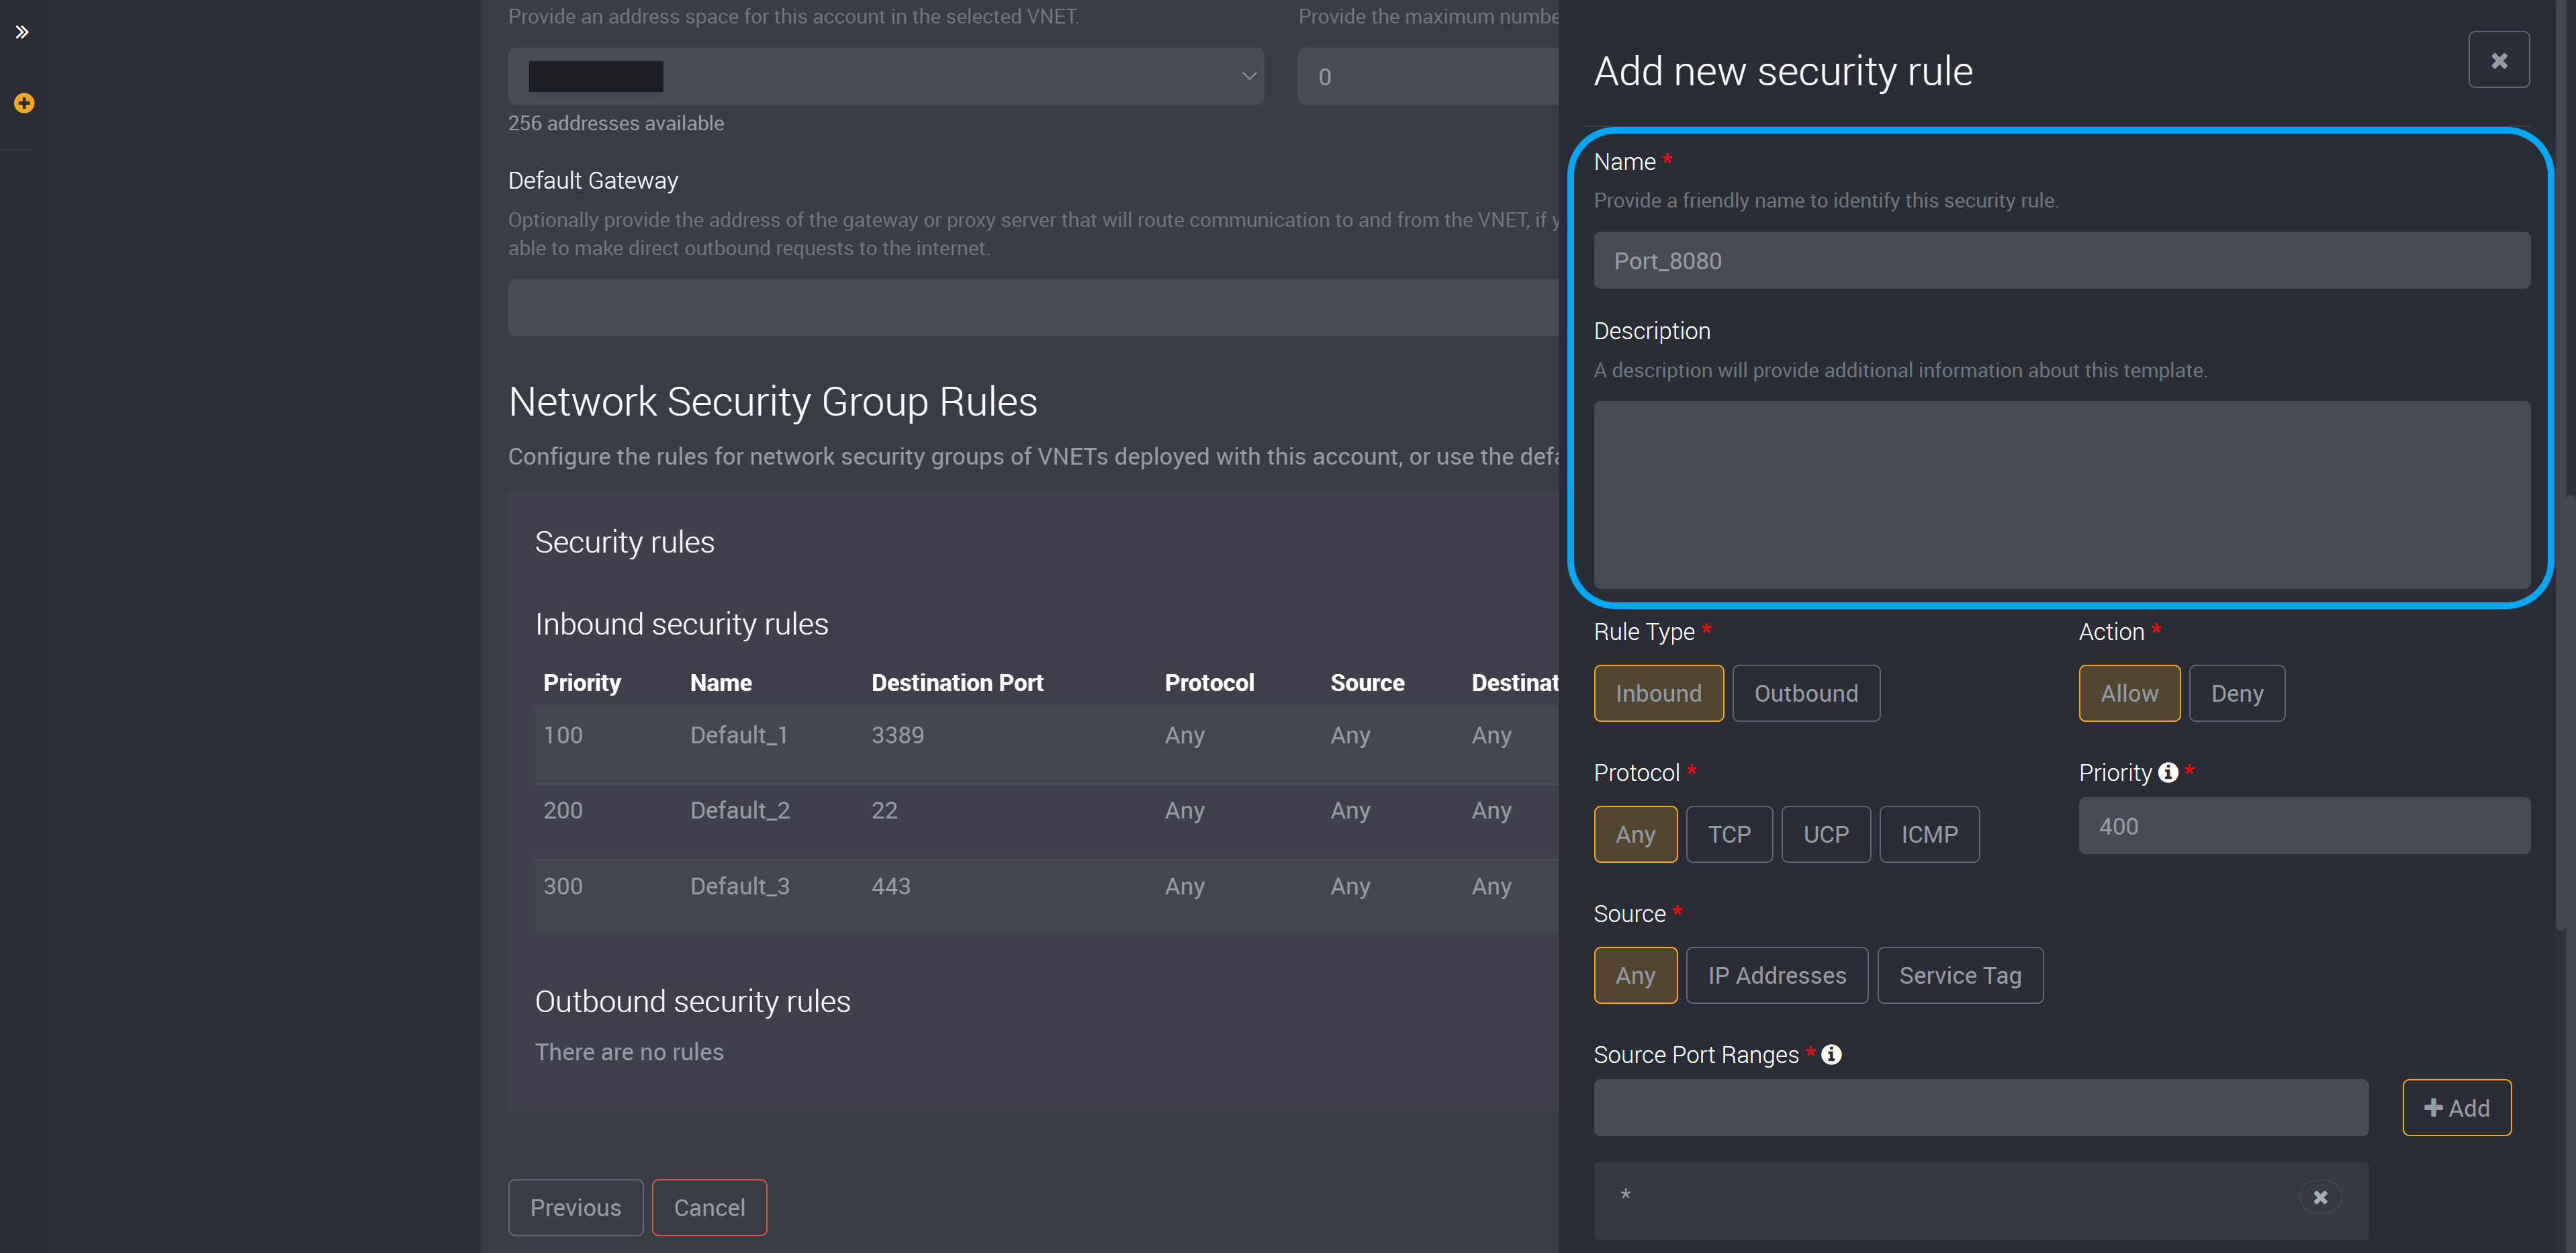
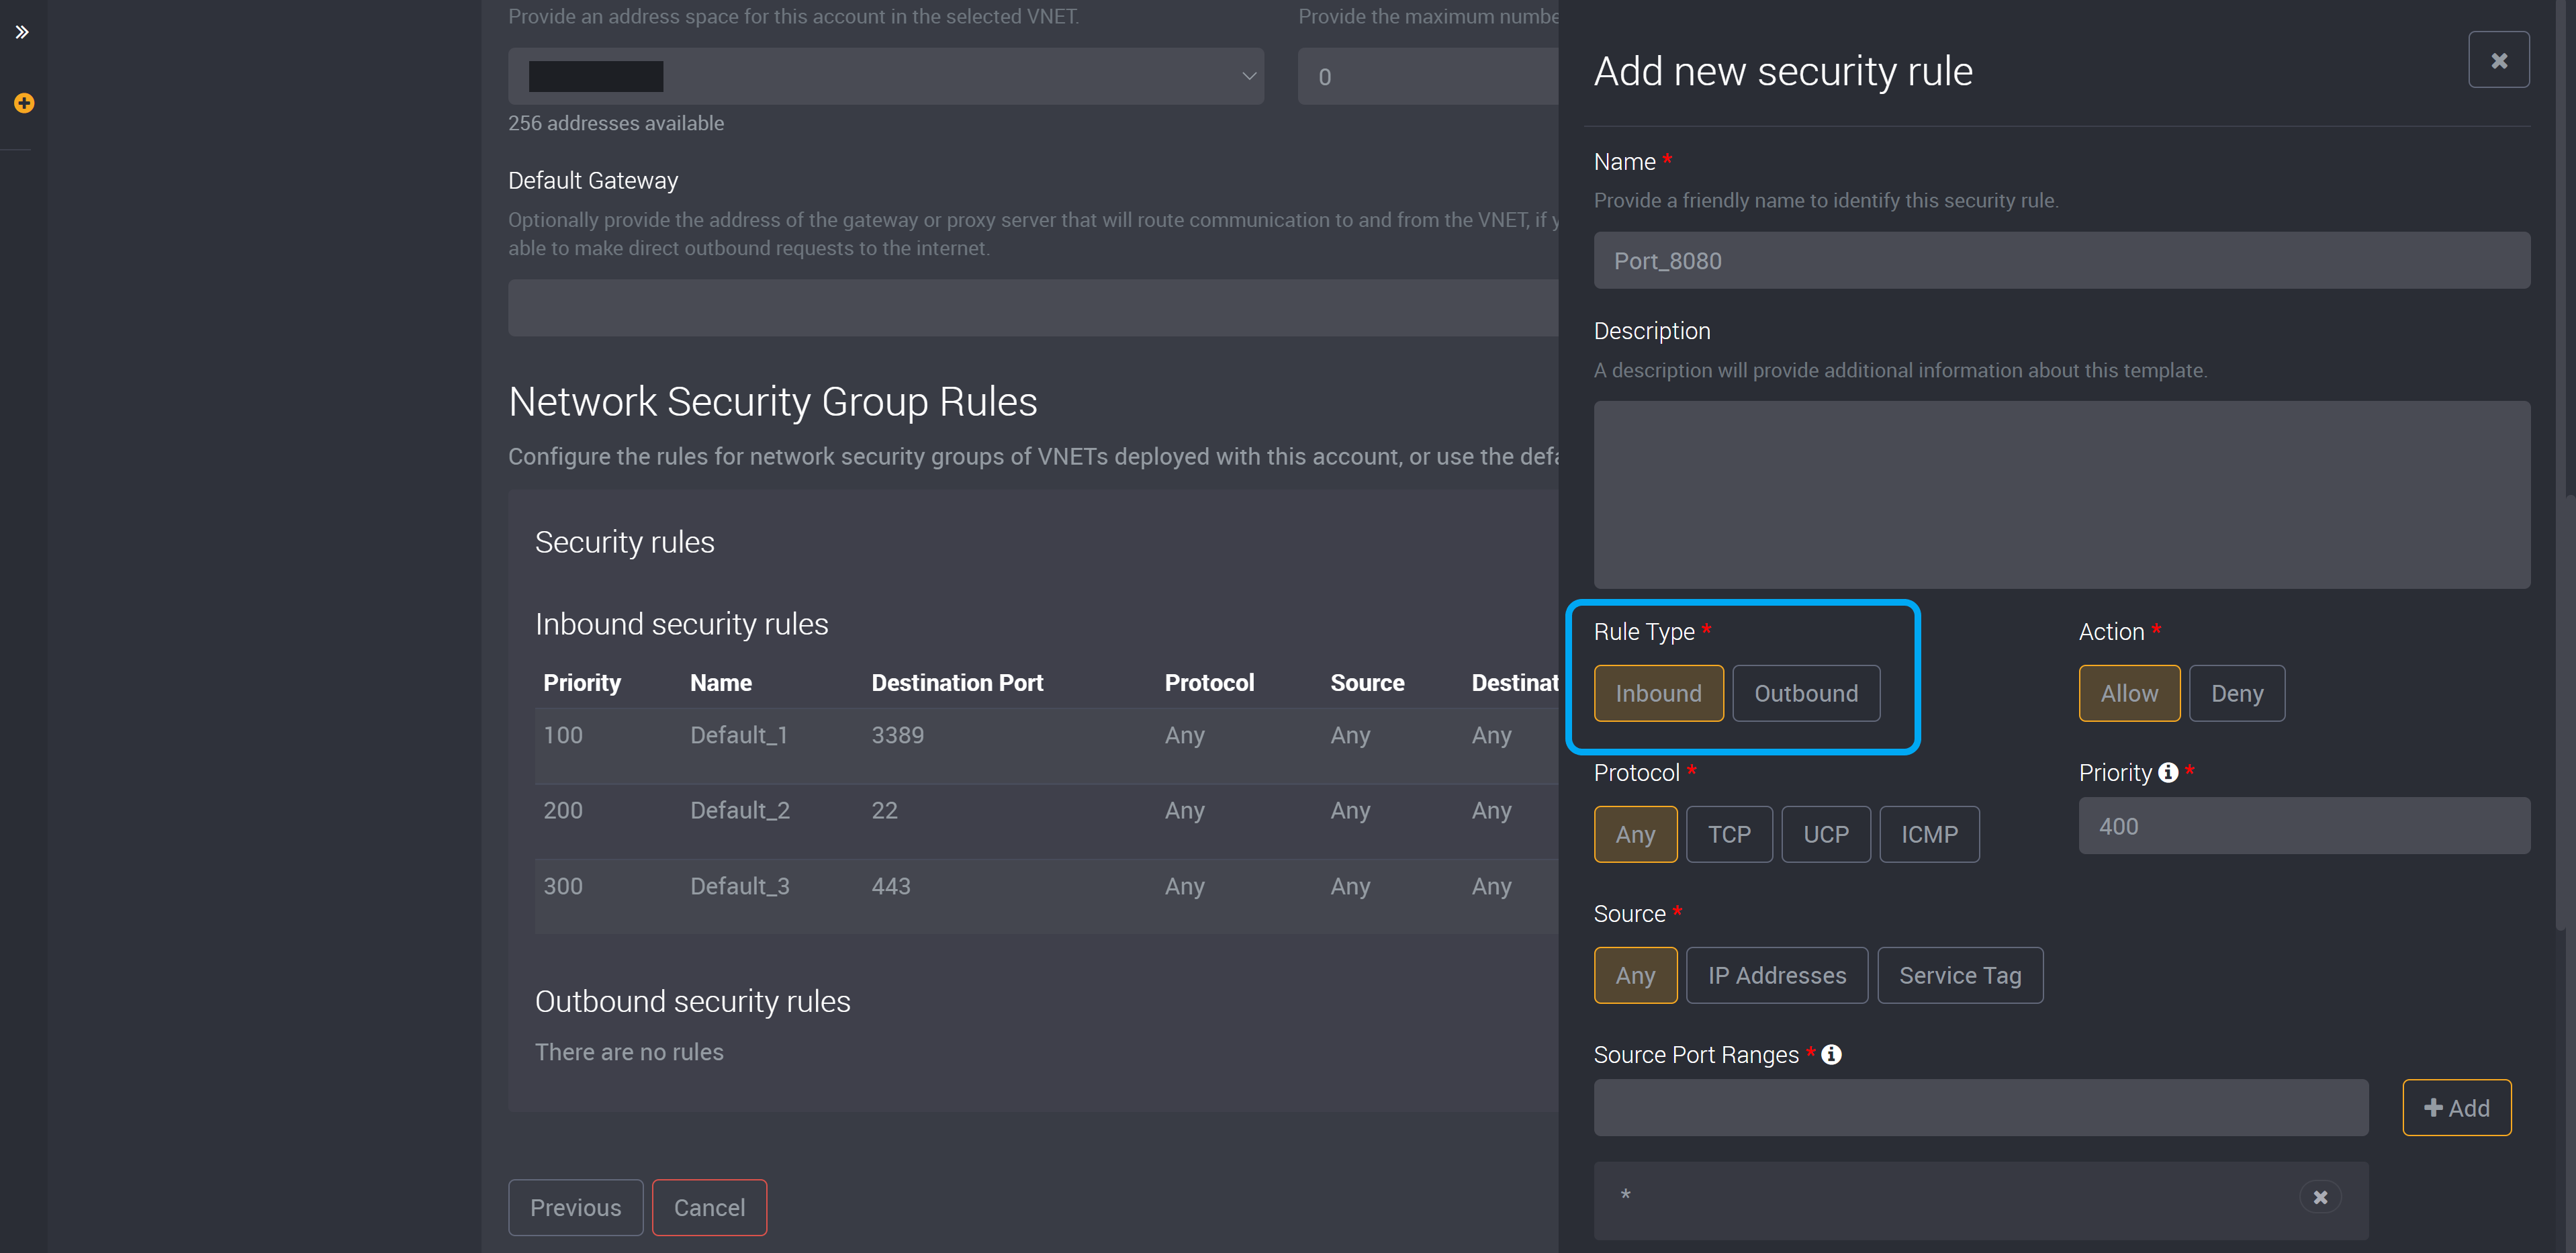
Then choose whether it is an outbound or inbound rule as its rule type.
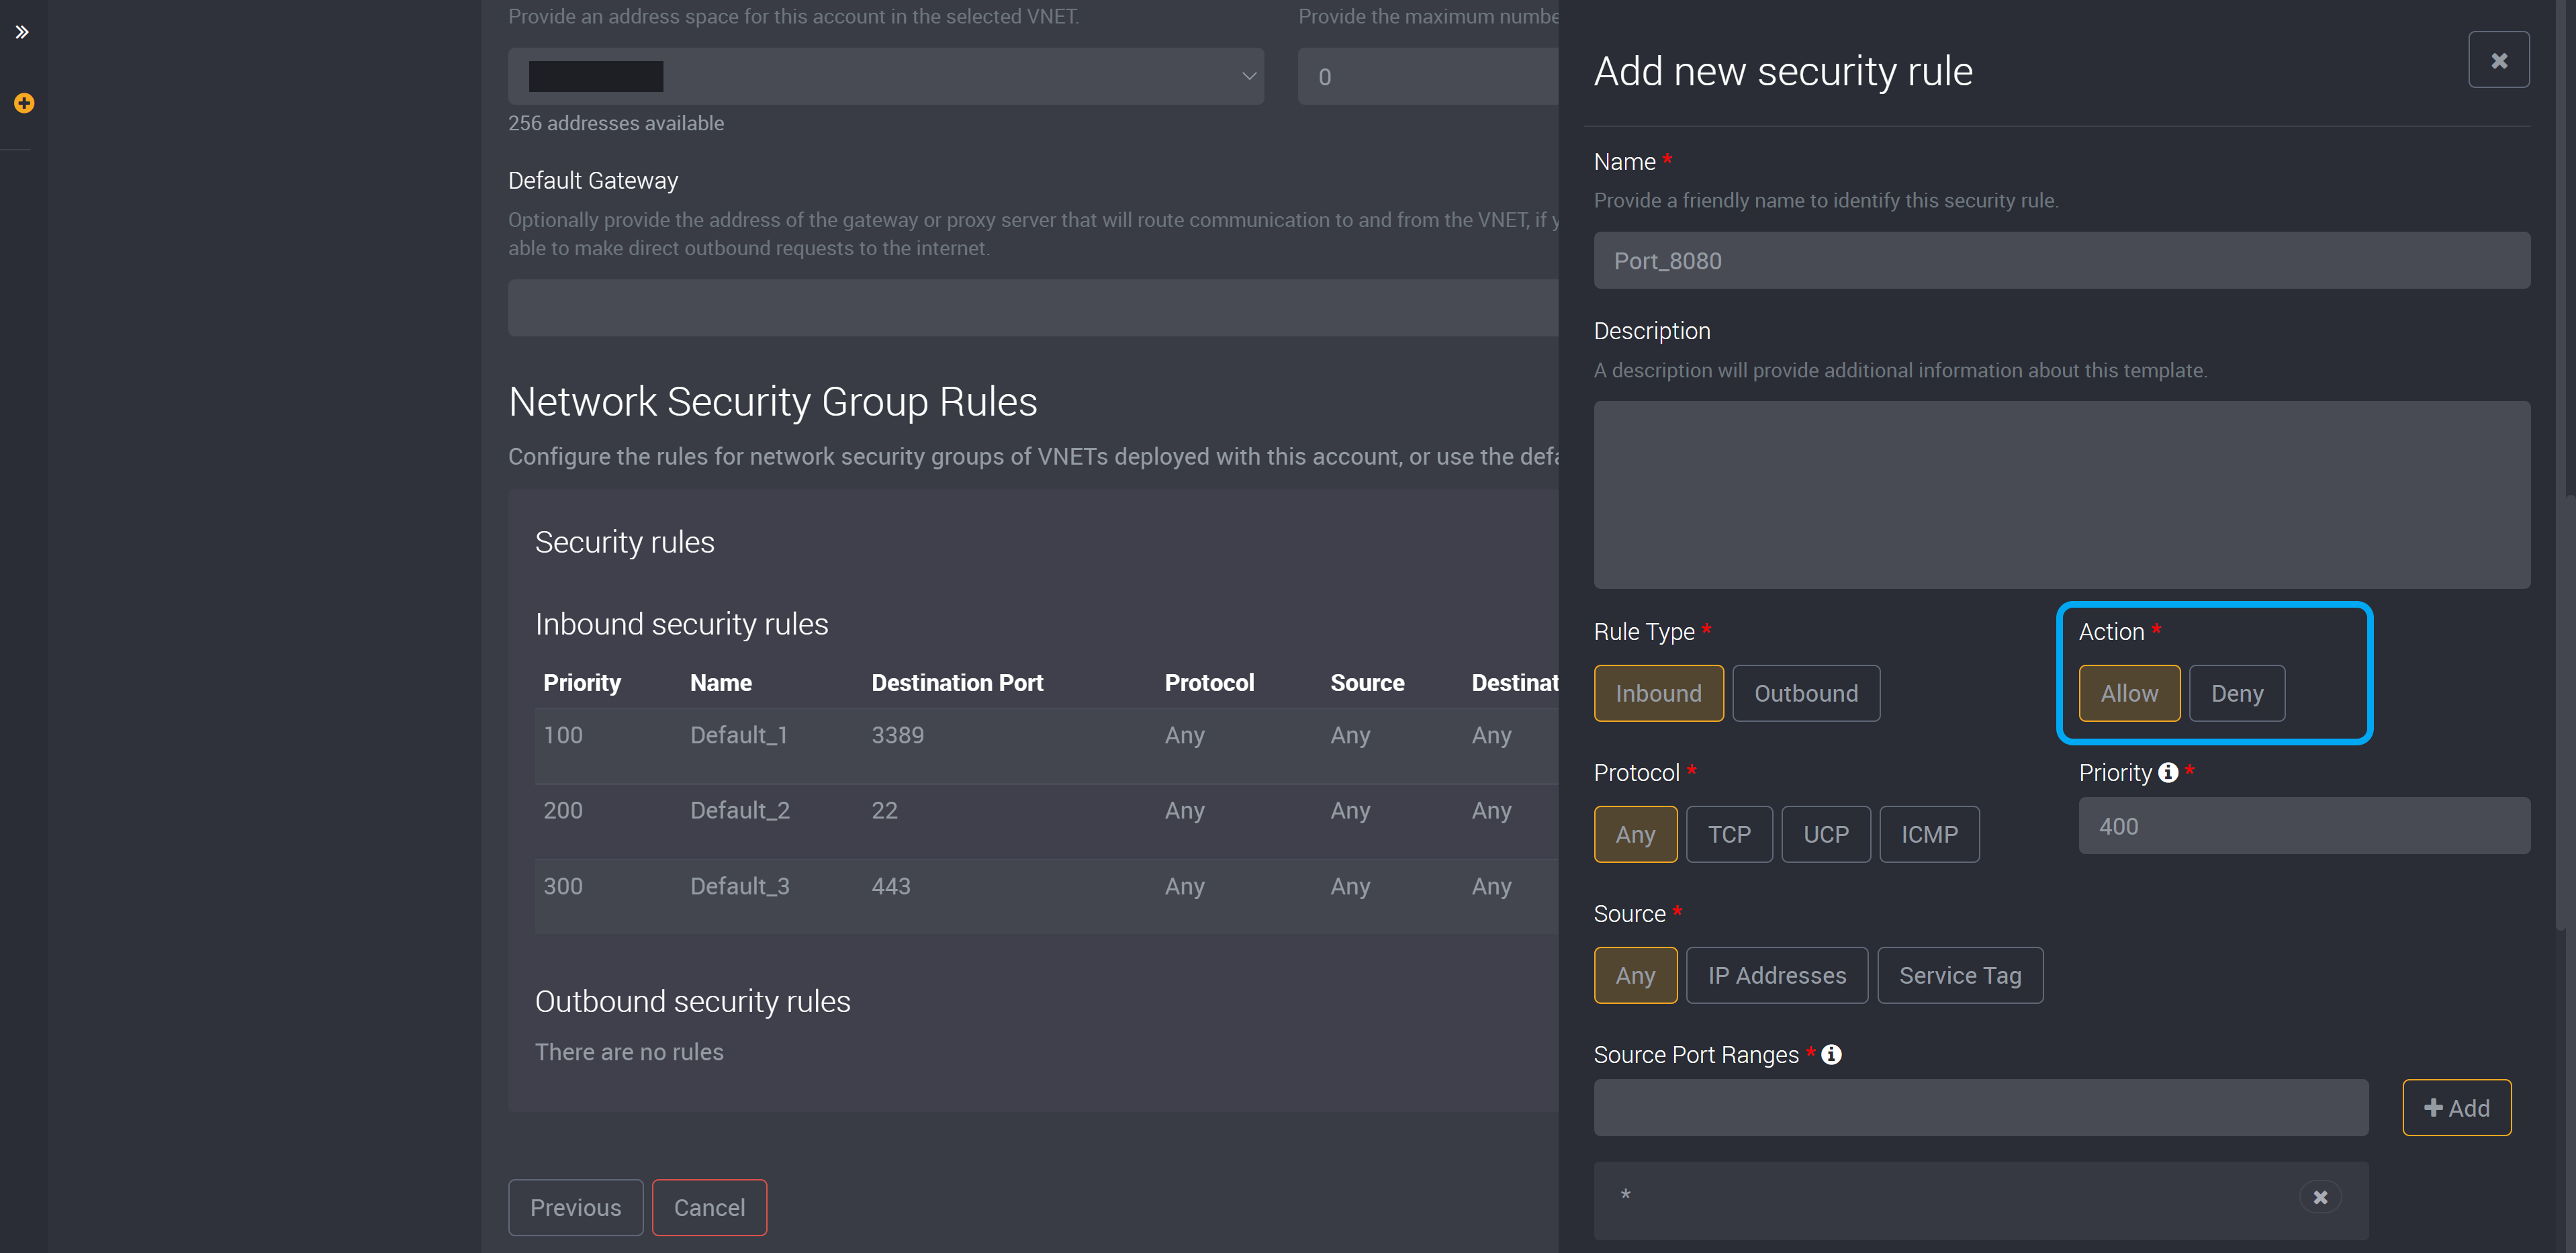
Choose whether action will be allowed or denied.
Select the protocol from TCP, UCP, ICMP or any.
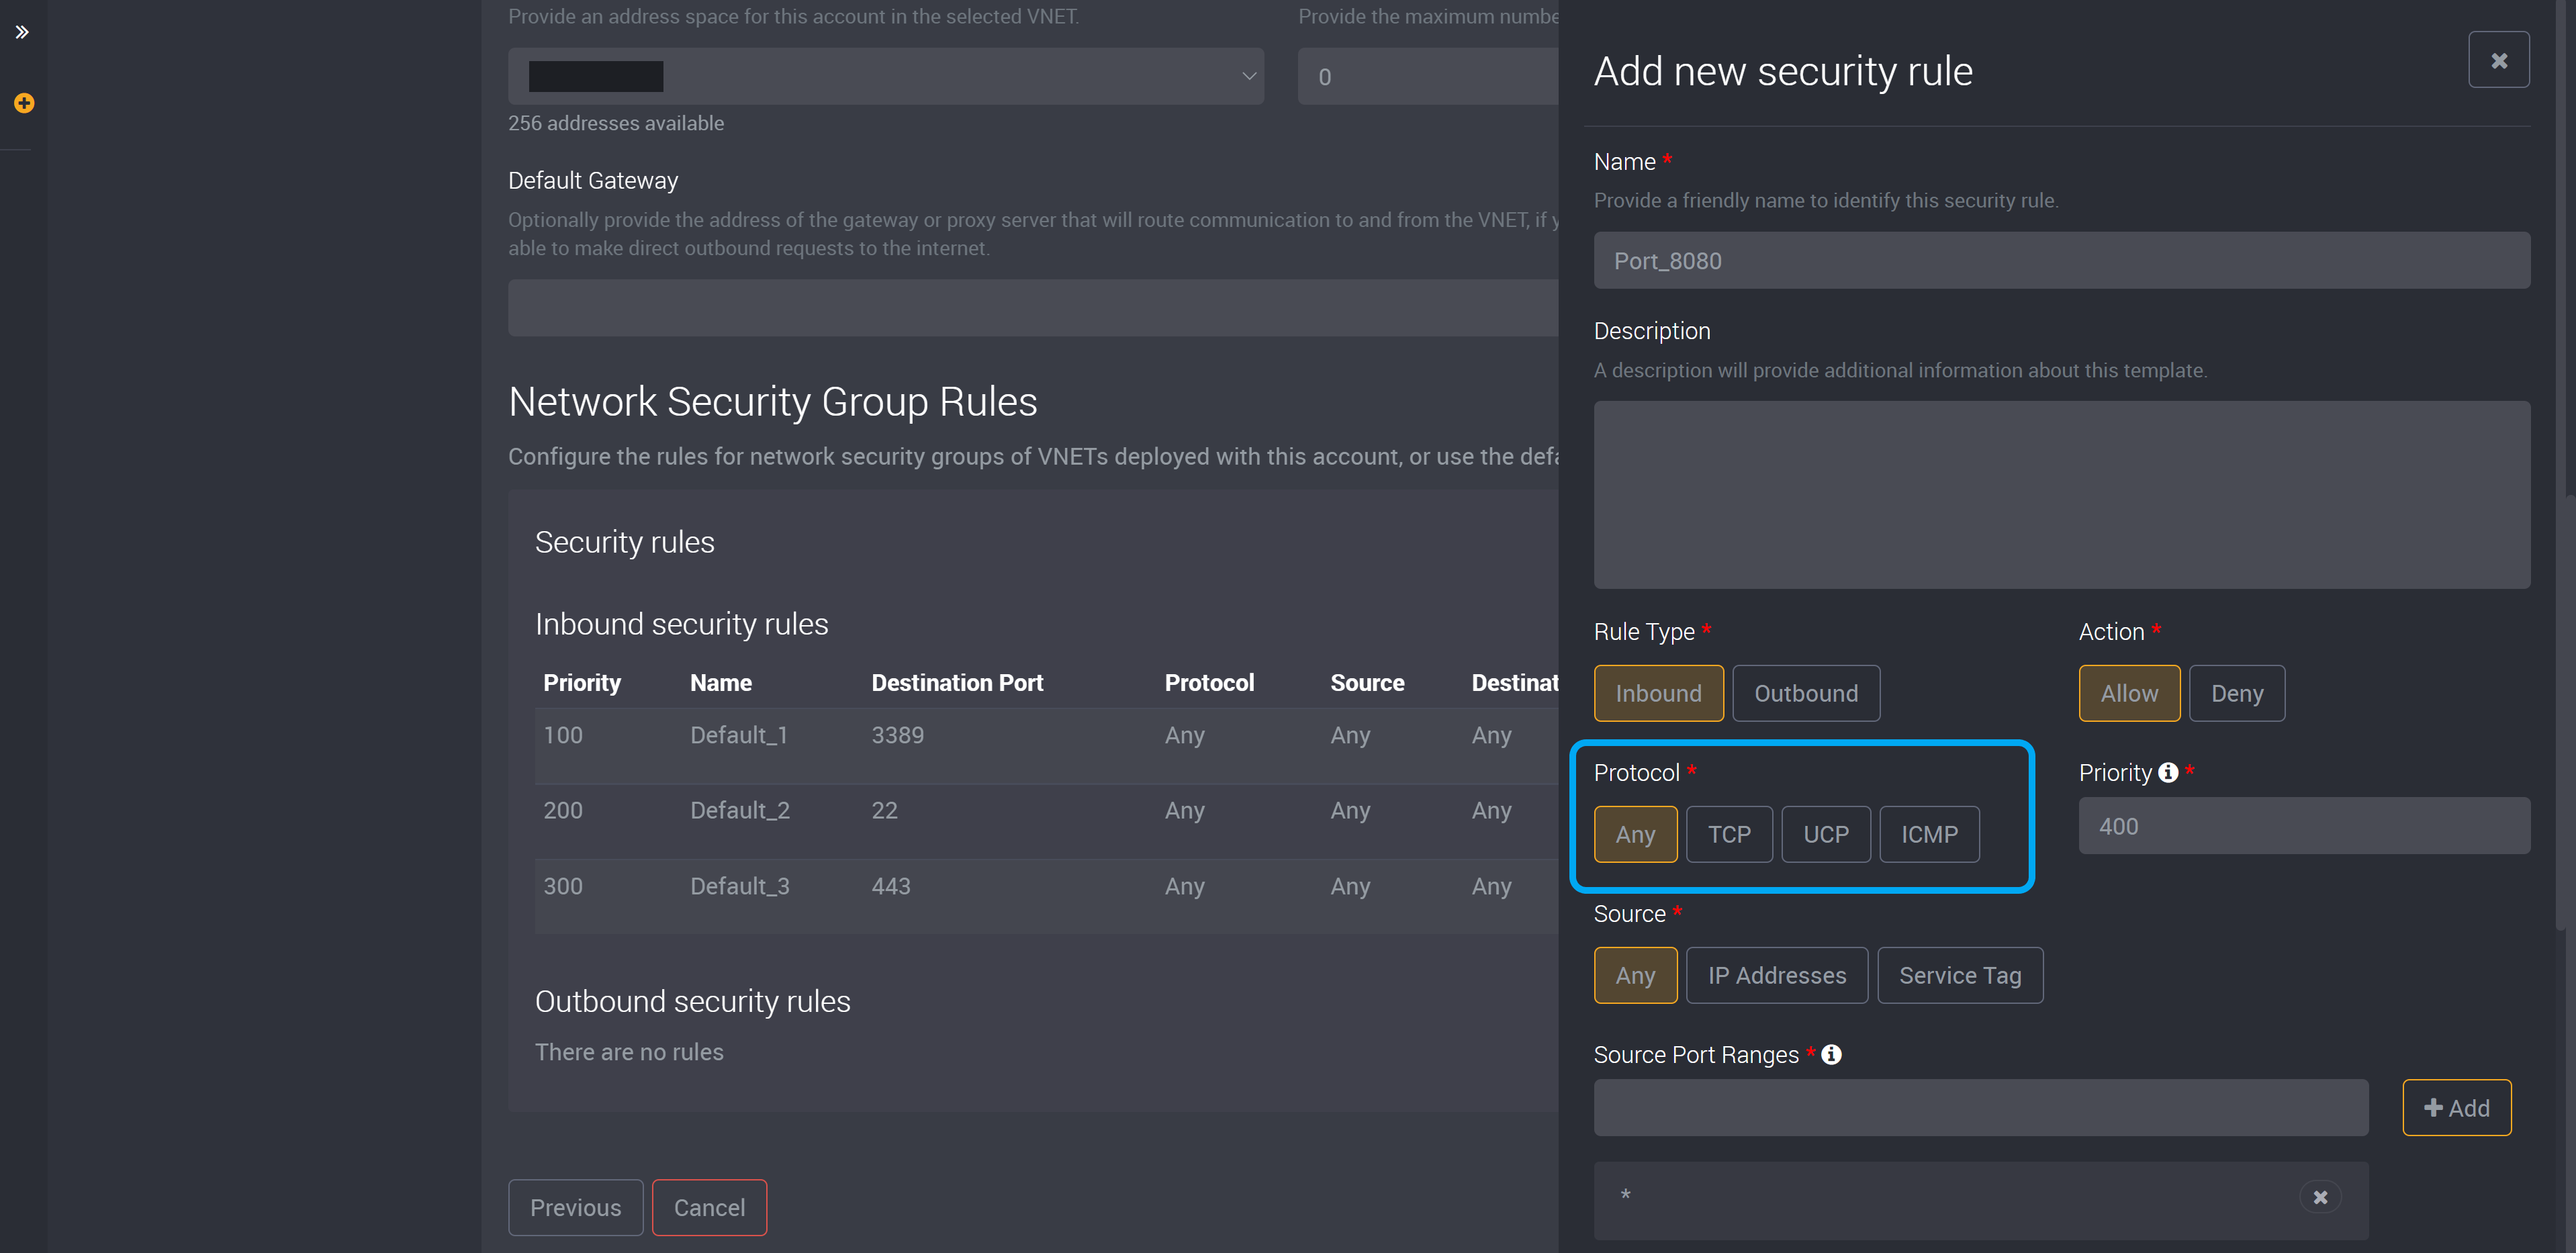
Provide a number to set its priority. Rules will be processed in the order of priority. Rules with a lower number will be processed first.
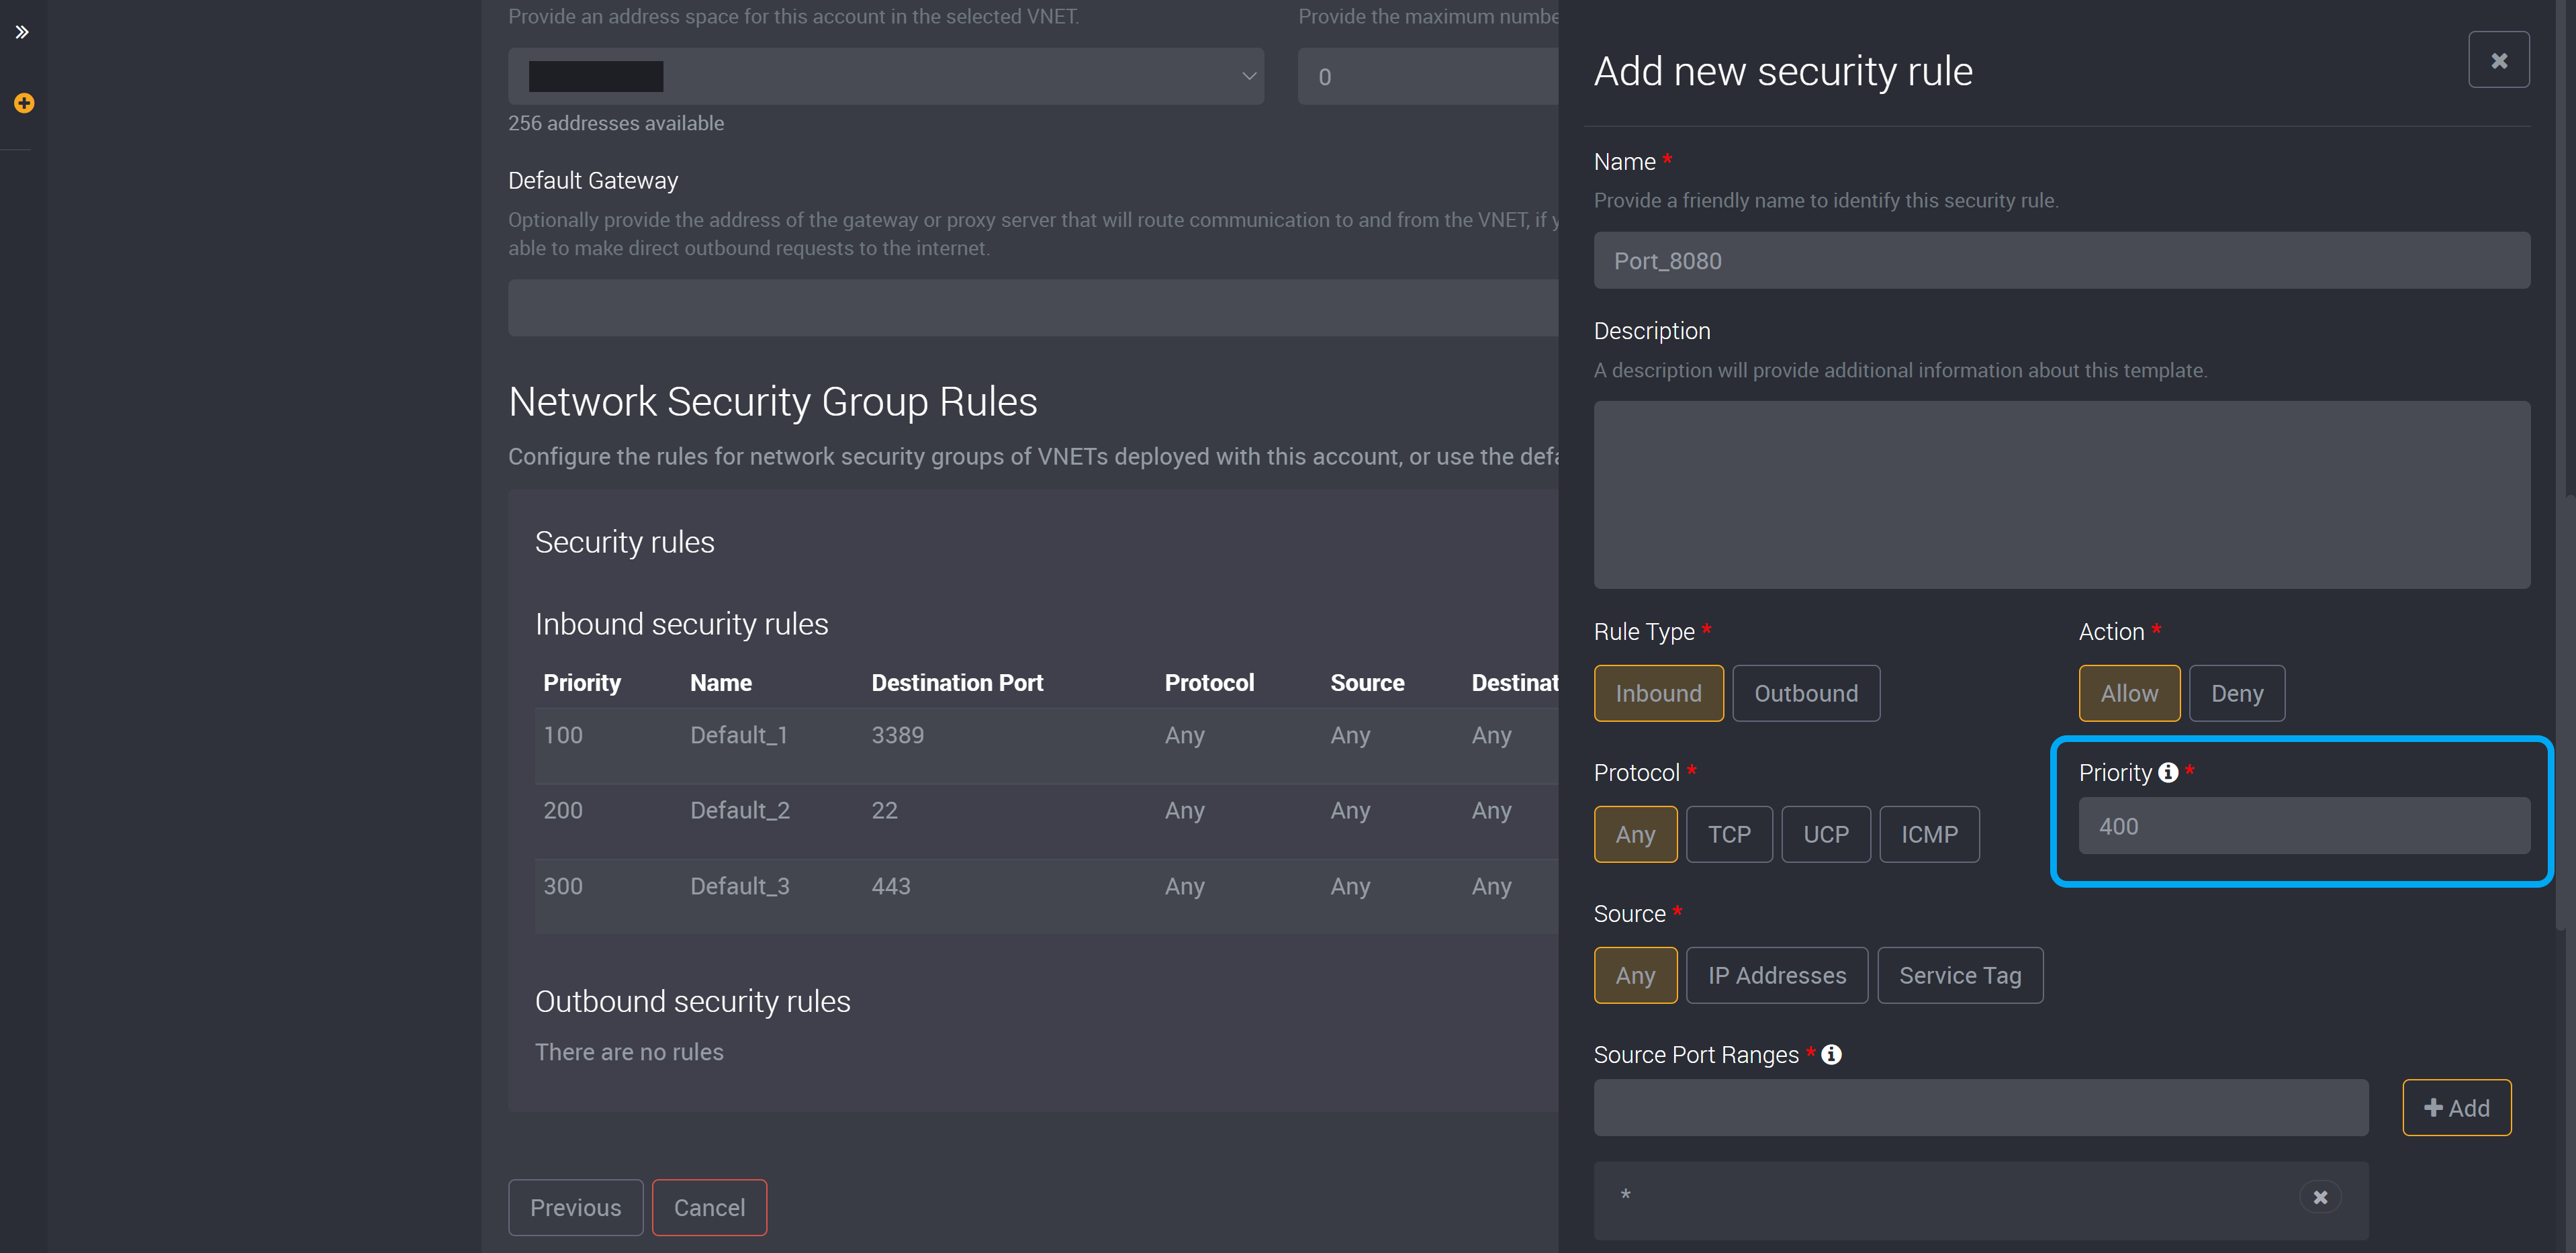
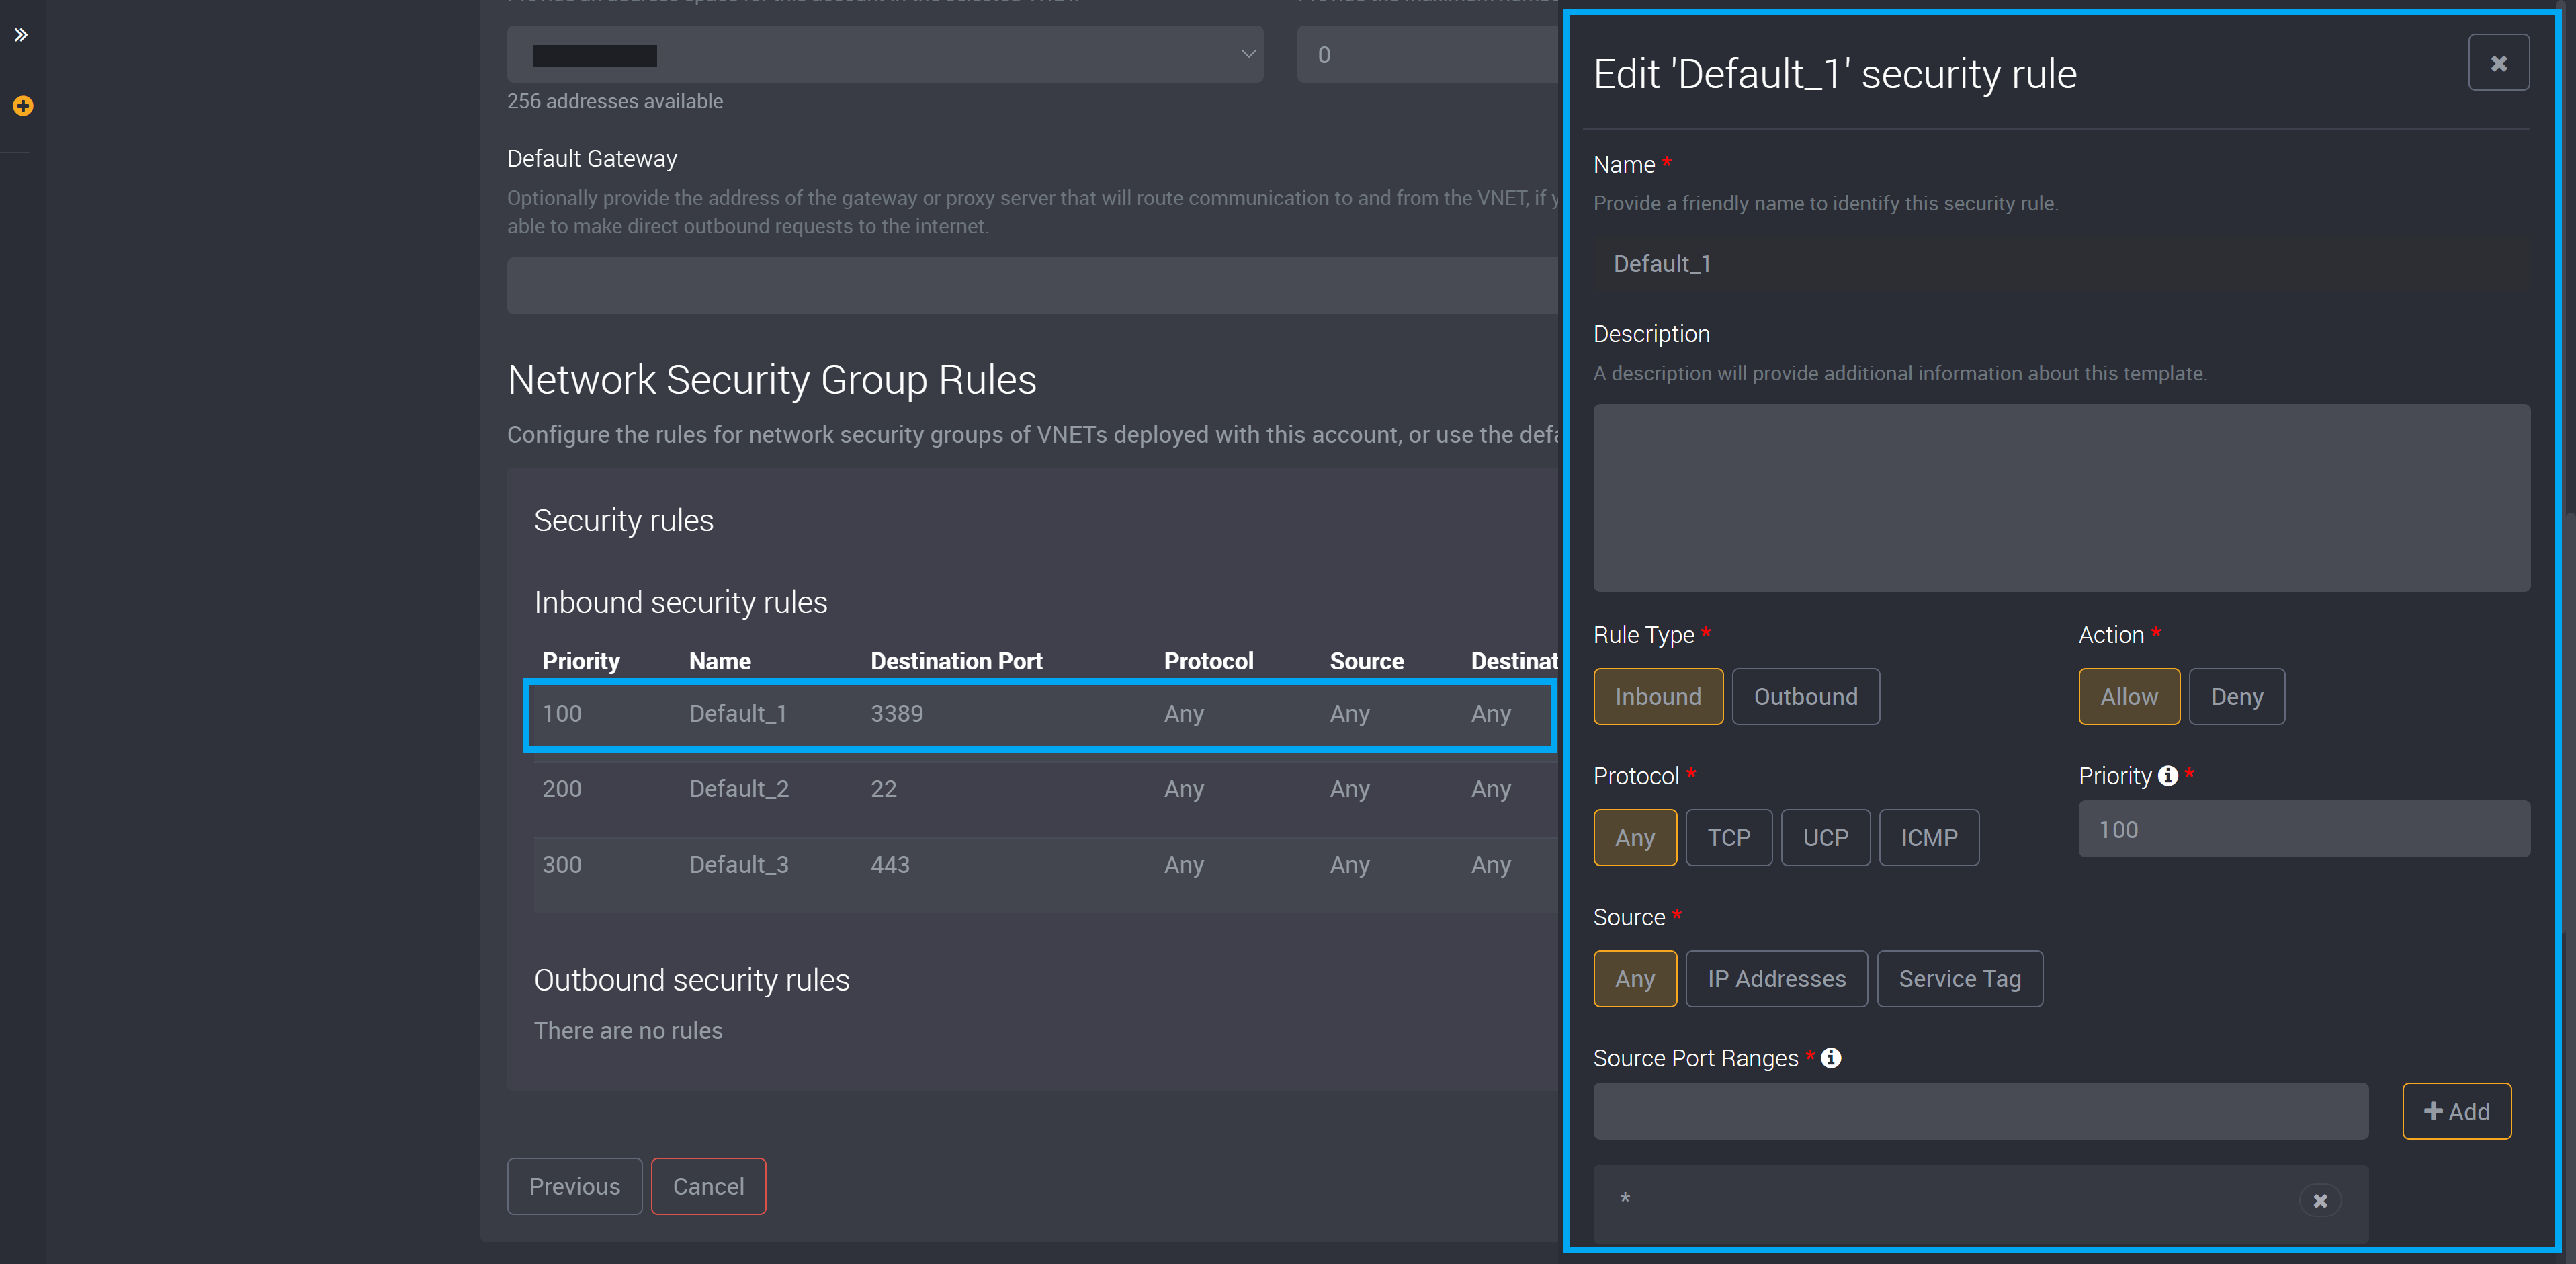
For example, in the image above, the default rule 1 will be processed first because its priority is set at ‘100’ while rule 2 is set at ‘200’.
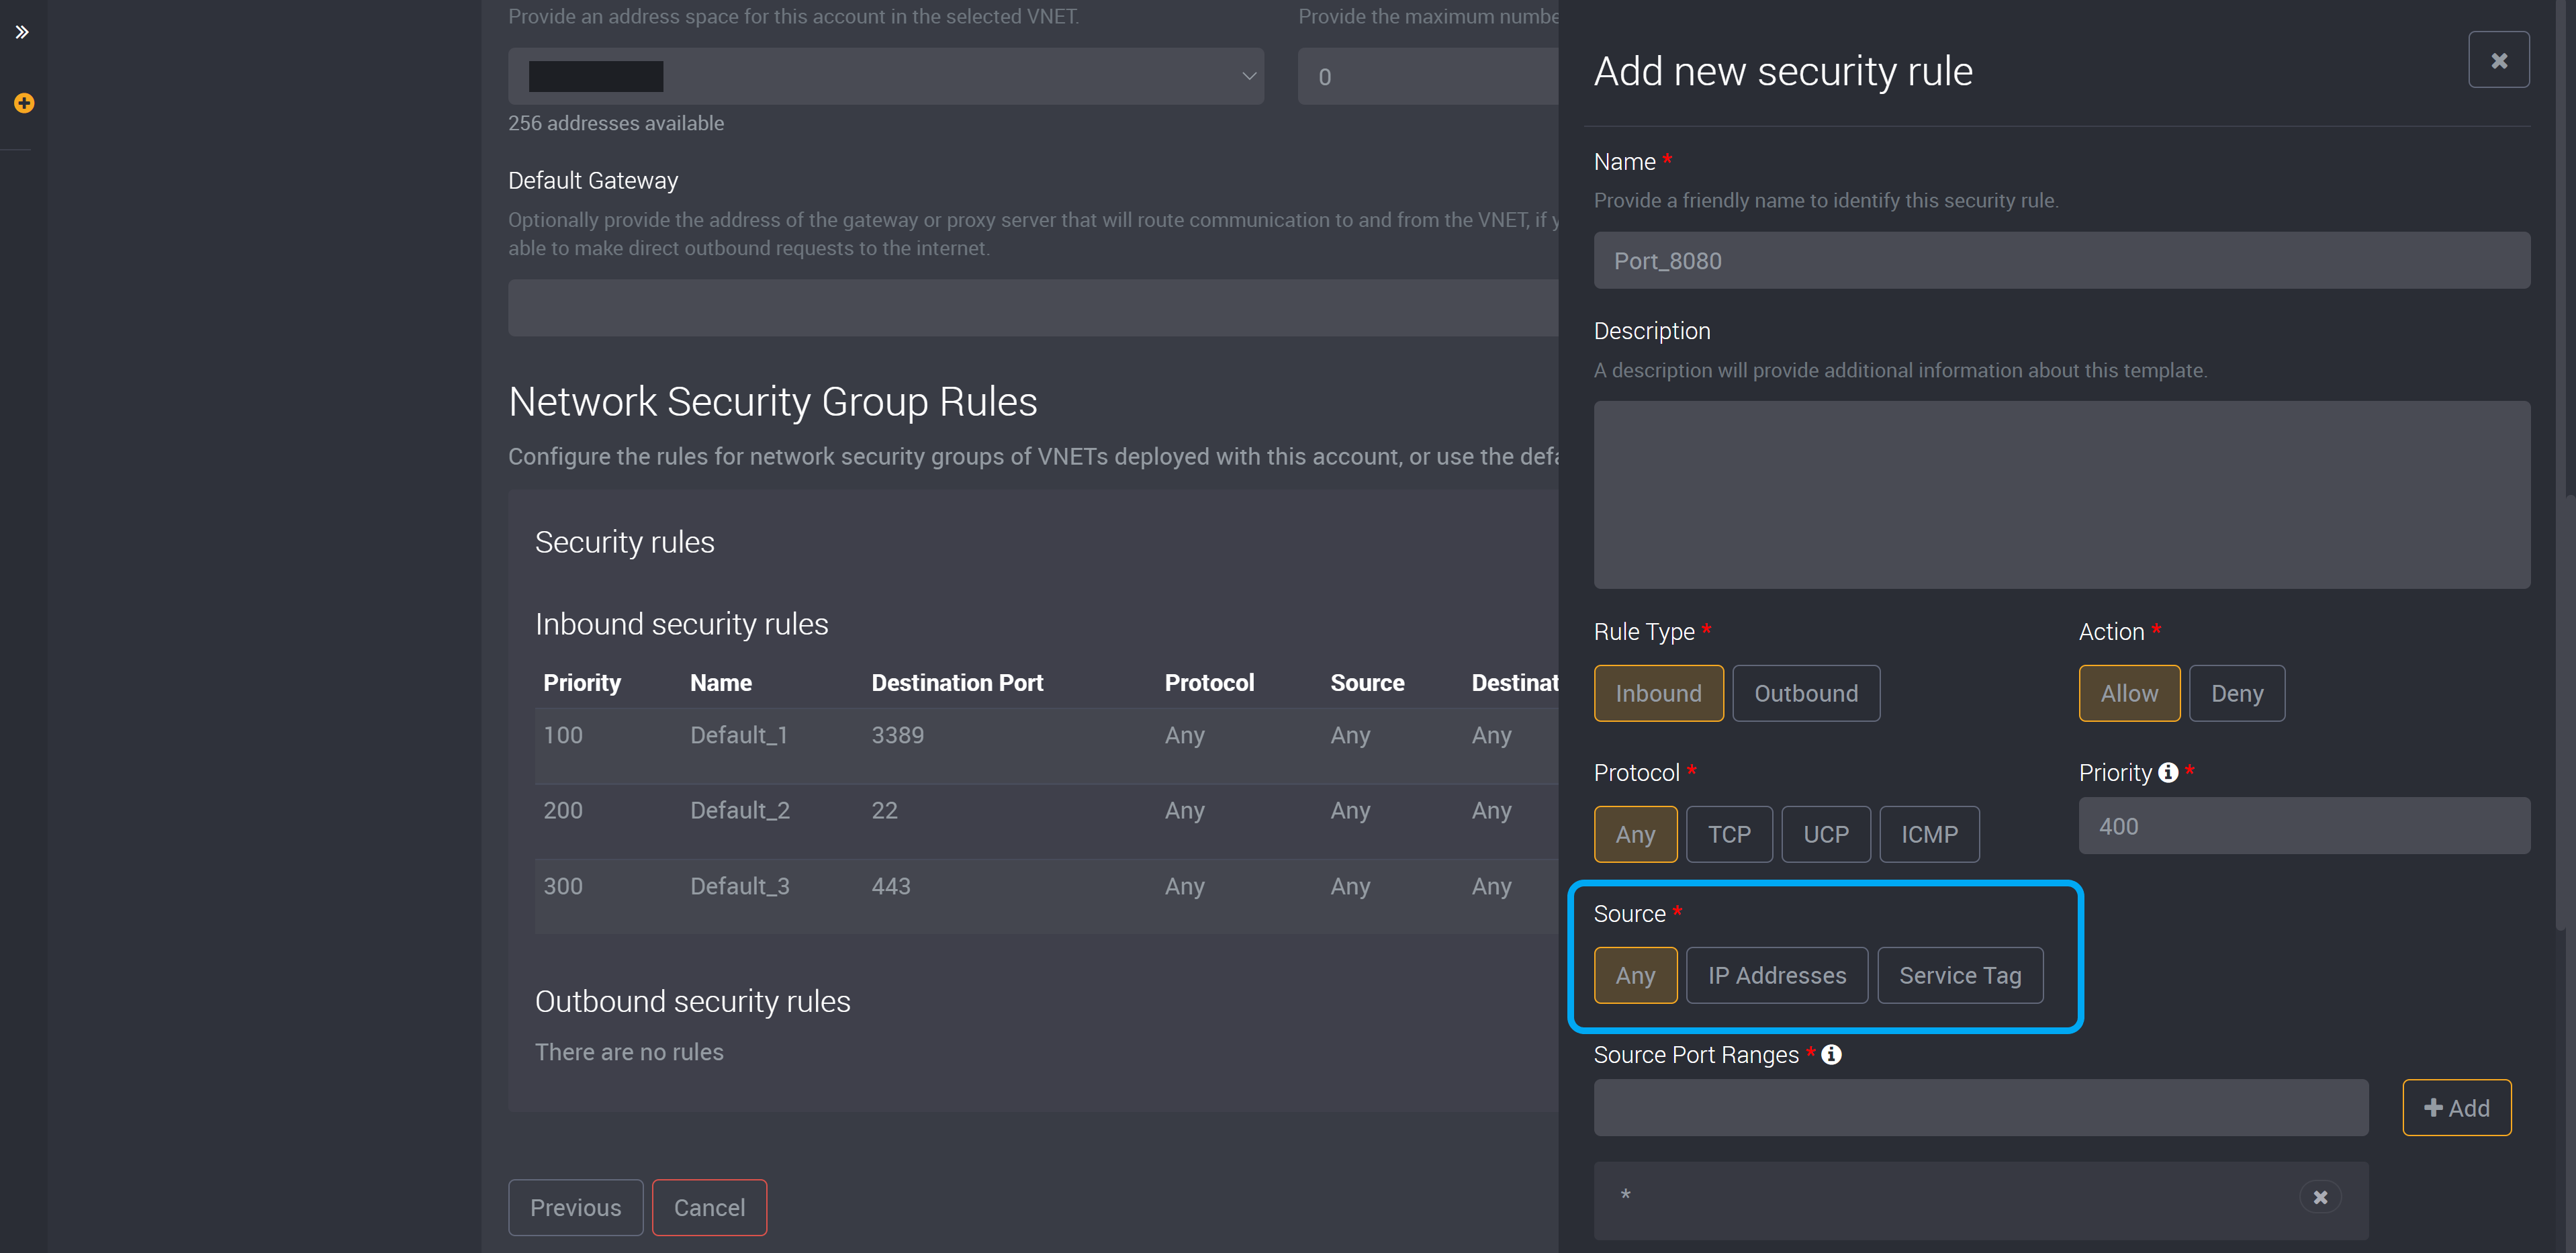
You can choose ‘Any’, ‘IP Addresses’ or ‘Service Tag’ as the Source of this rule.
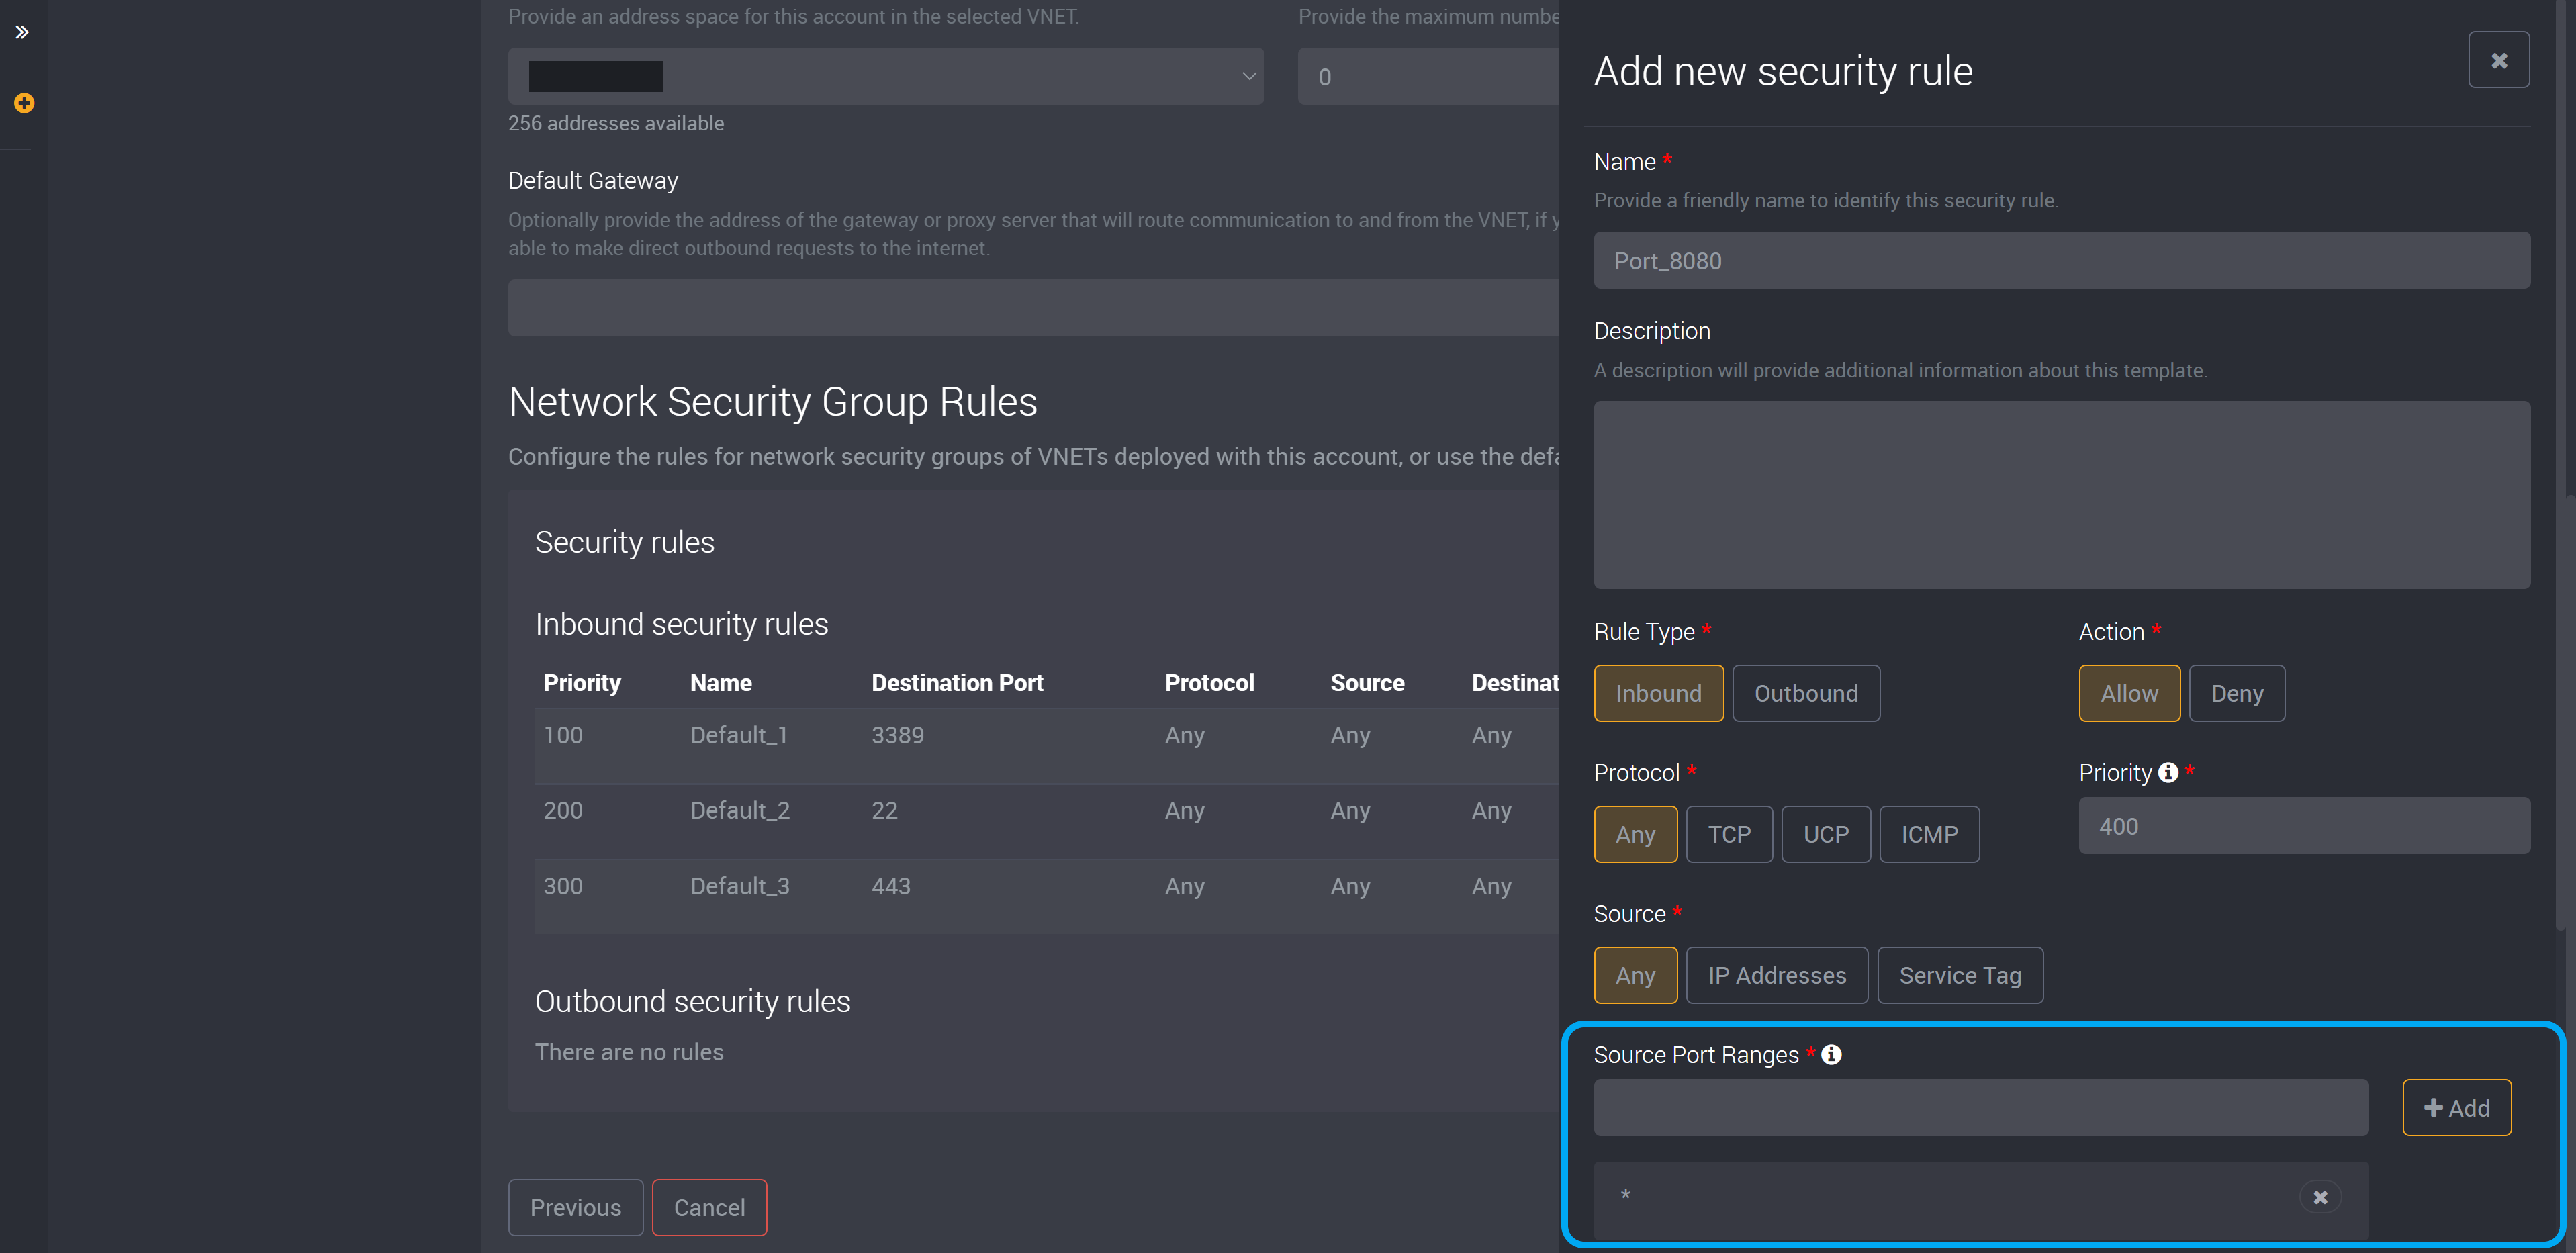
You can choose a port for your source in ‘Source Port Ranges’. You can choose a single port, e.g. 80, a range, e.g. 1200-2400, or an asterisk ‘*’ to allow traffic on any port.
Choose ‘Any’, ‘IP Addresses’ or ‘Service Tag’ as the Destination.

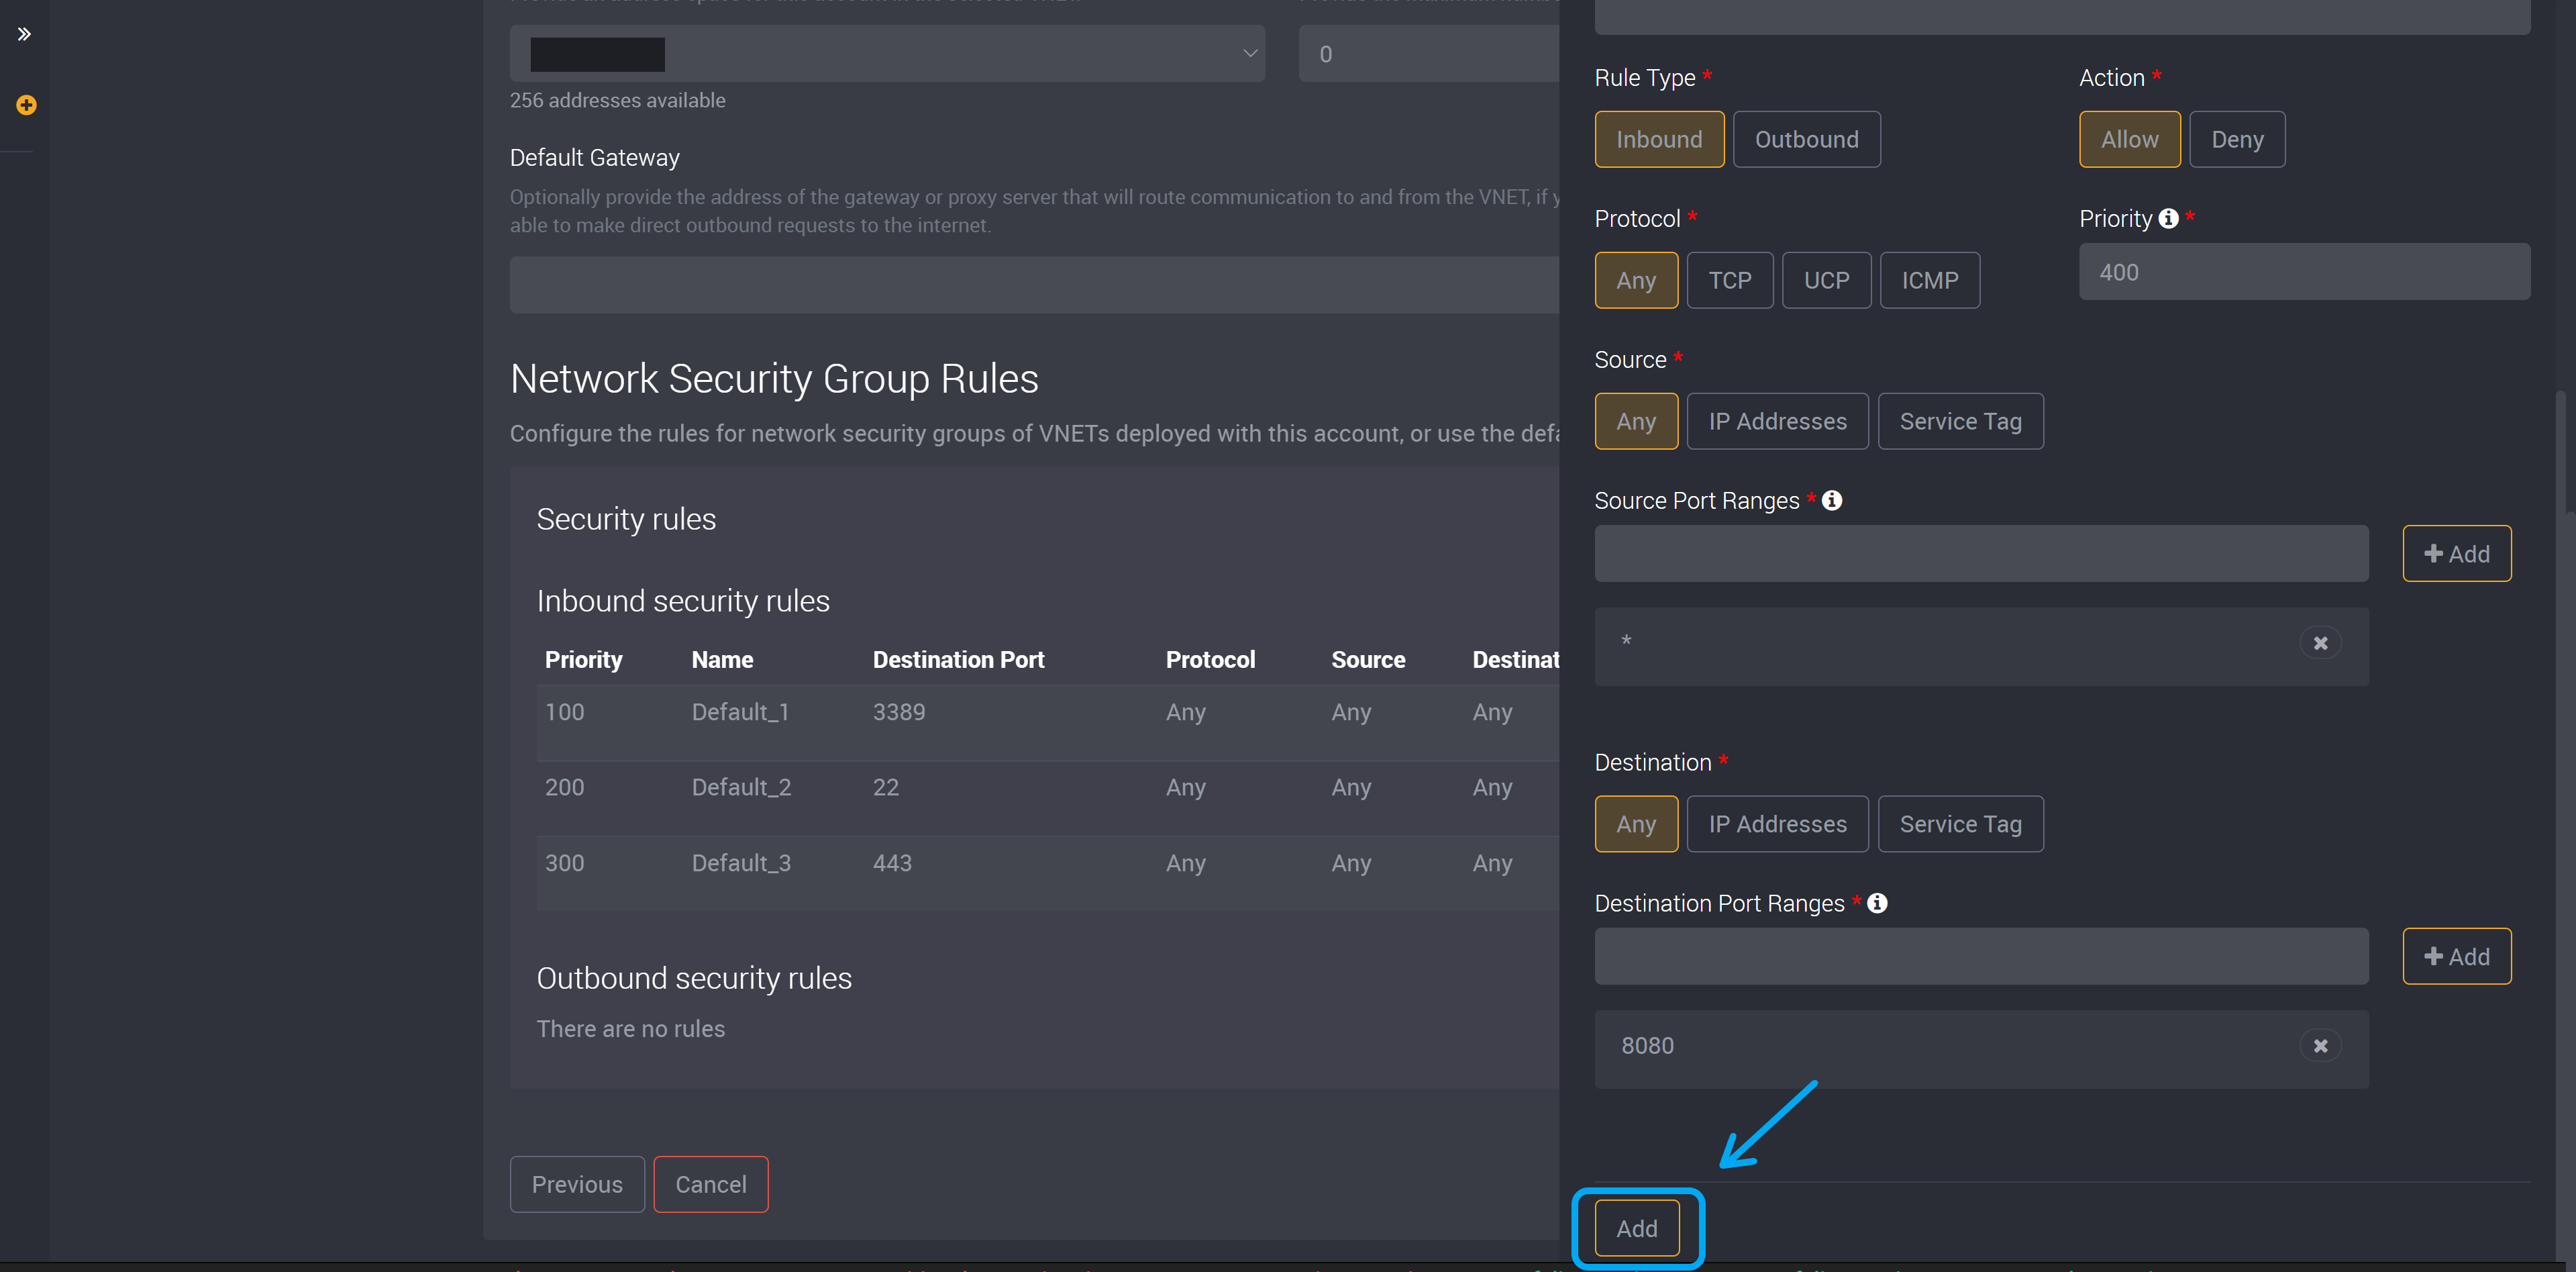
You can also add destination port ranges and you can choose from a single port, e.g. 80, a range, e.g. 1200-2400, or an asterisk ‘*’ to allow traffic on any port.
Click Add and this rule will be added to this account.
You can edit a rule using ‘Edit’ on the right of a row. It will expand the slideout where you can edit the details of the rule.
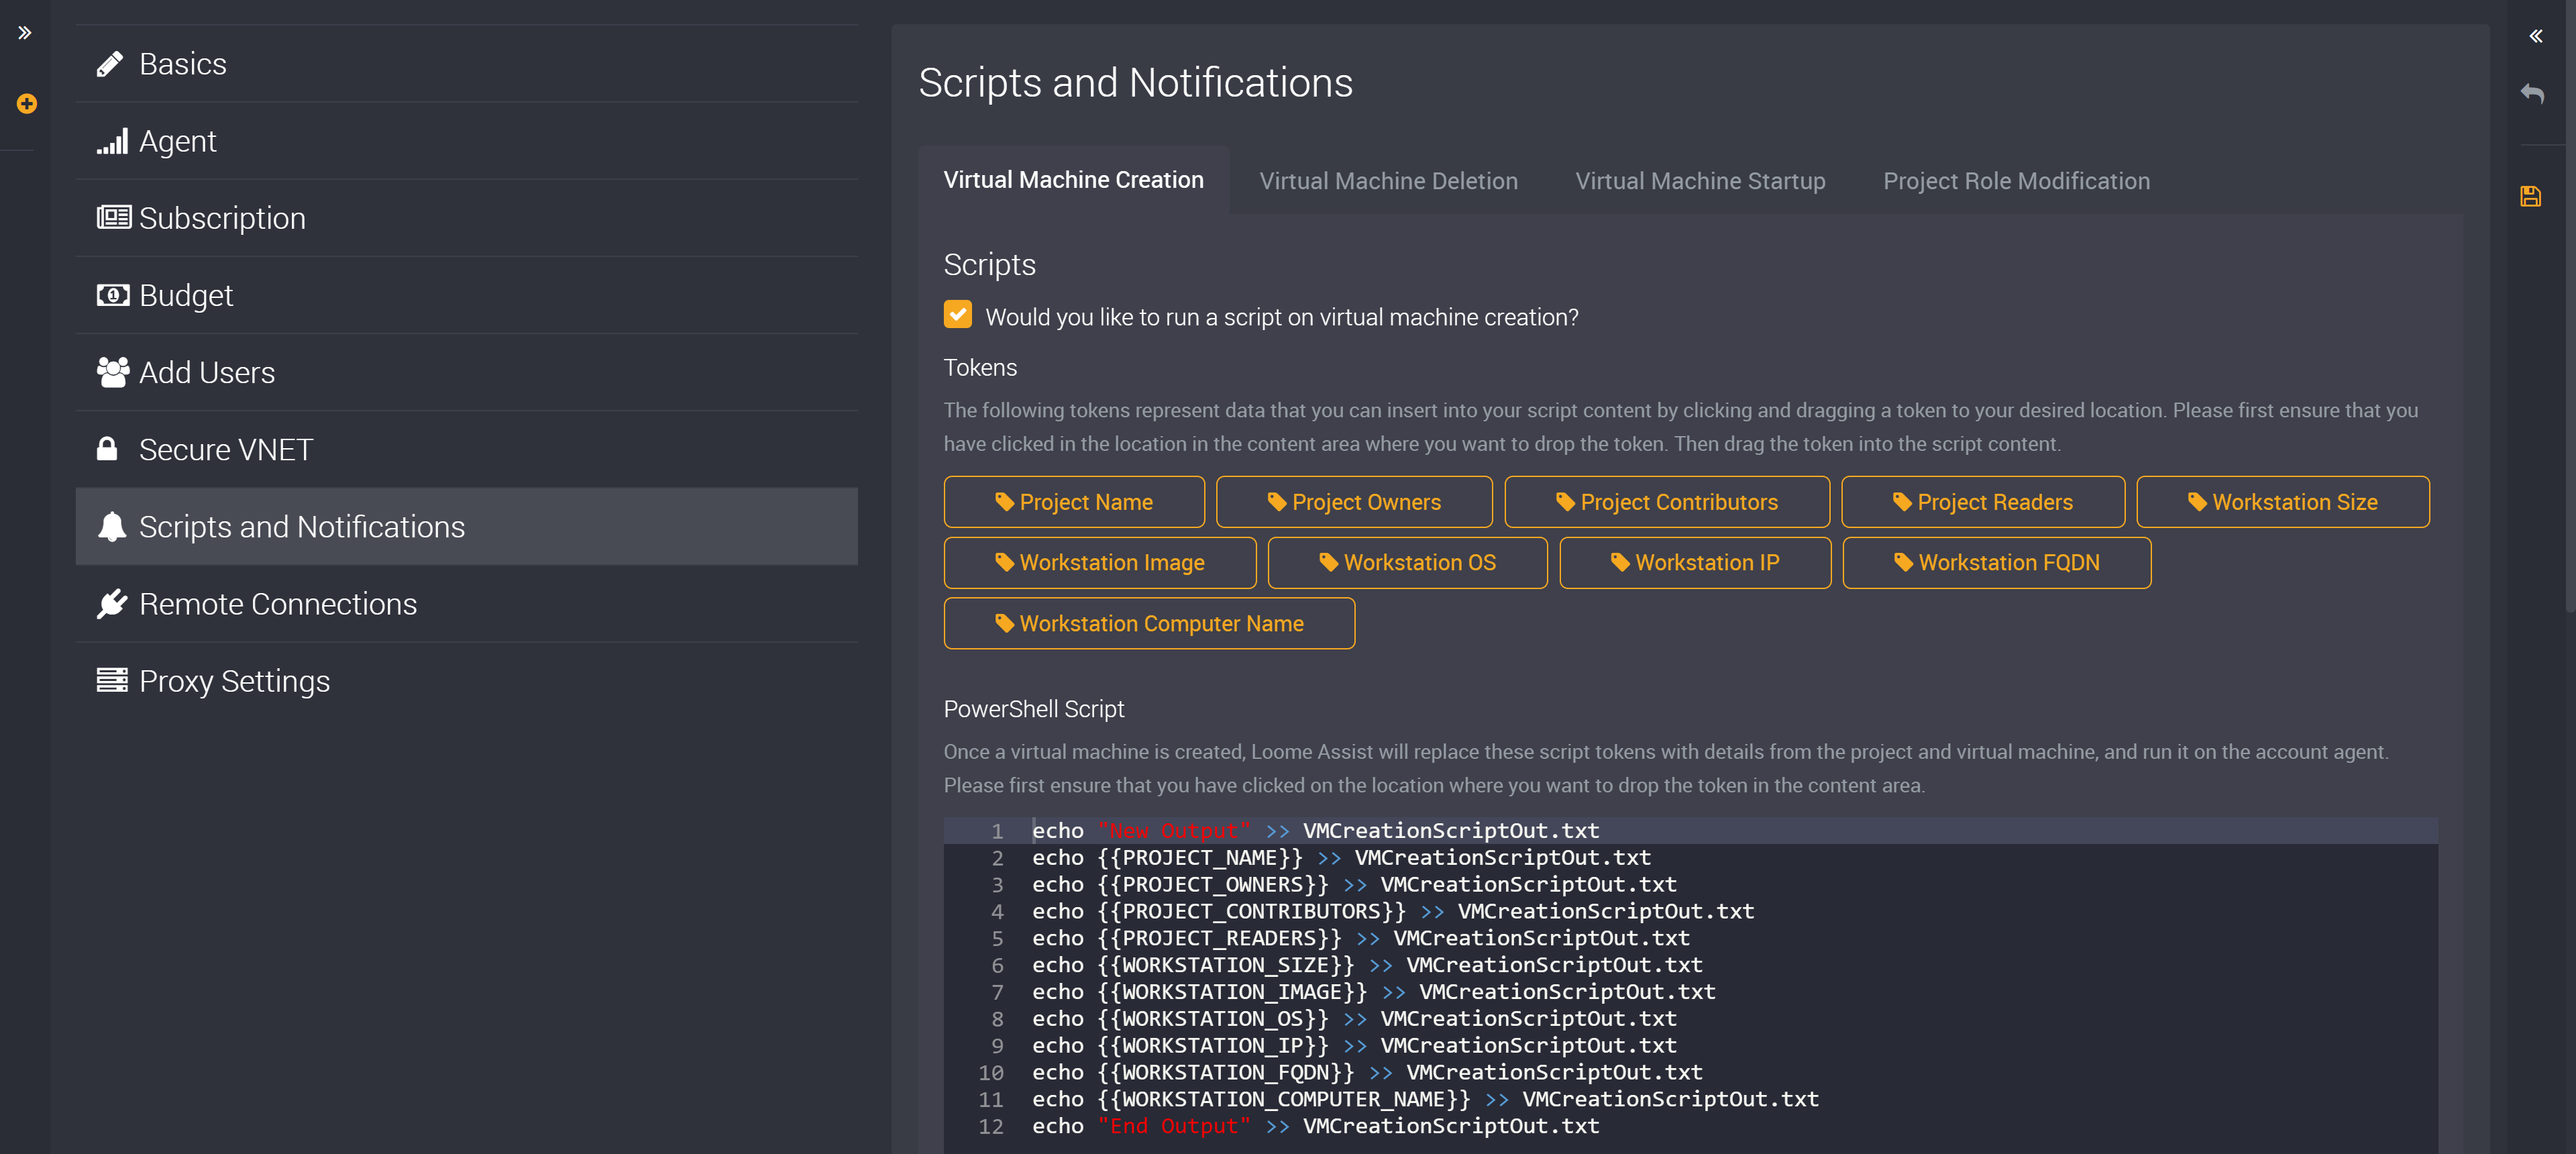
Scripts and Notifications
You can choose to set up scripts and notifications that will run when a virtual machine is created, deleted, or started, or when a project role is modified, in a project that uses this account.
These scripts can be an action you would like completed when one of the above scenarios occur.
The notifications will be sent as an email to your selected email addresses, if you have enabled notifications for one of the above scenarios.
Virtual Machine Creation
You can choose to run a script when a virtual machine is created.
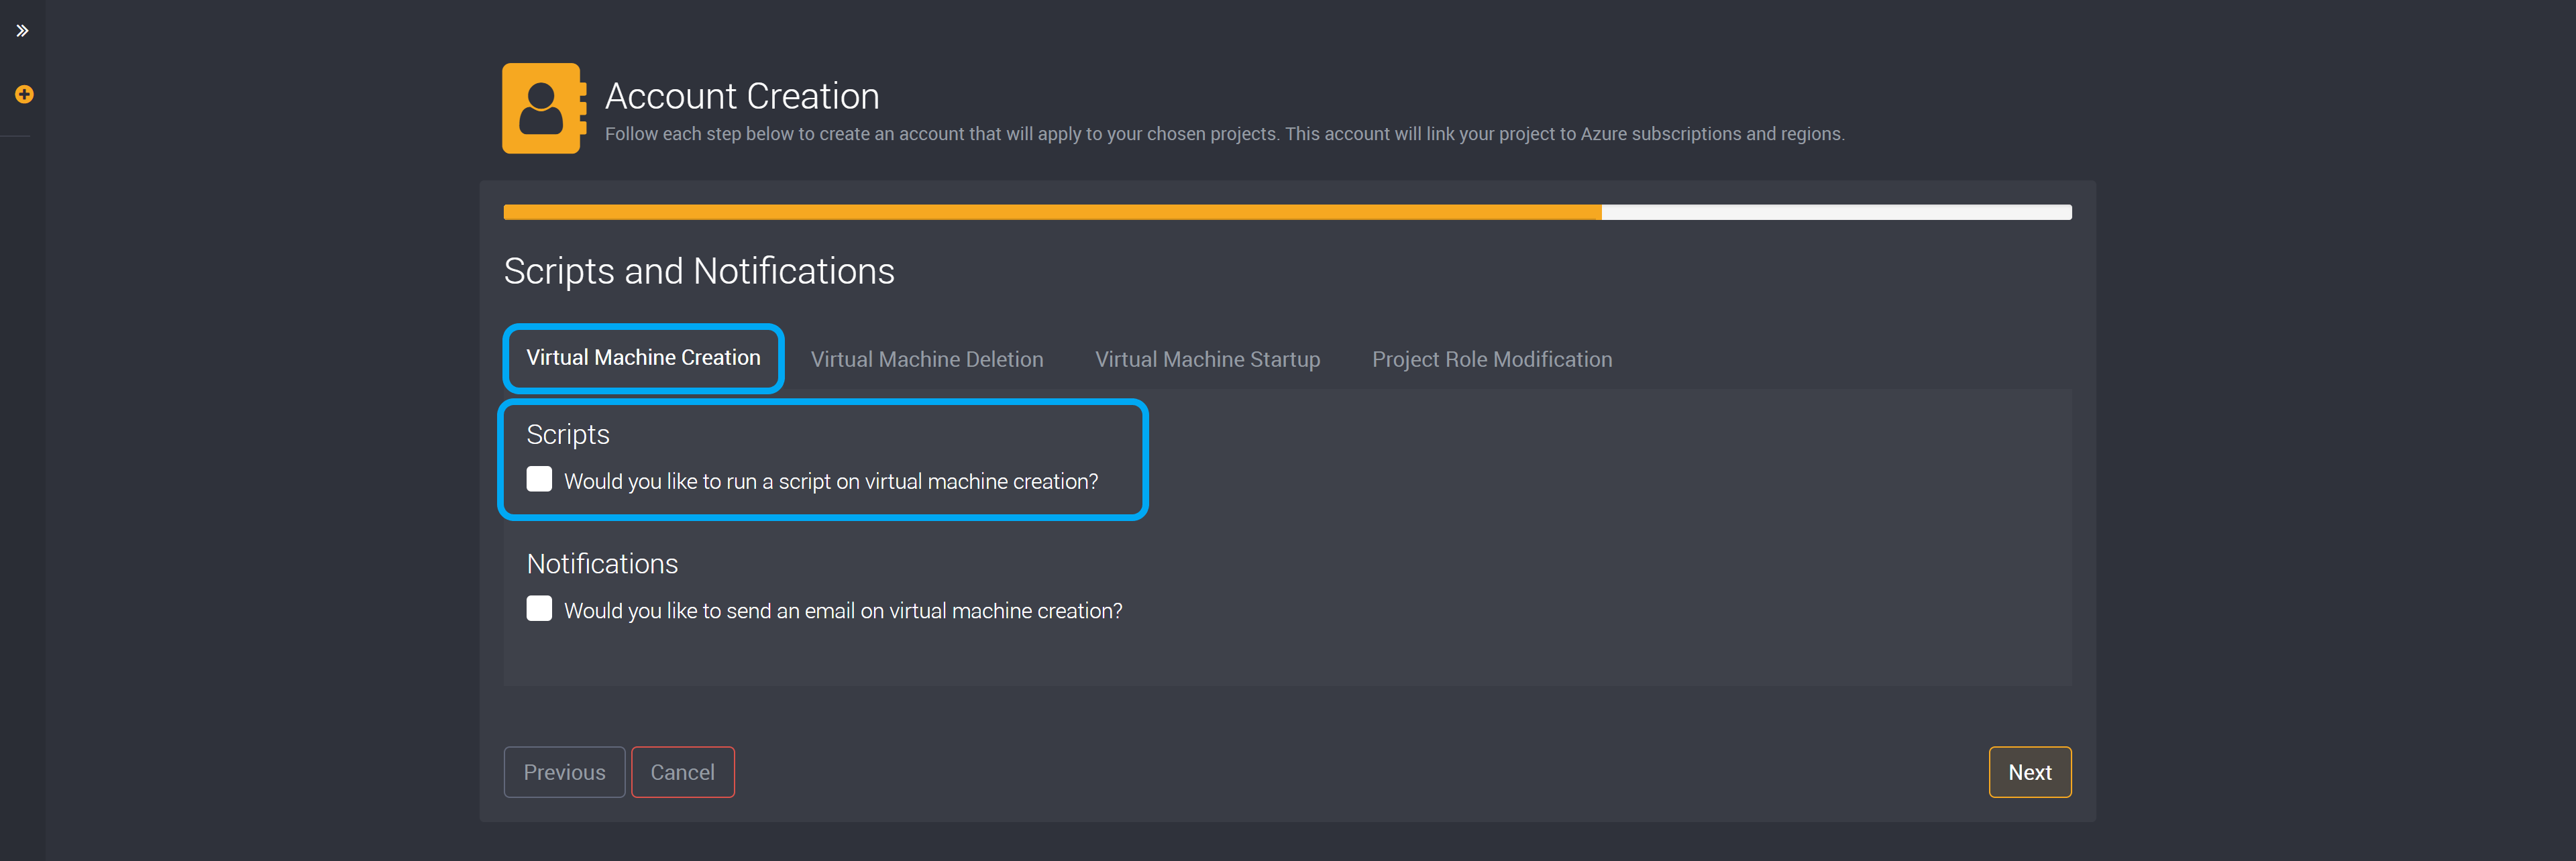
Once you select this checkbox, you can provide your script and add tokens. These tokens will be replaced with details from the project and virtual machine, and run it on the account agent.
You can use tokens such as, Project Name, Project Owners, Project Contributors, Project Readers, Workstation Size, Workstation Image, Workstation OS, Workstation IP, Workstation FQDN, and Workstation Computer Name.

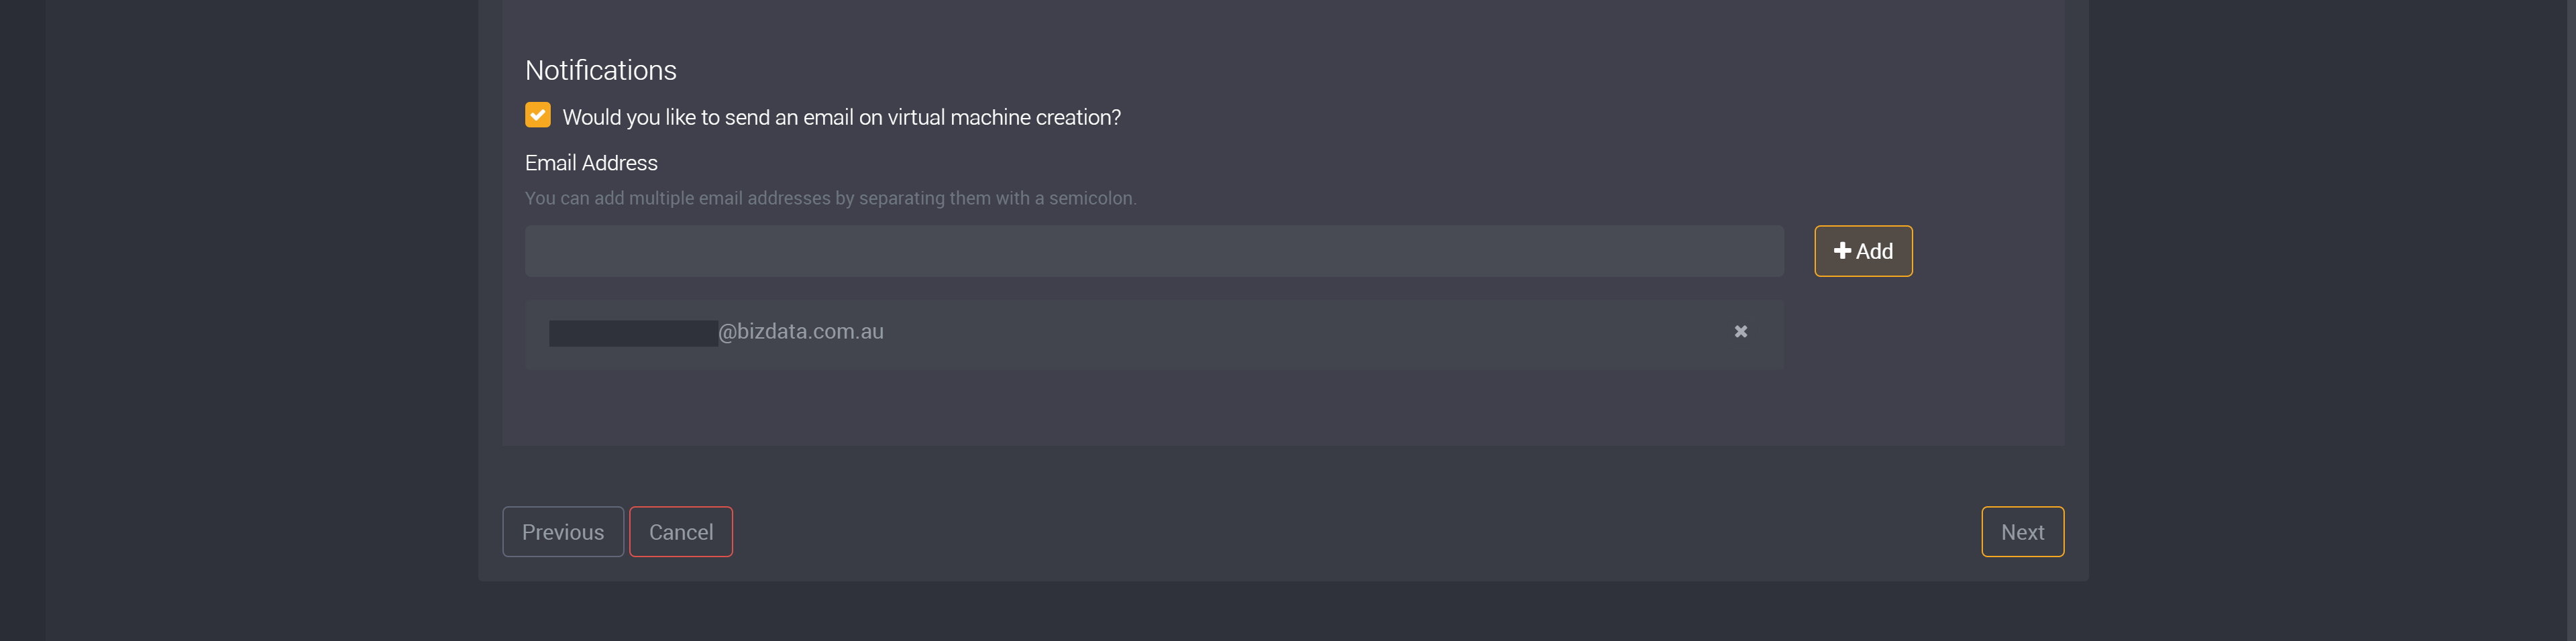
You can also send an email on creation of a virtual machine.
Once you have selected this checkbox, you can add the email addresses you would like notified on creation of a virtual machine.
Make sure you click on Add beside the email field, once you have typed in an email address to save this email.
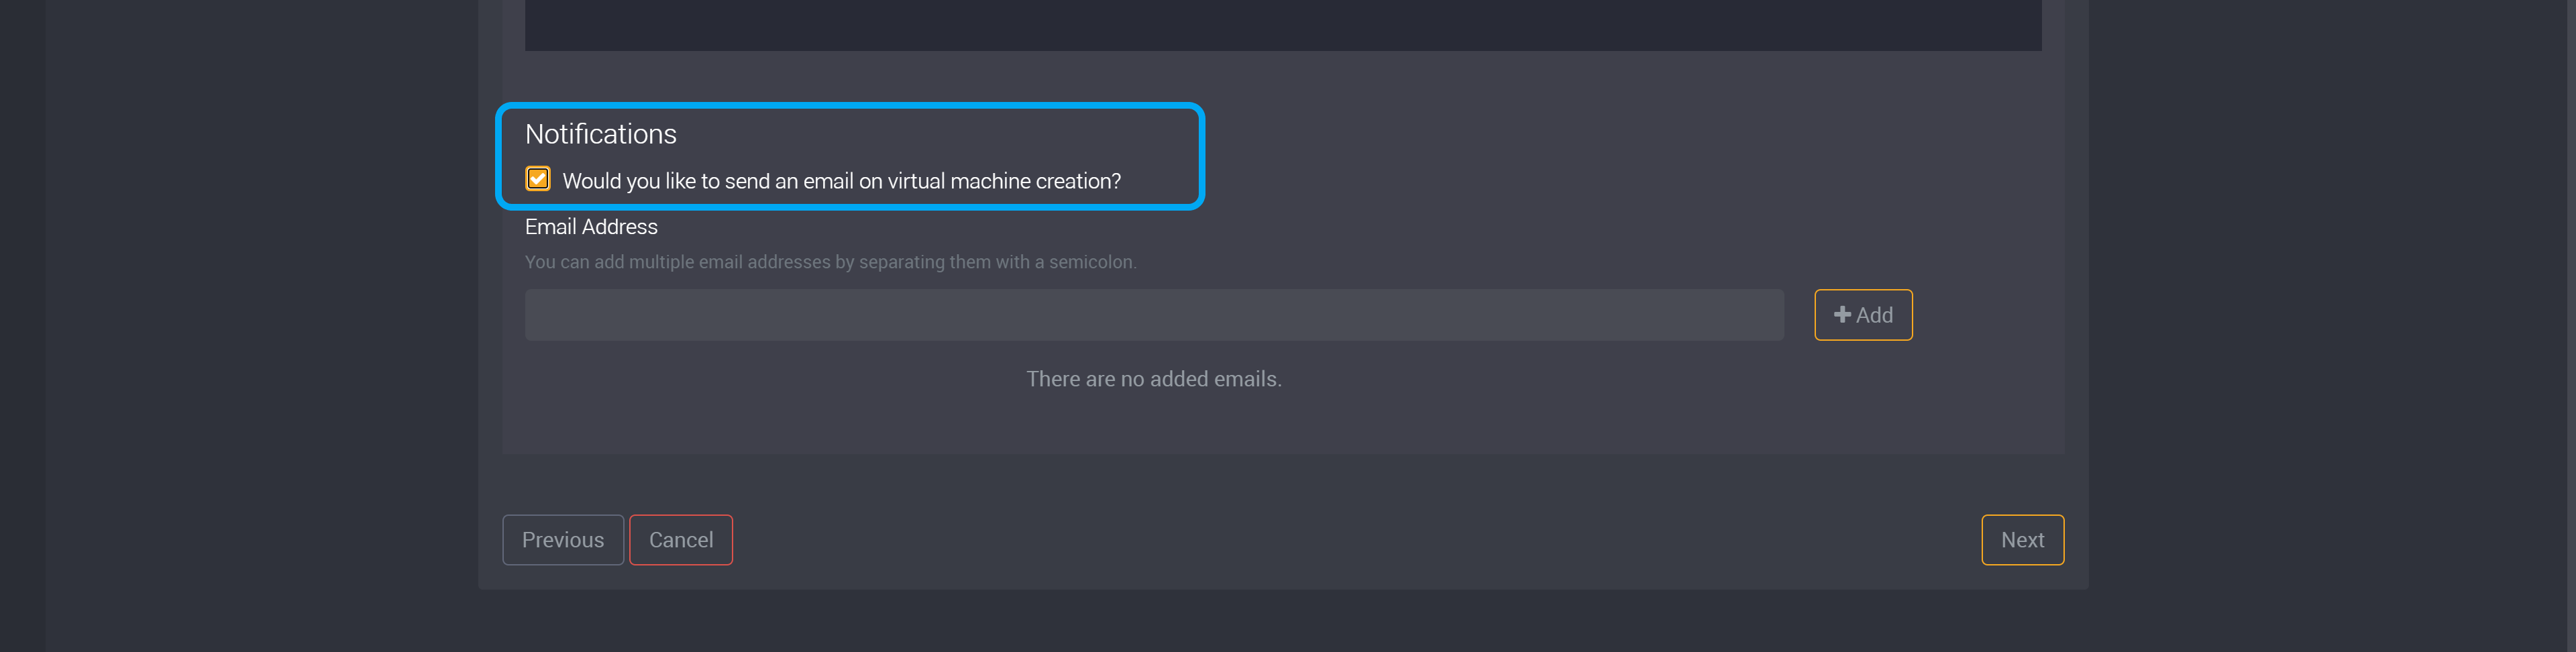
In the following example, we have added the administrator as the person who will be notified.
Virtual Machine Deletion
You can choose to run a script when a virtual machine is deleted.
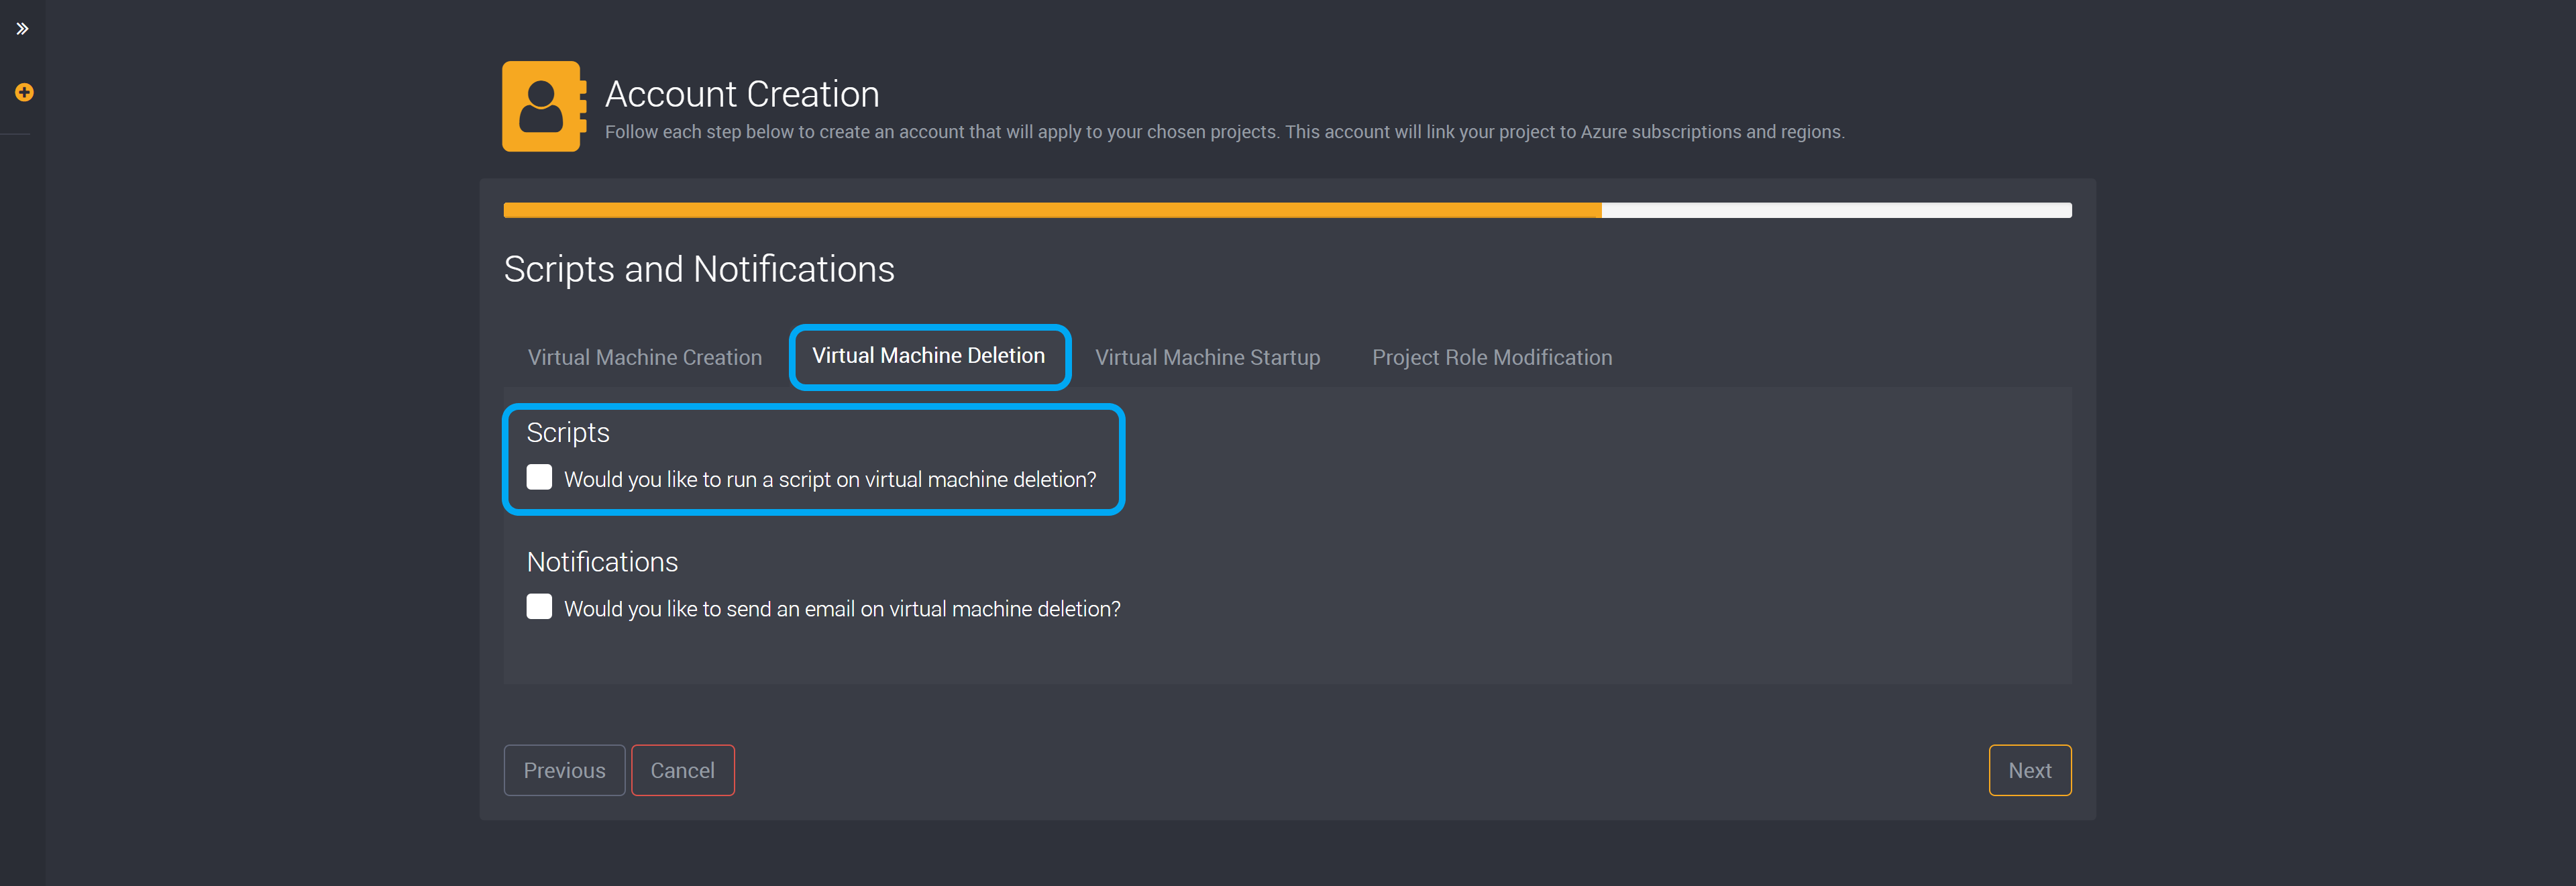
Once you select this checkbox, you can provide your script and add tokens. This script will run when a virtual machine is deleted, and it will replace tokens with details from your project and workstations.
You can use tokens such as, Project Name, Project Owners, Project Contributors, Project Readers, Workstation Size, Workstation Image, Workstation OS, Workstation IP, Workstation FQDN, and Workstation Computer Name.

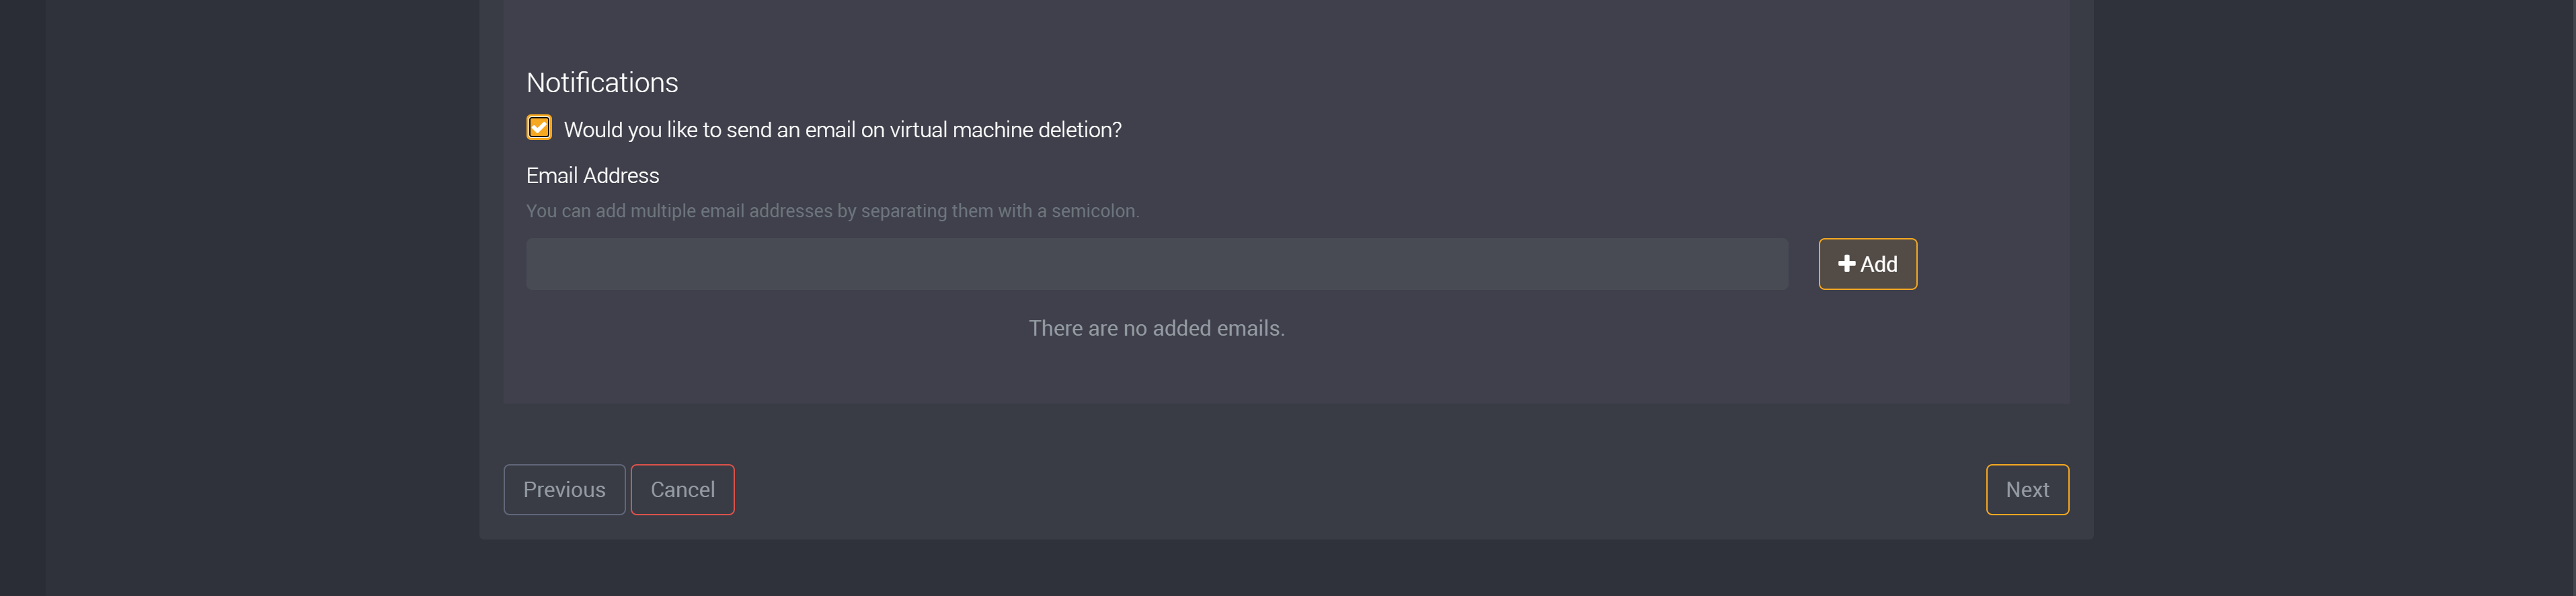
You can also add the email addresses you would like notified when a virtual machine is deleted. When a virtual machine is deleted, Loome will send an email to the provided email addresses.
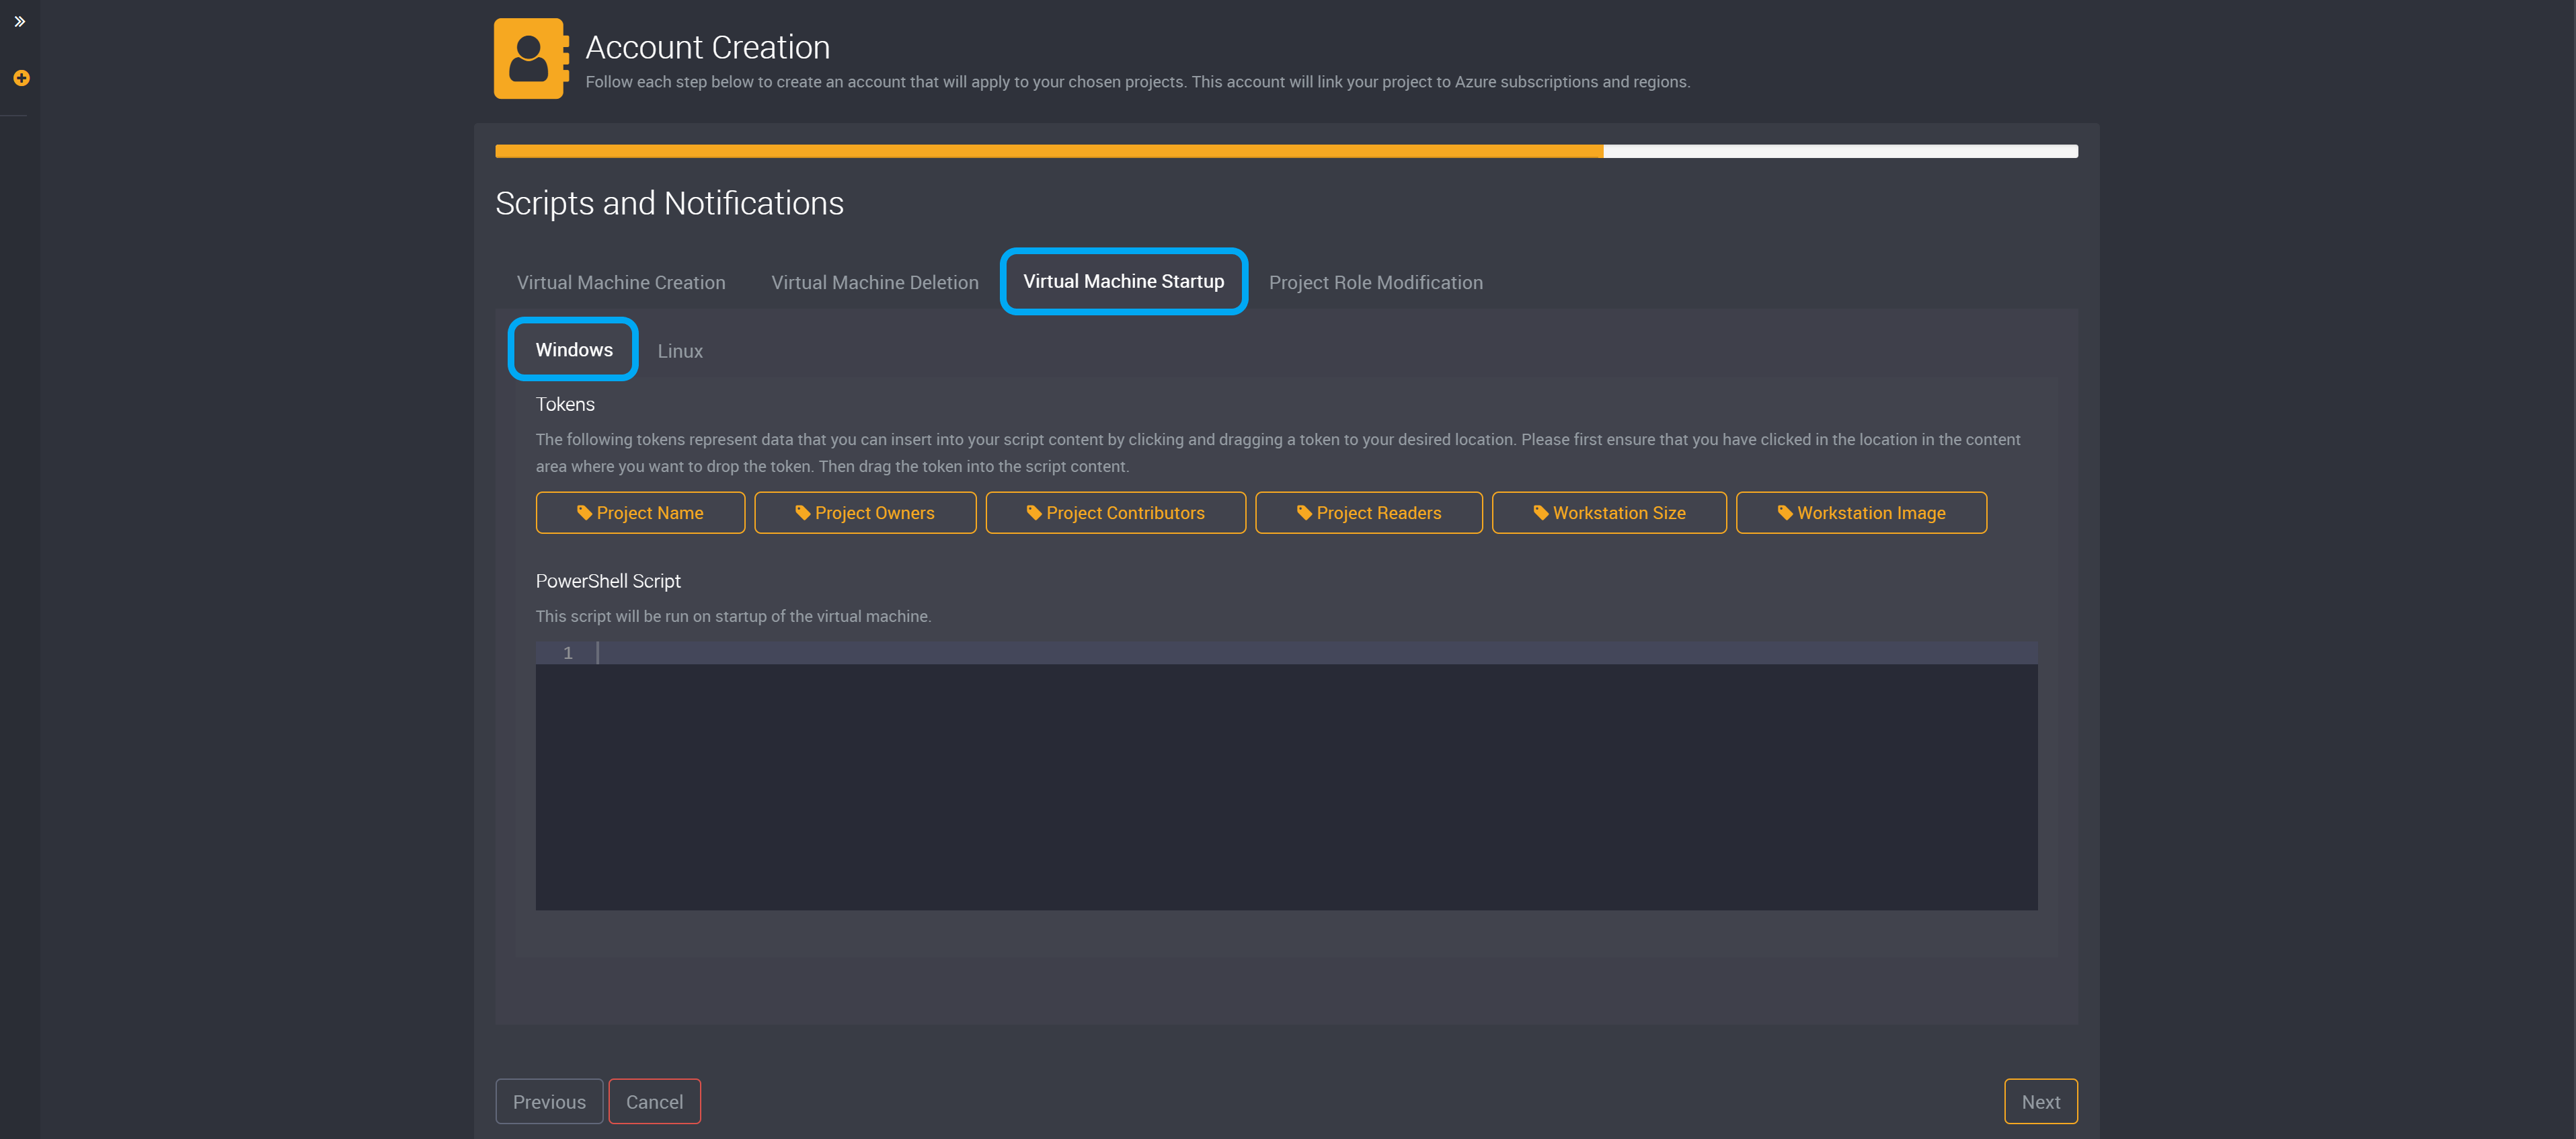
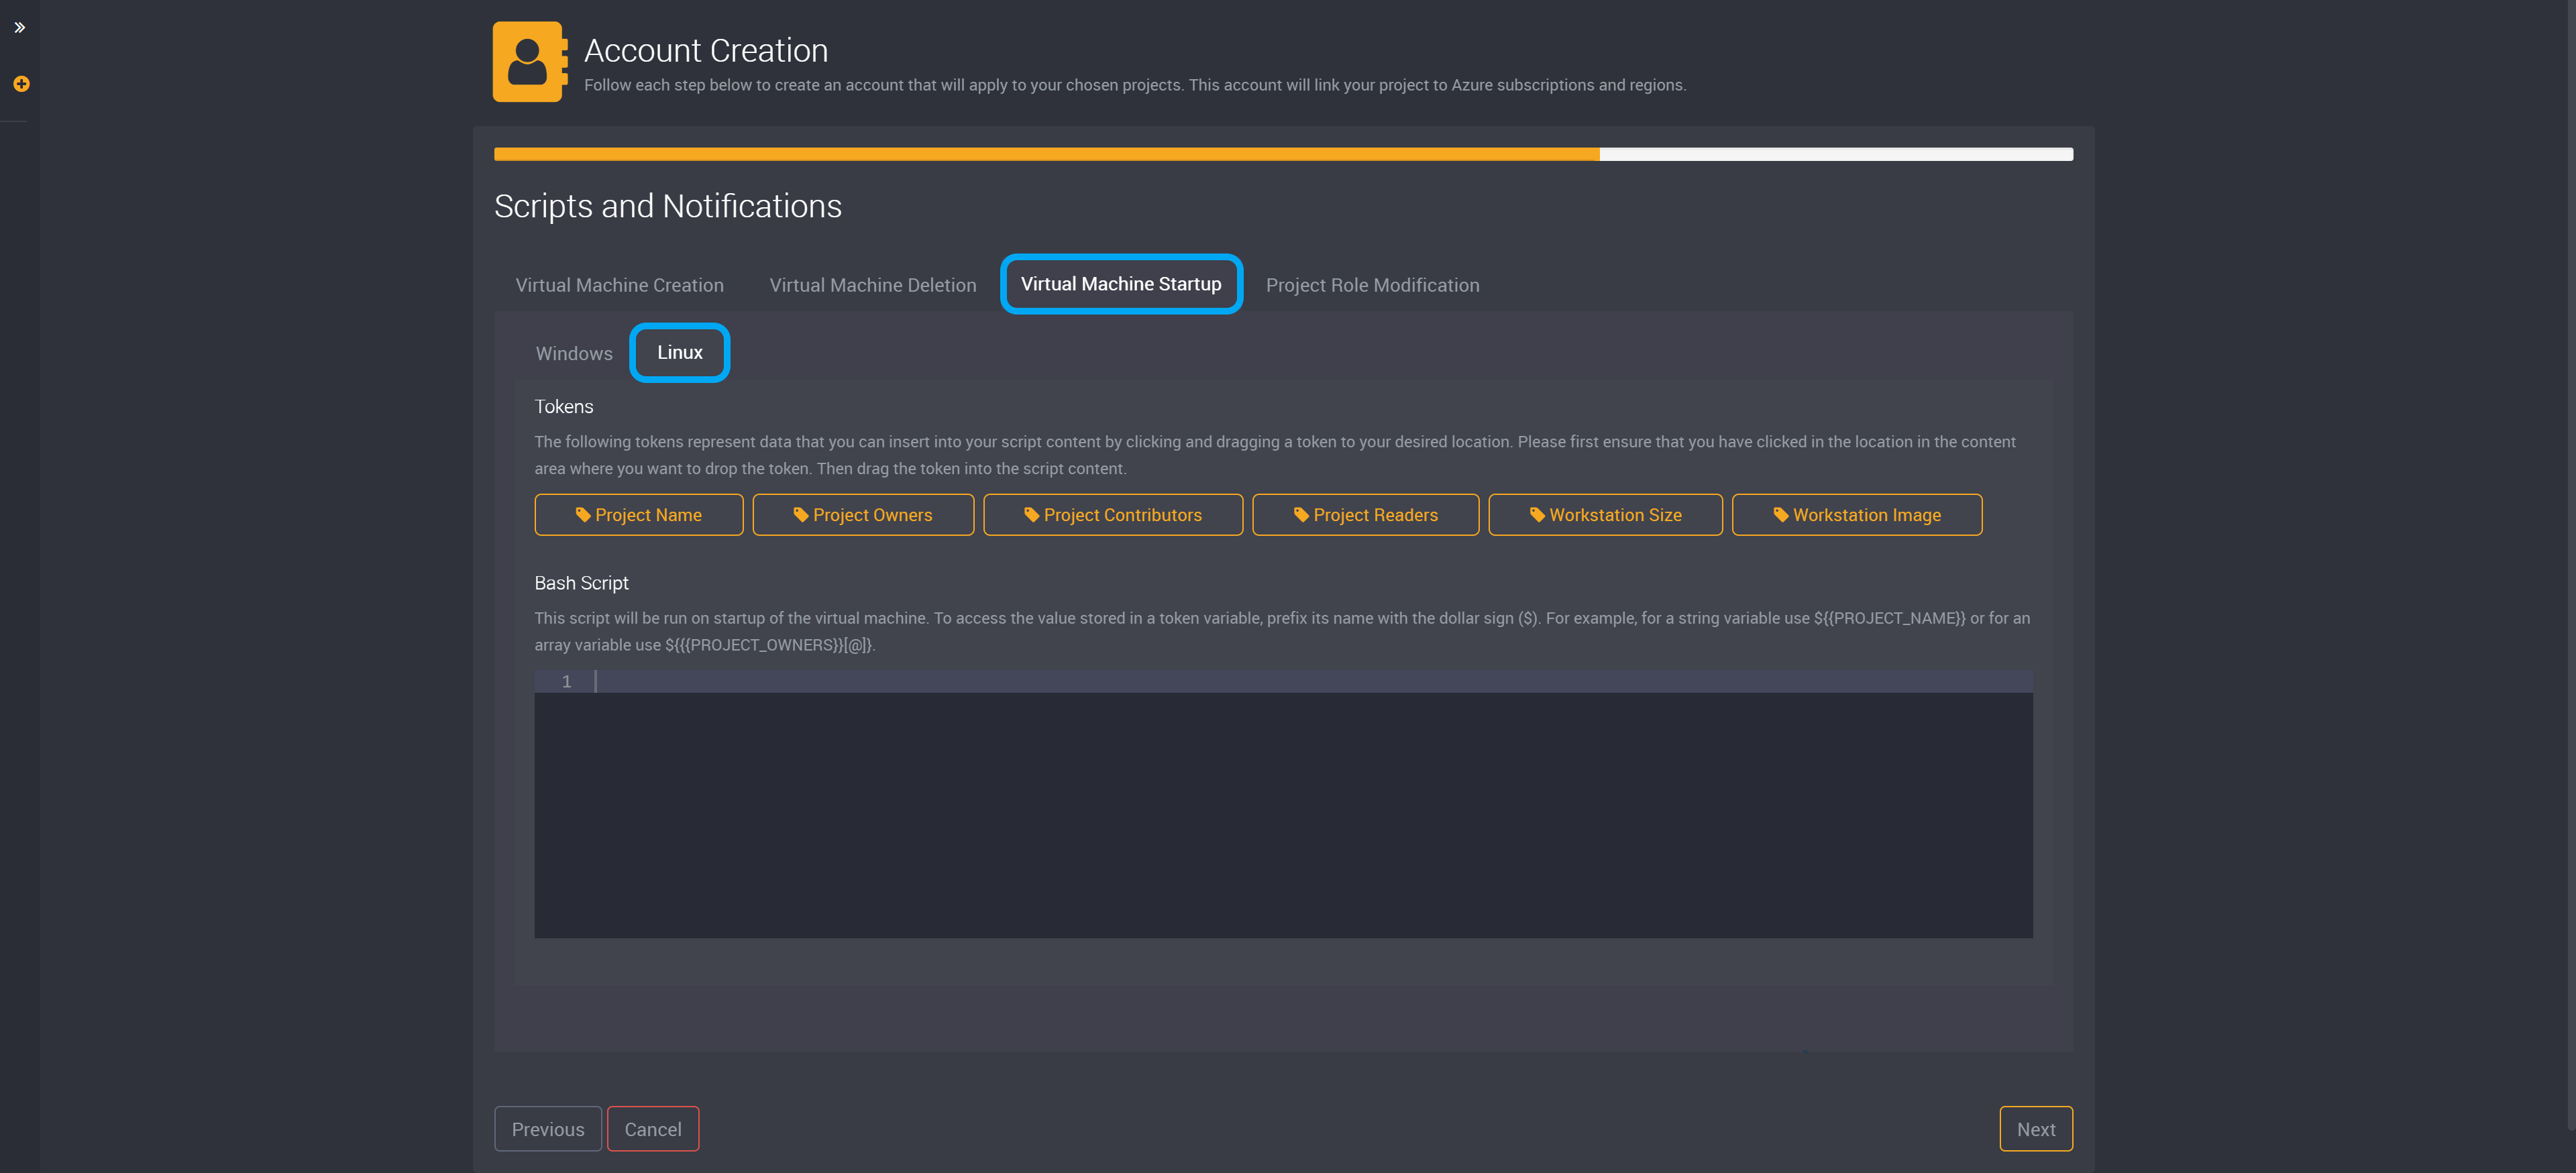
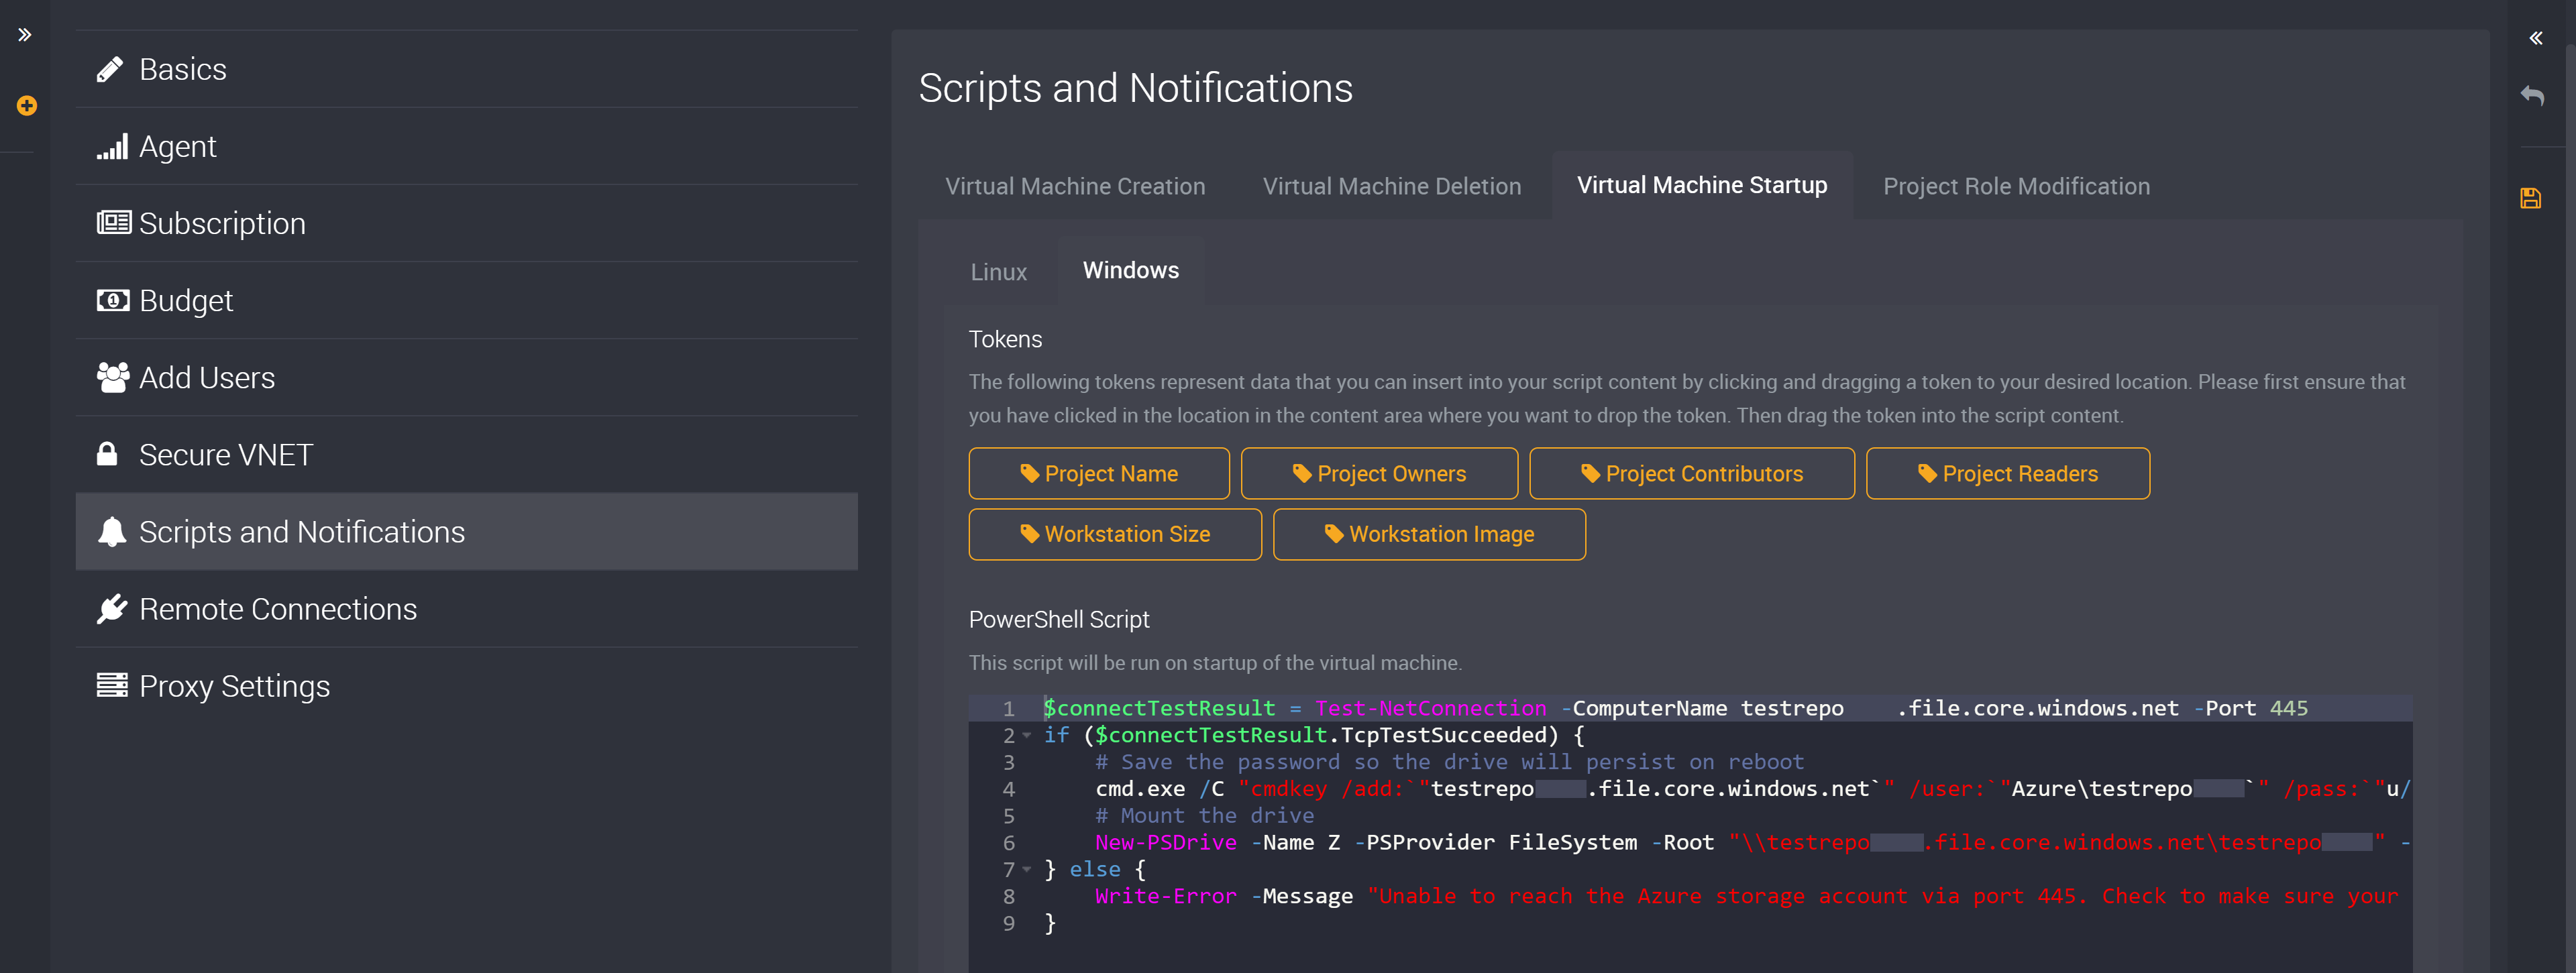
Virtual Machine Startup
You can run a script when a virtual machine is started. Just add the script to this field and when a virtual machine is started, it will run and replace any tokens you have used with details from the project and virtual machines.
You can use tokens such as, Project Name, Project Owners, Project Contributors, Project Readers, Workstation Size, and Workstation Image.
You can use PowerShell for a script in Windows by selecting the ‘Windows’ tab.
For Linux, you can use a Bash script by selecting the ‘Linux’ tab.
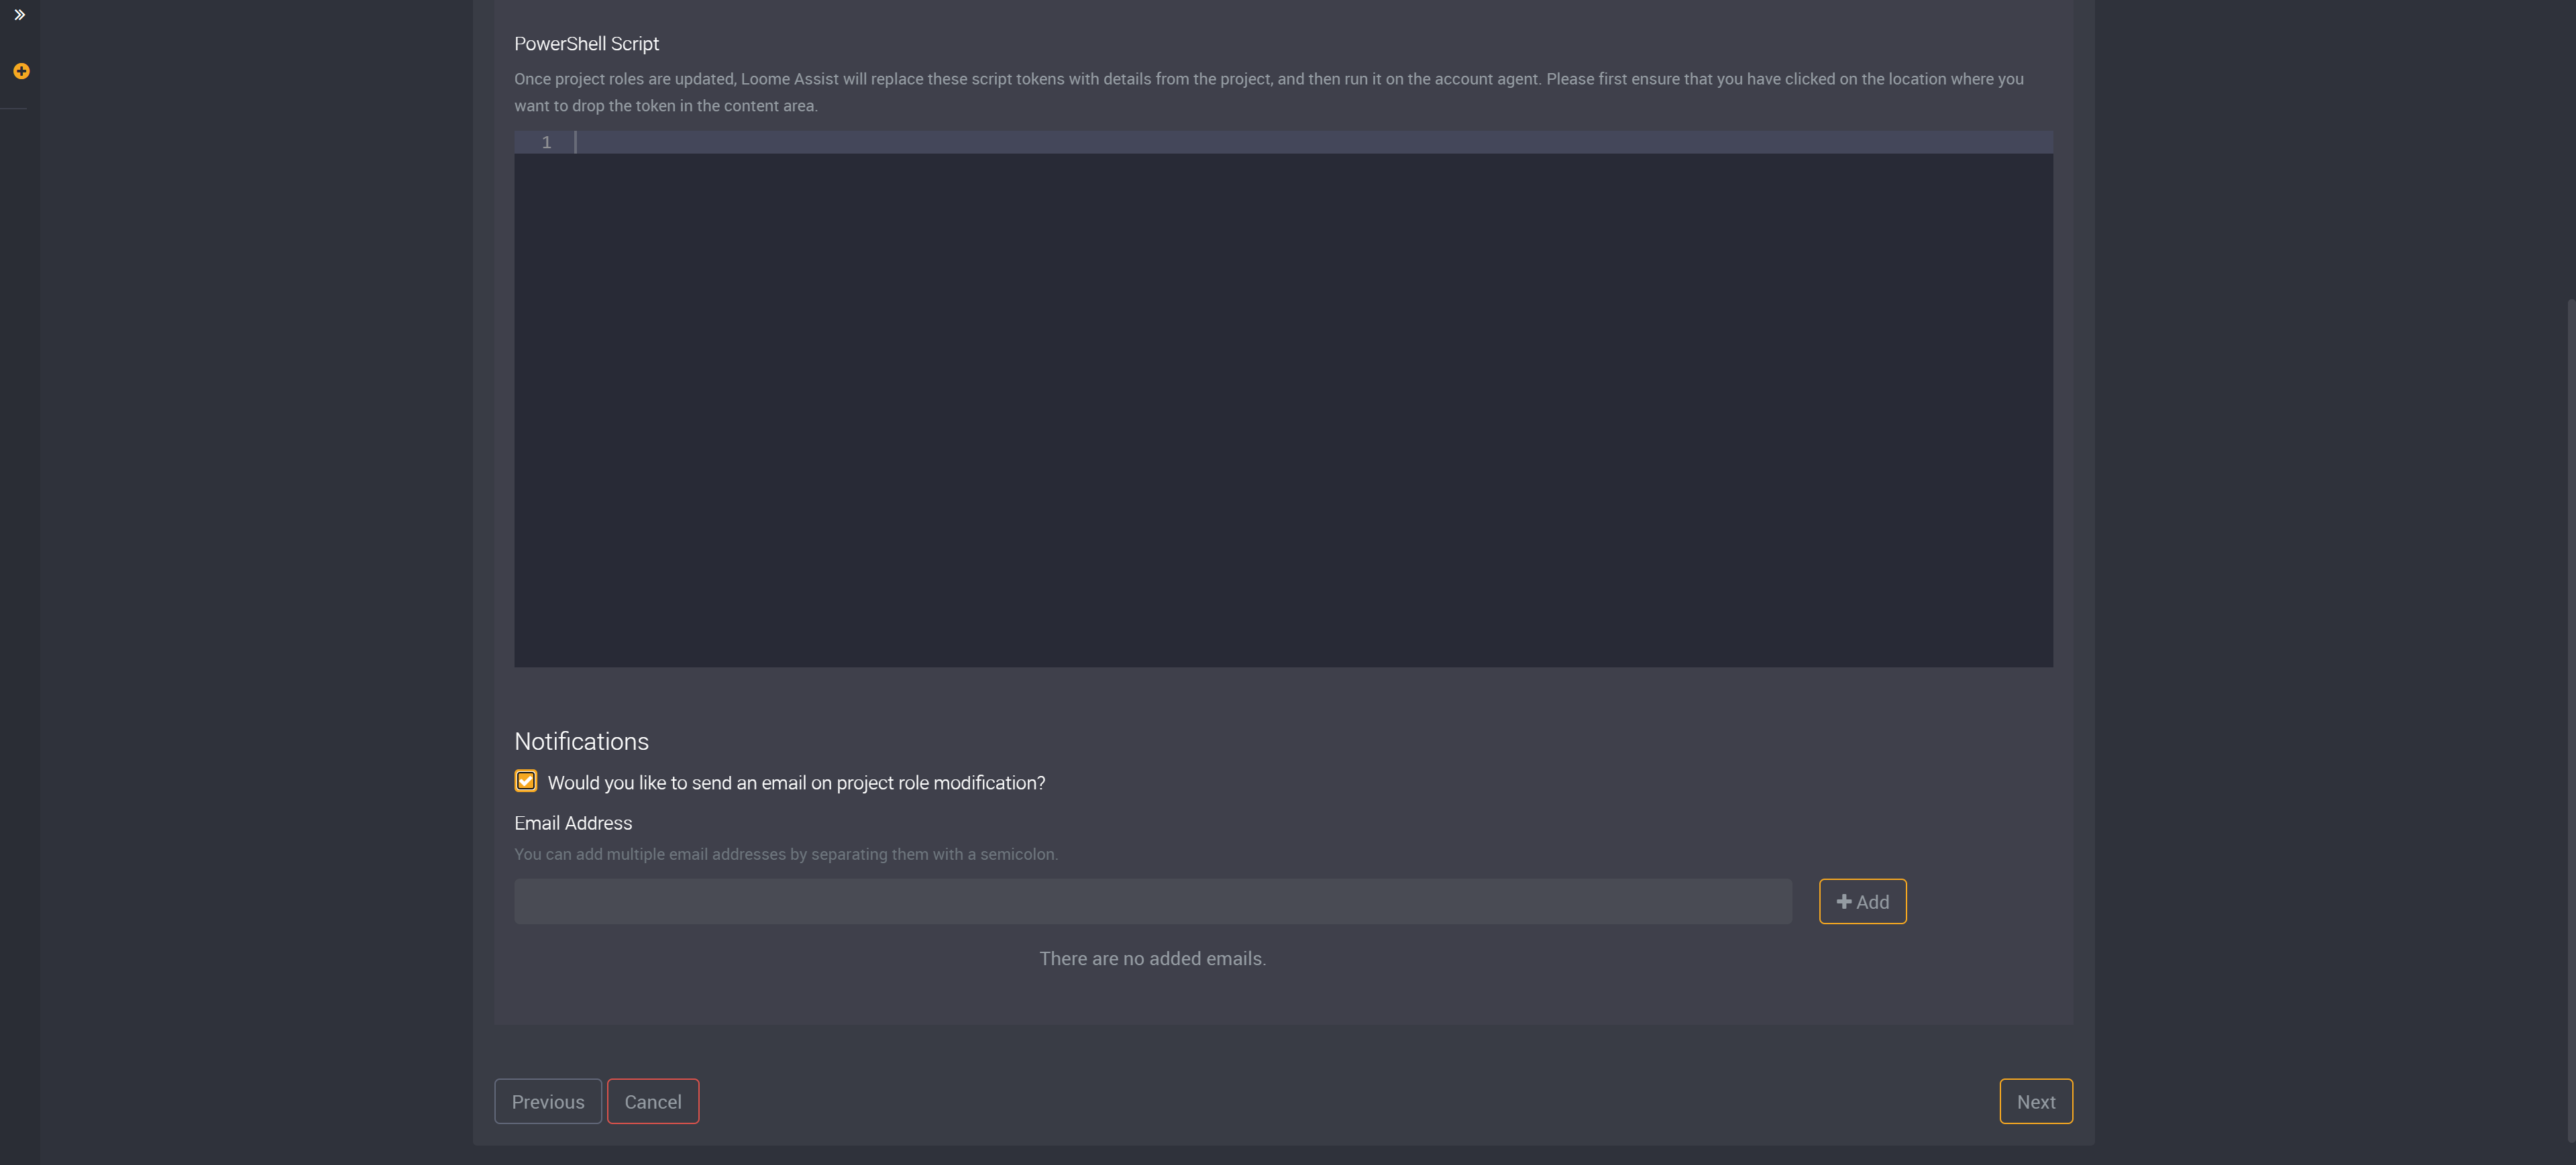
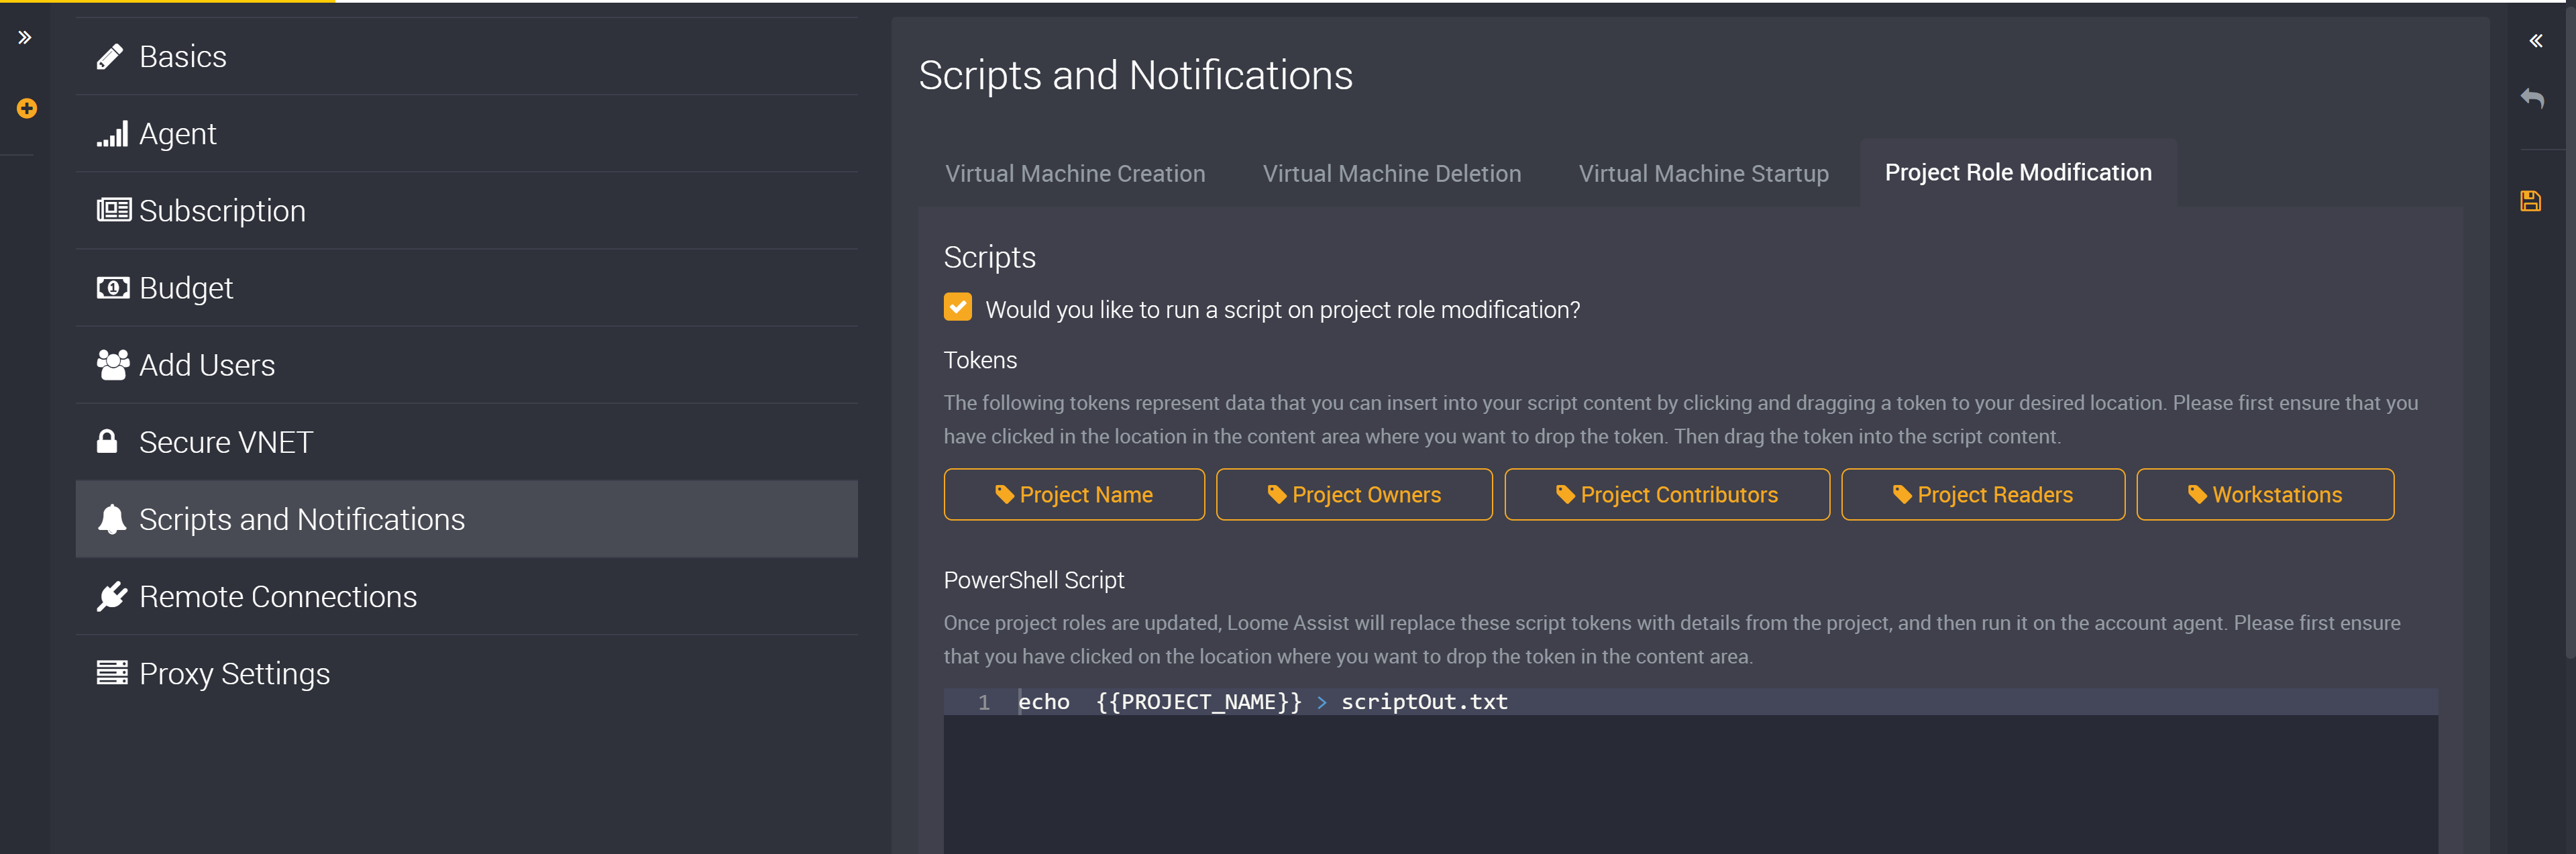
Project Role Modification
You can next add a script that will run if any roles are modified in a project that uses this account.
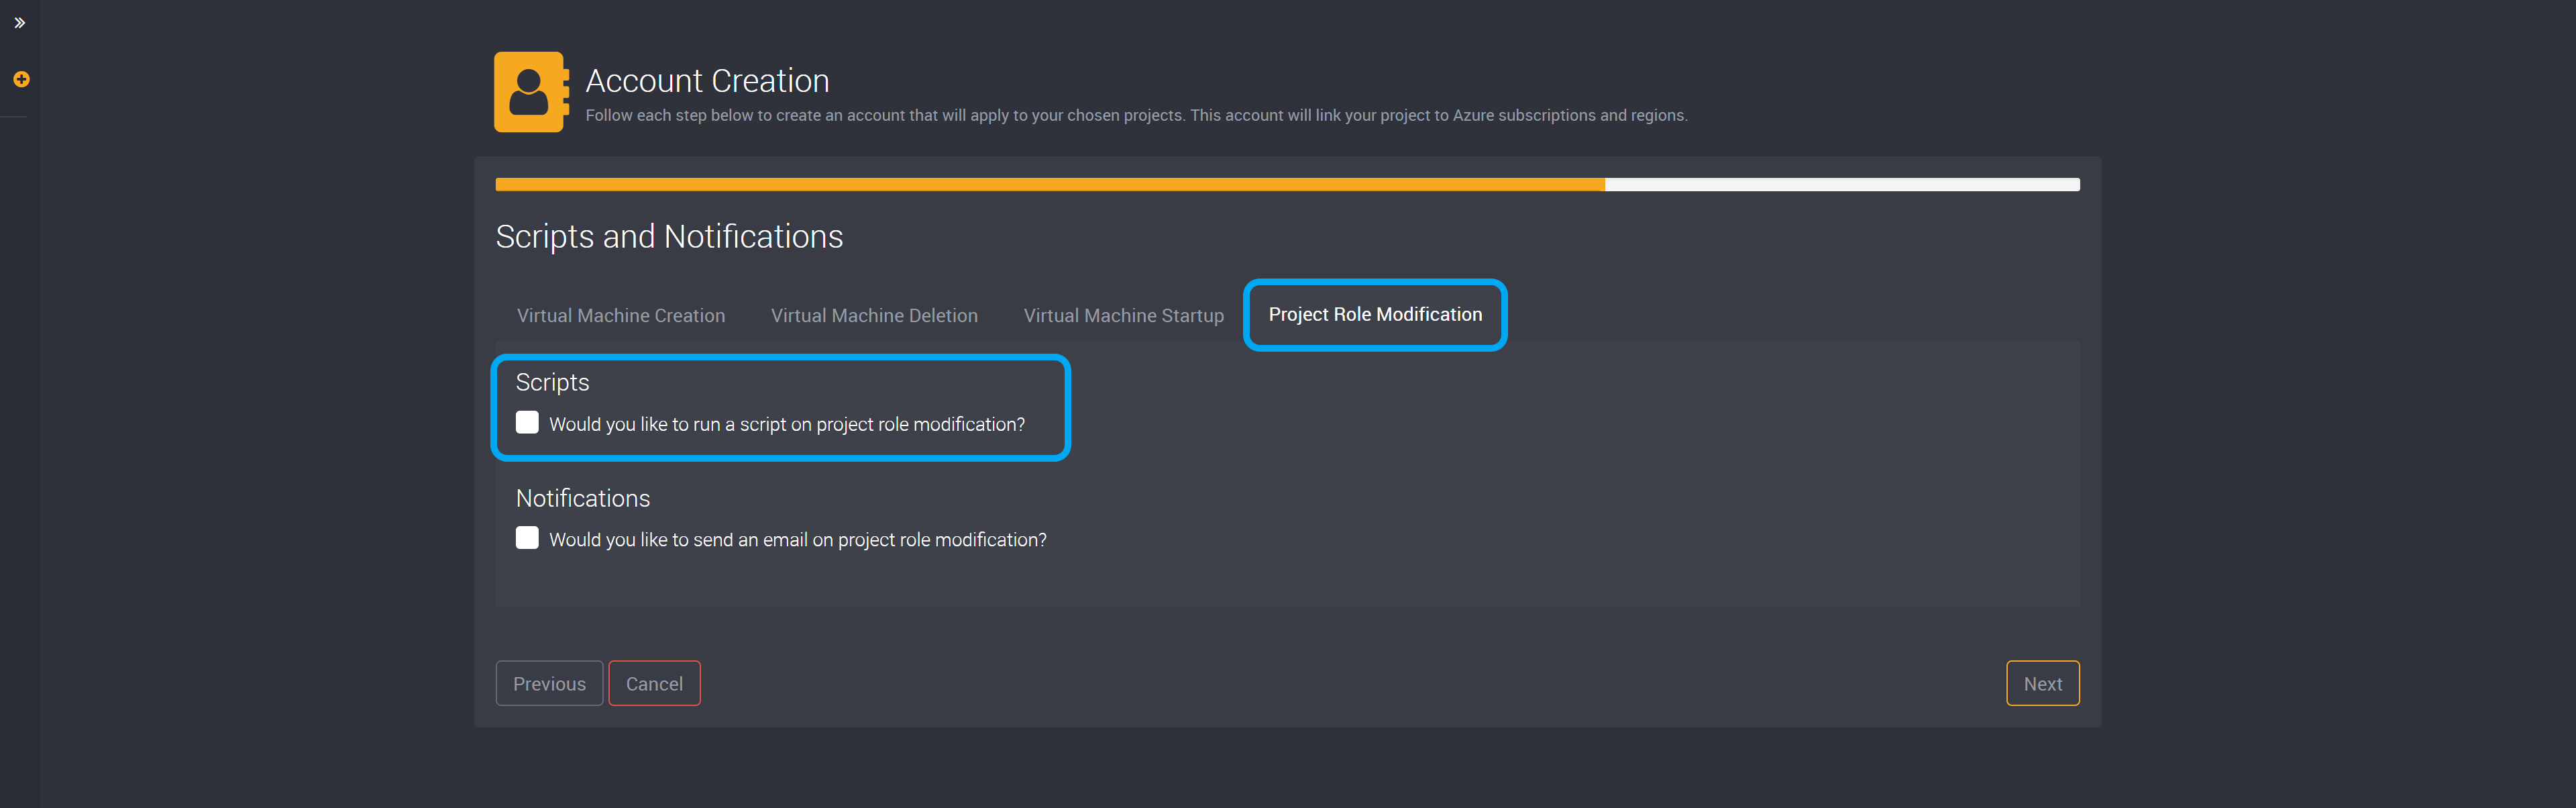
Any tokens you have used will be replaced with details from the project or workstations.
You can use tokens such as, Project Name, Project Owners, Project Contributors, Project Readers, and Workstations.
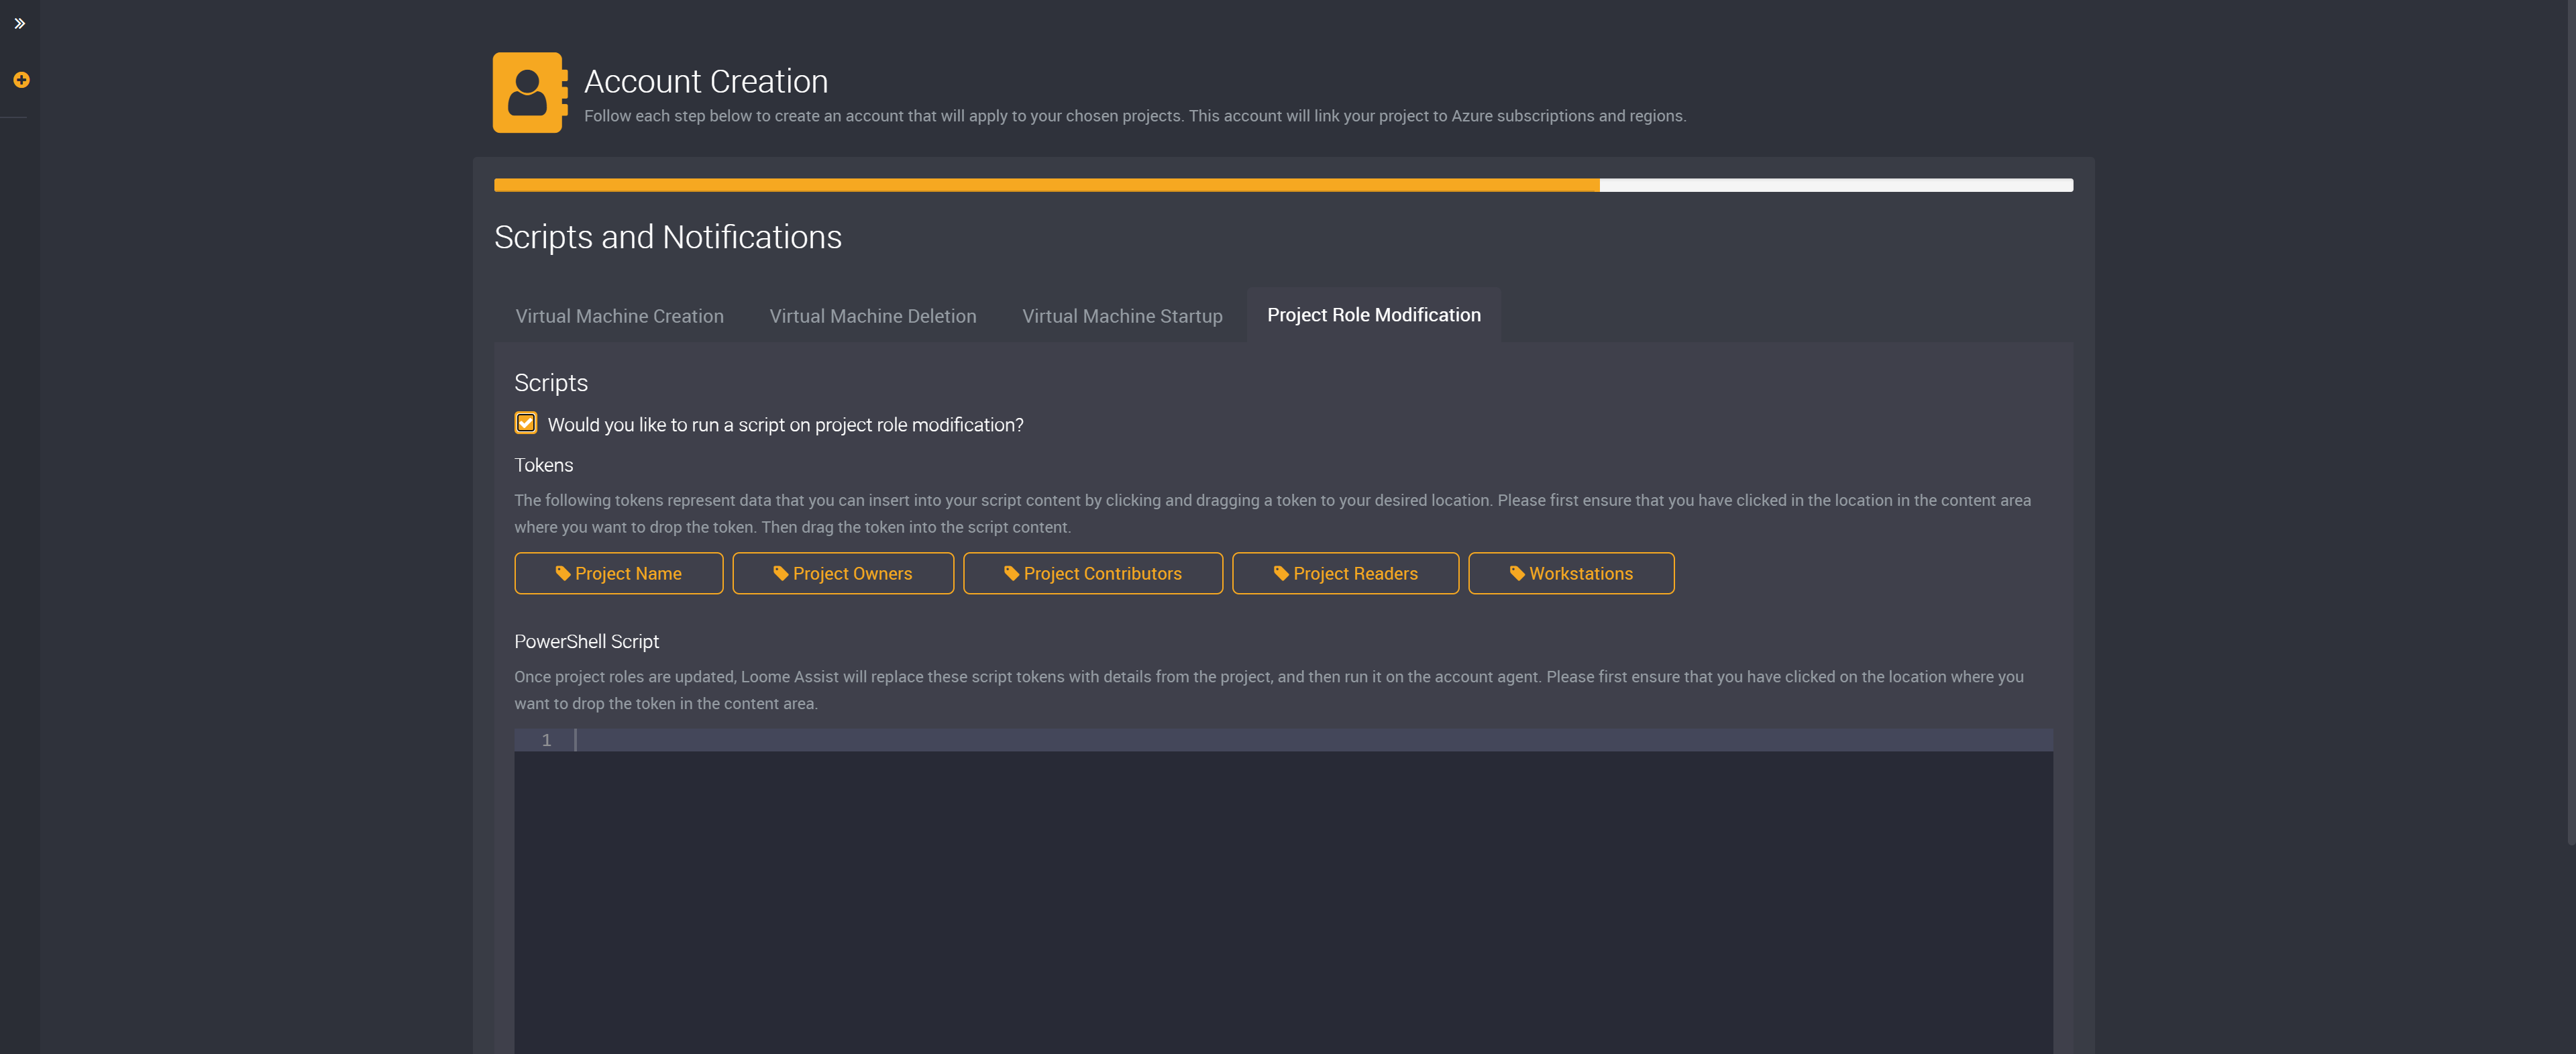
You can also add email addresses that will be notified when a role is modified.
Once enabled, provide the email addresses here. You can provide multiple email addresses by using a semi-colon, e.g., Example1@bizdata.com.au; Example2@bizdata.com.au; Example3@bizdata.com.au.
Then click on Add beside this field to add your provided email addresses. Once added, they will display in a list below this field.
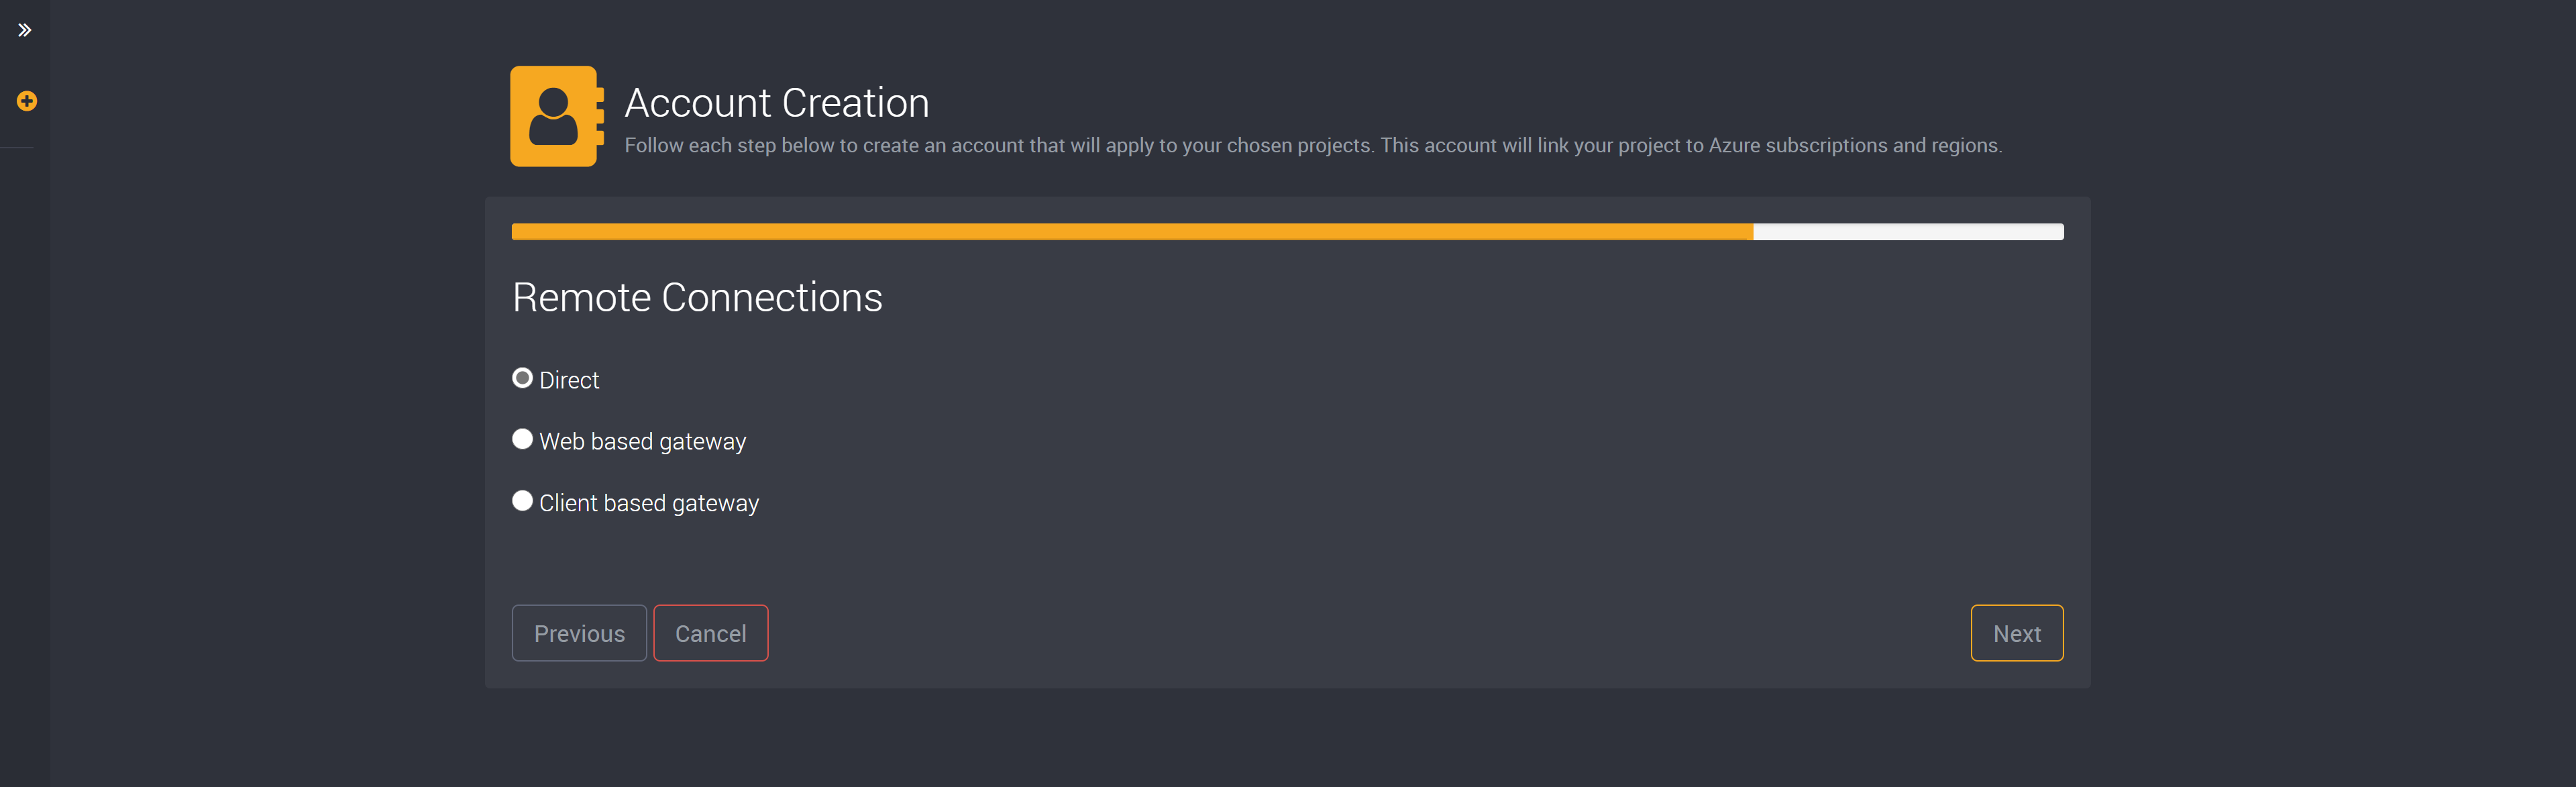
Remote Connections
As an administrator, you can configure remote connections for Virtual Machines within Loome Assist. If you enable a Secure VNET for an account, you will also need to configure your remote desktop settings to enable users to connect.
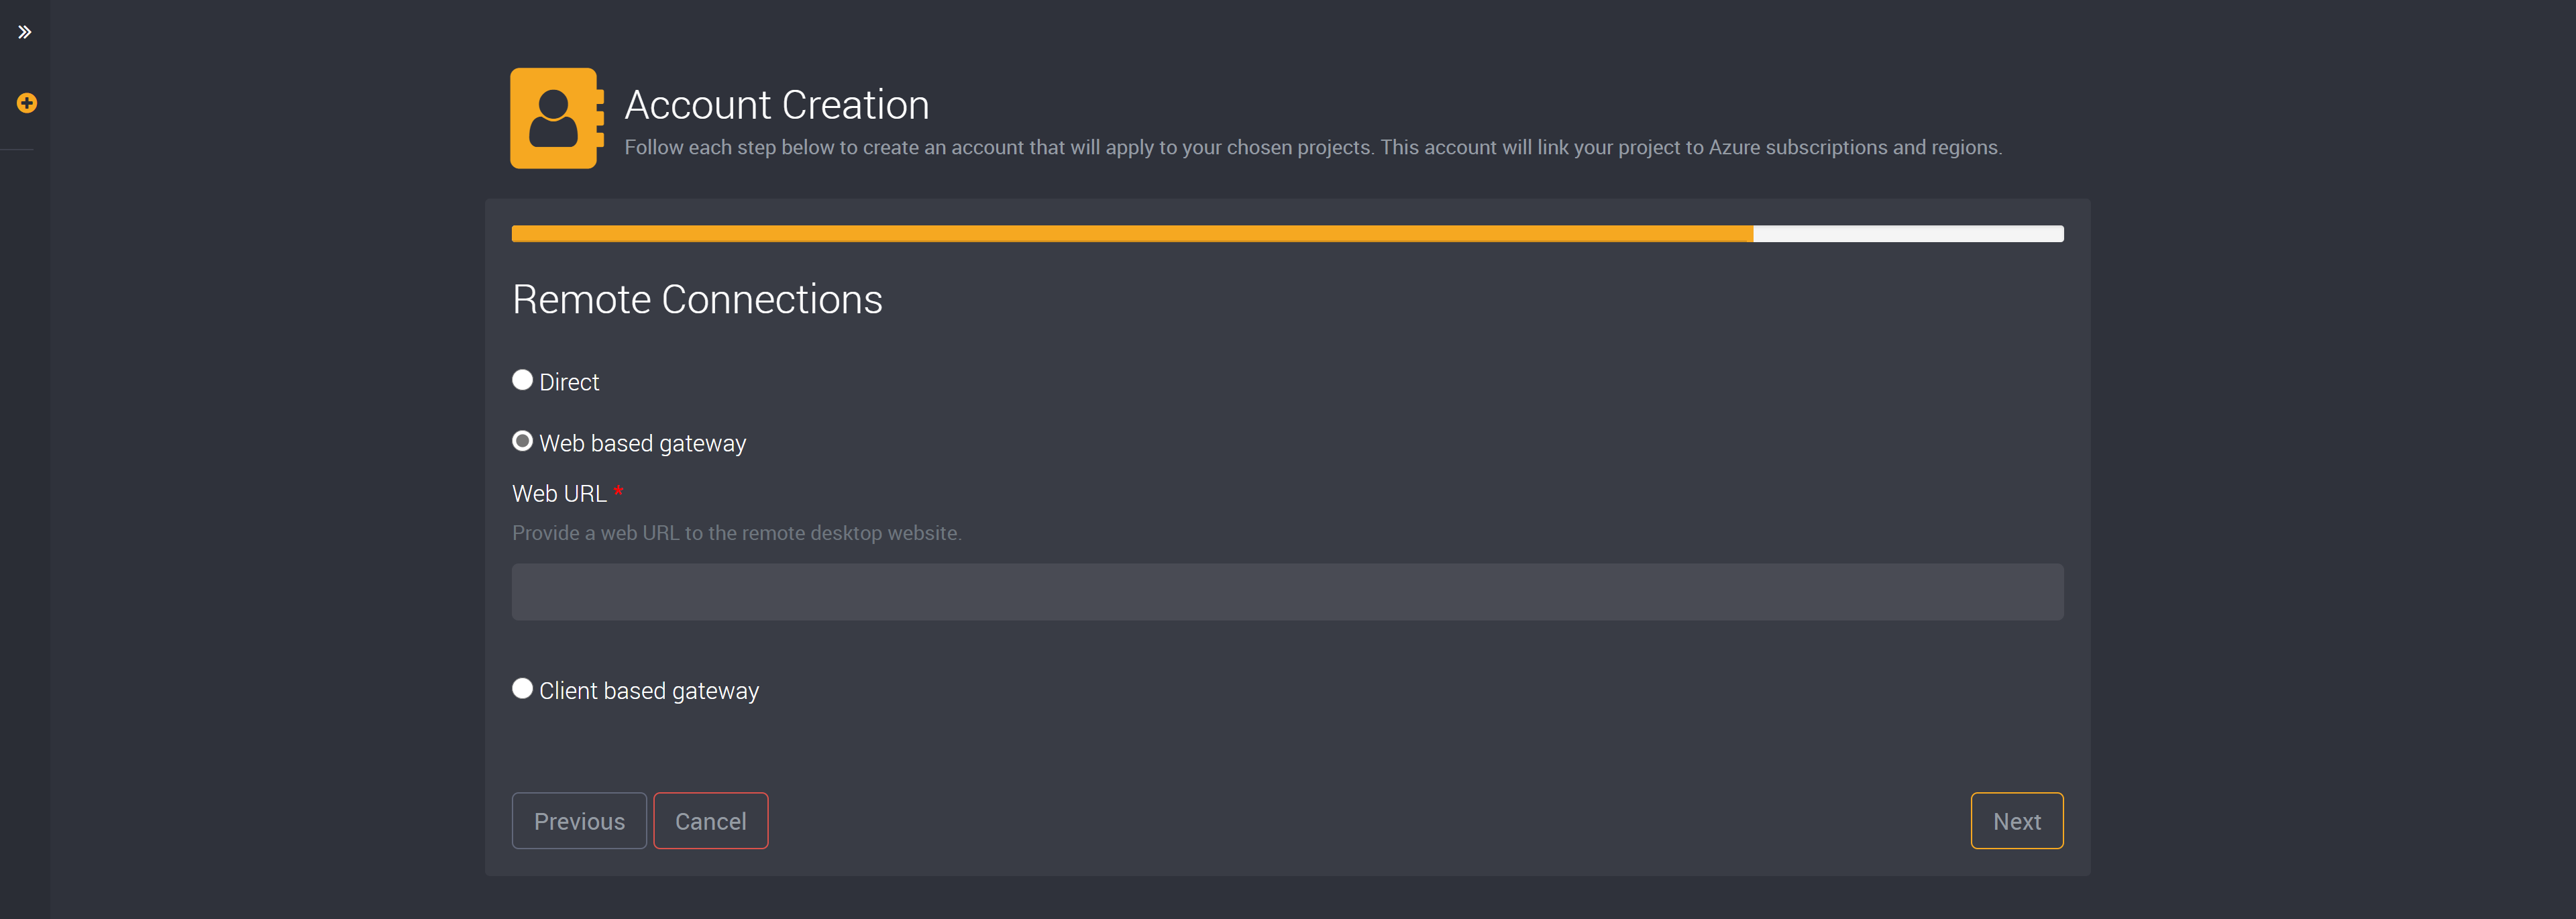
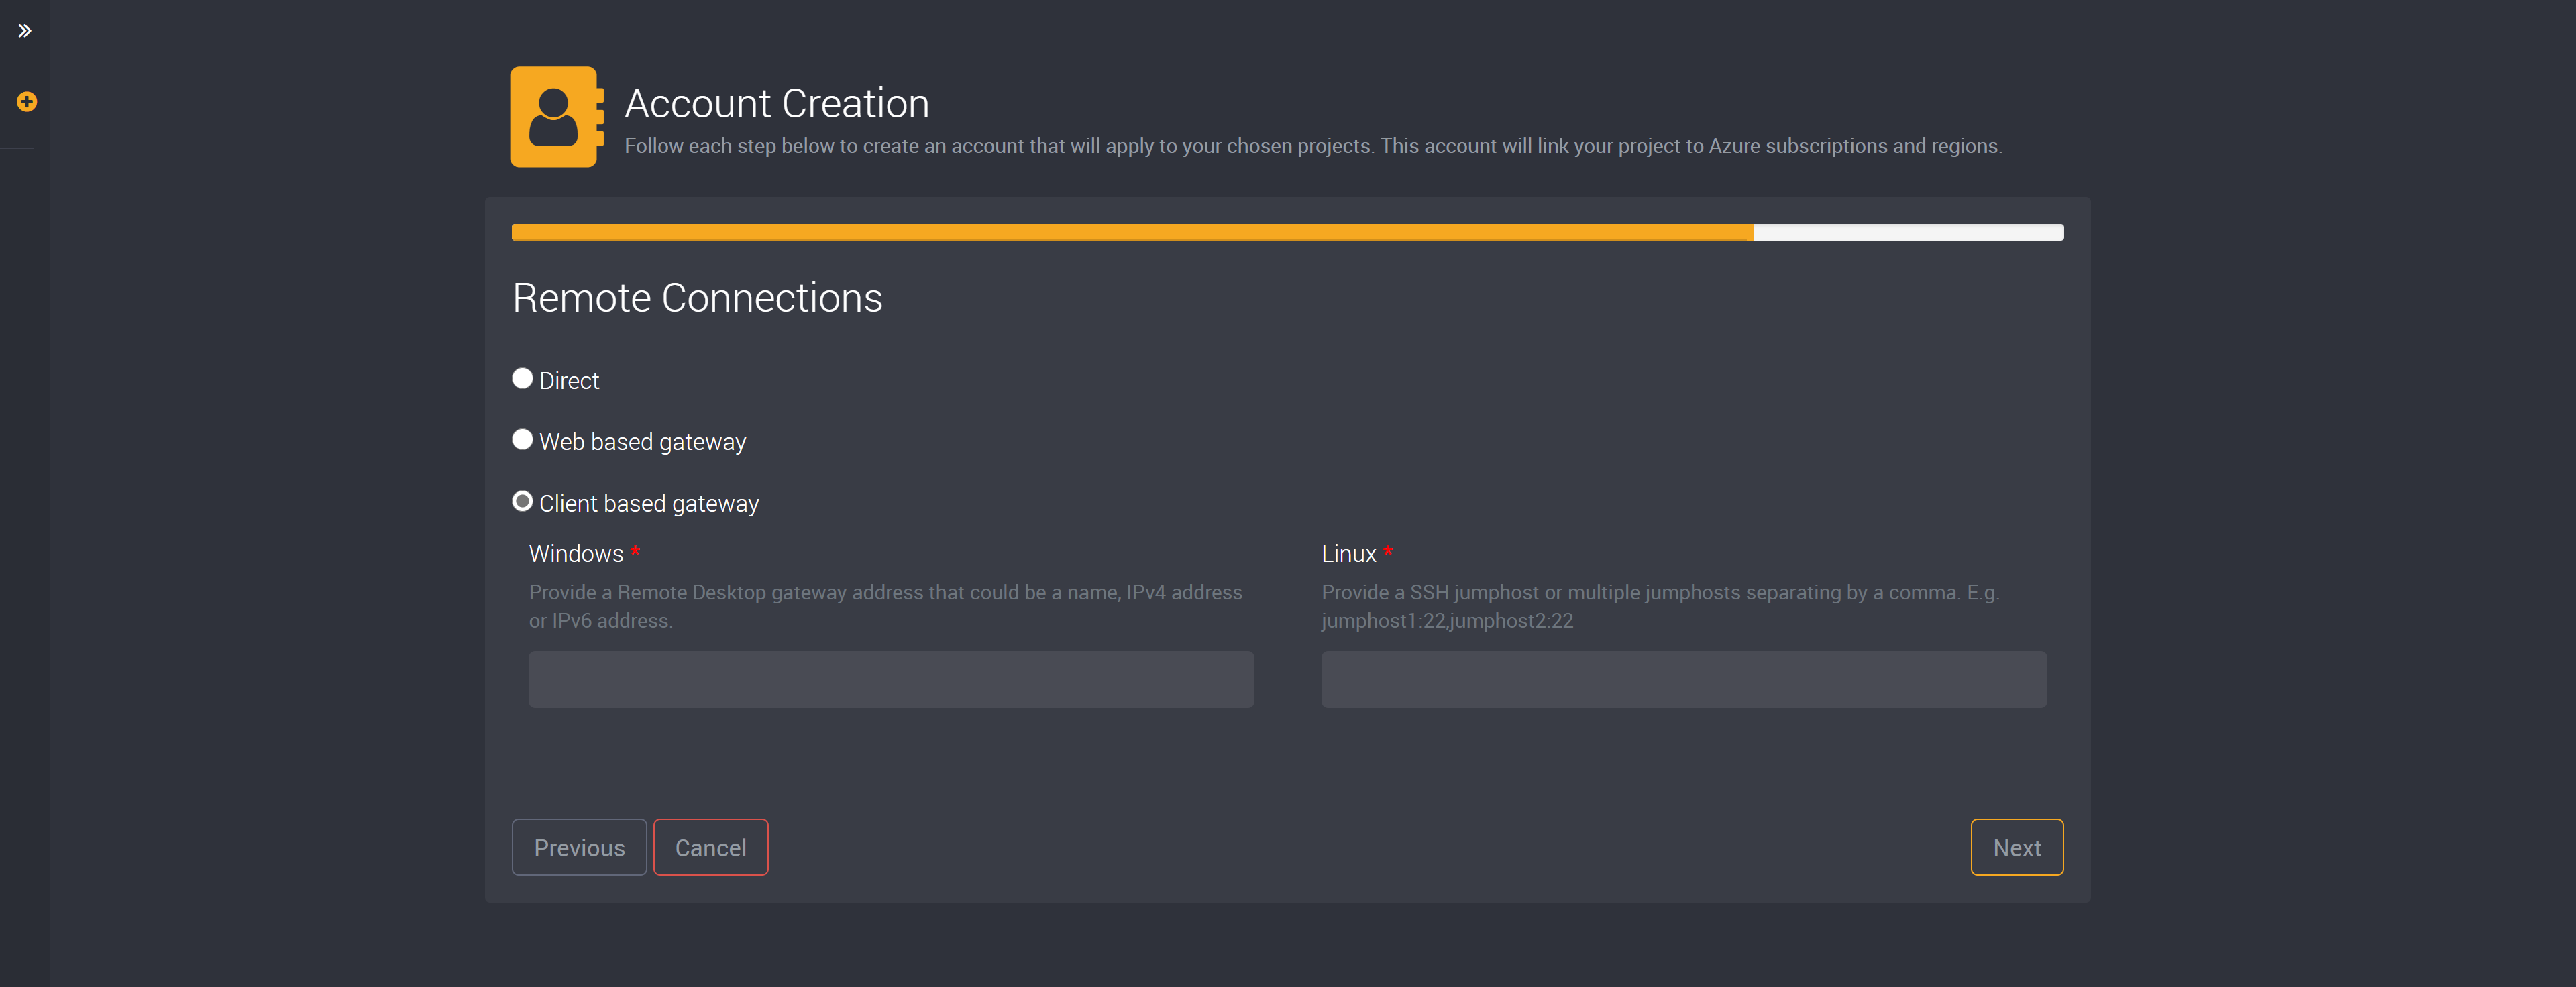
In this next window, you can choose whether your remote connection for this account will be direct, a web based gateway or a client based gateway.
If you choose a direct remote connection, it is selected by default, you can proceed to the next step.
If you choose a web based gateway, you will need to provide the Web URL.
In workstations of projects that use this account, the user can open a new tab to this URL, rather than downloading the RDP or a SSH login.
If you choose to use a client based gateway, you need to provide a Windows remote desktop gateway address and a Linux SSH jumphost.
In Windows, this will provide a RDP that users can download when connecting to a workstation in a project that uses this account.
In Linux, the user will see SSH details in your workstation, but Loome will inject the gateway.
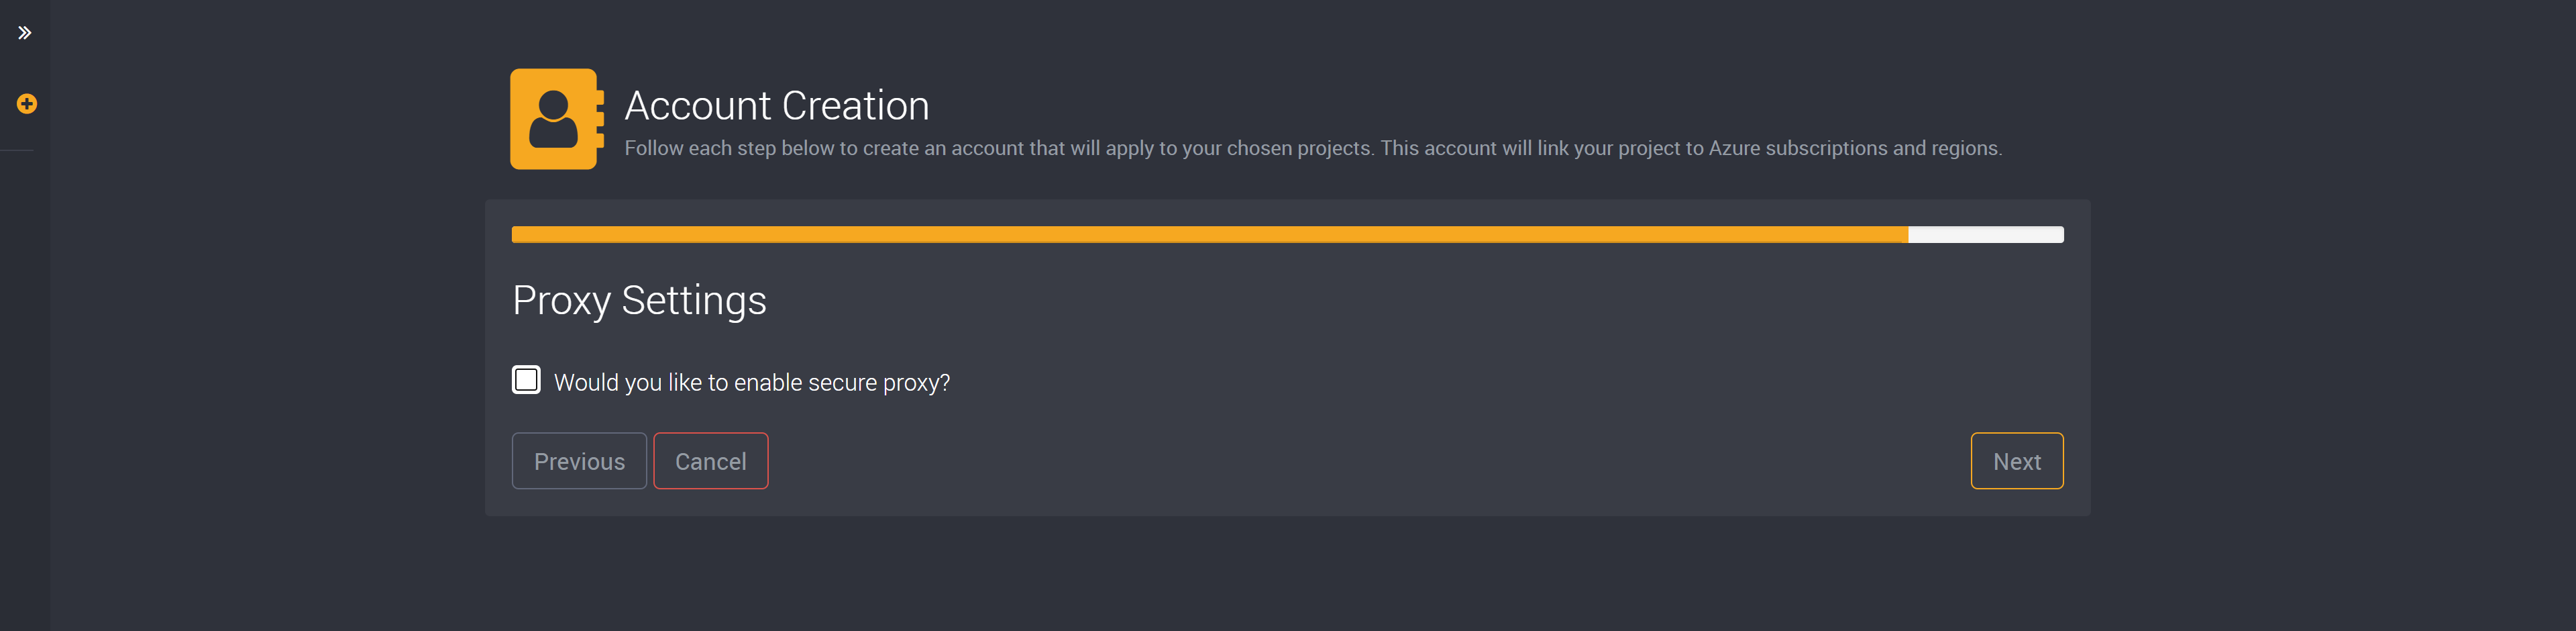
Proxy Settings
You also have the ability to specify proxy settings for virtual machines that are created in Loome Assist for projects that use this account.
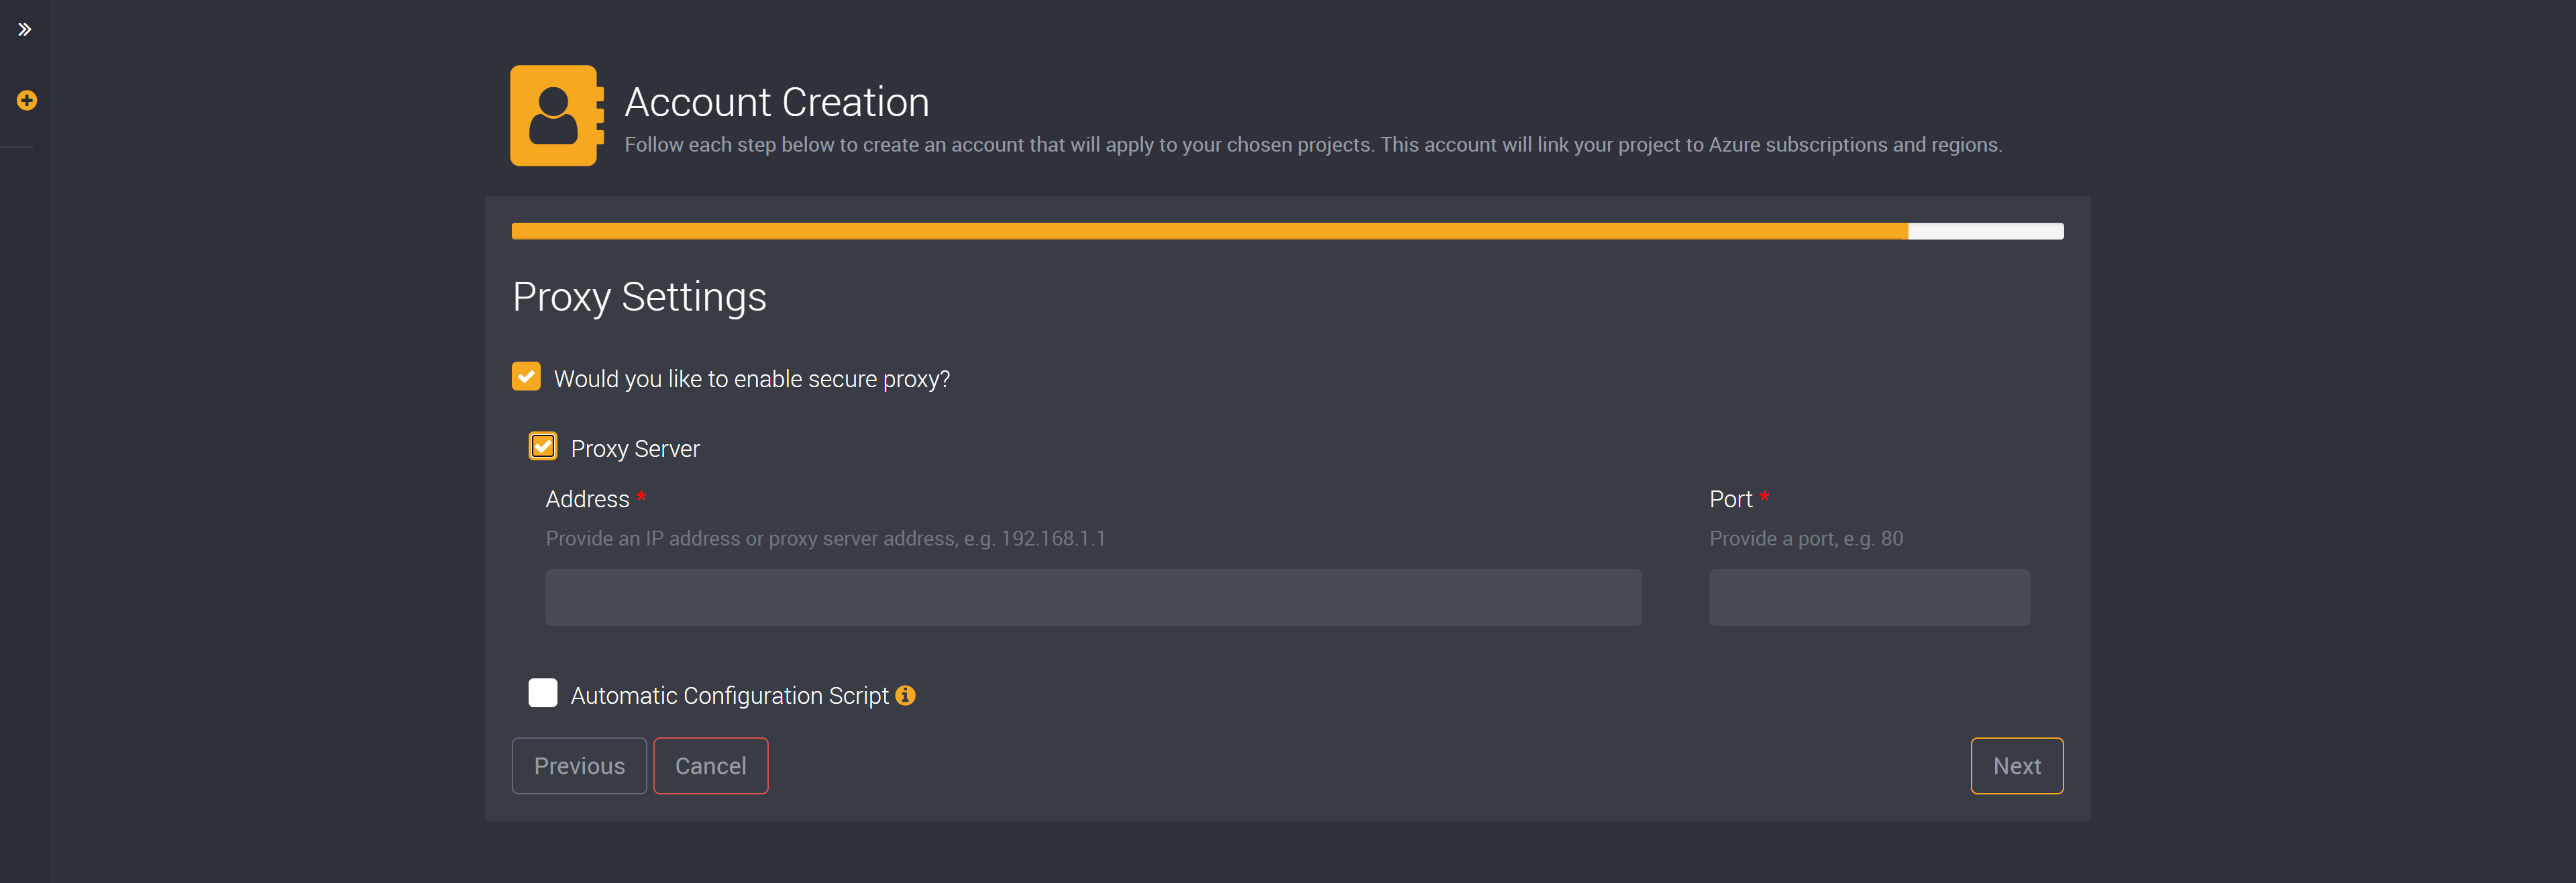
You can enable a secure proxy by selecting the checkbox. By default, this is not enabled.
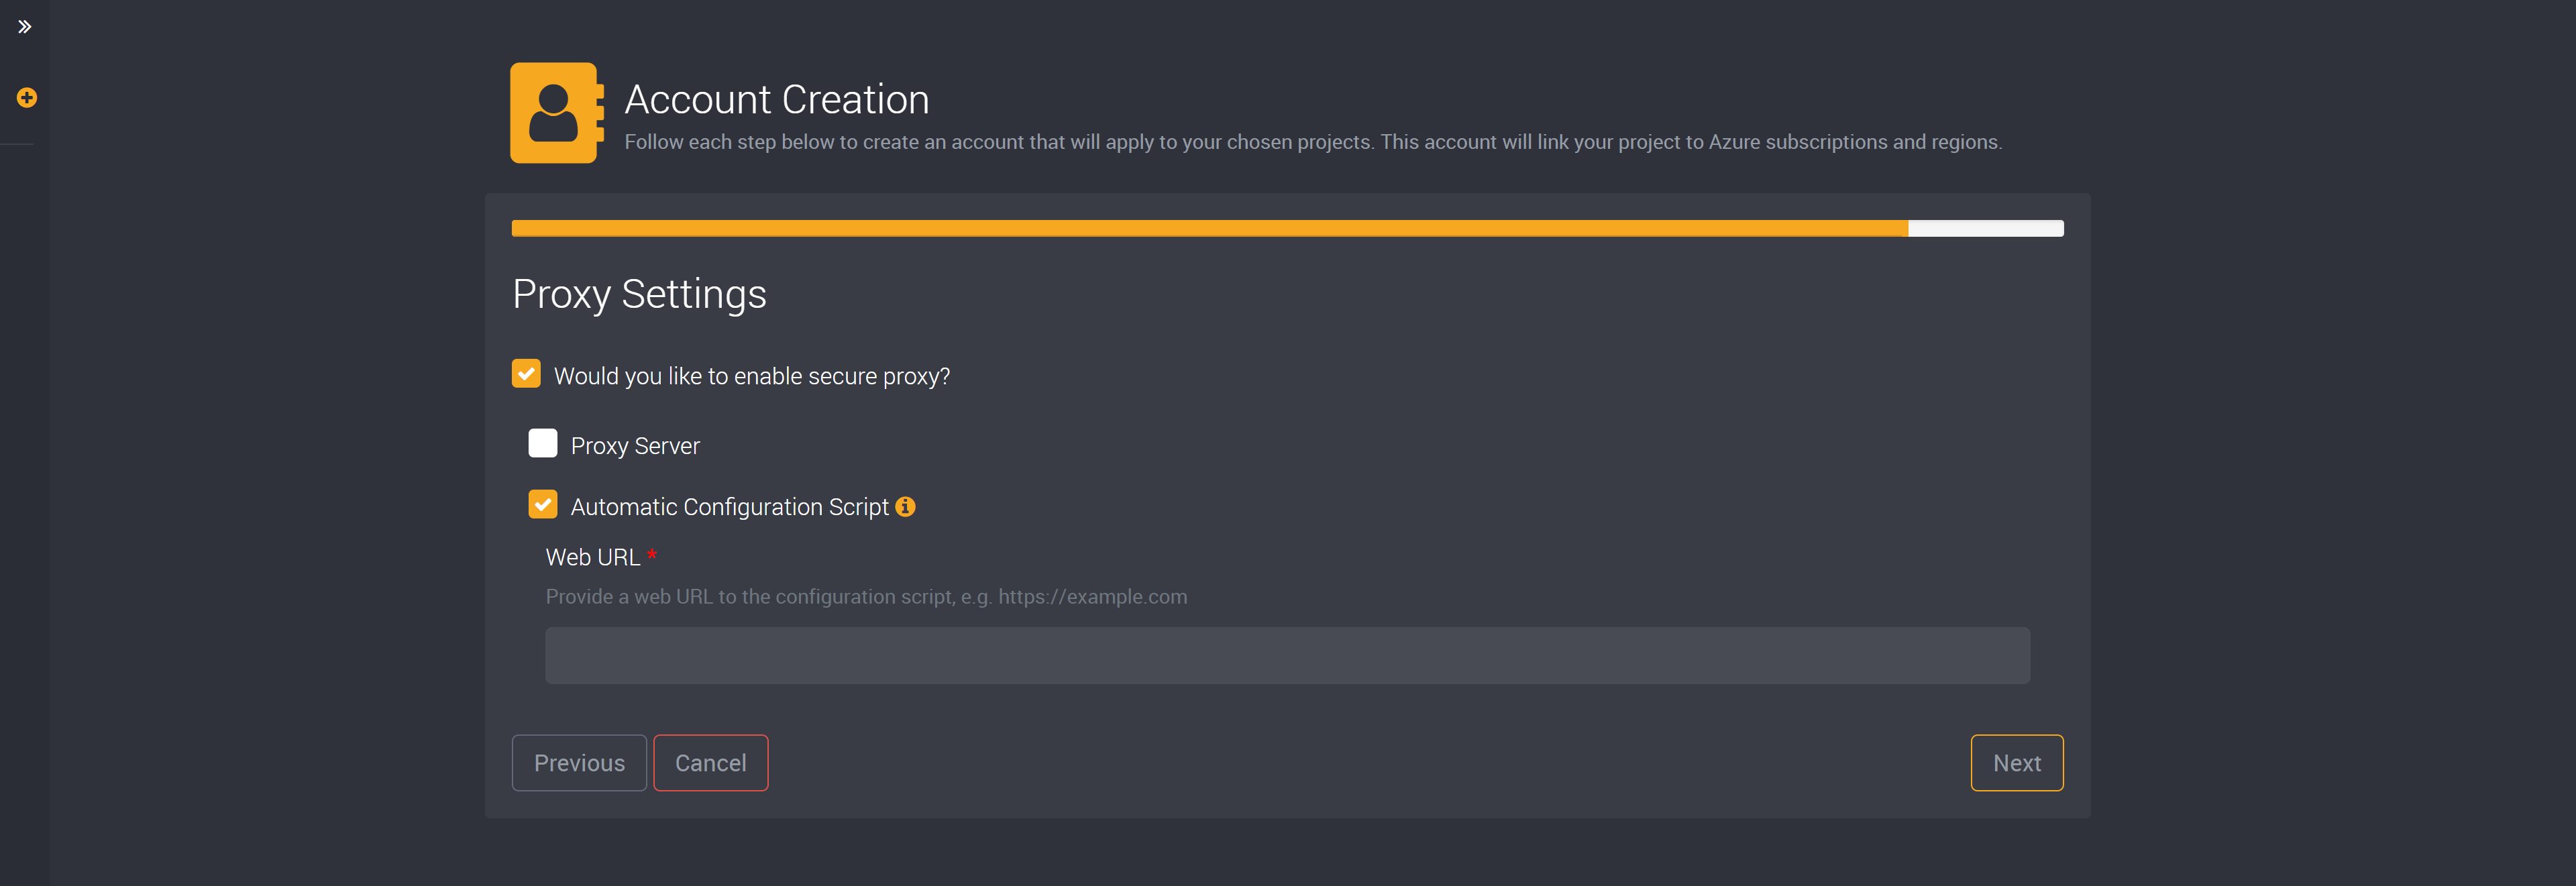
You can then choose to use a proxy server, an automatic configuration script, or you can use both. If you select both, tick the two checkboxes and provide the details in the next few steps.
For a proxy server, you need to provide an IP address or proxy server address and a port.
In Windows, you can also choose to use an automatic configuration script.
You will need to provide a web URL to the configuration script.
This script will only work in Windows and will not have any effect on Linux.
Identity Settings
You can enable Managed System Identity (MSI) for an account and it will activate MSI functionality for workstations created under this account. This allows you to provide managed access for these workstations to other resources.
Please note that this will not apply to any existing workstations when editing an existing account. It will only apply to new workstations created after this setting was enabled.
The Enable MSI? checkbox will be enabled by default.
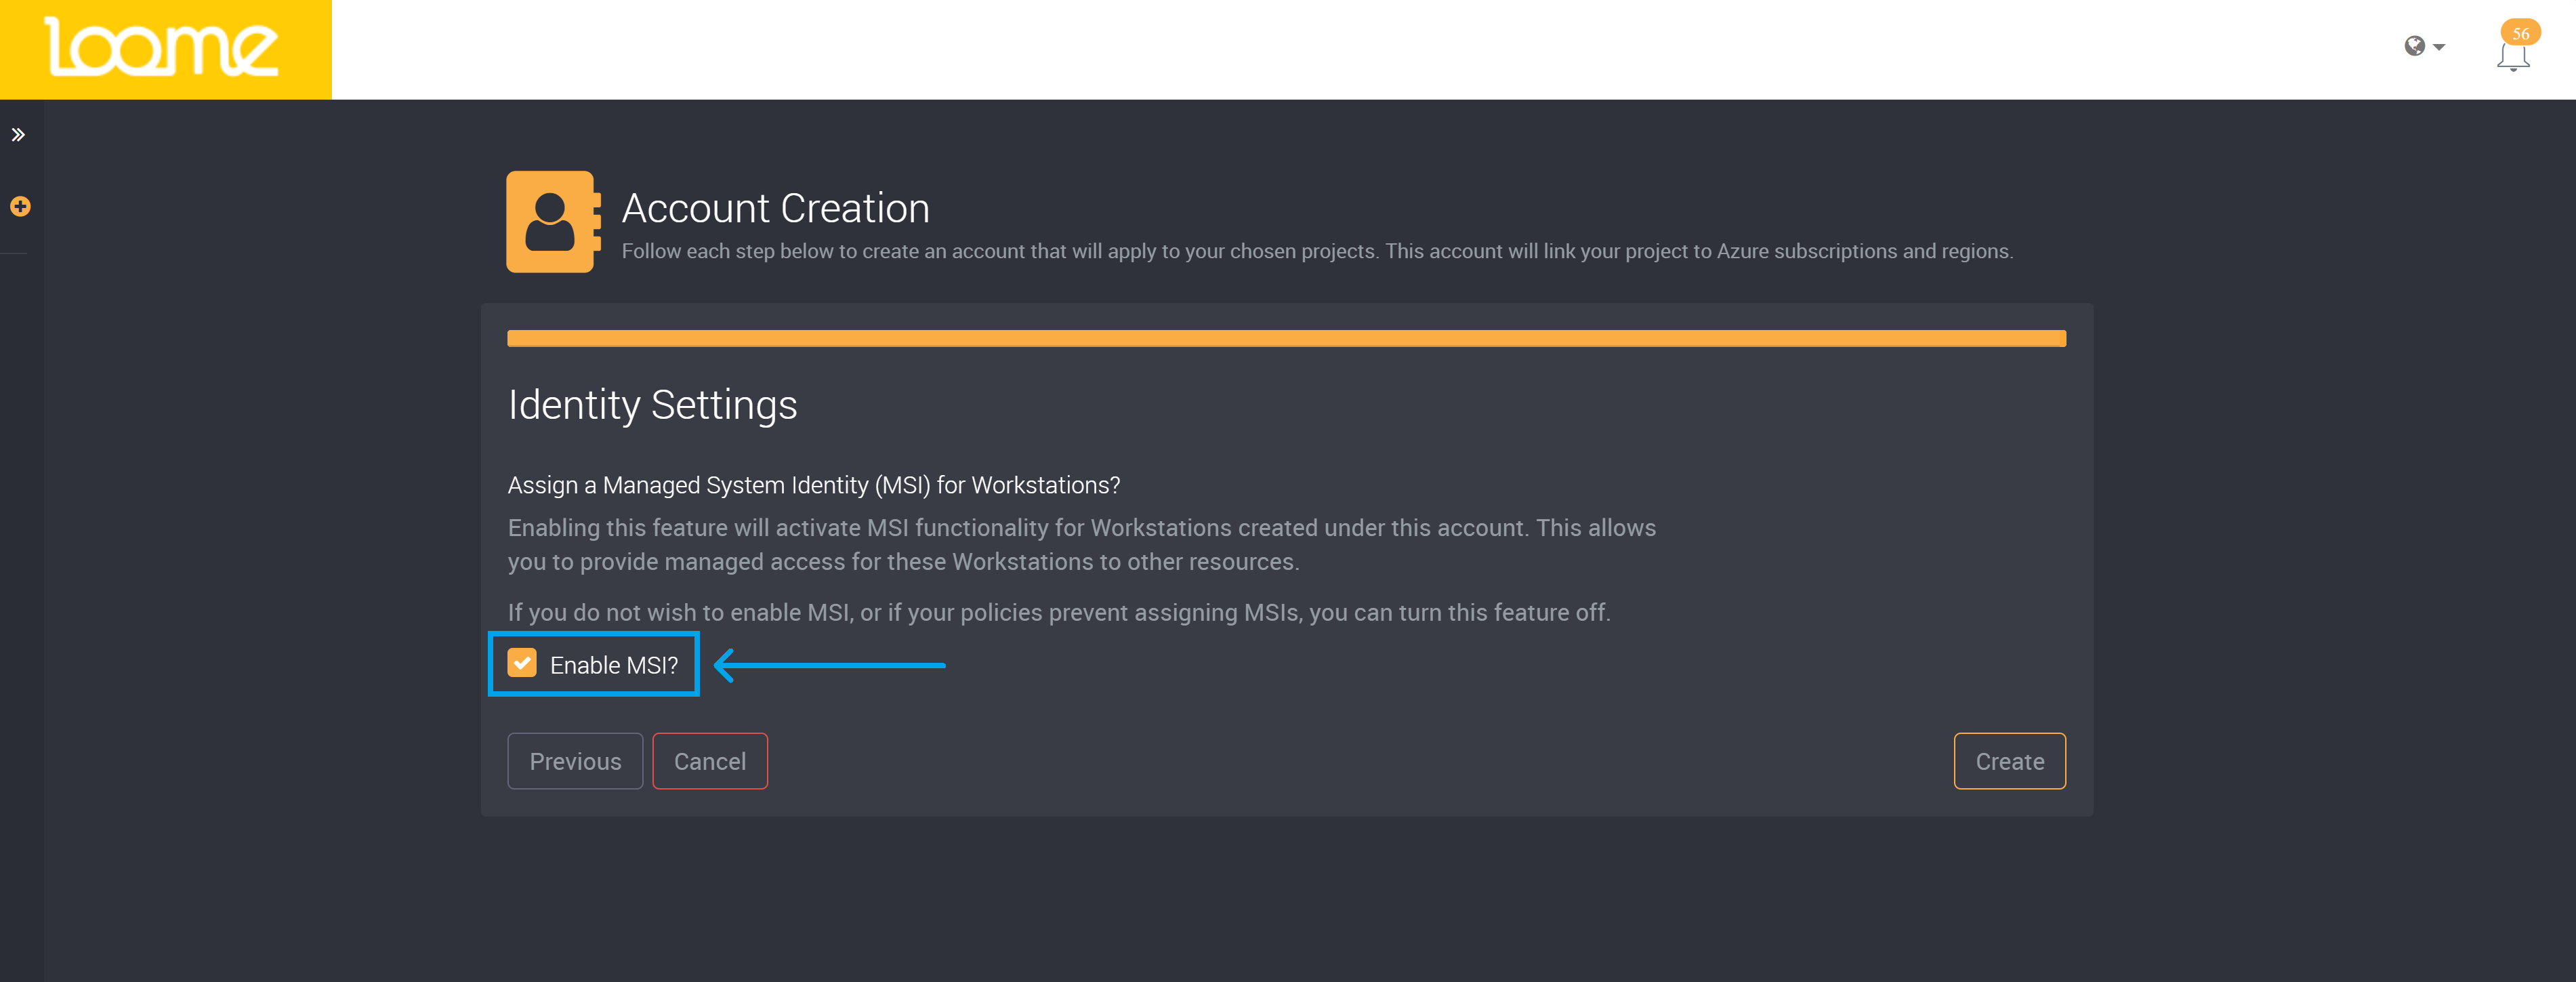
If you do not wish to enable MSI or if your policies prevent assigning MSIs, you can turn this feature off.
You can verify this in Microsoft Azure, in the ‘Identity’ section of the VM. ‘System Assigned’ will be ‘On’ if MSI was enabled for the account.
Create the Account
You can create the account by clicking on Create at the bottom right.
How to Edit an Account
On the right of the row of your selected account, you can click on the edit button to edit an account.

You can choose from the sections on the left to edit account fields.
Edit Secure VNET
Select the Secure VNET tab on the left to find all fields that were selected earlier.
If the account has been used for workstations or data repositories, you can disable the secure VNET, but you cannot change VNET settings as it is connected to other areas of Loome.
If it is not used for workstations or data repositories, you can edit or disable the selected VNET, the addressable IPs per project and the address space.
Please ensure you have access to your chosen IP address space to later access any added data repositories that use this account.
The maximum number of addressable IPs per project you have chosen will display the number of the project subnet CIDR below the field.
In the example above, you can see that a number of 10 will have a project subnet CIDR of /28.
You can also modify any network security group rules.
If you have allowed the service tag rule for Internet access, the storage accounts should be accessible from outside the VNET (e.g., from Azure Portal and from Loome Assist), because they have two endpoints: one public (i.e., Internet) and one private (i.e., for the VNET).
Edit Scripts and Notifications
You can edit a script or notification by editing the account and finding the tab on the left.
Following are some examples of scripts that can be used when a virtual machine is created, deleted or started, and when a project role is modified.
You can modify a script or tokens used when a virtual machine is created, or you can disable the script.
You can also modify the script or tokens that will run when a virtual machine is deleted, or you can disable the script.

Below, you can see an example of a script that will run when a virtual machine is started for Windows.
You can also disable or change the script that will run when there have been any modifications to project roles.
Edit Identity Settings in Existing Accounts
You can enable Managed System Identity (MSI) for an account so when you deploy a workstation using that account, new workstations (created after enabling this setting) will have MSI functionality. This allows you to provide managed access for these workstations to other resources.
Please note that this will not apply to any existing workstations when editing an existing account. It will only apply to new workstations created after this setting was enabled.
In your account, go to Identity Settings in the tabs on the left.
Enable MSI by clicking on the checkbox.
Save your changes using Save in the right-hand slideout.
After this is applied, any new workstations you deploy will have MSI enabled. It will not apply to existing workstations.
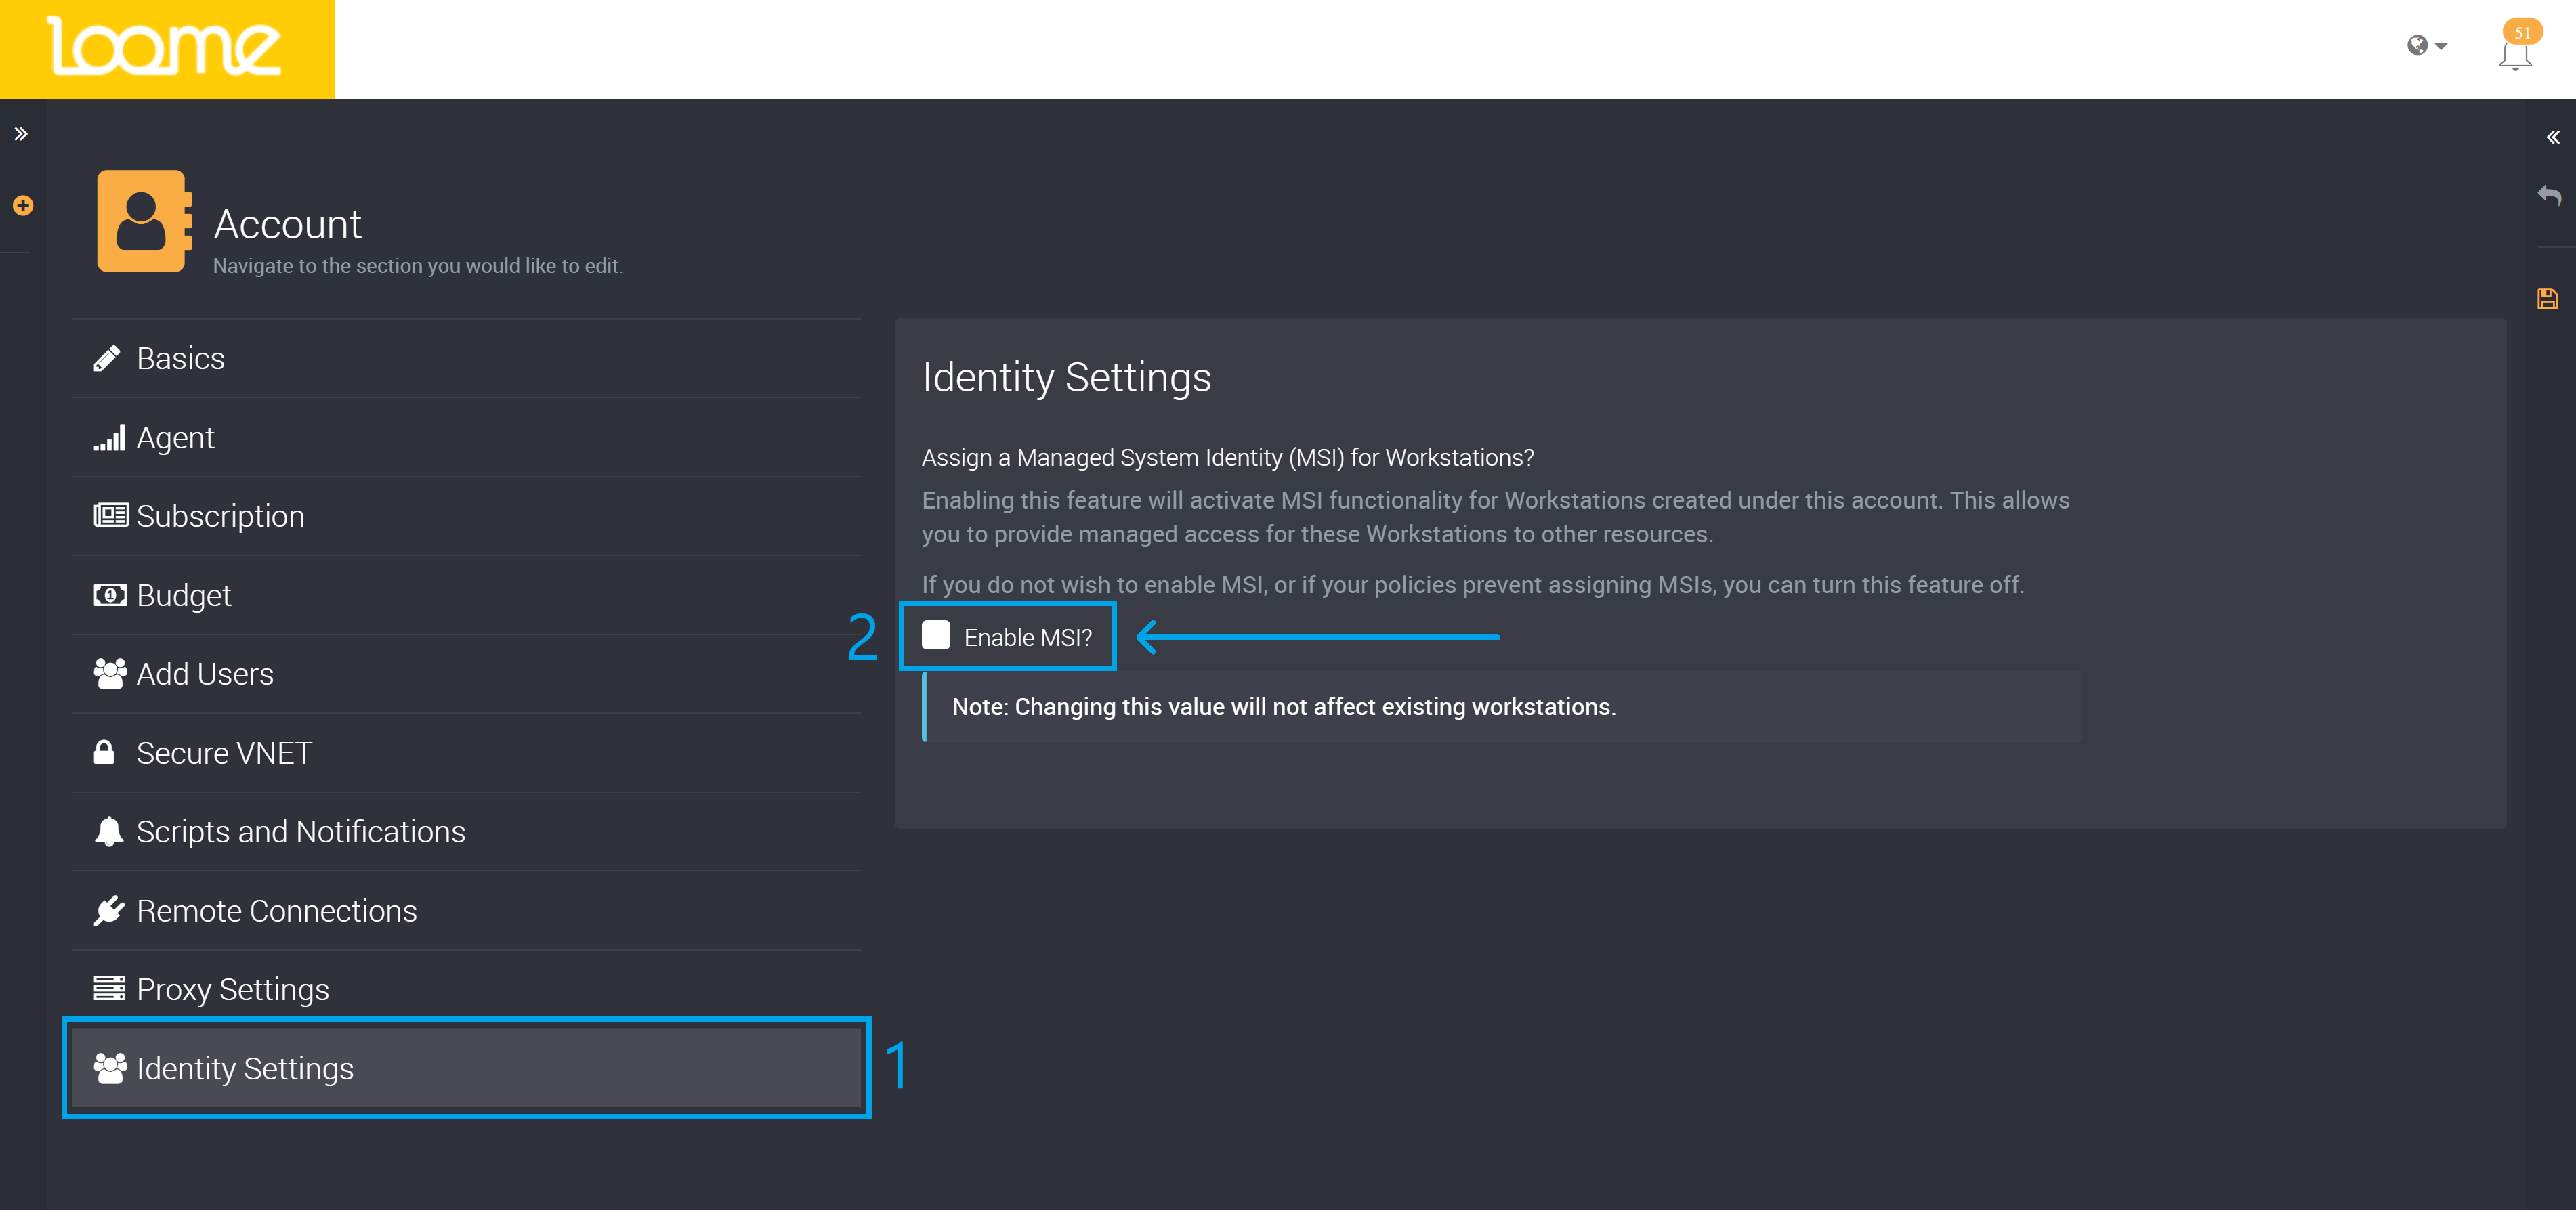
If you do not wish to enable MSI or if your policies prevent assigning MSIs, you can turn this feature off.
You can verify this in Microsoft Azure, in the ‘Identity’ section of the VM, ‘System Assigned’ will be ‘On’.
How to Delete an Account
On the right of the row of your selected account, you also have the option to delete an account.
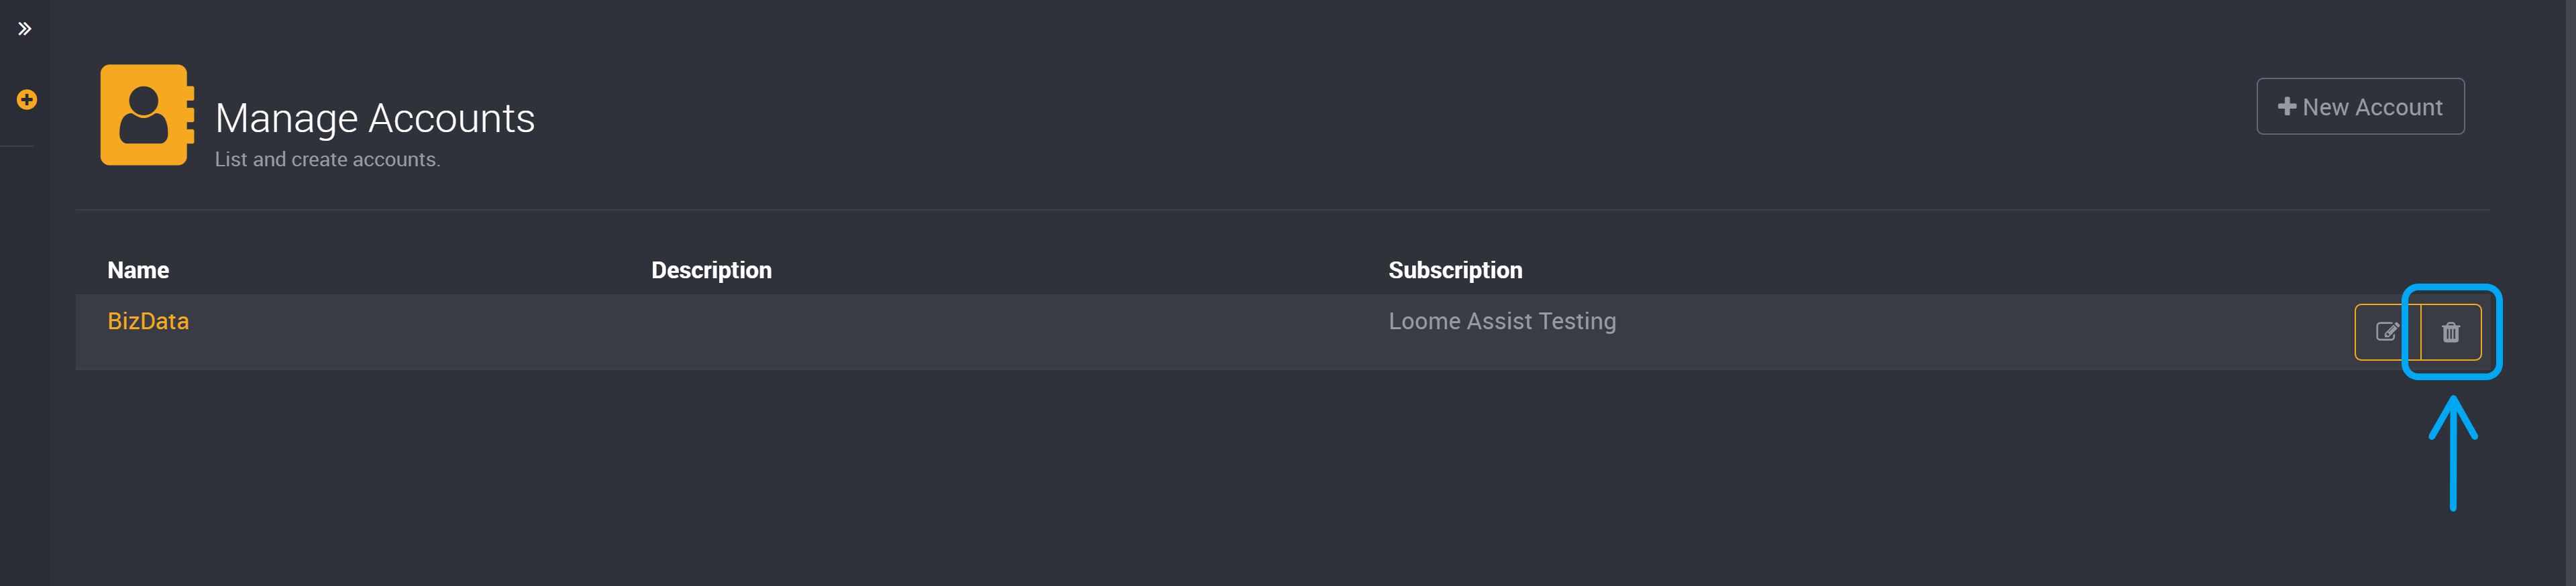
Click on this to confirm that you would like to delete the account and the account will be deleted.