How to Install in an Azure Container Instance
Pre-requisites
Before installing an agent on an Azure Container Instance, you will need access to Azure CLI in order to run the container provisioning command. You can either make use of an Azure Cloud Shell, or install the Azure CLI on your computer. For the purposes of this installation guide we will use an locally installed Azure CLI, however the same commands can be run in an Azure Cloud Shell.
You can find documentation on how to install the Azure CLI, along with the installer here - Azure CLI Setup.
You will also need an Azure Subscription and a Resource Group to host the agent.
To deploy the Loome Assist agent to an Azure Container Instance (ACI) within a Virtual Network (VNet), you will need to enable the Microsoft.Storage service endpoint on the target subnet, learn more here. This will need to be completed before deploying the agent.
Installing the Agent
Follow along with the below instructions to install and configure the Loome Agent on an Azure Container Instance.
Complete the Agent Configuration Wizard
On the agent page, you will need to complete a few pieces of information to get started.
Before You Start:
The Loome Agent can be installed to Azure Container Instances using our preconfigured docker image.
- You will need to configure a Managed Identity for the Azure Container Instance and provide some roles to this Identity, you can find more information here - completing additional configuration in the Azure Portal.
- You might require additional configuration, such as outbound firewall rules, you can find more information here - additional agent configuration.
- You can upgrade an existing agent by running the installation command again, just be sure to input the settings of the existing agent.
Agent Details
Click on Setup Agent at the top-right of the Agents page.
The ‘Azure Container Instances’ platform will be selected by default from the tabs at the top of the page.
First, provide a name for the agent. This should be unique and easily identifies this agent. It may only contain letters, numbers, dashes, and dots.
Choose an Expiry Date. You can also click on the calendar on the right of the field to choose from a date selector.
Provide a description for the agent.
On the next page, choose to add networking configuration:
- You can choose to add your own client IPv4 address at the top-right of the table.
- You can also add firewall rules. You can add a range of IPv4 addresses.
- Provide a name for the firewall rule, and then choose a start and end IPv4 address.
If applied, the agent can be accessed from these IPv4 addresses.
Next, review your agent details and then click on Create Agent to create the agent.
Follow the instructions on the next screen to install and configure your agent on your selected environment.
Where to Deploy the Container Instance
Provide details on where to deploy the container, and Loome will update the Azure Shell/CLI command and the PowerShell command at the bottom of the screen based on your input, you can run either of these commands to create the Azure Container Instance.
The Container Name for your Agent should be lowercase alpha-numeric, and can include hyphens. Your Azure container instance name must be the same as the agent name. Loome will prefill your agent name here.
You can then provide the name of an existing Resource Group in your Azure Subscription. If you don’t yet have one, go to portal.azure.com and create a new Resource Group.
Then select your resource location from the Azure Region dropdown. It will determine what Azure Region the container is created in.
Choose the Docker Image location, this is where the Loome Agent image should be pulled from.
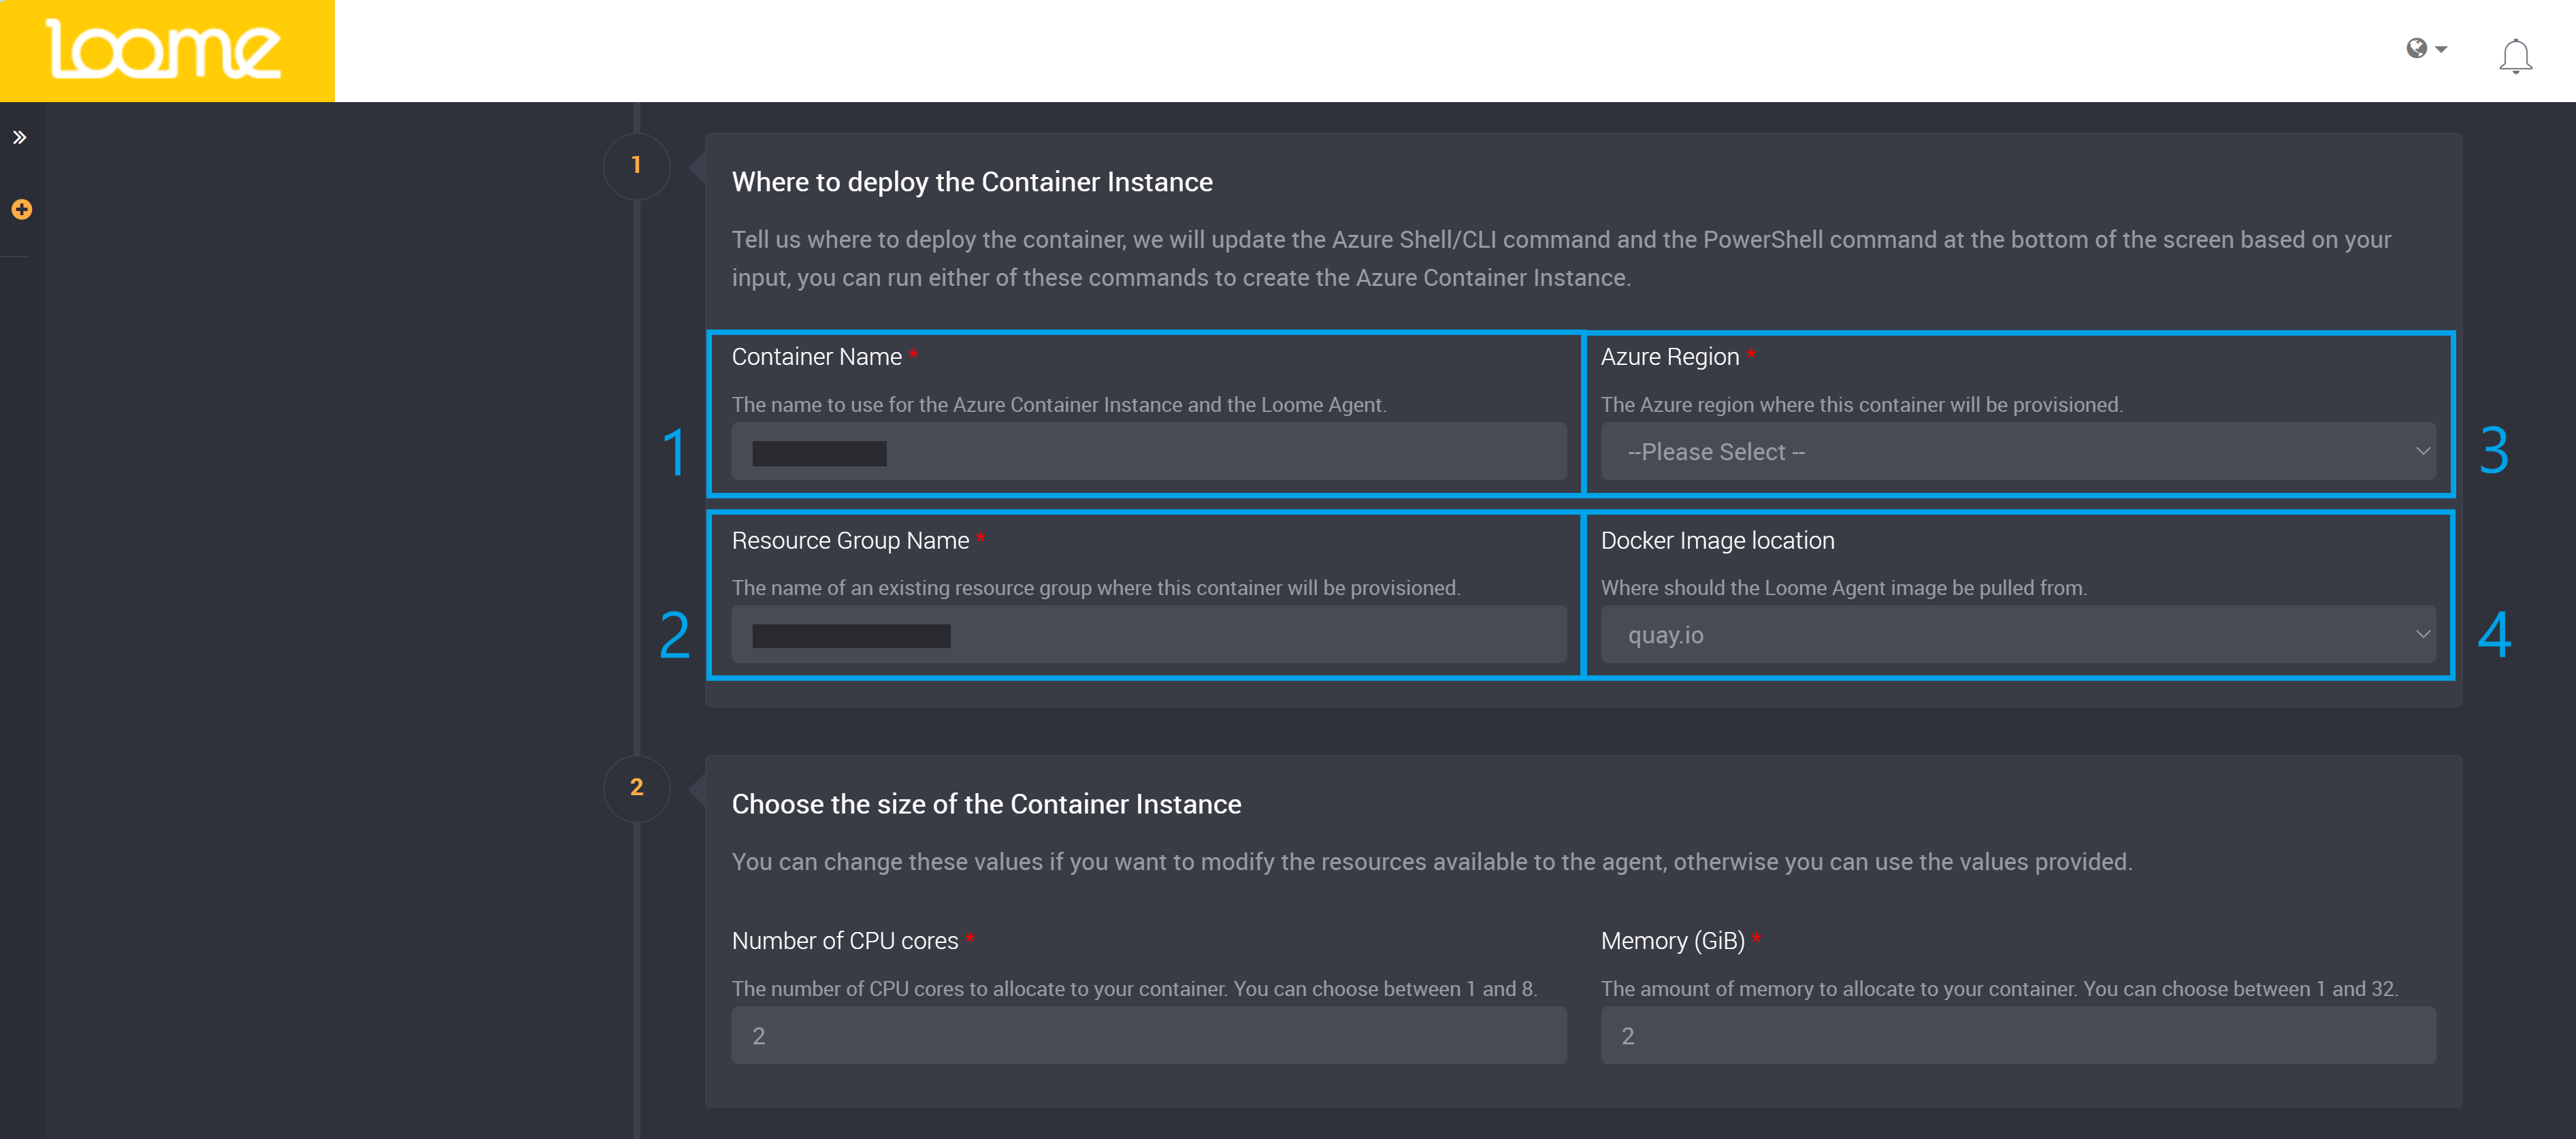
After you’ve completed these steps, you can set up further configuration.
Additional Agent Configuration
Next, you can specify optional configuration for the agent. Click on the checkbox beside each option to set it up.
Choose whether you want to:
- Specify external storage for your container instance.
- By default, we store files, such as logs, inside the container instance. You can choose to supply an Azure Storage Account, which will allow you to easily retrieve and view log files.
- Click on the checkbox for Use an Azure Storage Account to specify this.
- Then provide:
- ‘Storage Account Name’ - The name of the Azure Storage Account where you want to store agent files.
- ‘Storage Account Key’ - One of the access keys for your storage account.
- ‘Fileshare Name’ - The name of the Azure Fileshare where you want to store agent files.
- Then provide:
- Specify Azure Virtual Networking for your Container Instance.
- If you do not use Azure Virtual Networks you can skip this step.
- Click on the checkbox for Use Azure Virtual Networking to specify this.
- You can then:
- You can supply the names or IDs of an existing Azure Virtual Network and Subnet in Azure Virtual Network ID or Name or Azure Subnet ID or Name
- If the Azure Virtual Network and Subnet reside in the same Resource Group, you can provide the names of Azure Virtual Network and Subnet.
- If the Azure Virtual Network and Subnet reside in a different Resource Group, you will need to use the fully qualified Azure Resource IDs of the Azure Virtual Network and Subnet.
- You can supply the names or IDs of an existing Azure Virtual Network and Subnet in Azure Virtual Network ID or Name or Azure Subnet ID or Name
- You can then:
- Assign a User Assigned Identity to your Container Instance.
- By default, we will enable a System Assigned Identity and you can use this Identity to provide the Loome Agent access to resources in Azure.
- If you prefer to use a User Assigned Identity, you can provide the fully qualified Azure Resource ID in the Azure Resource ID of the User Identity field.
After you have configured the Agent with a Managed Identity, you will need to provide it with permissions to provision and manage resources within the Subscription. Learn about the roles and permissions you will need to provision here, as well as the reasons these permissions are required.
After you have provided these agent details and chosen the optional configuration, you can proceed to the next page.
Azure Container Command
You can use the copy button next to the Azure CLI command to put the command in to your clipboard.
You can also use the Azure RM command if you have Azure RM installed.
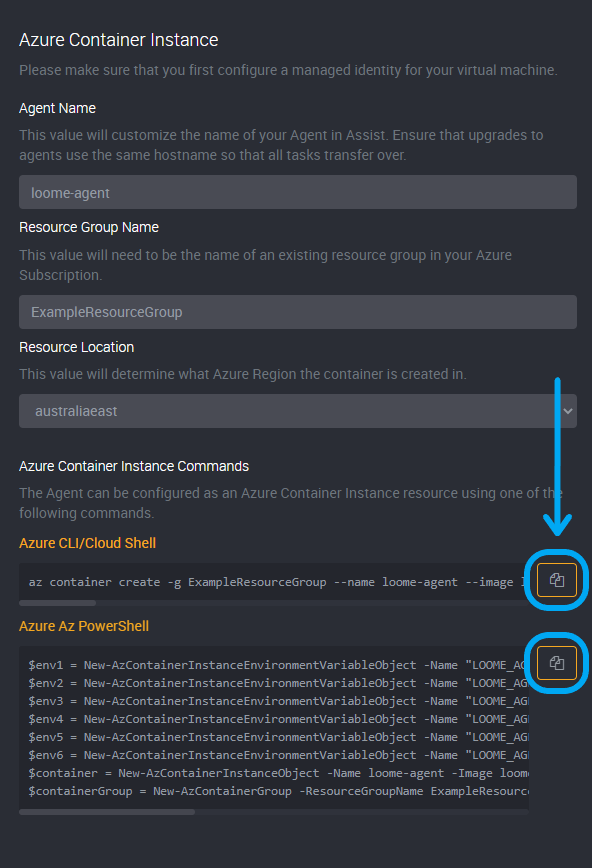
Using Azure CLI to create the Agent
Open a command prompt from your machine. If you are not logged in to Azure CLI, you can type in az login and hit enter.
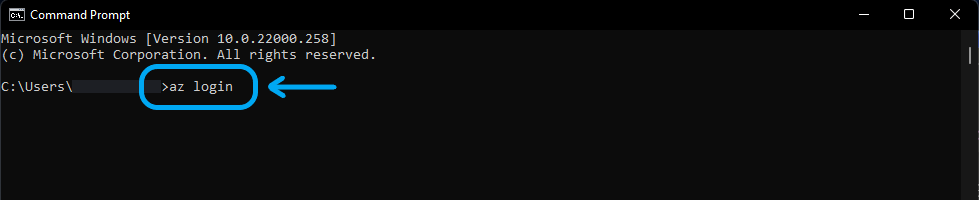
This process will open a browser and ask you to log in to Azure with your Microsoft credentials. This will then authorize your Azure CLI session.
Once complete you can close the browser and return to the command prompt window.

Please make sure to select the correct subscription for this agent. az account list --output table will list your subscriptions. Then set the correct subscription by providing your chosen subscription in the command az account set --subscription "YOUR_SUBSCRIPTION_NAME".
Now paste the Azure CLI command that you copied earlier from the bottom of the screen in to the command prompt window. You can tab back to the window and copy the command again if need be.
Press enter to start configuration of the Agent.
You should now see a message that the configuration is in progress. This may take several minutes to complete.

Once completed, you will see a JSON output of the configuration. You do not need to do anything with this output and can discard the Command Prompt window.
Completing Additional Configuration in the Azure Portal
Before we can use the Agent, we need to complete additional configuration on the Azure Container Instance containing the Agent.
Loome will configure the Agent with a Managed Identity and will use a System Assigned Managed Identity by default, or you can choose to use a User Assigned Managed Identity on the agent page in Loome. You can then provide the Managed Identity permissions to provision and manage resources within the Subscription.
If you choose a User Assigned Managed Identity, in Step 5 ‘Optional: Assign a User Assigned Identity to your Container Instance’, select the checkbox ‘Assign a User Assigned Identity?’.
Then provide the fully qualified Azure Resource ID below in the Azure Resource ID of the User Identity field.
You can then provide the Managed Identity permissions to provision and manage resources within the Subscription.
Provide Managed Identity Permissions
System Assigned Managed Identity:
First, browse to portal.azure.com and locate and click on the Resource Group where you provisioned the Container Instance.
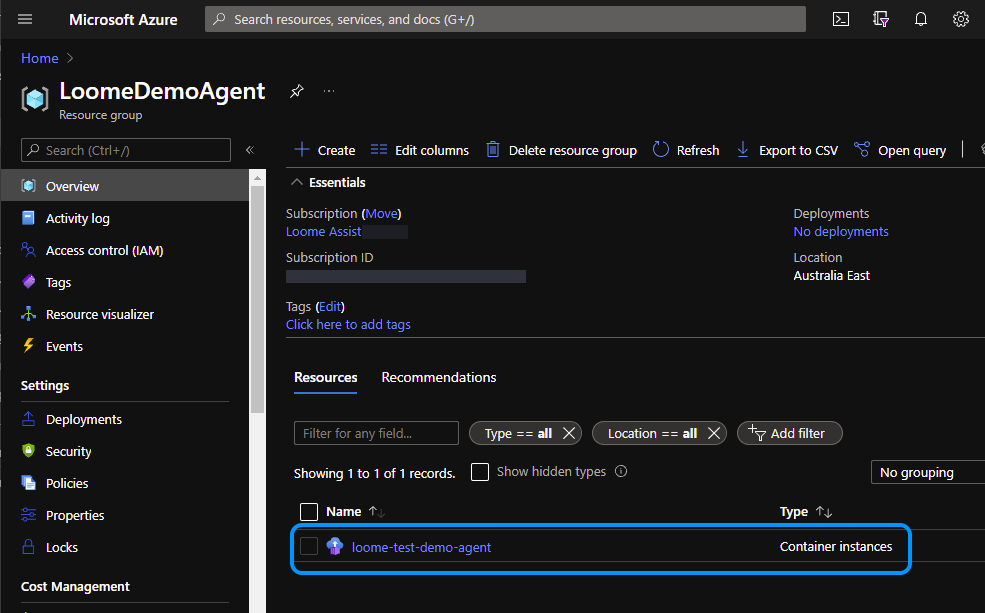
Locate the Identity menu option and click on it.
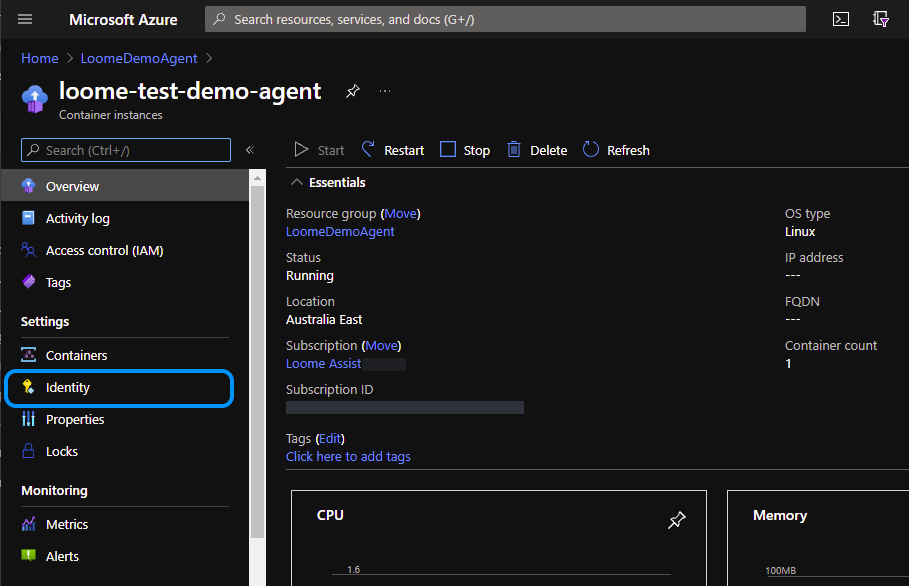
You can then add Azure Role Assignments in the following section.
User Assigned Managed Identity:
Browse to portal.azure.com and go to the User Identity.
Click on the Azure Role Assignments in the left-hand menu.
If you have more than one subscription, select the Subscription from the dropdown.
Azure Role Assignments in Both Managed Identity Types
Click on Azure Role Assignments.
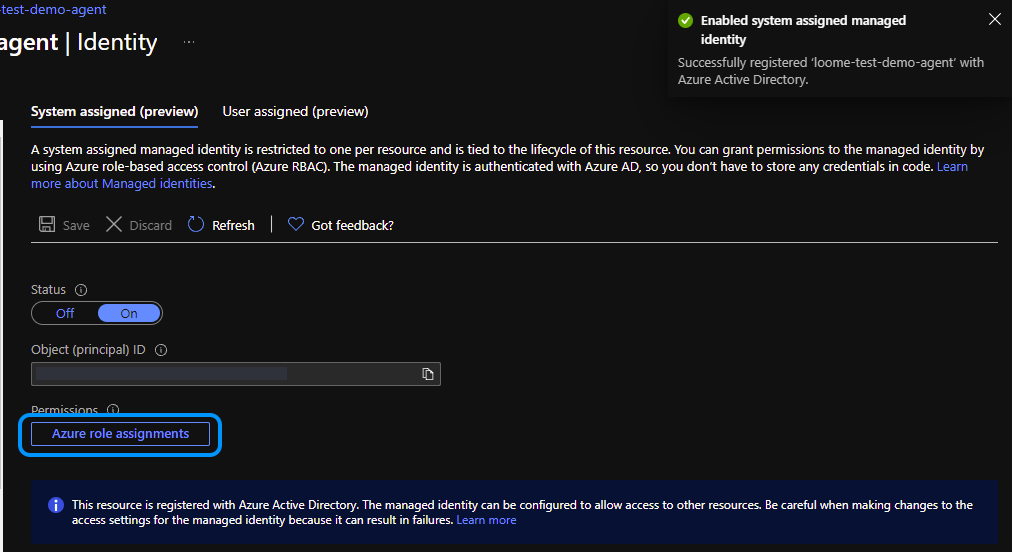
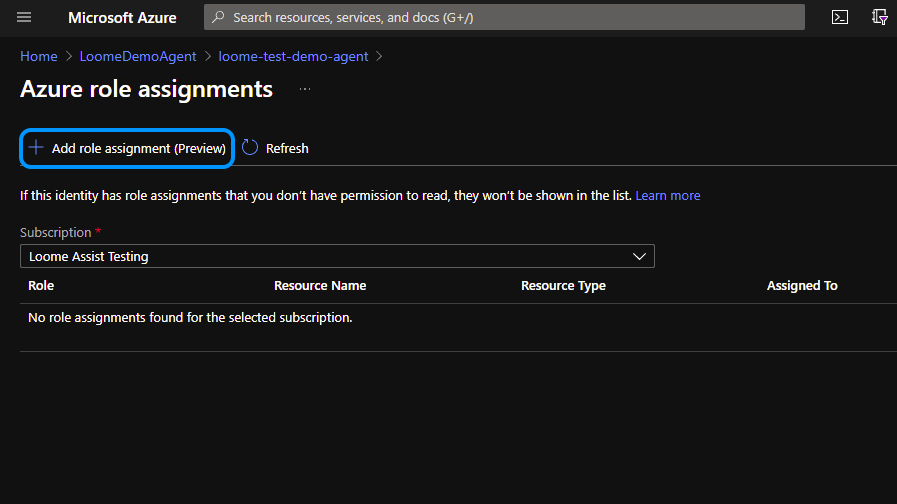
Click the Add Role Assignment (preview) button to add a new Role Assignment.
Select Subscription for the Scope, select your Subscription, and then select Contributor for the Role.
Click Save to add this Role Assignment.
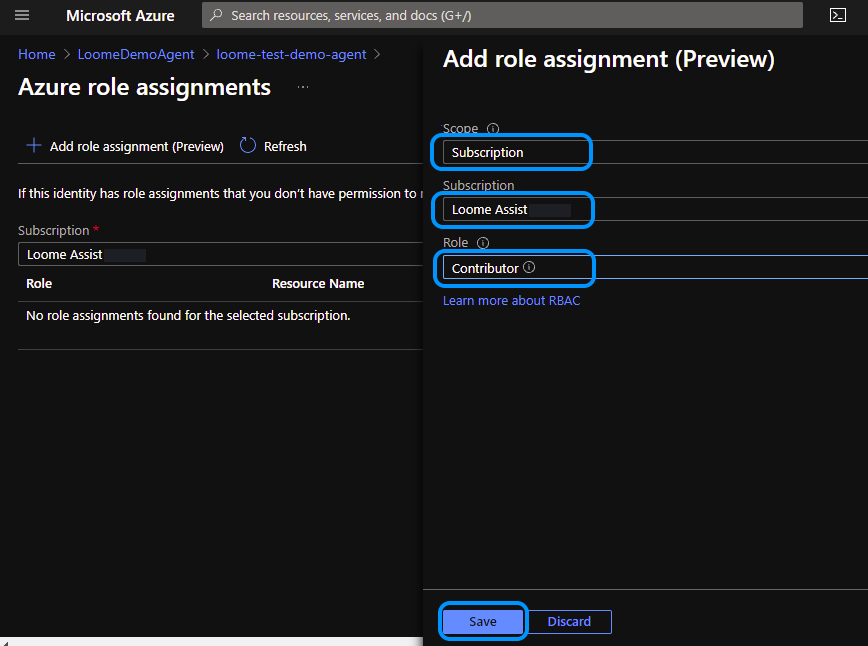
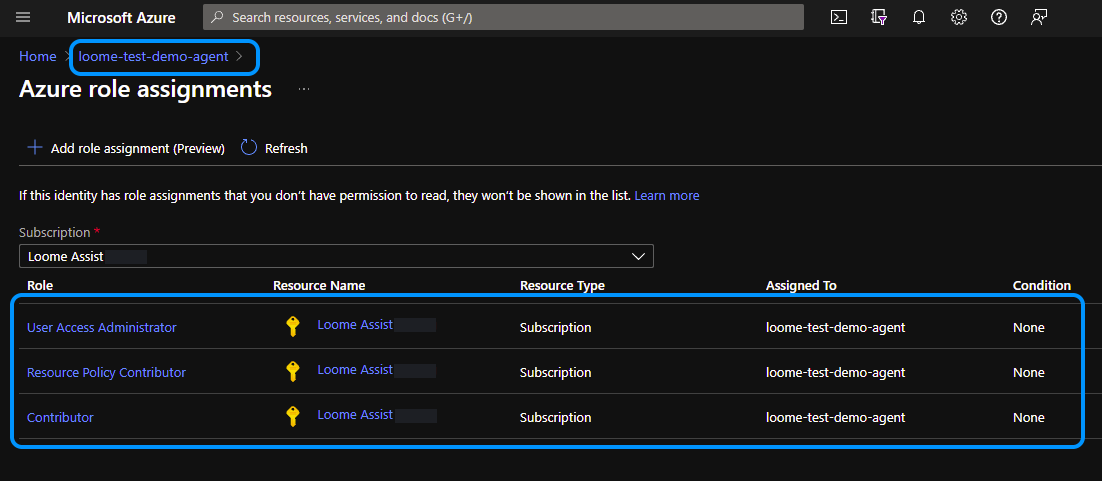
Repeat this step until you have all of the roles in the below table assigned.
| Scope | Subscription | Role |
|---|---|---|
| Subscription | Your Subscription | Contributor |
| Subscription | Your Subscription | User Access Administrator |
| Subscription | Your Subscription | Resource Policy Contributor |
Your Role Assignments should look like this once completed.
Why Does the Loome Agent Need These Roles?
Loome needs these permissions for Azure policies and specifically, the tag inheritance of resources that will be managed in Loome. You can learn more about Azure’s policy definitions here.
| Role | Reason it is Required |
|---|---|
| Contributor | This role is used to create and manage all Azure resources, e.g., virtual machines, storage accounts, network security groups, etc. Learn more here. |
| User Access Administrator | The agent will need the Azure ‘User Access Administrator’ role to assign the ‘Contributor’ role to the policy assignment. The agent will use this role to assign role(s) in Azure RBAC* to a resource group for policy assignment, in order to perform tags remediation*. Loome uses the built-in policy ‘Inherit a tag from the resource group’, and this policy definition requires the ‘Contributor’ role for policy assignment in a resource group. ‘Tags remediation’ updates the tags of all resources so that it aligns with the resource group tags. Learn more here. |
| Resource Policy Contributor | This role will be used by the agent to create and manage policy assignments and policy remediations. Learn more here |
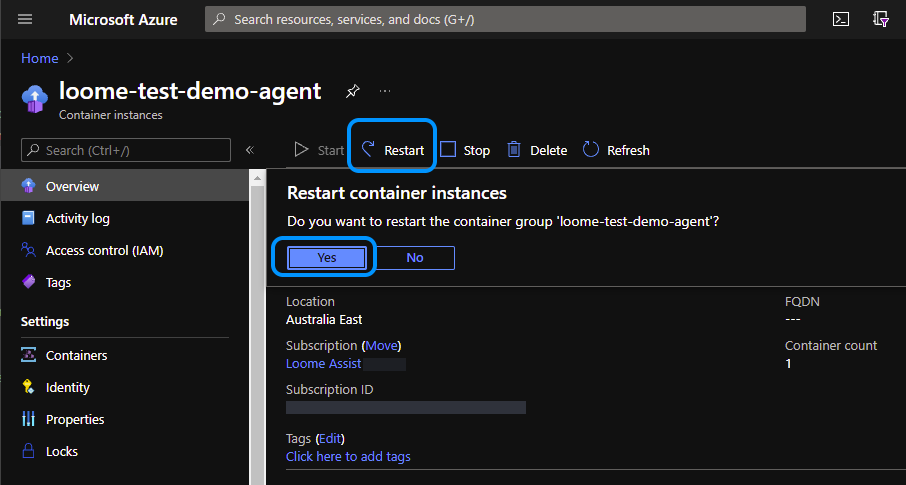
Restart the Container Instance
Click on the Agent name near the top left of the screen.
Now let’s restart the Container Instance so the Agent can connect to Loome Assist.
Click on the Restart button near the top, and click Yes to the confirmation message.
Now click on Container on the left hand menu, and confirm the status of the container is ‘Running’.
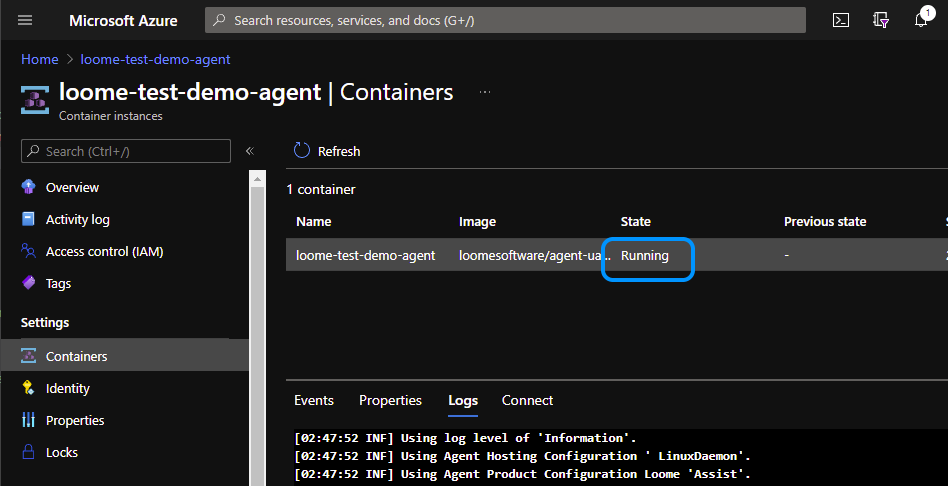
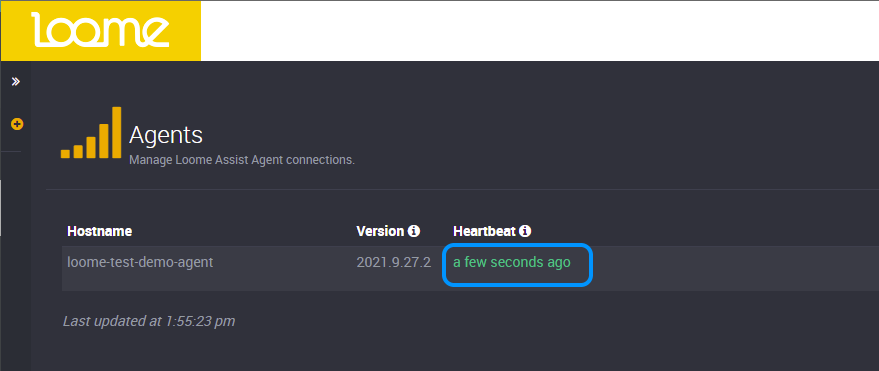
You should now be able to go back to the Loome Assist Agent page and confirm that the Agent is connected.
The Agent will display a green status if everything has been configured successfully.
Additional Agent Configuration
You can optionally configure additional agent settings based on your needs.
- If you wish to configure Microsoft Teams integration for Loome Assist, check out the documentation here.
- If you need to configure Firewalls, Proxies, or Anti Virus software then check out the Additional Agent Configuration.